14 Pros and Cons of Laying Vinyl Over Tile: With Install Tips

Below I share the pros and cons of laying vinyl over tile including advantages, problems, installation process, and if the tiles must be removed first or not. Since their availability on the market, vinyl tiles and planks have become one of the more popular flooring alternatives for homeowners today, as they are showcased for their affordability and DIY-friendly installation.
Due to the significant improvements in vinyl tiles today, more homeowners consider the finishing material an ideal option for stone, hardwood, ceramic, or porcelain. Luxury vinyl tiles, for instance, are thicker and have additional UV resistance, seamless designs, and enhanced durability. But like any other flooring and walling material, vinyl tiles and planks have benefits as well as limitations or disadvantages.
Advantages of Installing Vinyl Over Tile
Affordable Finishing Solution: For remodeling needs on a budget, vinyl tiles are about 40 to 50% more affordable than most varieties of flooring and walling materials. Furthermore, the reduced labor needed to remove the existing tiles adds to the cost-effectiveness of laying vinyl over existing tiles.
Less Installation Time: You can quickly transform a room without significantly disrupting household activities. Laying vinyl over tile can be installed in just a few hours, excluding the acclimation time. The average installation time is 4 to 6 hours for vinyl flooring tiles, while 8 to 10 hours are needed for other types of tile materials.
Less Floor Height or Wall Thickness is Added: With a range of thicknesses of 2mm to 8 mm, with 3mm being the most common vinyl thickness for home applications, less floor height or wall thickness is added.
A Wide Range of Designs Available: Easily available in most home improvement stores, vinyl tiles or planks come in a wide range of designs. You’ll find vinyl styles of floor tiles that look like other natural stone such as marble, as well as various patterns or colors to choose from.
Water Resistant: Vinyl floors and other vinyl products are resistant to water damage due to their impervious surface. This makes the vinyl finish suitable for bathroom and kitchen areas. However, be sure to look for quality luxury vinyl floors with an SPC or VPC core.
DIY-friendly: Anyone with a basic knowledge of laying out tiles can lay out vinyl tiles over existing tile flooring.
Whichever soundproofing products or materials you choose, make sure to follow the manufacturer’s installation instructions to achieve the optimal performance. – Black & Decker The Complete Guide to DIY Projects for Luxurious Living: Adding Style & Elegancce with Showcase Features You Can Build By Jerri Farris
Added Soundproofing: The added surface layer can minimize sound transfer and even improve the acoustics of a room. Choose a cork backing for the vinyl tiles, but this can add to the height or thickness of the surface finish.
Vinyl On Top Of Tile Problems
Can Trap Moisture: An advantage of removing existing tiles before placing them over another flooring material is that you can check the condition of the substrate. When the old surface and substrate are not properly sealed off or waterproofed, trapped moisture can harbor mold and mildew as well as weaken the adhesion between the existing tiles and the vinyl tiles.
Tile Movement: Temperature changes, subfloor movement, or poor adhesion of the vinyl tiles can easily displace them.
Warranty Voidance: Some manufacturers may void a warranty if their vinyl products are installed over an existing tile surface.
Slippery When Wet: There is textured vinyl flooring on the market, but generally, vinyl tiles are slippery when wet. If installed in wet areas, vinyl floors are recommended to have a non-slip coating.
Not as Durable as Other Tile Materials: Because of the thin nature of vinyl floors and their inherent flexibility and softness, they are not as durable as ceramic, porcelain, natural tiles, and other denser flooring materials. For this reason, vinyl flooring is not recommended for high-traffic areas.
Less Attractive to Home Buyers: In addition to durability issues with vinyl floor finishes in general, covered tiles can raise concerns for potential homeowners. As there is no way to check the condition of the existing tiles and subflooring underneath the vinyl finish.
VOC Emissions: It is a common characteristic of vinyl and laminate materials to give off a “plastic smell” when brand new. However, harmful emissions not only occur during installation, but high temperatures can also cause the vinyl tiles or planks to “melt” or off-gas.
Installation Process for Laying Vinyl Directly On Tile

Basic Tools Needed:
- Tape Measure
- Pencil Marker
- Rubber Mallet
- Pull Bars for Floor Install
- Speed Square
- Nail Remover
Step 1 – Read Product Instructions: Many installers miss the most important step in laying out vinyl tiles, which is reading the manufacturer’s guidelines. Information on the recommended tools, adhesives, safety procedures, and reminders; storage and handling; job site conditions and pre-installation requirements; subfloor conditions and inspections; type of tiles allowed to be installed over the vinyl product; radiant heat temperature allowed; preparation; warranted installation; etc.
Step 2 – Acclimate the Vinyl Tiles or Planks: As an elastic product, vinyl flooring can expand and contract depending on the ambient temperature. By keeping the vinyl tiles or planks placed inside the room for 24 to 48 hours before installation.
Adding expansion gaps of approximately less than an inch around the perimeter of the room will prevent any misalignment or lifting of the newly installed vinyl tiles as they settle with the room’s temperature.
Step 4 – Check the Existing Tiles and Subfloor Conditions
• Check for Structural Stability: Make sure that the existing tiles to be covered do not have missing fragments or pieces. Replace damaged areas or fill the cracks or small holes with epoxy. There are tile filler kits available for the particular type of tiles you have. If you have floor planks, make sure to nail or screw down parts that are loose and replace damaged planks.
• Check the Level or Flatness of the Floor: Using a leveling tool, check the level of your flooring or wall. There are leveling compounds, such as cement-based ones, that can fill large areas with significant depression, but check the manufacturer’s instructions before using any type of compound or filler.
• Clean the Area: Remove any nails, debris, or dirt from the floor. Wipe off any spills, wax, or oils that may have been left on the surface. For a thorough cleaning, vacuum the floor area to remove dust.
• Check the Moisture Level: One of the challenges in tiling over an existing tile is the unseen moisture buildup that may be present on the subfloors. Using a moisture meter, identify the moisture levels in different areas of the floor.
A digital hygrometer is recommended for concrete subfloors. The ideal moisture content for subfloors is between 7% to 9%. But check with your manufacturer’s recommendations and cross-check with the recommended moisture content for your existing flooring material.
Step 3 – Establish New Floor Height
• Adjust Existing Molds and Trims: When there are existing trims along the floor to be laid over with vinyl that you want to retain, mark the new floor height on the trim or mold using a piece of the vinyl tile or plank. The mold or base trim will then be removed using a hammer and a pry bar. With the new height marked, the molding will then be cut to accommodate the vinyl flooring to be installed before reattaching.
• Scrape off Dried Putty: Remove any wood putty left from the wall where the molding base was attached to maintain a level surface.
• Adjust the Door Jambs: When installing vinyl tiles around doors, the door jambs are cut using a saw at their base to accommodate the new floor height. For most types of closets, the doors are removed to make adjustments to the base frame of the closet.
Step 4 – Layout the Vinyl Tiles or Planks: Before laying out the tiles, determine the number of vinyl tiles or planks to be used and the positioning of the tiles. Have a sketch or drawing plan with the corresponding layout as a guide.
Steps for Determining Tile Layout:
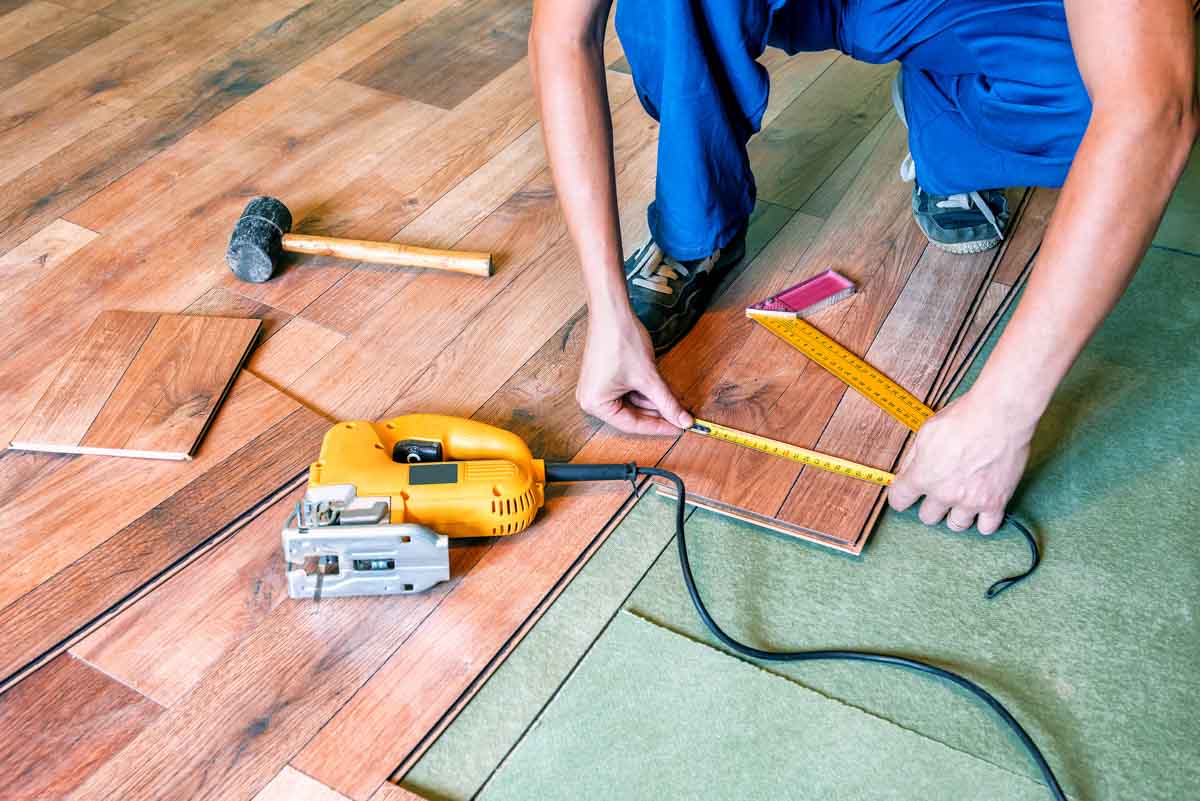
• Using the tape measure, measure the length and width of the room. Then transfer the measurements to a piece of paper.
• Divide the width and length into two to determine the center of the room, and mark the point with a pencil. This will indicate the center tile.
• From the center tile, lay out the rest of the tiles. You can divide the length of the room by the length of the tile, just as you can divide the width of the room by the width of the tile. This gives the number of tiles per side.
• When there are narrow tiles (less than 4 inches) at the ends (beside the wall) of the layout, adjust the second to the last tile by cutting a few inches to be added to the end tiles. This makes the end tiles look wider. Narrow tiles may not be visually pleasing, especially for larger areas, but check with the homeowner’s preferences before finalizing the layout.
• Laying out the Tiles: Typically, for regular-shaped floors (rectangle or square), the first tile starts at the centermost of the area, or where the planned focal point is. For instance, the fireplace, feature wall, bay windows, etc. For the first row of tiles, lay out the tiles without any adhesive to double-check the precision. Mark the final layout to be used as guidelines when finally installing the vinyl tiles.
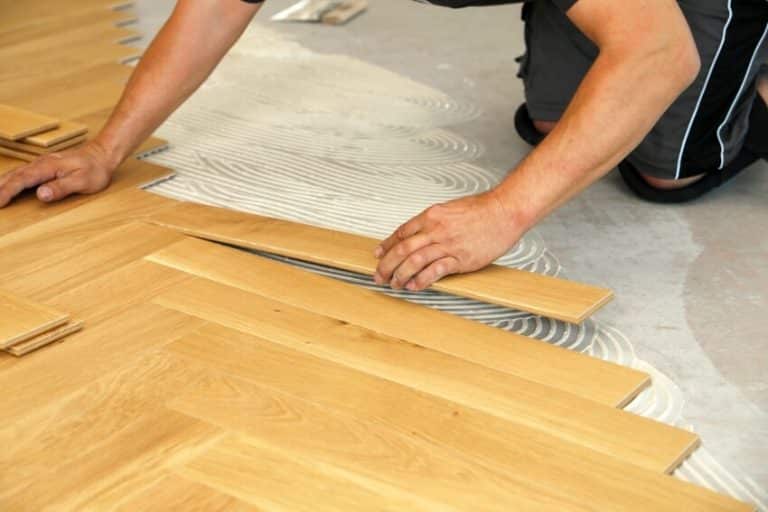
Step 5 – Apply Adhesive: Apply tile adhesive using a notched trowel along one quadrant of the marked area. Start from the centerline and work outward. It’s recommended to work in small sections to prevent the adhesive from drying before you lay the vinyl tiles.
Step 6 – Layout the Center Tile: Following the guidelines marked, press the vinyl tile into the adhesive with a slight twisting motion to ensure proper bonding.
Step 7 – Continue Laying Out Each Tile: Layout each tile in either direction, then cut any excess vinyl to accommodate the side walls.
Step 8 – Check Alignment and Level: Double-check the level of the tiles before proceeding to install the next tile. Then, have another level check after all the tiles have been set. Make sure to make adjustments quickly before the adhesive cures.
Should You Remove The Tile Before Installing Vinyl Flooring?

When aiming for longevity and having the budget and time, it is recommended to remove existing tiles before installing vinyl flooring. This way, you can check the structural integrity of your substrate and repair or replace it before placing it over new surface material.
Tiles that have been installed for many years have the potential for damage. Even when fillers and other surface treatments have been applied to the old tiles, there is a high possibility that the material has cracks or any type of damage underneath the tiles or on the substrate.
For homeowners who are on a tight budget and need a quick makeover, installing vinyl flooring over existing flooring is a cost-effective solution. It may be best to choose rigid-core vinyl floors that are still inexpensive but have a thicker and more durable structure. The thicker vinyl tiles with a durable backing will lessen any transferred indentation from the existing flooring underneath.
To showcase highly specific designs, some images on this website use advanced AI-generation software to illustrate ideas and room inspiration. See our editorial policy to learn more.