Office Kitchenette Layouts: Small to Large Ideas (6×8, 8×8, 8×10, 10×10, 12×14)

These five office kitchenette floor plans range from 6×8, which would fit in a converted closet, to 12×14 with an island. All offer their dimensions so you can see exactly how it might fit in your own space before ordering the cabinets. The appliance sizes are the standard off-the-shelf ones, such as 24″ and 30″ fridges, 30″ sink bases, and a 24″ dishwasher. Countertops are uniformly kept to 24″ deep, which is the most common size. For the walkways, I’ve noted the clearances, as that’s usually what makes the difference between a kitchenette that works for one person versus one that feels right when there are several people using it together. None of the plans include a range or cooktop, since most commercial leases and local fire codes get complicated if you have an open flame in the building, and a typical break room doesn’t really need one. The general rule of thumb is a sink, fridge, dishwasher, microwave, and coffee area. If your office is going to go any further than that, then you need to speak to your building manager to ensure it is possible in your building.
6×8 Compact Single-Wall Office Kitchenette Layout
One 8 foot run of counter space will cover a small offices needs, provided you keep the 48 inches in front of it open as an access point.
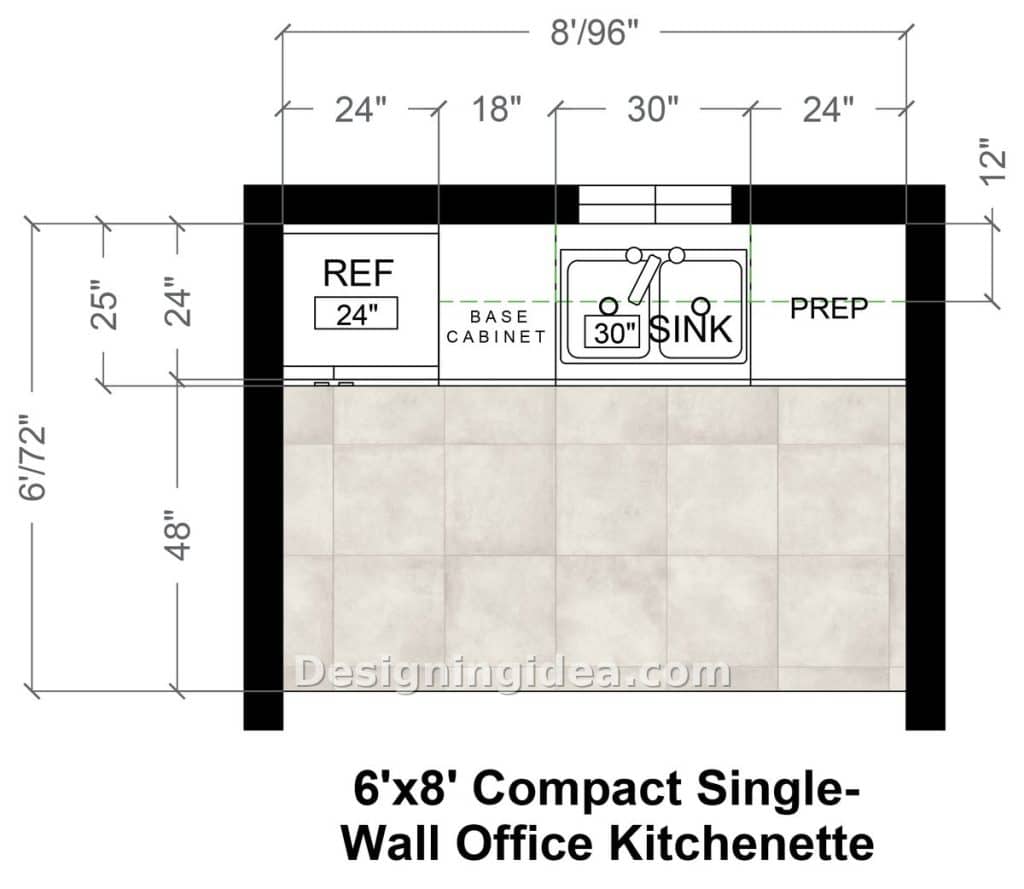
This is the smallest plan of the group, and much like what you’d expect in a converted storage room or the back corner of a small office. Everything is placed along one 96″ wall, starting from the left side with a 24″ fridge, 18″ base cabinet, 30″ sink base, and 24″ of counter at the end for prep, and a small window centered over the sink. The 48″ of floor space in front of the counter is the one to carefully consider, as there is a 24″ deep cabinet and a 25″ countertop with 1″ of overhang that coincides with the 48″ of floor space in front. That’s enough room for one person at the sink and another walking past them from behind. If your room is only 5′ deep rather than 6 ‘, you’re down to only 36″ of space and the second person has to wait to get by.
The 18″ cabinet between the fridge and the sink is there to give the fridge door somewhere to open without it hitting the faucet. So make sure the model you purchase opens the right way so it doesn’t stop halfway. This is also your only closed base storage in the plan, so it ends up with the extra accessories like the dish soap, paper towels, trash bags, coffee filters, and whatever else you need. I wouldn’t bother shrinking it to make room for a bigger fridge, unless you really need the cold storage more.
The weak link is the coffee station space; since there’s no specific place for it, it ends up on the 24″ prep counter. This is also where you may want to put a microwave, so you’ll have to determine if there’s room for it on the 18″ section. This kitchenette design is acceptable with five or six people; however, beyond that, you’ll want one of the larger plans below.
Dimensions:
- Room size: 6′ x 8′ (72″ x 96″)
- Counter run: 24″ fridge, 18″ base cabinet, 30″ sink base, 24″ prep counter
- Counter depth: 25″ top over 24″ base cabinets
- Clear floor in front of counter: 48″
- Window over sink: about 30″ wide, 12″ in from the back wall
Design Tips:
- If possible, keep the coffee maker on the 24″ end (away from the fridge) so the person pouring isn’t standing in the fridge door swing.
- Use a counter-depth 24″ fridge, since a standard depth unit will stick out 6 to 8 inches past the counter, and obstruct your 48″ walkway.
- Put wall cabinets or open shelves above the whole countertop run (you only have one base cabinet, so most of your storage is going to have to go up).
8×8 Small L-Shaped Kitchenette Floor Plan
By placing the kitchenette in a corner with an L-shaped counter, it separates the sink from the coffee maker so two people or more can more easily use the room at the same time.
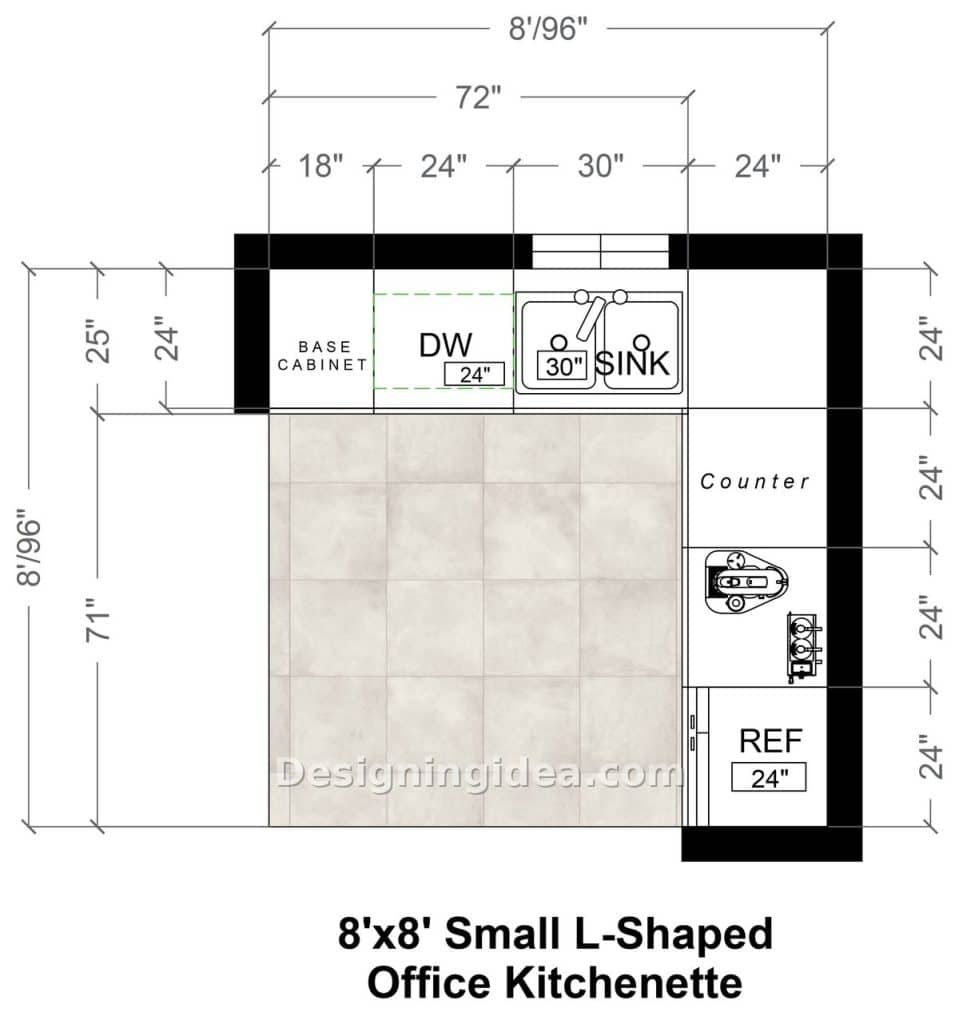
An 8×8 room is a tight footprint for a kitchen, but it can work for a kitchenette with the right layout. The L-shaped countertop stretches 72″ along the top wall with an 18″ base cabinet, 24″ dishwasher, and a 30″ sink base. It then turns the corner and runs 96″ down the right-hand side with a 24″ countertop section in the corner, 48″ stretch for the coffee maker and small appliances, and a 24″ fridge in the far bottom corner. Compared to the single wall plan, the main thing you get is separation, with the sink and dishwasher on one side, and the coffee and the fridge on the other. One person can rinse a cup while another makes coffee, and they won’t be in each other’s way. In a shared office, that’s a big advantage for multi-person use.
The dishwasher is a good addition at this size, and it’s in the right spot (next to the sink), so the plumbing stays to a minimum. It comes at the expense of a 24″ base cabinet, which you would use for extra storage. Whether that’s a worthwhile trade-off depends on your office’s needs. If dishes are often sitting in the sink, then you’ll want the dishwasher. If everyone has their own mug and stores it in the kitchen, then you’ll probably miss the cabinet space more.
Dimensions:
- Room size: 8′ x 8′ (96″ x 96″)
- Top wall: 18″ base cabinet, 24″ dishwasher, 30″ sink base (72″ run), plus a 24″ return to the corner
- Right wall: 24″ counter, 48″ appliance counter, 24″ fridge
- Counter depth: 25″ top over 24″ cabinets
- Open floor: about 71″ x 72″
Design Tips:
- Treat the 48″ stretch on the right-hand wall as the drink station for a coffee maker, kettle, and a drawer underneath for the pods and tea. Keep all your food prep on the top wall by the sink.
- Put a lazy susan or a blind corner pullout in the corner where the two legs meet. Otherwise, that 24″ x 24″ corner cabinet is pretty much dead space that goes unused.
- Mount a paper towel holder and a small shelf on the wall above the fridge side counter, as that’s where people will often be standing the longest.
8×10 Galley-Style Kitchenette Design
With two facing counters combined with a 48″ aisle running down the middle, you gain a functional space with an abundance of storage and counter space for a larger office.
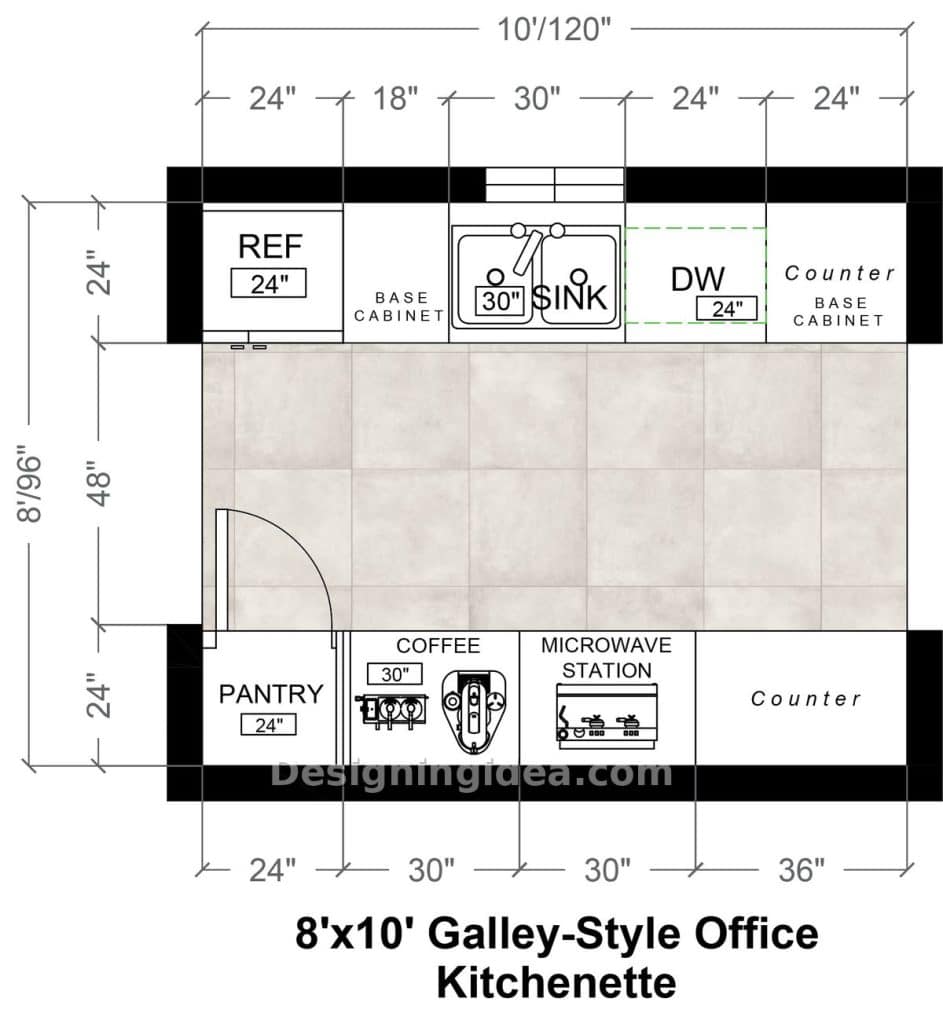
If your room is wider than it is deep, then a galley design is usually the way to go. This one is 10′ across by 8′ deep, with a 24″ deep counter on each long wall and 48″ of floor space between them. That 48″ of open floor space allows two people to work back to back or one person to work while someone else walks straight through. The top wall is the wet side with a 24″ fridge, 18″ base cabinet, 30″ sink base, 24″ dishwasher, and 24″ counter at the end. The bottom side is considered the dry side with a 24″ pantry, 30″ coffee station, 30″ microwave station, and 36″ of open counter. That split improves functionality by keeping people reheating lunch separate from people washing up.
The door in the bottom left corner opens up to a 24″ wide reach-in pantry. By opening up to the right, the pantry door swing doesn’t interfere with the coffee station, especially when you’re using it for filters, coffee, and other accessories you need access to. For an office of 15 to 25 people this is the plan I’d start with, as it’s big enough that it doesn’t feel cramped and small enough that it can fit most rooms.
Dimensions:
- Room size: 8′ x 10′ (96″ x 120″)
- Top wall: 24″ fridge, 18″ base cabinet, 30″ sink base, 24″ dishwasher, 24″ counter
- Bottom wall: 24″ pantry, 30″ coffee station, 30″ microwave station, 36″ counter
- Counter depth: 24″ both sides
- Aisle between counters: 48″
Design Tips:
- Put the trash and recycling pullouts at the end of the run so people can toss something away on the way out without having to cross the aisle.
- Give the microwave unit its own 20amp circuit, since having a microwave and a commercial coffee brewer on the same circuit can cause the breaker to trip.
- Add under-cabinet lighting to both walls, as a person standing at the counter in a narrow galley will effectively block out the ceiling light with their own back.
10×10 U-Shaped Kitchenette With Pantry Layout
A U-shaped kitchen allows for counters on three of the walls so you can have a pantry, some snack storage, and dish cabinets to help keep the countertops clear.
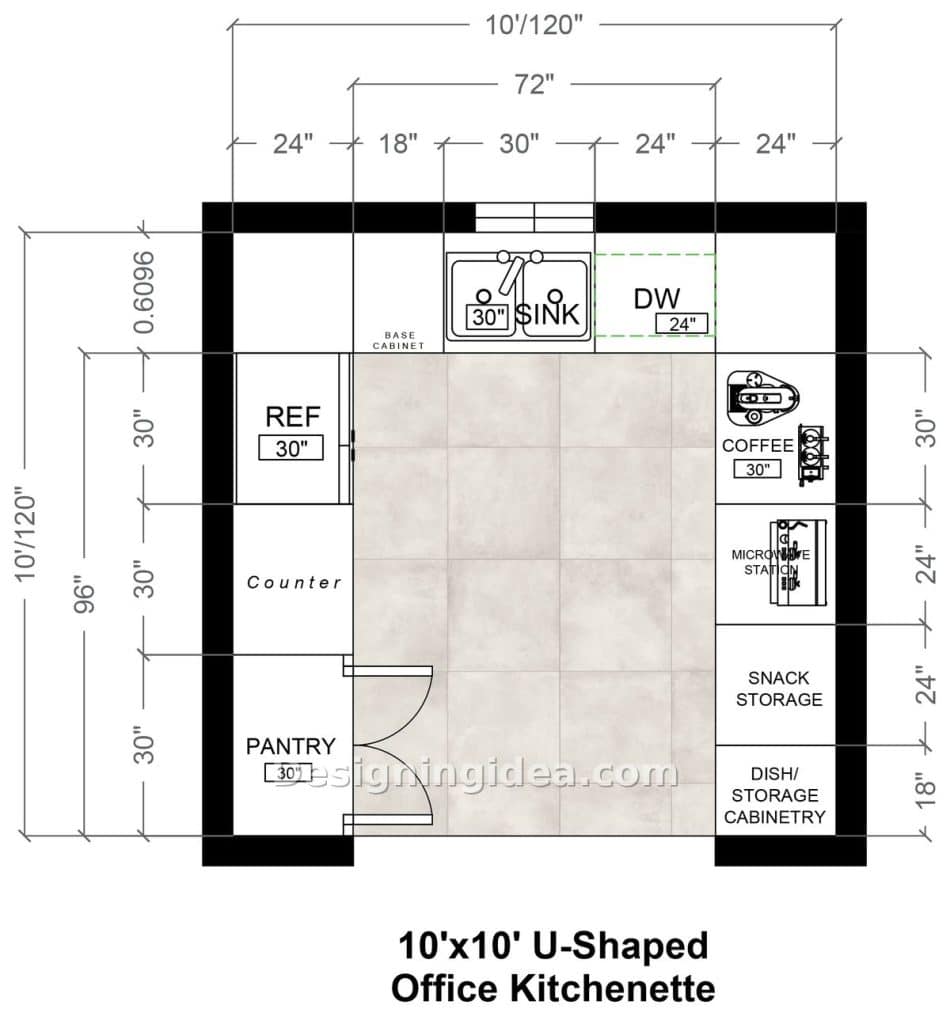
At 10×10, the kitchenette starts to feel like a room, and a U-shaped cabinet layout uses all three walls effectively. The top of the U is a 72″ working run with the 30″ sink base and 24″ dishwasher. On the left side of the U, we have a 30″ fridge, a 30″ counter, and a 30″ pantry. On the right side of the U, we have a 30″ coffee station, a 24″ microwave station, a 24″ snack cabinet, and an 18″ dish cabinet. The open floor space in the middle is approximately 72″ x 96,” which is large enough for three people to go around each other without bumping. The storage makes this plan better than the galley, with a pantry, a snack cabinet, and a dish cabinet. In most office kitchenettes, those would be three things just sitting out on the counter in plastic bins, but here they’re behind doors, and the countertops are free to use.
Traffic runs clockwise, allowing you to come in through the entry at the bottom, go past the pantry, hit the fridge, cross to the sink, and end up at the coffee and microwave on the far right wall. No one has to go back the way they came, and if you’ve ever worked in an environment where the fridge was on the other side of the coffee line, you’ll know why that’s important to plan for. The downside of any U shape is the two inside corners, each with a 24″ x 24″ base cabinet that can be hard to reach. You can go to the expense of corner pullouts, or accept that one corner will be filled with stuff you never use and the other with your backup paper towels. Don’t expect those corners to be the most useful.
Dimensions:
- Room size: 10′ x 10′ (120″ x 120″)
- Top wall: 24″ corner, 18″ base cabinet, 30″ sink base, 24″ dishwasher, 24″ corner (72″ working run)
- Left wall: 30″ fridge, 30″ counter, 30″ pantry
- Right wall: 30″ coffee station, 24″ microwave station, 24″ snack cabinet, 18″ dish cabinet
- Counter depth: 24″
- Open floor: about 72″ x 96″
Design Tips:
- Stick with the 30″ wide, counter-depth fridge on the left-hand wall, as using a full-depth 36″ fridge would reduce the open floor to under 66″.
- Make the 18″ dish cabinet a drawer stack rather than a door cabinet, with deep drawers for mugs and plates, which are far easier to use one-handed.
- If the hallway will allow it, hang the entry doors to swing out, because if they swing in, they will clip the pantry and the first 2 feet of floor every time someone walks in.
12×14 Large Kitchenette in Office With Central Island Floor Plan
This one-wall kitchen with an island offers a full appliance wall plus a 30 x 60 island, giving you a bigger office space to eat your lunch in rather than just make your coffee.
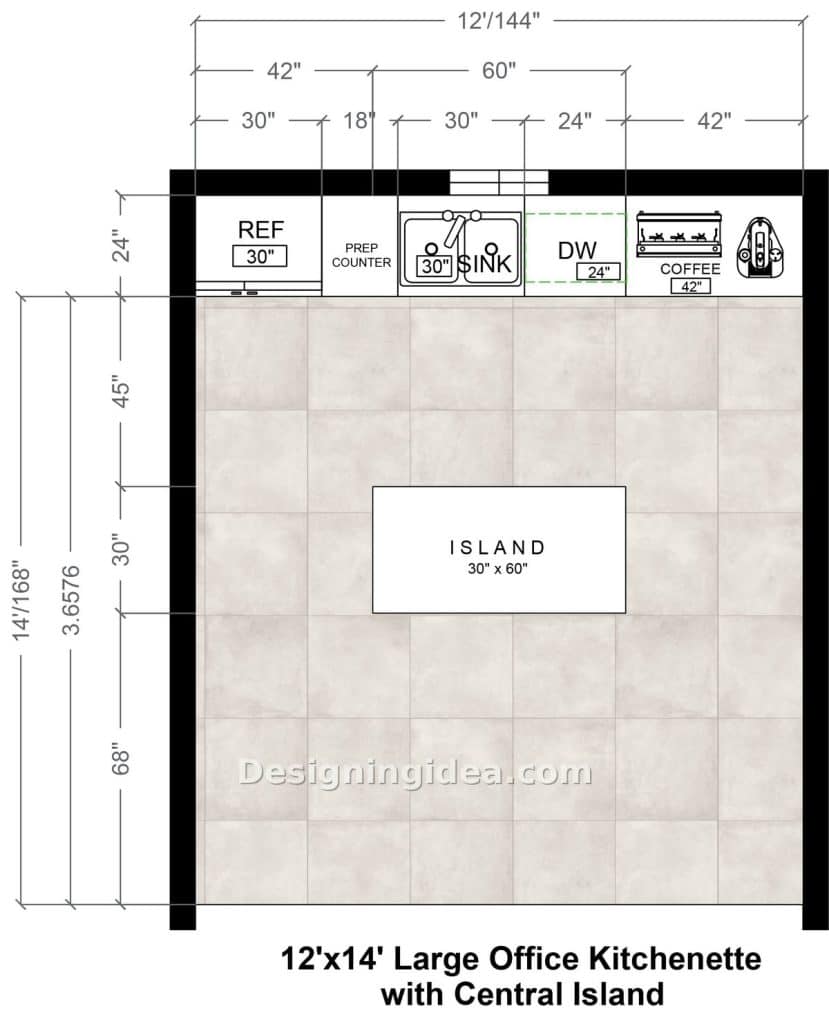
This is for an office of 40+ or a company that wants the break room to be a casual area to hang out in. Everything is on one 12-foot wall: 30″ fridge, 18″ prep counter, 30″ sink base, 24″ dishwasher, and a 42″ coffee station, with space for a brewer, grinder, and hot water tap. The rest of the room is open apart from a 30″ x 60″ island which can be used with a countertop overhang for stool seating. The island is 45″ from the appliance wall, which gives 68″ on the other side. The 45″ is the working aisle. The 68″ side is where people stand with their lunch and chat without blocking anyone trying to get to the sink. If you’d centered the island, you’d end up with two 56″ aisles, and neither one would be a place you’d want to stand.
Put the 42″ coffee station at the far end of the run, so it’s away from the sink and the fridge, and the coffee line will run along the wall rather than across the middle of the room. In any office, that’s often where congestion happens, so it’s worth deciding where it will be.
This plan lacks tall storage, since there’s no pantry or tall cabinet, just the base cabinets beneath the counter and whatever you’re going to incorporate inside the island cabinet. For a room of this size, it’s a shortfall, but the simple solution is a 24″ deep tall pantry unit on the left-hand wall away from the entry. That takes up about 2 feet of floor space, and you’d still have more open space than with any of the other plans.
Dimensions:
- Room size: 12′ x 14′ (144″ x 168″)
- Appliance wall: 30″ fridge, 18″ prep counter, 30″ sink base, 24″ dishwasher, 42″ coffee station
- Counter depth: 24″
- Island: 30″ x 60″
- Aisle between counter and island: 45″
- Open floor beyond island: 68″
Design Tips:
- Add a 12″ overhang on the far side of the island and three stools so you gain seating without in any way infringing on the 45″ working aisle.
- Put a drawer microwave in the island on the side facing away from the sink, as it keeps the appliance wall open and keeps the lunch crowd separate from the coffee crowd.
- Run a floor outlet to the island before the flooring goes in so you don’t have an expensive kitchen remodel job later on.
To showcase highly specific designs, some images on this website use advanced AI-generation software to illustrate ideas and room inspiration. See our editorial policy to learn more.