Popular Options For Granite Countertops: Colors, Finishes & Edges

There are many reasons homeowners choose granite countertops for their kitchens. The top of the list is due to granite’s durability. The natural stone is extremely durable, making it ideal for a high-use space such as the kitchen. In addition, granite counters are beautiful, with a wide variety of styles and colors to choose from. Whether buying a new home or remodeling, granite is a highly sought-after countertop material that continues to grow in popularity.
What is granite? Granite is a hard igneous rock composed of a mixture of quartz, mica, feldspar, and other minerals. It is formed through the crystallization of magma beneath the earth’s surface. This process creates stunning dark visible streaks in granite’s dominant white, pink, or gray color.
Its versatility and durability make it a popular material choice for people who want to remodel and build houses. The minerals in the stone produce its distinct beauty, adding an appeal to your house that no other stone can surpass. It can be used as a wall treatment, a flooring material, or a countertop surface. The most popular granite application in houses is as a kitchen or a bathroom vanity sink countertop.
Granite Colors
Granite comes in a wide variety of colors and diverse patterns. Veins, grains, and flecks of stone beautifully adorn this natural stone which makes it visually appealing and a popular choice for both homeowners and designers. It adds a distinct character to any space, ranging from a spectrum of neutrals to jewel tones. Here is a list of the most popular granite colors for countertops on the market and some tips to follow in choosing the right type for your needs:
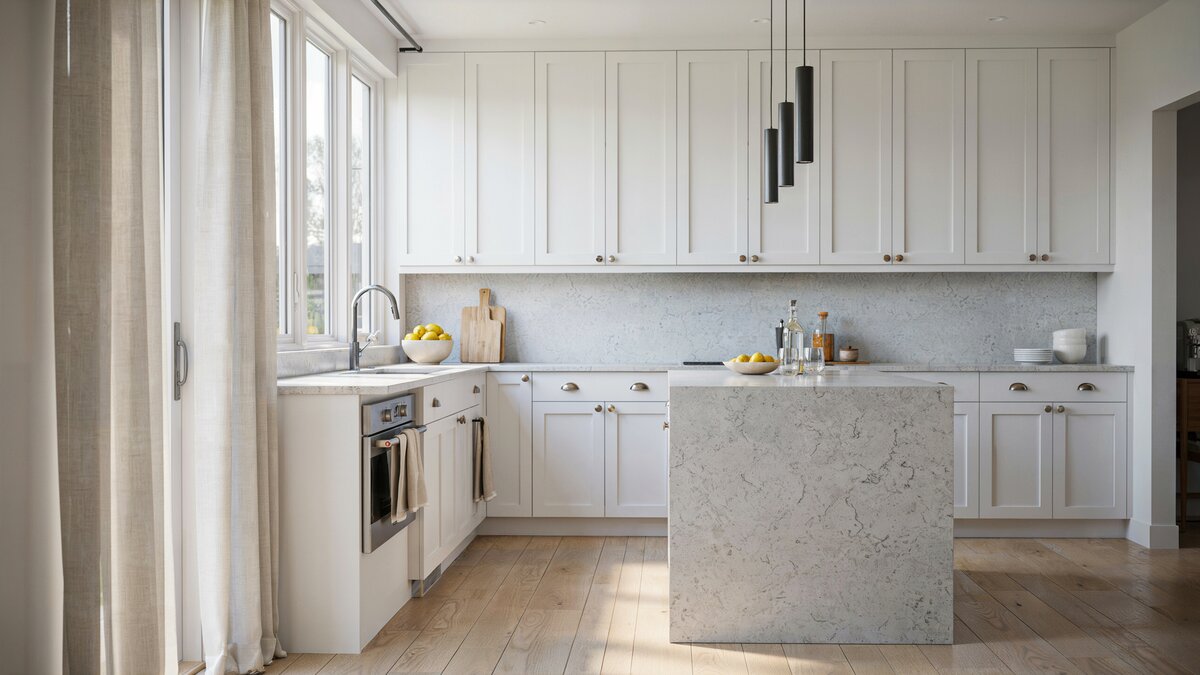
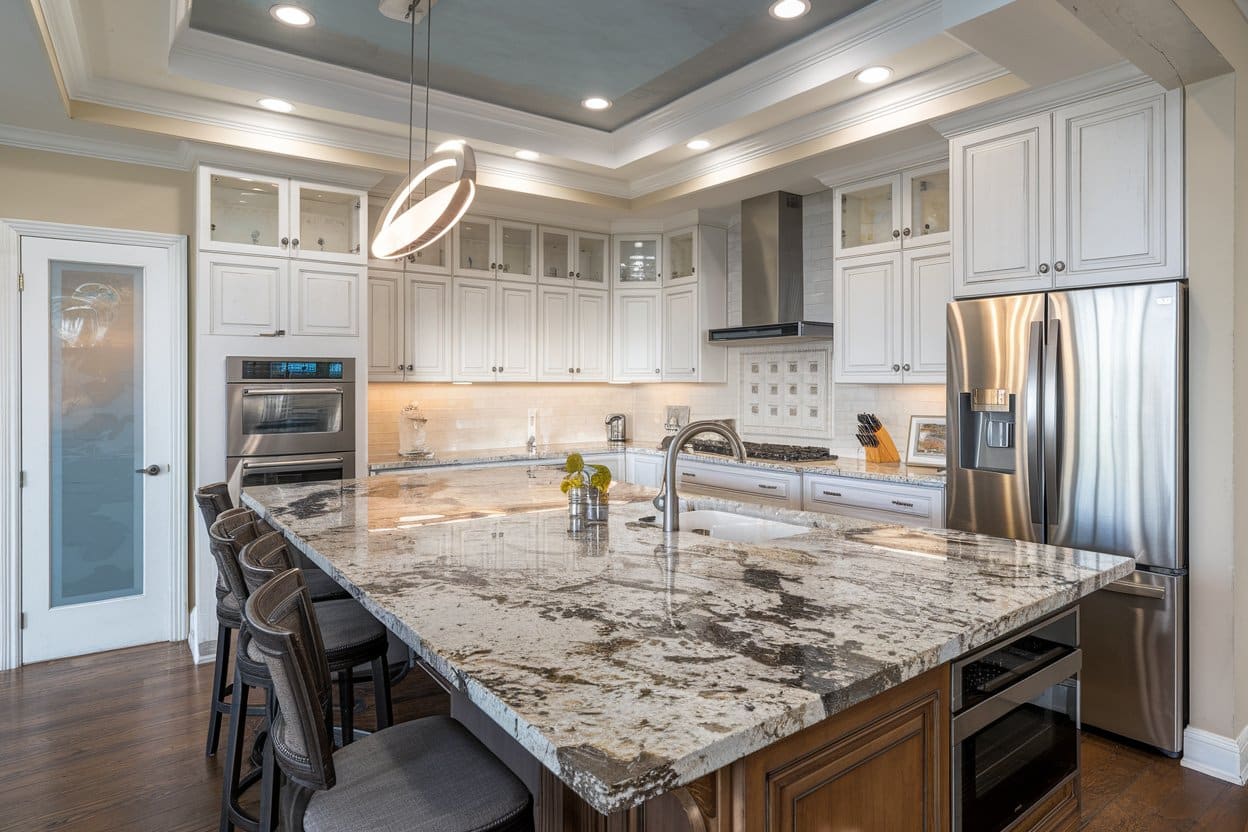
White Granite
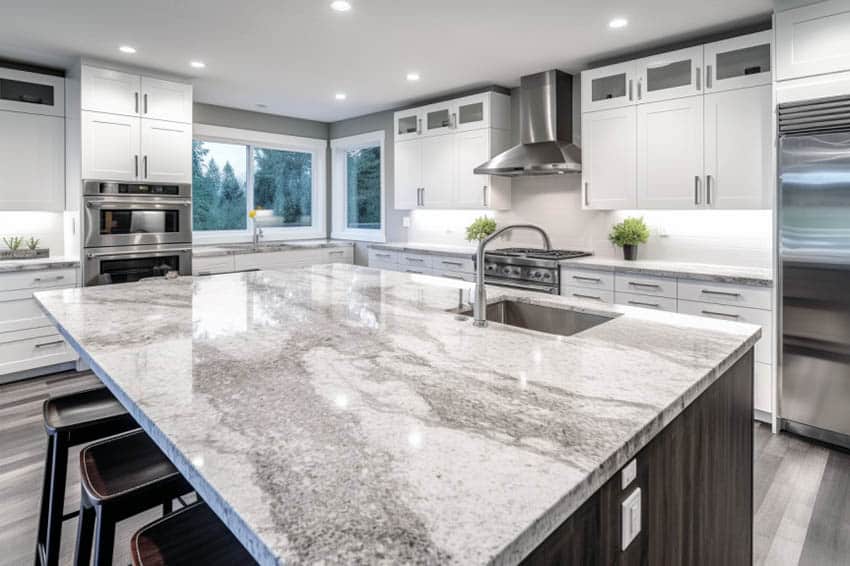
White granite is often underestimated as some consider it too plain or simple, but it is an interesting shade because it has veins and some flecks of stone. Pure white granite is also available in the market but is hard to come by. It also creates a clean, crisp look. As the general rule in design goes, “white makes any space look bigger”, it is suitable for small kitchens.
Cabinet color it is best paired with: Black, white, or any neutral color
Design concept it is most suited for: Classic or modern kitchen. Visit this page to see the white granite countertops picture gallery.
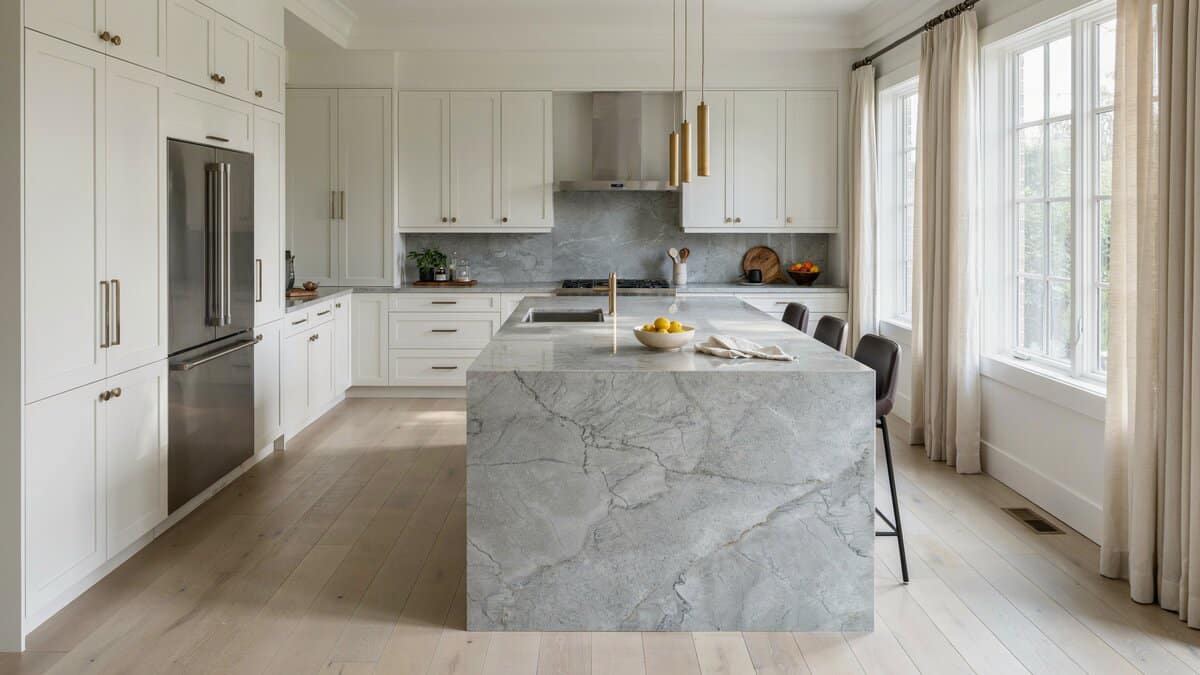
Beige Granite
Beige granite is also another versatile color. Its unique look is characterized by the colors that are mixed in it, such as black, gray, and brown. It offers a timeless look which will surely last over the years.
Cabinet color it is best paired with: Dark and light colored kitchen cabinets
Design concept it is most suited for: Classic, Traditional, Victorian, Country. Visit this page to see the beige granite countertops picture gallery.
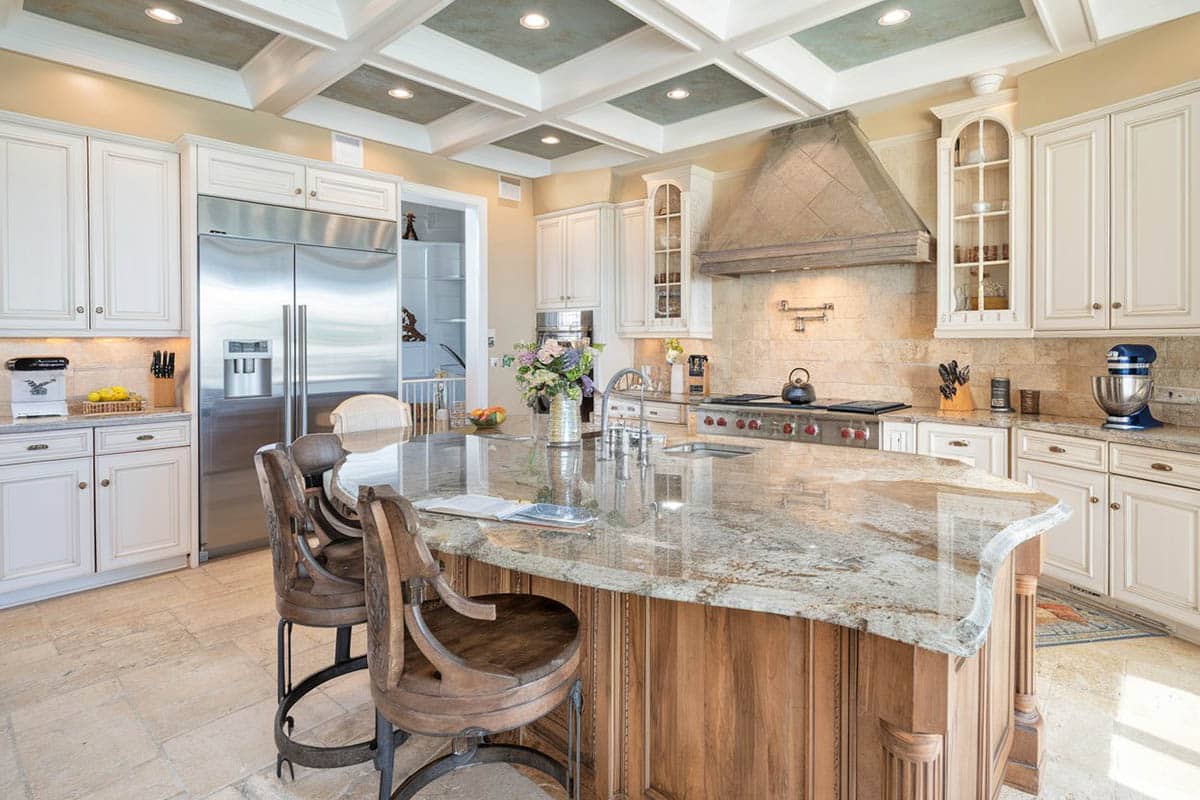
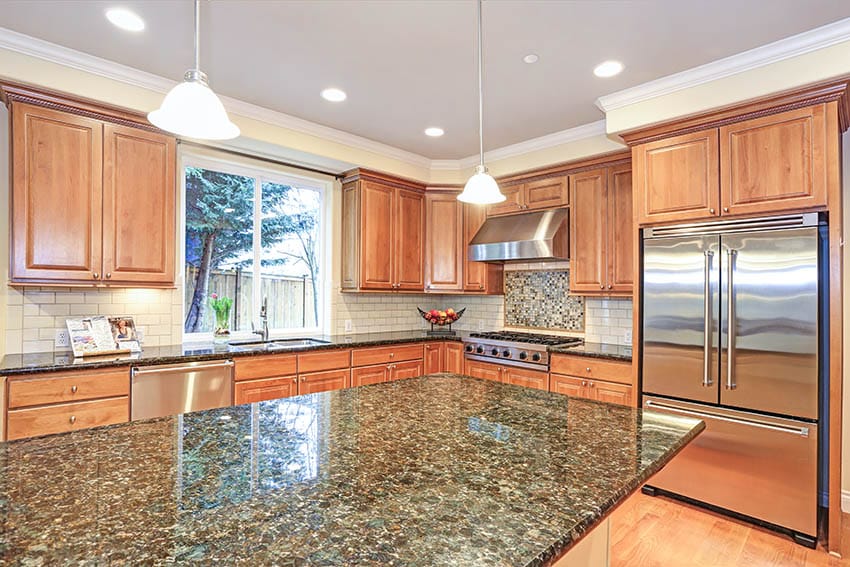
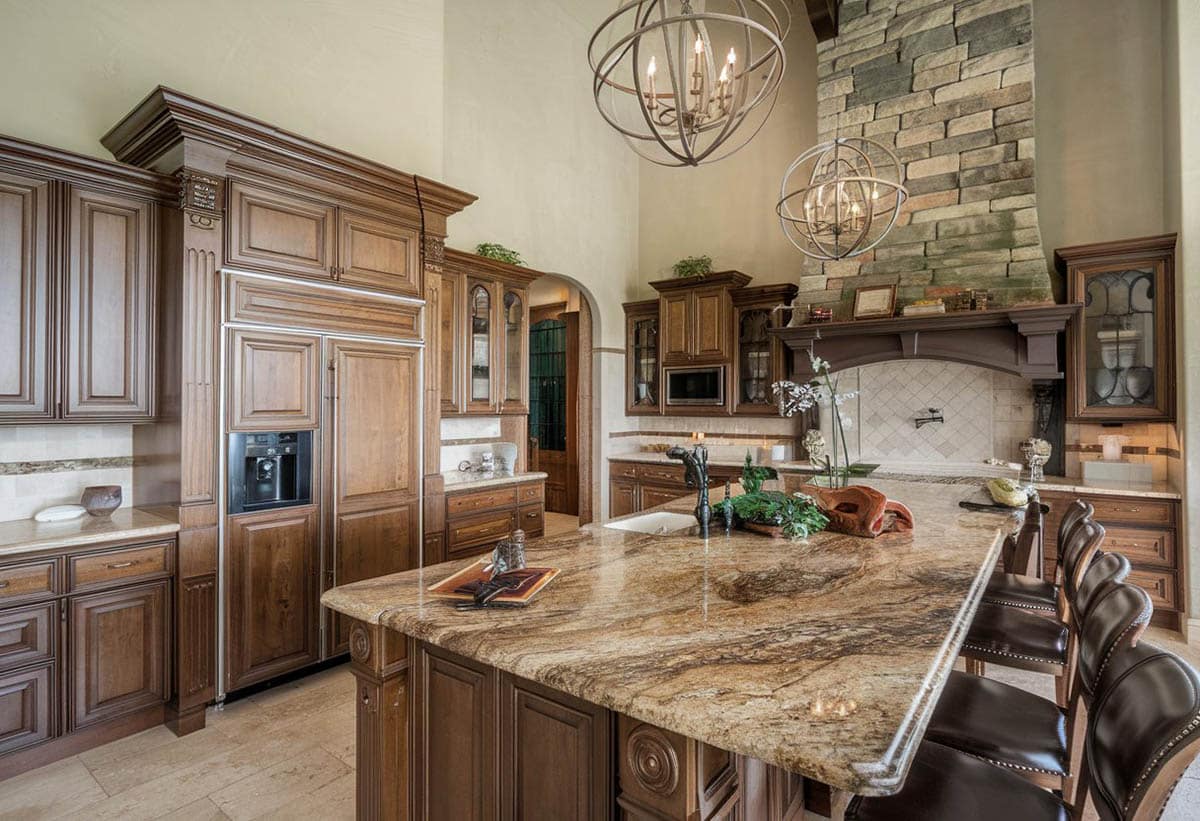
Brown Granite. Brown shades generally evokes a warm, inviting feeling. It is cohesive with wood but also creates a deep contrast with light-finished cabinetry.
Cabinet color it is best paired with: light colored cabinets (wood finishes such as Oak,Maple, Birch, Light Cherry, Pine and Birch)
Design concept it is most suited for: Country, Rustic
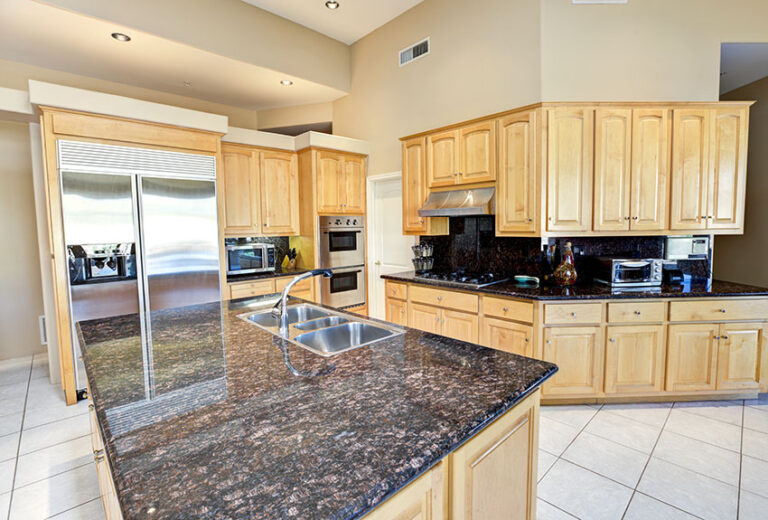
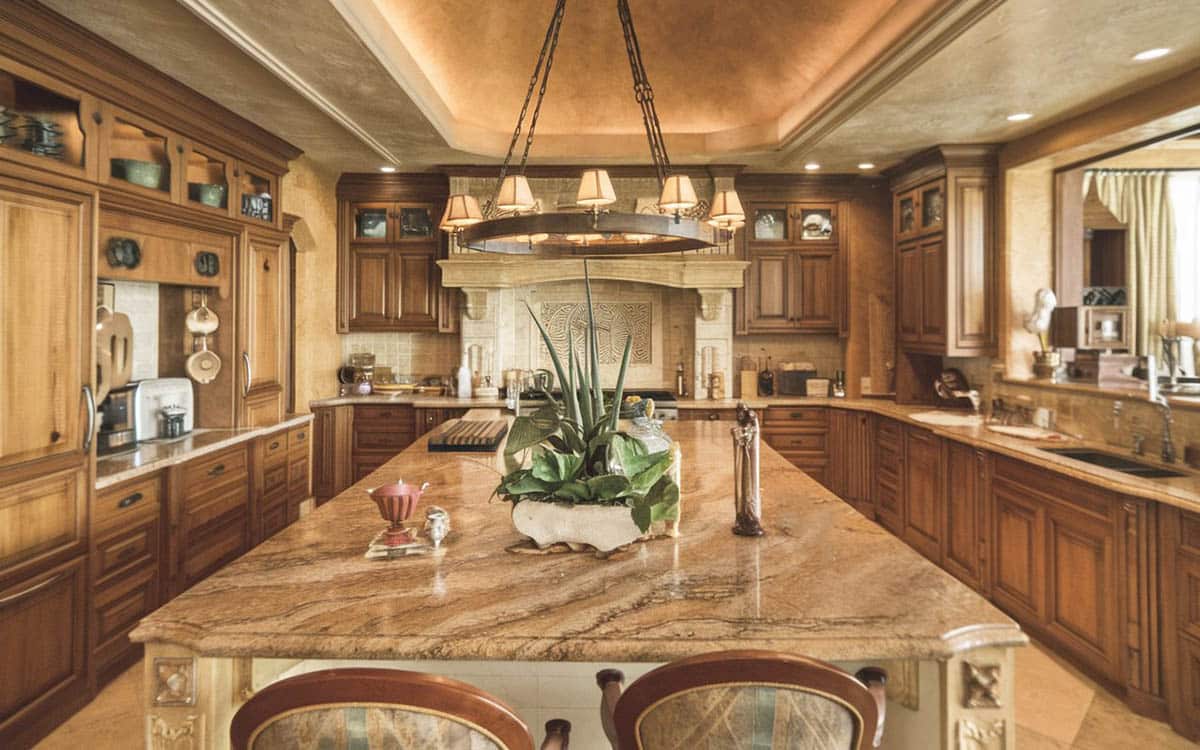
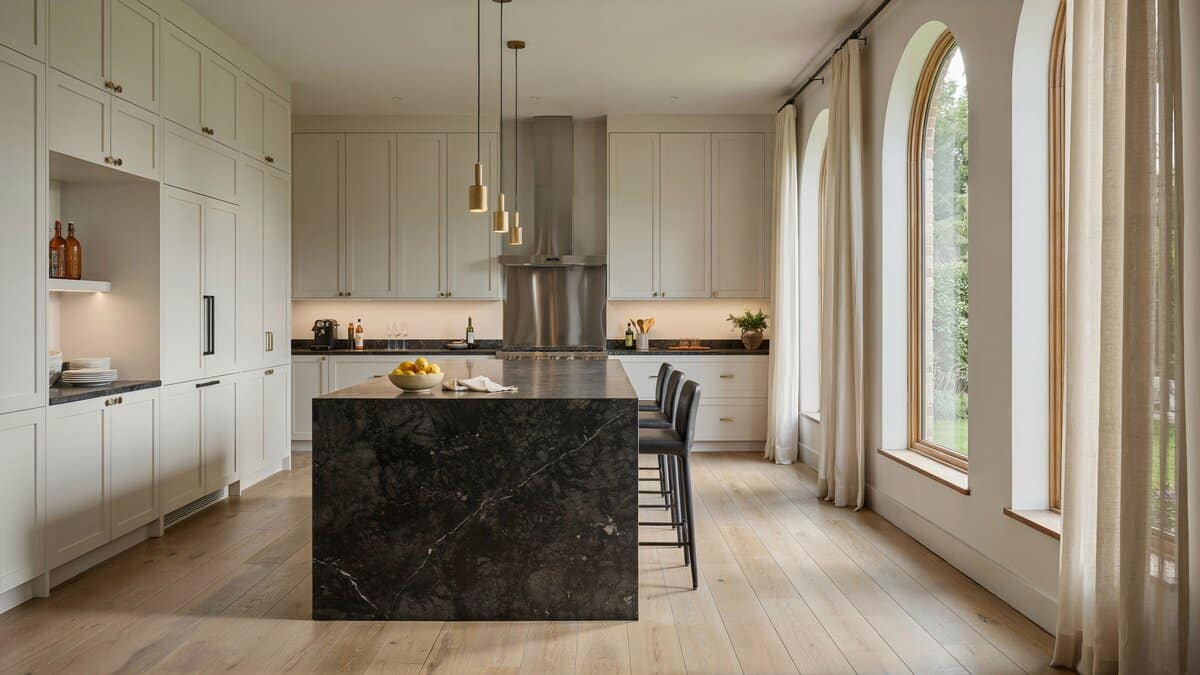
Black Granite
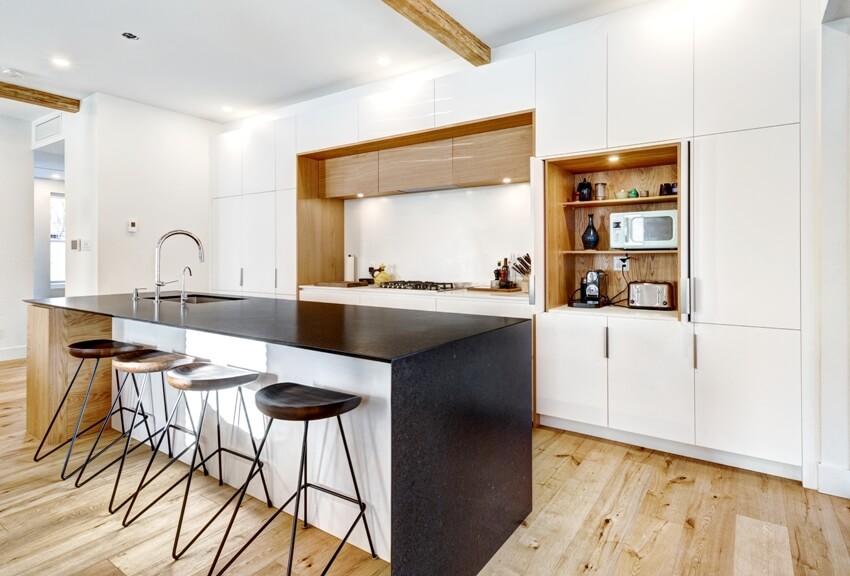
Black granite is the most elegant and most dramatic of all the colors. It has a very distinct character because of the tiny specks of silver, which makes it shine. On the other hand, another option is the “Jet black granite,” which is a plain black finish that is ultra-shiny and lustrous.
If using this color, do not hide its beauty by pairing it with a heavily decorated and intricate cabinetry design. Avoid using it with dark cabinetry and use it as a focal point in your kitchen.
Cabinet color it is best paired with: white cabinets
Design concept it is most suited for: Modern, Ultra- Modern. Visit the black granite countertops gallery here.
Red Granite
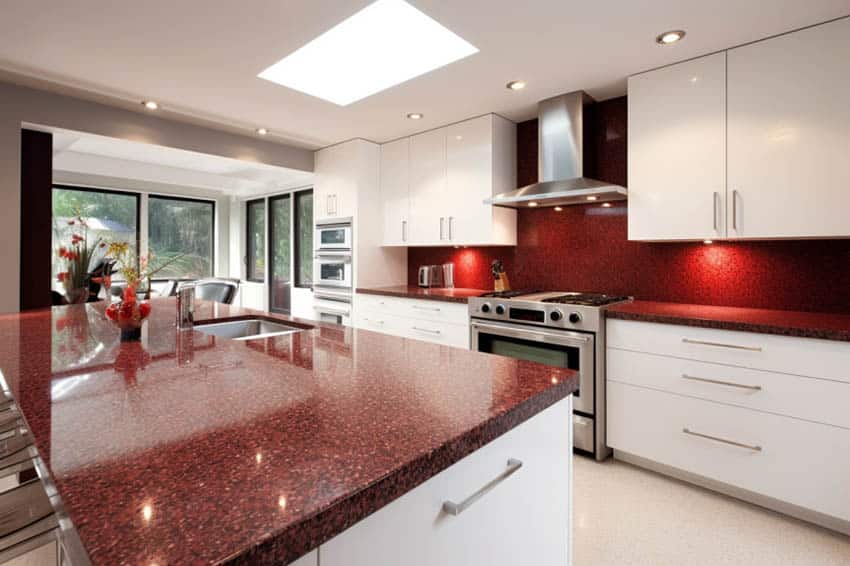
Red granite is one of the rarest and most unique of all the stone colors. Its rich color offers a great contrast to light cabinetry.
It can also be a bold eye-catching statement piece for your kitchen. This will surely produce a stunning kitchen if wisely paired with light cabinets and a muted color palette for the walls.
Cabinet color it is best paired with: light colored cabinets
Design concept it is most suited for: Oriental or Asian themed
Lighting is also a vital factor to consider in selecting the pattern and color for your kitchen. For spaces with little or no natural lighting, choose stone that has light colored specks. For areas with ample lighting, dark colors will work best.
Green Granite
Green granite is luxurious and exotic. Its primary strength is that it can be successfully paired with almost any color kitchen cabinet. The versatility of green colors, patterns, and styles also makes matching it with your kitchen finishes easier. Visit the green granite countertops gallery here.
Granite Countertop Finishes

Granite countertops have three types of finishes: polished finish, honed finish and flamed finish.
Polished Finish
A polished finish is granite which has a glossy shine. Its mirror like appearance reflects light well making it advisable to be used for areas which one may want to draw attention to. This makes it the most popular choice of stone finish for a kitchen countertop.
The flecks of stone and veining present in granite stands out in well lighted areas making spaces appear more elegant and dramatic.
Polished granite works well with modern, contemporary kitchens. It is also easier to maintain than the honed finish and the flamed finish. It can also be used as a flooring material for light traffic areas.
Honed Finish
Another type is the honed finish, which has a buffed or matte appearance. Unlike the polished finish, this has no reflective surface and has a satiny texture.
Although lacking luster, it has a smooth texture, making it easy to clean. When used as a kitchen countertop, it adds a soft look, creating great contrast to high gloss cabinetry. A honed surface is advisable for those looking for an aged feel.
A honed surface does require more maintenance and can be more challenging to keep clean. However, It has the added benefit of not showing scratches as readily when compared to a polished surface. Scratches can be mostly avoided completely by always using a cutting board, not using abrasive materials, and taking care when dealing with heavy objects nearby.
Flamed Finish
The last type is the flamed finish which is characterized by its rough texture. This is achieved by heating the stone at a very high temperature, making the stone’s appearance more natural and its color more faded. The sheen levels vary depending on the hardness of the minerals in the stone.
Flamed finish granite are more typical in muted colors such as gray or shades of brown. It is most commonly used for exterior areas and for surfaces that are prone to moisture and works well with rustic themed houses.
Granite Edge Types

After selecting the color of your granite counter, another factor that you have to decide on is your countertop’s edge profile. Simply put, the edge profile is the shape the edge takes.
It is available in many shapes depending on cost and function. It may be in the form of rounded, semi-circle, square, to name a few. Custom edges are also available in selected fabricators and suppliers, don’t forget to ask them if you have a distinctive design in mind.
Aside from the aesthetic value it adds to your kitchen, the purpose of a smoothed rounded edge is to prevent the stone from chipping off easily, thus adding to the years your countertop will last.
Although natural stone is characterized by its durability, unpolished edges lead to long term problems because the stone can crack from an impact at inside corners. In terms of maintenance, they are also easier to maintain
Countertops need a rounded over edge to maximize the thickness of the material. The typical thickness for a rounded profile is ¼ inch thick. The required thickness for granite countertops is at 1-1/2” inches for a rounded profile edge of 1/8 inch.
Straight edge is the simplest of all profiles wherein the tip of your countertop material follows a simple straight cut.
Curved profiles on the other hand are rounded and may either be basic or fancy. This is an excellent choice for households with children since they lessen the need to worry about getting heads bumped on corners of your countertop. It softens the feel of the room and suits both classic and contemporary kitchen design styles.
Fancy edge is the most intricate and unique of all. It requires skilled workers and years of expertise in handling granite for precise cutting. Generally more expensive than the straight edge and the curved edge, they are more of an investment for the value and character added to your home.
These edges tend to be overwhelming if overused. It is best paired with simple cabinetry, creating a perfect design detail for your kitchen. This is a wise choice if you want to create a statement with your countertop.
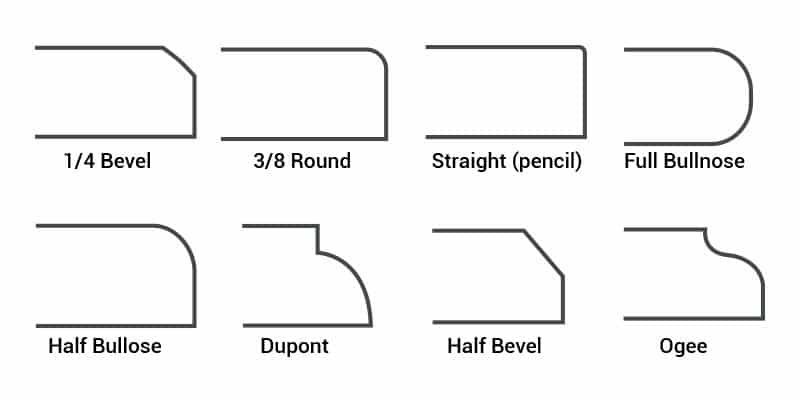
Below is a list of common edge profiles for your granite countertop:
Eased Edge. Also known as the flat edge or straight edge, this is characterized by a basic square profile showing the full thickness of the stone. It is also the most cost efficient of all making it the most popular choice for people who remodel and design their kitchens.
It is clean, streamlined and matches any design style and concept. The corners are also slightly rounded, softened at a 3-centimeter space, to avoid damage to the material.
Pencil Edge.The pencil edge profile as its name suggests, is cut to shape like a pencil. It has a slightly angular edge that rounds into the vertical surface of the stone. It has a softer design than the eased or flat edge because of the rounded square design. It works best with contemporary style spaces.
Bullnose Edge. Completely rounded with both edges curved, the bullnose edge softens the feel of any space. It is half-circle in shape which makes it an appropriate choice for households which are concerned with safe.
However, they are less recommended for areas which easily get wet because spilled liquid tends to fall down the cabinets. Ideal application for this edge profile if for island countertops in the kitchen. Its design is also flexible since it suits both the classic and modern kitchen styles.
Hall Bullnose.As the name suggests, it has a round smooth profile with a flat bottom edge. The rounded off edge adds curve and also suits both the classic and modern style.
Chiseled Edge.The chiseled edge is the most natural looking of all edge profiles. Characterized by a lightly smoothed finish, it looks like a naturally broken piece of stone. The rough edge makes it fit for rustic style kitchens.
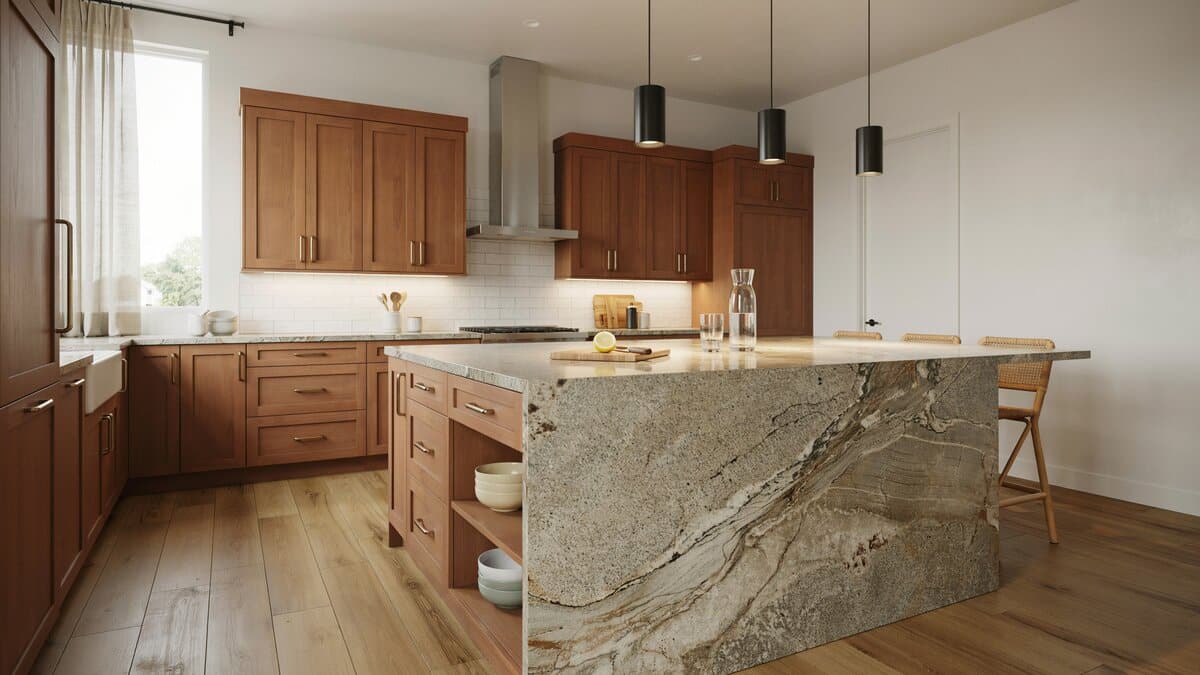
Granite Waterfall. The granite waterfall is one of the current design trends in kitchens today. The whole sides of the counter continuously fall of the edge, top to side, following the height of the counter.
It is dubbed the “waterfall” because it perfectly ends and flows to the floor creating a whole uniform surface. Paired with streamlined modern cabinets, it offers a clean and sleek statement.
Dupont Edge. Considered a premium edge shape that is a variation from the curved Ogee edge design. Rather than a curved edge the Dupont edge starts off with a short 90 degree angle that then flows down into a curved angle.
Ogee Edge.The ogee edge is an edge profile wherein the design has 2 sweeping arches: a concave arch that flows into a convex arch. When viewed from the side, it forms an “S” shape. Because of its dramatic outline, it is considered a premium cut and is more expensive.
Bevel Edge. The bevel profile is an edge that has a 45-degree angle, which may be on top or bottom of the countertop edge. The deeper the angle is cut, the wider the surface of the material looks.
It is a classic edge treatment that is not only aesthetically pleasing, but provides elegance, and is functional as well because it is easier to clean. It requires the countertop material to be at least 1 to 1 ½ inches thick. It has a classic luxurious look and works best with classic themed or country themed kitchens.
Other types of edge profiles which aren’t discussed above are variations of the basic types. Here are some of the examples:
- Straight Edge: Straight with apron edge, Radius edge
- Curved Edge: Tuscan curve, Ogee bullnose, Ogee over full bullnose
- Fancy Edge: Versailles edge, Chiseled edge, Roman Ovollo, Ogee over Versailles, Ogee top and bottom, Demi bullnose, Demi bullnose with step-out
Aside from the wide range of edge profiles available in the market, you may also consult your stone supplier for fabricators for custom-cut edges for a more unique look for your house.
Granite Pros and Cons

Some advantages of using granite as a countertop are:
- Granite countertops do not depreciate in value.
- It adds value to your home.
- It is easy to maintain and requires little effort to clean.
- If sealed properly, it is also stain-resistant.
- It is sanitary because it is less porous than other natural stones, such as marble.
- It is scratch-resistant and does not damage easily from knife marks.
- It can withstand the heat from pots and pans.
- It has a distinct luminous look which makes any space stand out.
- The visual aesthetics it offers are timeless and limitless.
- It is available in a broad spectrum of colors and patterns which can be used in different design applications. See our list of interior design software here.
On the other hand, granite also has several weak properties. Some disadvantages of using granite as a countertop are:
- Granite is more expensive compared to other natural stones.
- It requires periodic sealing to ensure that no liquids will seep into it. Stone countertops that are not properly sealed will absorb stain, dirt and spills.
- Installation is labor intensive.
- If you want to change the look of your room or its color, the whole countertop needs to be ripped off entirely.
- If you are aiming for a uniform look, granite may not be a good option because each slab can be completely different from the other.
- Due to its weight, it requires an additional structural support construction-wise.
Granite Cost
The cost of buying granite for kitchen countertops will vary wildly depending on the type and rarity of the stone you choose. Another important factor is whether you purchase a solid one piece slab or multiple pieces which can bring down the cost. The downside to using multiple pieces for your kitchen countertop is it will result in an unsightly seam visible on the surface. Purchasing granite remnants is a way to cut costs and potentially get a more expensive piece for less.
Cost per Square foot
You can purchase granite slab countertops for $50 to $60 per square foot, while stone tile countertops cost $10 to $40 per square foot. Due to its size, slabs are more cost effective for large surfaces. Tiles will work best for kitchens with unique counter shape and lay-out.
Cost per Square foot when Installed
Because of the labor-intensive process , granite installation also cost higher compared to other countertop materials. Aside from the material itself, additional costs to be considered in installing a granite countertop are as follows:
- Materials (consumables excluding granite) – $400 to $ 600
- Edging – $ 200 to $300
- Seams – $ 200 to $ 300
- Labor – $ 300 to $500
Installing granite countertops may be a bit expensive so make sure to prepare your budget ahead of time. The cost of granite per square foot when installed is around $ 80 to $150 per square foot. It will take about $2000 to $4000 (including the material) to furnish your kitchen with a granite countertop. An estimate will vary based on the rarity of the type and service costs for your local area. Although a bit pricey, these countertops serve as a great investment because they will last a lifetime.
When it comes to comparison pricing, granite is often less expensive than materials like Corian, glass surfaces, and marble, and more expensive than laminate, tile, and quartz.

Factors that Affect the Price of Granite
Several factors affect the price of granite. It is generally priced based on how many soft minerals are present in its composition, its color and how it is cut.
Color. Rare colors such as blue, purple and red are more expensive than other colors. Beige and green have more abundant supply in the market which makes them cheaper.
Slab size. Larger slabs cost more and are more difficult to work with in installation.
Thickness. Thicker slabs are more expensive because it is more durable.
Origin. Granite usually comes from Brazil, Spain, India, Italy, and China, with the last two being the most common origins. China manufactures the cheapest because they have lower labor costs. Quarried stones from Italy and Brazil is the most expensive.
Although two slabs of equal quality may be at par, the country of origin affects the price considerably. Shipping costs also add up to granite’s market price. For example, Italian granite is priced much lower in Italy because it would take up less expense to be transported from its origin.
Grading of granite. Granite may either be “low grade”, “mid grade” or “high grade.” Low grade or commercial grade materials have more soft minerals mixed in them, thus making them more susceptible to damage. They have less color variation. Mid-grade stone has pure colors but does not offer much uniqueness. High grade stone is for those with rare colors and exotic patterns.
Granite Slabs vs Tiles

Two types of granite countertops are available on the market: tile and slab. In choosing the type best suited for your project, you need to consider several factors. One of these is the area or amount of space that needs to be covered, and the other one is installation. Each of the factors will be discussed further in this detailed guide. Most people prefer to install slabs since tiles are currently viewed as being outdated.
Granite Slabs
Granite slabs are ideal for projects which require a large amount of countertop space. Typically, a standard granite slab is 4 to 5 feet (W: 1.2 meters to 1.5 meters) wide, 7 to 9 feet (L: 2.1 to 2.7 meters) long, with a thickness of 1 ¼ inch (2 to 3 centimeters).
Due to its weight, it is not advisable to use it in a DIY / Do-It-Yourself project as it requires an extra workforce to lift it and set it up. It is advisable to leave the proper handling of slabs to professionals. You may either hire a contractor or directly deal with your supplier for the installation.
These slabs have incomparable beauty. Because of their size, they produce a uniform look without any visible seams and connections. It also eliminates the need to use grout, which makes it less prone to dirt and dust being inserted in between. It works best for projects that require a more modern, contemporary look. Although more expensive than tiles, slabs are better in the long run because it is also easier to maintain.
Granite Slab Buying Tips
Some practical tips to consider in buying granite are the following:
Examine the material before purchasing. Carefully look out for any holes, hairline cracks, chip marks, and uneven surfaces. The presence of such makes the material more prone to damage.
Purchase thick stone. This is one of the most practical solutions, showing its reward over time. It is ideal to buy thicker stone because the less thicker ones are more fragile and would require more support. They generally cost more but serve as a great investment because of its superior quality. The ideal thickness for granite is 1 inch.
Ask for samples. Ask your supplier for available samples of the granite colors and patterns you choose. This is very essential in color matching with your cabinet.
You can get a general idea of how your counter would look like if placed against your cabinetry and also lessen the need to go back and forth the supplier in trying to make your final decision on which one to purchase.
Choose seamless granite. Not only do they look more uniform but they are also easier to maintain.
Check the granite’s polish quality. You can do this by using a simple test. Use any metallic object to scratch the surface of the material; if it leaves behind a mark, it indicates a poorly polished piece.
Color match. Each slab is entirely unique from one another; if you want to ensure a more uniform color, purchase slabs coming form the same batch.
Granite Tiles
Granite Tile is another type that is available in the market. It comes in a more manageable size, making it easier to handle. The standard size of granite tiles is usually 12 inches x 12 inches.
Stone tiles are also more cost-effective, at about 50 percent less expensive than slabs. Since they come in modular sizes, you save on the surface material and the fabrication and installation process.
In terms of application, they will work best in counters with complicated shapes. Although more affordable, it takes a longer process of installation by laying the tiles in a particular way.
Grout is required to cover the seams to combine the pieces of granite tiles. The grout must be of the same exact color as the stone and needs to be reapplied regularly to ensure that no food particles or dirt get stuck in between.
Another downside of tile seams is that they have to be diligently cleaned and have lower perceived value and quality than a whole slab. Design-wise, it offers more style options.
Granite Thicknesses
A frequently asked question is: how thick are granite countertops? Granite is available in a variety of thicknesses, typically ¾ inches (around 1.90 centimeters) to 1-1/4 inches (3.175 centimeters) thick. However, the ideal thickness is 1-1/4 inches or 3 centimeters.
As a general rule in the industry, the thicker the slab is, the more expensive it is. In choosing the right thickness of granite for your countertop, there are a number of factors that need to be considered.
First is the look or style you want to achieve. Thicker countertops serve as a great focal point for any kitchen and they best complement modern and contemporary design.
Aside from this, the color of the countertop you choose also affects your decision. Typically darker colors are usually more available in a thicker variety than the lighter ones.
Lastly, the budget you have also plays a vital role in choosing the thickness of your granite. Thicker slabs are rarer making them expensive in the market. This is the reason why they are often used for small areas such as an kitchen island countertop.
Best Places to Buy Granite
• The best place to buy granite is from a stone manufacturer rather than a local home improvement store. Exclusive suppliers offer a more diverse range of choices and have a vast supply ready to order. Some pros of buying from a supplier are as follows:
• Buying in bulk from contractors and fabricators can save you significant money because they can give it to you at a lower price.
• Stone slab businesses offer hundreds of material colors, patterns, and finishes. Home improvement stores usually have a limited supply of around 30 options.
Local fabricators and contractors also offer installation. You can ask them for a full contract including the material and labor cost.
Before making a purchase, make sure you are dealing with a reputable stone manufacturer who stands by their product. Ensure they offer a warranty on their stone, covering potential damage or staining.
Ensure you find out how long the warranty is valid and its total coverage. Often, a quality stone installer will offer service and customer care for the extension of the warranty period.
A stone surface warranty can protect you if something goes wrong or provide maintenance such as fixing cracks or sealing surfaces and seams periodically.
It’s also a good idea to make sure the company fabricating and/or installing your granite does not outsource the work to substandard contractors. Make sure they are doing the work themselves so you receive a quality product.
How to Measure Granite

Measuring your countertop for granite installation only takes a little effort. These are the tools you will need:
- Pencil or pen
- Tape measure
- Paper
- Calculator
The general rule to follow is to measure your counter space twice. Estimation must be done carefully, precisely, and accurately. Here are some tips you can follow in measuring your counter space:
Draw a diagram of your countertop space. Remember to include the backsplash in your drawing and measurement,
- Include the sink, cooktop, or any appliance that will be set into the granite. You need their measurements for the cut-outs on the surface.
- Use a tape measure to measure the length of the counter space (wall to wall). Put the appropriate label of measurement on your drawing/diagram.
- Measure the depth. The standard counter depth is 25.5 inches or around 60 centimeters.
- Measure the backsplash length (this is the same as your counter’s length) and the backsplash height. The standard backsplash height is 4 inches or 10 centimeters.
- Double check your measurements. Keep in mind that this must be done accurately, so always check if you measured correctly and labeled the diagram accordingly.
- When all the measurements are complete, compute for the square footage. Follow this simple formula for measurements taken in inches:
(LENGTH of counter x DEPTH of counter) ÷ 144 inches = total square foot for countertop
(HEIGHT of backsplash x LENGTH of backsplash) ÷ 144 inches = total square foot for backsplash
Here’s a sample computation following the given formula. If your countertop’s length is 100 inches and the depth is 29 inches:
(L x D) ÷ 144 = total sq ft
100 in x 29 in = 2900 sq in
2900 sq in ÷ 144 sq in = 20.138 sq ft
Granite Counter Installation

Granite countertop installation is a labor-intensive process that requires precise measurements and skilled work. The type of material you use, whether it may be a stone tile or a slab will determine the steps you need to follow in installation.
Granite tiles may be a Do-It-Yourself process for someone with prior experience in laying tiles, while slabs are best left to professional contractors, as handling and installation is more tedious. You may hire a contractor or consult your stone supplier for labor costs and required assistance.
Some general tips to consider before installing granite:
- Measurements should be taken accurately. As mentioned in the previous topic on “measuring your countertop,” the length, depth, and opening for appliances such as the range or hob cooktop and the sink must be precise.
- Color matching is also very important. No granite slab is exactly alike; to ensure that your material has a close color, buy materials that belong to the same batch.
- When in doubt, always hire a professional. Stone countertop installers are well-skilled in their craft because of their experience and years spent practicing. You may always consult one if needed.

Installing a Granite Slab Countertop
Here is a step by step guide for projects which use granite slab countertops.
Tools you’ll need:
- Tape Measure
- Light cardboard or kraft paper
- Pencil
- ¾” Plywood
- Painter’s tape or masking tape
- Level
- Screws ( 1-¼” size)
- Drill
- Drill bit
- Spade
- Screwdriver
- Jigsaw
- Circular Saw
- Putty knife
- Seam setter
- Silicone sealer
- Polyester based resin
- Epoxy
- Caulking and Caulk gun
- Granite Slab
Steps for Installing a Granite Slab Countertop:
Order the granite countertop material from your trusted supplier.
Create a full-size template of the actual measurement of the countertop. You may use paper or light cardboard for this. The reason for such is not all walls are perfectly leveled and a guide will ensure a perfect fit. Include all openings in your template.
Preparation of cabinets. Stone counters require a plywood backing to support the weight of the slab. The typical thickness of the plywood substrate is ¾ inch. Cut plywood to fit on top of the base cabinet
Remember to cut in the exact same size without any allowance or overhang. Also, add a clearance in the thickness for the edging.
Attach the plywood backing onto the base cabinet by using screws. First drill a pilot hole to keep from splitting the face frame of the cabinet. Use 1 ¼” screws to secure it in place and make sure to center the screws.
Cut the hole for the sink in the plywood substrate. After securing the plywood backing in place, trace the exact outline of the sink onto the plywood then start cutting.
Use a jigsaw to cut around the sink hole but make it slightly bigger than the outline you drew; about 1/8 inch is enough. Drop sink in place. Run caulking around the sink rim.
Preparation of the stone surface. Dry fit the stone on top of the base cabinet to ensure an accurate fit. You may require an extra hand since stone slabs are extremely heavy.
To avoid breaking the stone, carry the granite in a vertical position. If you need to remove a couple of millimeters for it to fit, scribe the material by using a circular saw with a dry-cut segmented blade. Adjustments must also be done with extra care.
Cut the hole for the sink in your countertop. Use the plywood sink hole as your guide. You may use an electric grinder with a diamond blade to cut through the granite’s surface.
Install the countertop. Set the stone in place on top of the plywood backing.
Join the seams. When you start fitting the granite slabs together, you can tape the edges to protect them. In joining the seams, use a color based epoxy.
Tighten the screws, and to keep the screws flushed, you may use a seam setter. The epoxy will dry out in an hour, and by then you can remove the seam setter.
A single edged razor maybe used to shave excess epoxy. Just remember to use even strokes as you hold the razor vertically.
Attach the granite countertop to the cabinets by using silicone. Apply silicone about the size of a penny with an ideal spacing of 6 to 12 inches apart.
Put caulking around the counter’s perimeter, where the stone meets the cabinet top.
Check the seams for any gaps. This may be filled by using a polyester based resin which matches the stone color.
Apply a stone sealer to protect your stone from oil, stain and spills from seeping into its surface. Ensure a full coverage and let dry for 24 hours
Installing a Granite Tile Countertop
Here is a step by step guide for projects which use granite tile countertops.
Tools you’ll need:
- Tape Measure
- Light cardboard or kraft paper
- Pencil
- level
- ¾” Plywood
- Cement board backing
- Screws
- Drill
- Drill bit
- Spade
- Screwdriver
- Jigsaw
- Trowel
- Rubber padded grout float
- Sponge
- Carbide tip scoring tool
- Mortar
- Grout
- Granite Tiles
Steps for Installing a Granite Tile Countertop:
Installing granite tile countertops involves the same preparation process used in installing slabs.
Create a full-size template of the actual measurement of the countertop. You may use paper or light cardboard for this. The reason for such is not all walls are perfectly leveled and a guide will ensure a perfect fit. Include all openings in your template.
Install the plywood substrate. Stone tile countertops also require a ¾ inch plywood backing for support. Cut plywood to fit on top of the base cabinet and add the desired overhang. If you want it to look thicker, you may double the plywood. Drill holes and secure the plywood on top of the base cabinets.
Install the cement backer board. Cover the plywood substrate with a cement backer board. Either cut it with a circular saw or score it with a scoring tool. Screw it on top of the plywood and attach 2” thick cement board strips to edges.
Cut the hole for the sink in the plywood substrate. Use a jigsaw to cut around the sink hole but make it slightly bigger than the outline you drew, about 1/8 inch is enough. Drop sink in place. Run caulking around the sink rim.
Lay the stone tiles. Spread thin-set tile adhesive on the cement backer board worktop. Lay tiles outer edges first. For the edging, remember to overhang the tiles.
Apply grout in between the seams of stone tiles. Use the rubber padded grout float to apply the grout to the seams then wipe off excess with a damp sponge. Allow to dry for 24 hours.
Apply sealer to the seams. This will serve as an extra protection against dirt and spills.
To showcase highly specific designs, some images on this website use advanced AI-generation software to illustrate ideas and room inspiration. See our editorial policy to learn more.