10 Walk in Closet Floor Plans with Islands for a Boutique-Inspired Look
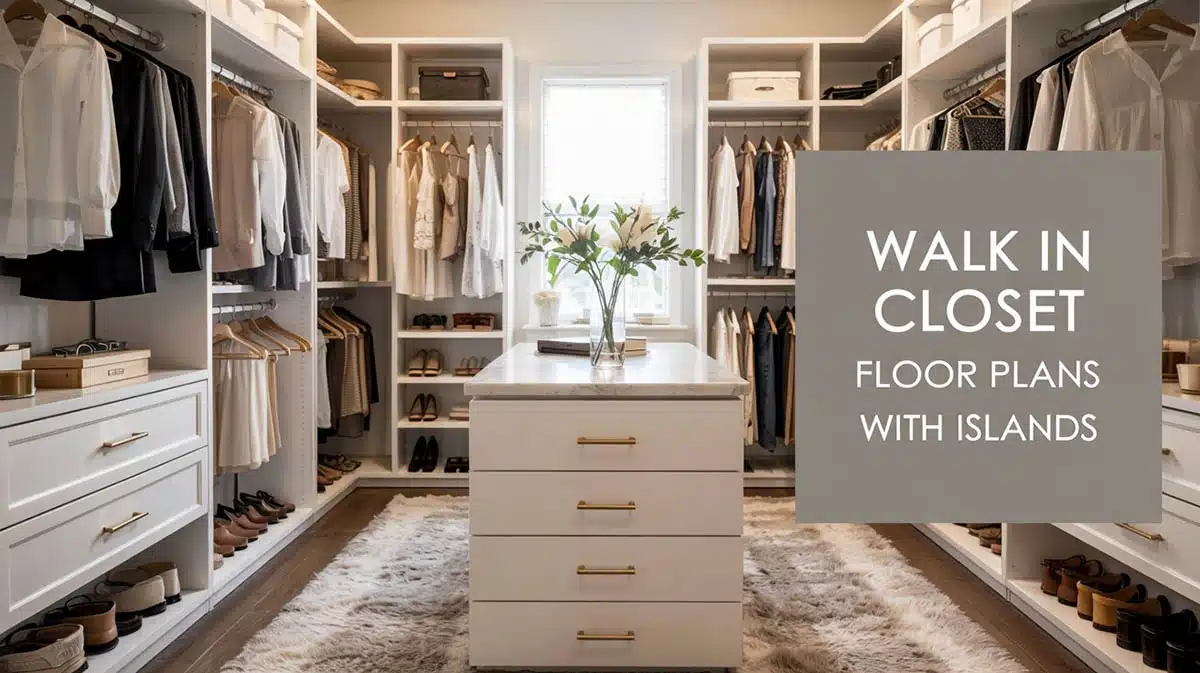
Ready to turn your closet into a mini boutique that you’ll love to use every day? Adding an island does more than offer extra storage; it brings a sense of luxury and style that enhances the entire space. It also gives you a spot to lay out outfits, a place to fold and pack, and acts as a central focal point. It can be further styled by bringing a glamorous light fixture, like a hanging chandelier or pendants, to really make the design stand out. Below, I share ten of my walk-in closet floor plans with islands that you can use to get the boutique-inspired look in your own home.
12×12 Compact Square Closet Layout With Center Island
By using a slim 24″×48″ island and 36 to 40″ walkways, it keeps this 12×12 closet feeling open while still providing plenty of space for hanging, shelving, and drawers.

Layout Details: This square walk-in closet utilizes three of the four walls with storage, with a slim 24″ x 48″ island, and dedicates the lower side to the entry with room for a full-length mirror for dressing. As you enter from the lower-right slider or pocket door with a 36″ opening, you’ll face a U-shaped storage design. The 24″×48″ island offers the perfect spot for staging your future outfits and storing delicates, jewelry, or accessories. The main aisles provide about 36″ on the left and right sides of the island, and about 40″at the top and bottom. The entire left side is dedicated to one long double-hang space with 24″-deep runs. The top has 16″-deep shelving for keeping bulky items like sweaters or bins, and can be used to display shoes or heels. The right side mixes 24″-deep cabinets with a drawer stack for small items with a full-height mirror near the door or room for a sit-down vanity.
Dimensions:
- Room size: 12′ × 12′
- Island: 24″ × 48″ with a fixed top and storage potential
- Clearances: 36″ on the left and right and 40″ on the top and bottom
- Storage depths: Left has a double-hang rack of 24″; Back has shelves that are 16″ deep, and right has 24″ with cabinets, drawers and rods
- Door: 36″ slider or pocket door at the lower-right
- Mirror panel: 30″ wide on the right near the entry
Design Tips:
- Keep the island slim. For this size of closet, use a 24″×48″ to maintain the 36″ and 40″ aisles.
- Asymmetric aisles are intentional. Aim for 36″ minimum around the island for easier turning and two-person passing.
- Zone by type of clothing. Use double-hang rods for everyday tops and pants. Use the cabinet on the right for jewelry and small accessories. Reserve the back wall’s shelves for baskets, bins, sweaters, shoes, or folded items.
- Mirror placement near the entry. This helps to check your outfit before you leave the room where the natural light is best.
- Lighting: Center a ceiling fixture over the island, such as a chandelier or mini pendant fixture. Supplement with recessed cans for additional illumination.
- Check the hardware depth. Use low-profile pulls to avoid bumps and bruises along the walkways.
12×14 Gallery Closet Floor Plan With Vanity Niche
With its symmetrical 24″deep gallery walls, a large 30″×72″ island, pull-out drawer storage, and a vanity niche for all of your makeup needs, this design offers everything you need in a full-featured closet design.
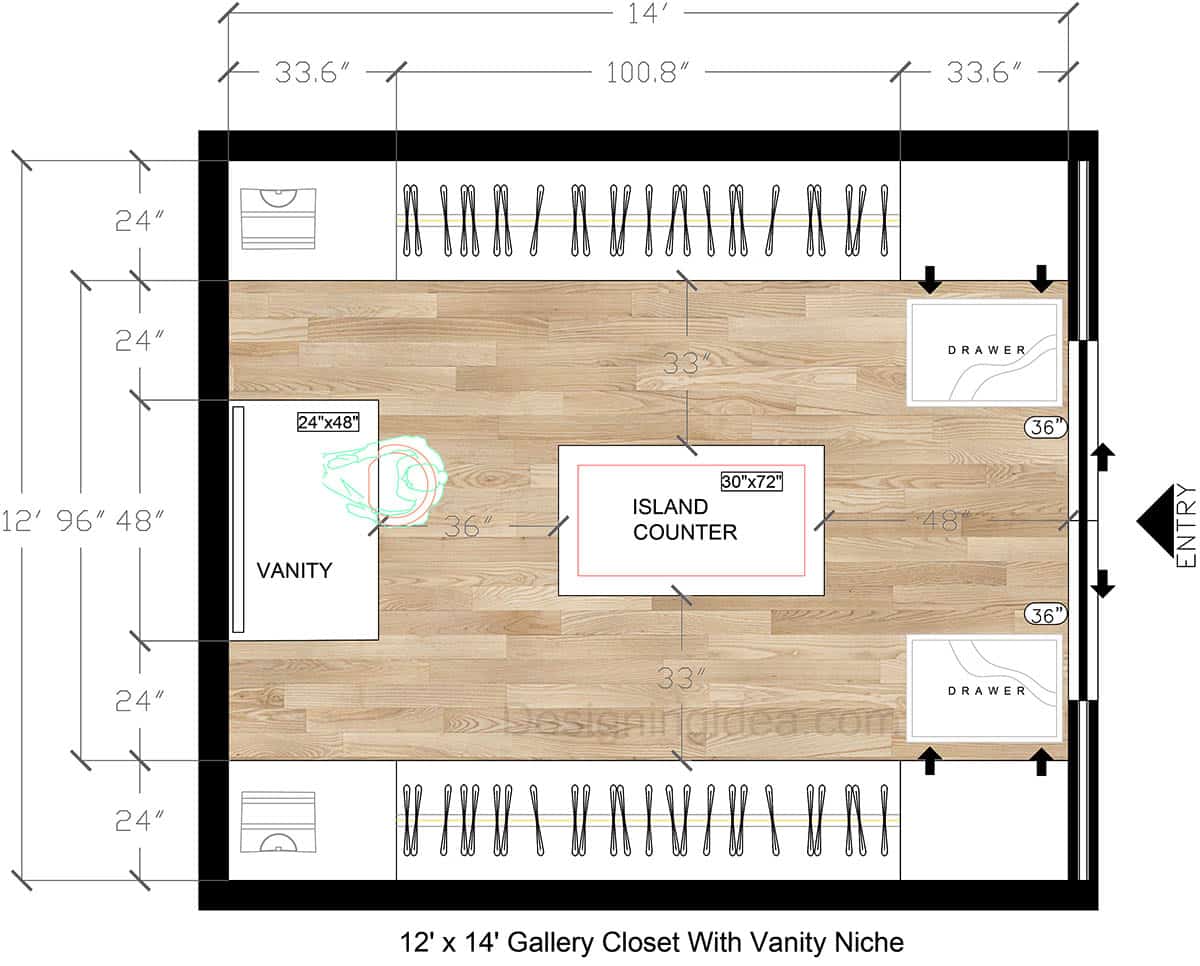
Layout Details: This walk-in closet goes for a gallery-style by using clothing racks ending in shelving along the two top and bottom 14-ft walls with a slim island for staging in the middle and a vanity against the far left. You enter from the right with double-hang runs lining both sides, the 30″ x 72″ island anchors the space and allows one to position an elegant chandelier overhead to give the space a luxe feel. The dedicated vanity niche sits on the left, is perfect for doing your hair, makeup, or storing accessories. You’ll also find pull-out drawer stacks near the entry for quick grab-and-go storage on the run. The design has balanced aisles measuring 33″ on each side of the island that give enough space for two people to use at once without bumping into each other.
Dimensions:
- Room size: 12′ × 14′
- Island: 30″ × 72″
- Walk aisles beside island: 33″ on each side
- Perimeter storage depth (hanging/shelves and cabinets): 24″
- Vanity counter: 24″ deep, and 48″ wide with 36″ behind for pulling out a chair
- Door: right-side entry; 36″ slider
Design Tips:
- Size the island for flow. Maintain the 33″ side walkway to help the area feel spacious.
- Mirror the hanging runs. Use matching 24″-deep top and bottom rods for a true couples storage design.
- Use the vanity as a prep zone. Add a lighted mirror, install shallow drawers for makeup and jewelry, and an outlet to run a hair dryer.
- Stage near the entry. Keep belts, shoes, and accessories in the pull-out drawer towers near the door.
- Light in layers. Center a chandelier over the island, add vertical sconces above the vanity, and install under-shelf LEDs along both hanging rods.
- Shelves above the racks. If you have a higher ceiling, add a shelf above each clothing run for storing off-season items or bulky, seldom-used clothes.
13×15 Boutique U-Shape Closet Layout With Shoe Wall
With a shallow, full-length shoe wall in back and clothing racks on both sides, and a long, centered island in the middle with a bench, this U-shaped closet design gives boutique-style and easy circulation throughout.
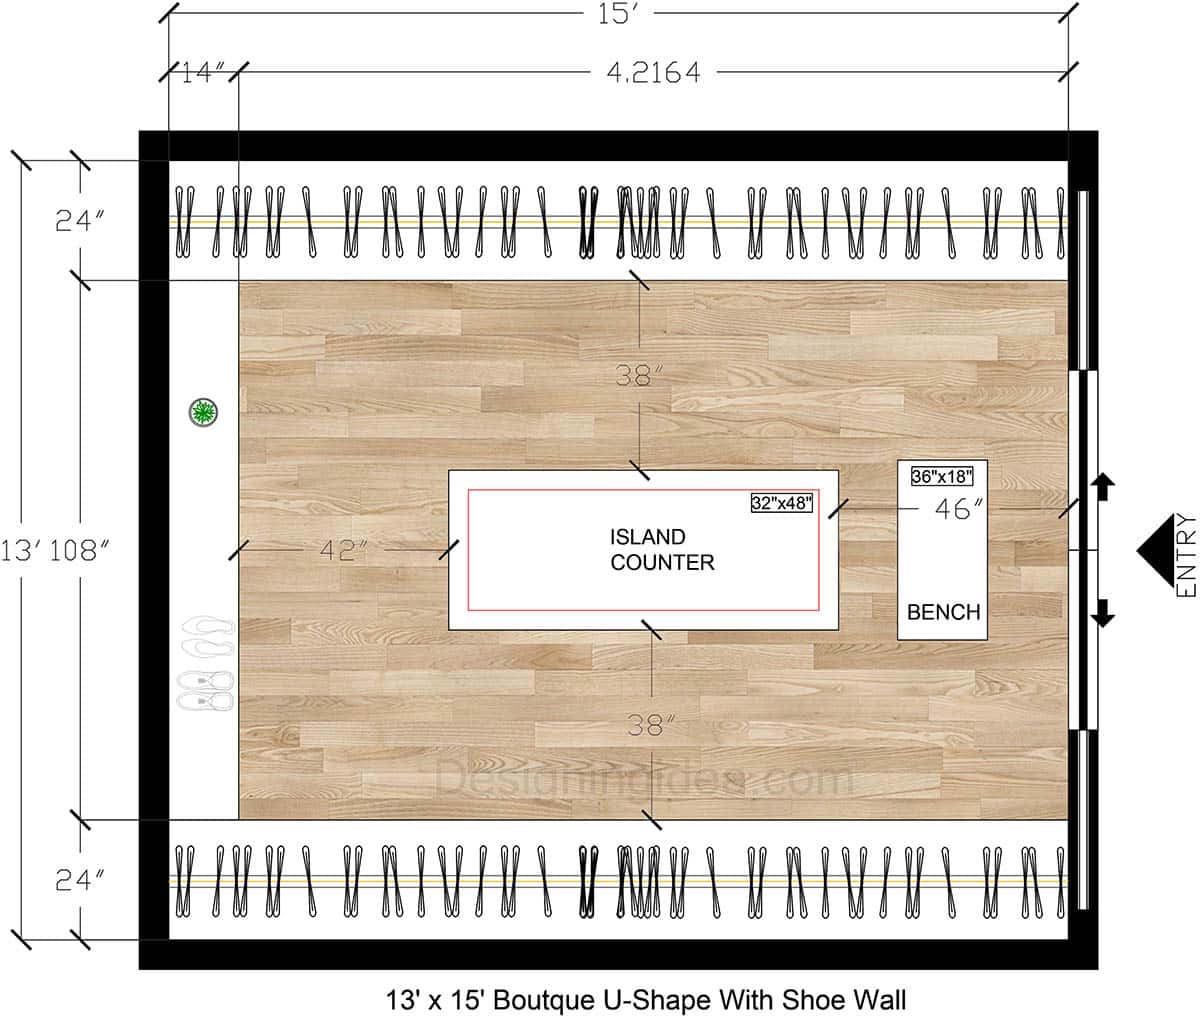
Layout Details: This plan feels like a small boutique as it has storage that wraps on three sides in a U, with a slim island, a bench by the entry and one side devoted to storage for shoes. You enter from the right side and see the entire top and bottom walls are dedicated to hanging clothing with the island in the center and a shoe wall with shallow shelving in the back. The racks are deep at 24″ and offer room for double-hanging clothing. The 32″×48″ island is the focal point and can be adorned with a chandelier or pendant above to really highlight and showcase the feature. The bench near the door is a great place to put on heels or get dressed before you leave for the day.
Dimensions:
- Room size: 13′ × 15′
- Island: 32″ × 48″ in the center
- Clearances: 38″ on the top and bottom of the island), with 42″ from the island to shoe wall), and 28″ on the bench side with it tucked in
- Perimeter rack depths: 24″ on the top & bottom and 14″ on the shoe shelves
- Bench: 36″ × 18″
- Entry door: right side slider
Design Tips:
- Keep the shoe wall shallow. Use 12 to 14″ deep shelves with 6 to 8″ vertical spacing to display pairs of shoes and heels.
- Zone for speed. Place the daily wear items on the bottom row near the bench, and reserve the top row for long-hang items to make things easier to locate.
- Use the correct size island. 32″×48″ keeps the 38 to 42″ aisles intact and leaves room for the bench seating.
- Bench = workflow. Add hooks on any available wall space near the bench for bags and hats.
- Lighting that flatters. A centered ceiling fixture (chandelier/pendant) over the island, with vertical sconces near the shoes, can help eliminate shadows.
12×10 Efficient His And Her Split Closet Design
A compact island with a his and her split wall layout with shelves in the back for shoes or folded items maximizes space and function in this 12×10 closet.
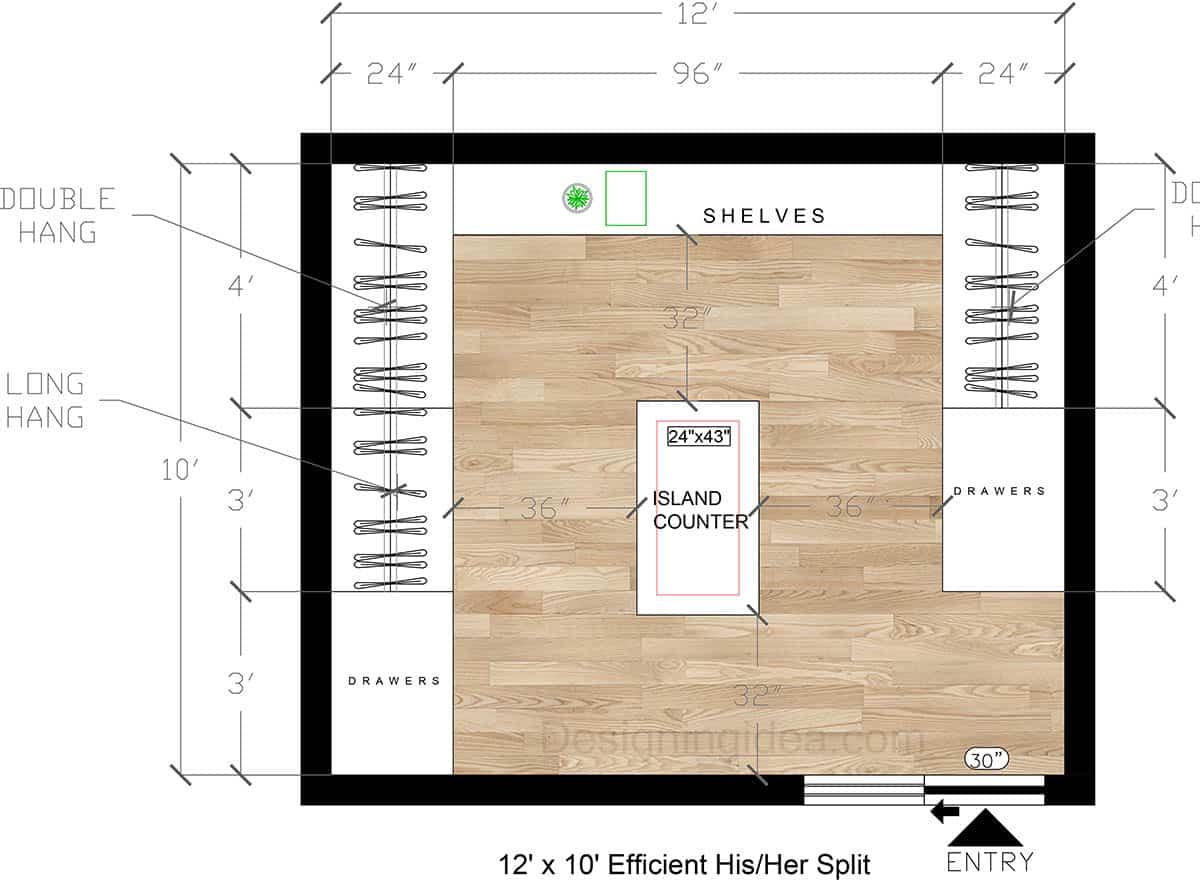
Layout Details: The entry is at the lower-right through a 30″ slider or pocket door leading into a 12×10 closet with a slim 24″×43″ island, two walls of clothing racks and drawers, and a back wall for shelving. The shelves at the top are excellent for bins, shoes, or off-season items. The left wall mixes double-hang for shirts and pants and a long-hang bay for dresses or coats, plus a drawer stack on the lower end. The right wall mirrors the idea, but it is 3ft smaller with a double-hang section near the top and a drawer tower by the door.
Dimensions:
- Room size: 12′ × 10′
- Entry door: 30″ on the bottom-right
- Island: 24″ × 43″ no seating, but can have storage
- Clearances: 36″ on each side of the island, and 32″ at the island’s ends
- Perimeter storage depth: 24″ throughout
- Drawer towers: 3′ wide on two sides
- Double-hang bays: Two 4′ wide on the left and right walls
- Dedicated long-hang bay: 1 section on the left
Design Tips:
- Keep the island tiny. In a 12×10 space, the 24″×43″ is the right size to allow the 36″ side aisles.
- True “split” zoning. Assign one wall per person and mirror double-hang heights on both sides.
- Use the top shelf for extra overflow. Put 12 to 15″-high bins across the 12′ run above the clothing rods for more capacity.
- Put daily items near the door. The right-side drawer tower can be used to store socks, belts, and accessories you want to reach on the way out.
- Light for tasks. Install a small flush mount or chandelier over the island, plus add under-shelf LEDs on the top shelving unit.
- Choose low-profile pulls on the island and drawers. This will protect your hips as you navigate the walkways.
14×12 Windowed Dressing Closet With Seating Layout
This closet layout focuses on promoting natural light through its two symmetrical windows with a centered mirror that acts as a dressing wall with a 36″×50″ island with a pull-out hamper that creates a bright, boutique-style room that’s easy to use.
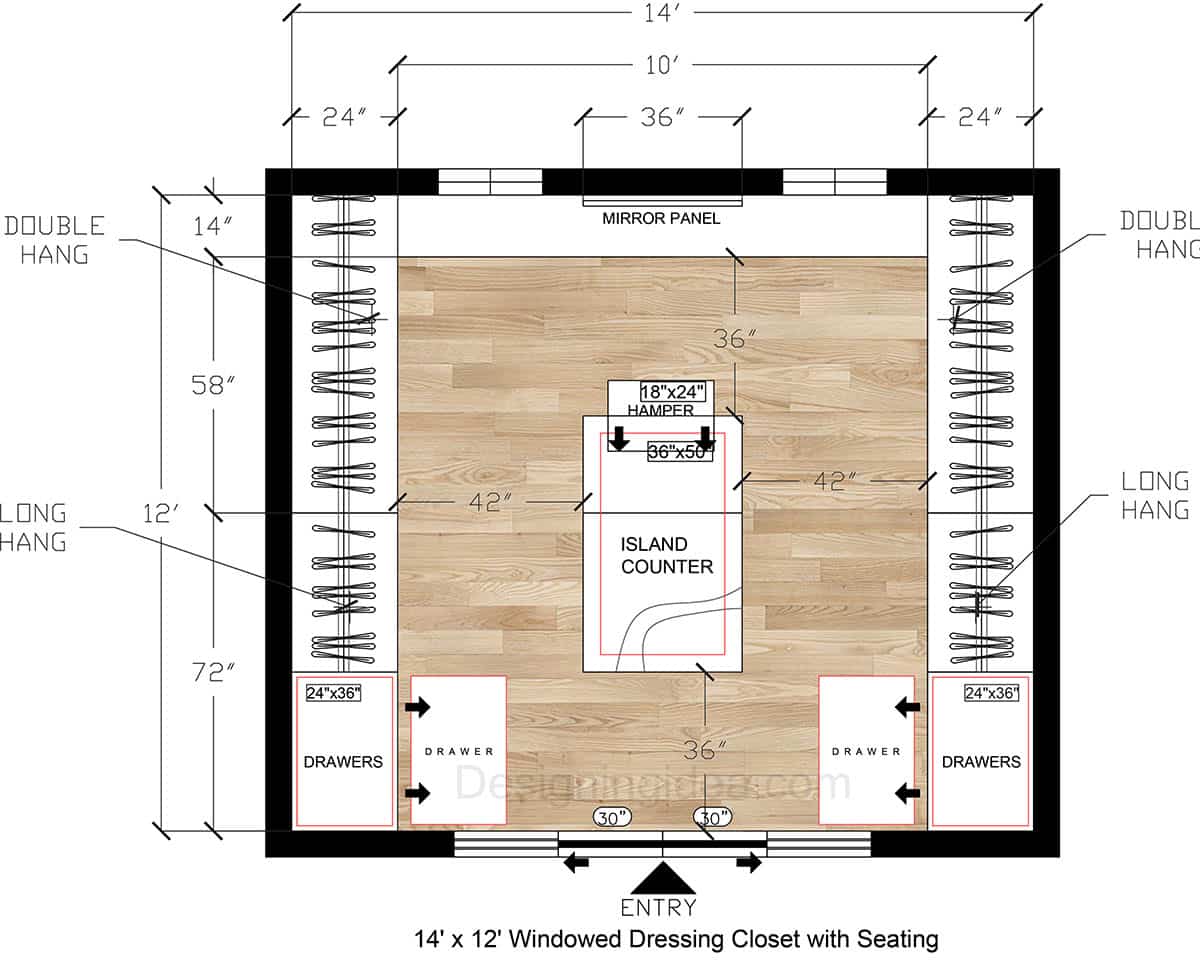
Layout Details: This plan turns a closet into a bright dressing room by adding two matching windows and a center mirror to help reflect light. You enter at the center of the bottom wall and face a compact 36″ x 50″ island with an integrated pull-out hamper. On either side are pull-out drawers measuring 24″ x 36″ and then leading to matching long-hang and double-hang clothes rods. In the back are the two windows with a 36″ wide mirror panel for full-body viewing, which is perfect for checking outfits you try on. Throughout the closet, there are generous 42″ side aisles and 36″ turnarounds, so that two people can comfortably share the space without crowding.
Dimensions:
- Room size: 14′ × 12′
- Island counter: 36″ × 56″ with 18″ × 24″ hamper
- Clearances: 42″ on the left and right of island and 36″ at the island ends
- Perimeter depth: 24″ cabinetry throughout
- Double-hang bays: 58″ of hanging length
- Drawer towers: 24″ × 36″ pull-out drawers near the entry
- Entry door: A slider at the bottom
Design Tips:
- Use the light well at the mirror. Add side sconces to either side of the mirror to balance daylight and avoid shadows.
- Protect fabrics. Specify UV-filter curtains or shades on the windows to reduce fading while still keeping the room bright.
- Keep the island functional. Add a built-in tilt or pull-out hamper measuring18″×24″ to hide laundry and prevent clutter.
- Zone storage by length. Add daily wear in the double-hang zone, and reserve the corner long-hang for dresses, gowns, coats, and long skirts.
- Add a valet rod. Mount one rod near the mirror to stage outfits.
- Layer closet lighting. Install an over-island ceiling fixture, cove or under-shelf LEDs, and dual mirror sconces for even illumination.
14×12 U-Shape Closet With A Square Island Design
This 14 by 12 layout is one of the easiest to move around in because it has a square island that is 4 feet by 4 feet and provides a full 36 inches of clear space on each of the open sides, together with an 8-foot shoe wall on the right and a vanity niche built into the back.
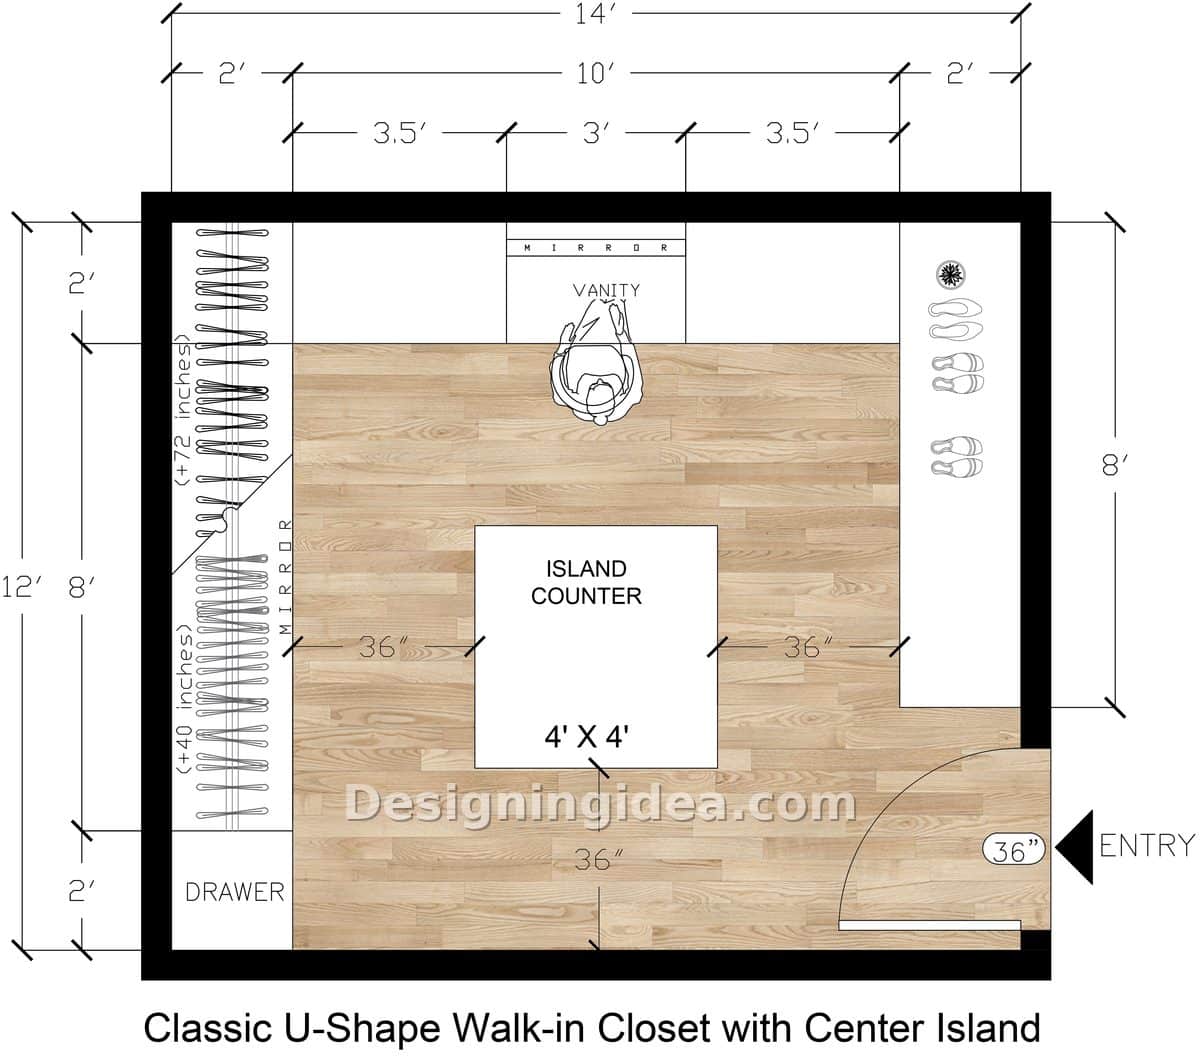
Layout Details: The 14 by 12 walk-in closet provides storage along three of the four walls and includes a square island measuring 4 feet by 4 feet which you can walk around in a complete circle. Access to the closet is via a hinged door that is 36 inches high and is situated in the lower right corner; the door’s swing keeps that corner clear and therefore it is advisable to leave it empty rather than putting in a hamper or a bench. On the left wall the hanging is arranged in a double row that is 24 inches deep and located at 40 inches and 72 inches, with a drawer unit below and a mirror on the end of the panel that gives a full-length view without taking up any of the storage wall space. There is a 3-foot vanity niche on the back wall with a mirror above it and this is bordered by 3.5-foot sections on either side. On the right side there is an 8-foot shoe storage wall that is 24 inches deep. It is the square island that enables the design to function properly because there is no long side to have to go past and since there is 36 inches on each face it is possible to fully open a drawer and still be able to stand in front of it, something that a rectangular island in a 12-foot deep space usually fails to achieve.
Dimensions:
- Room size: 14′ × 12′
- Island: 4′ × 4′ with a fixed top and storage potential
- Clearances: 36″ on the left, right and bottom of the island
- Storage depths: 24″ on the left hanging wall, the back wall and the right shoe wall
- Vanity niche: 3′ wide, centered on the back wall with a mirror above
- Door: 36″ hinged door at the lower right
Design Tips:
- If you’re folding a lot at the island, leave it at a height of about 36 to 38 inches which is suitable as a staging surface.
- The square shape is better at this size since a 4 foot by 4 foot island has the 36 inch aisle on all three of its open sides, whereas a longer island in a 12-foot deep area reduces one of those sides.
- Add a riser to the shoe shelves; a flat shelf that is 24 inches deep can hold two rows of shoes, and the rear row will disappear unless the riser is high enough so that it exceeds the front row.
- Make sure there is clear space at the door corner since the 36-inch door opens into the lower right section and so keep hampers, stools and bins out of that area.
- Use the mirror which is on the end panel. Putting it on the end of the hanging section allows you to get a full-length view without having to give up any wall space to it.
- Light the edges, not just the middle. Install a light fixture over the island and also use recessed lamps or under-shelf LEDs above the rods so that the hanging part is not in shadow.
14×16 Double-Aisle Closet Layout With A Drawer Island
This 14 by 16 closet has the atmosphere of a boutique shop rather than that of a corridor because it features twin 42-inch aisles and a 3-foot by 7-foot island with eight drawers and a jewelry counter, the vanity being located at the far end.
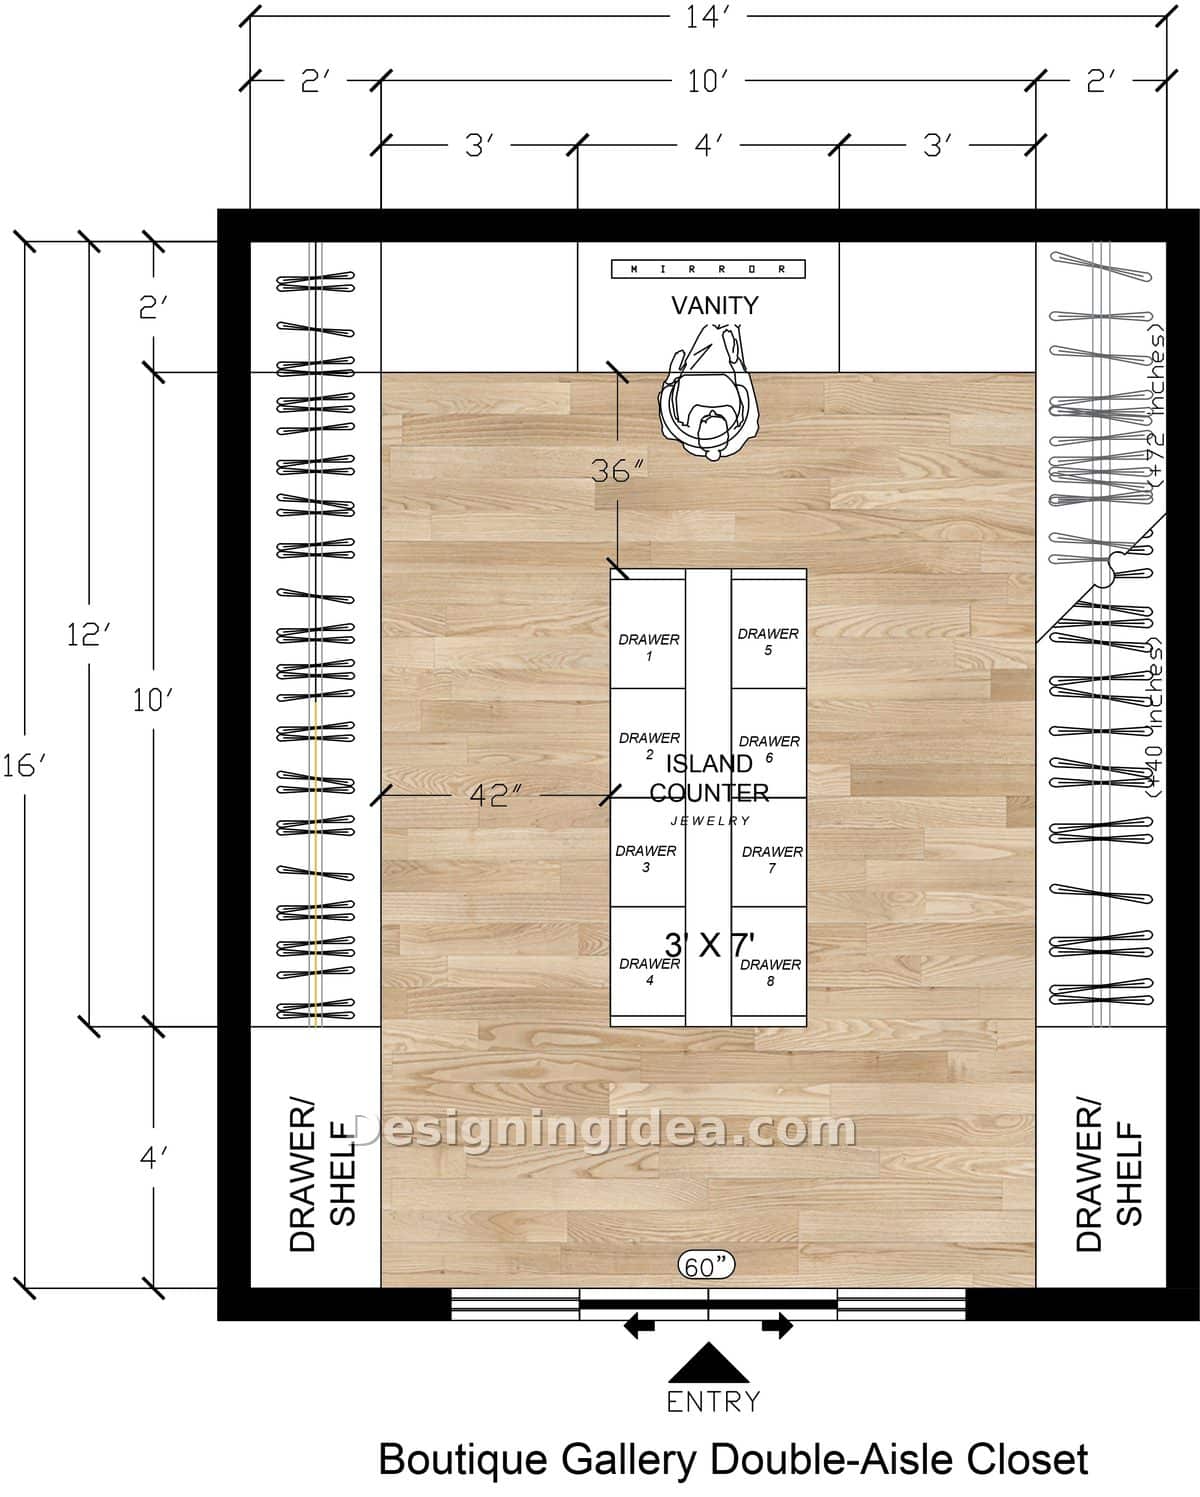
Layout Details: A depth of sixteen feet easily forms a corridor, but this layout prevents that by placing a long 3′ × 7′ island at the center and providing 42″ of aisle on either side, a width that allows two people to pass without having to turn sideways. Entry is made through a 60″ opening at the bottom and the line of sight goes straight up the room to a vanity having a mirror built into the opposite wall, thus giving the length something to conclude at. The island includes the small storage consisting of eight drawers, four on each side, together with a jewelry counter on top, which means both of the perimeter aisles can remain solely devoted to clothes. The two 16-ft walls have 24″-deep double-hang rods at 40″ and 72″, finishing in 4′ drawer and shelf towers close to the entrance for the belts and accessories that you take off as you leave. There is 36″ between the end of the island and the vanity, so that you are able to pull out a chair and sit down without bumping into it.
Dimensions:
- Room size: 14′ × 16′
- Island: 3′ × 7′ with eight drawers and a jewelry counter top
- Walk aisles beside island: 42″ on each side
- Vanity clearance: 36″ between the island and the vanity
- Perimeter storage depth: 24″ double-hang runs at 40″ and 72″ on both long walls
- Door: 60″ double door or cased opening at the bottom
Design Tips:
- Light the sides of the aisles rather than the central area of the ceiling. Installing two rows of recessed lamps along the walkways ensures that the shadows are kept away from the rods, something that a single central light fixture cannot do.
- Strive for the 60-inch entry; with a double door or a cased opening the island will look like a piece of furniture rather than something you have to step over when entering.
- Place your everyday clothes close to the door and keep the clothes you only need a few times a year at the far end by the vanity.
- Arrange the drawers on the island according to which side they are on, putting the jewelry and accessories on the vanity side and the folded items on the entry side so that you don’t have to go round the room twice.
- Add an outlet to the vanity since you’ll need it for a hair dryer or a lighted mirror and it’s much easier to install it before the cabinetry is fitted.
- Use the towers for grab-and-go. Belts, bags and shoes stored near the entry keep the daily routine at the door end of the room.
13×17 Long Closet Design With A Window Bench
A 20″ × 60″ bench under the window turns the far end of this 13×17 closet into a dressing zone, with a 3′ × 6′ island holding 36″ aisles and storage split between clothes, bags and laundry.
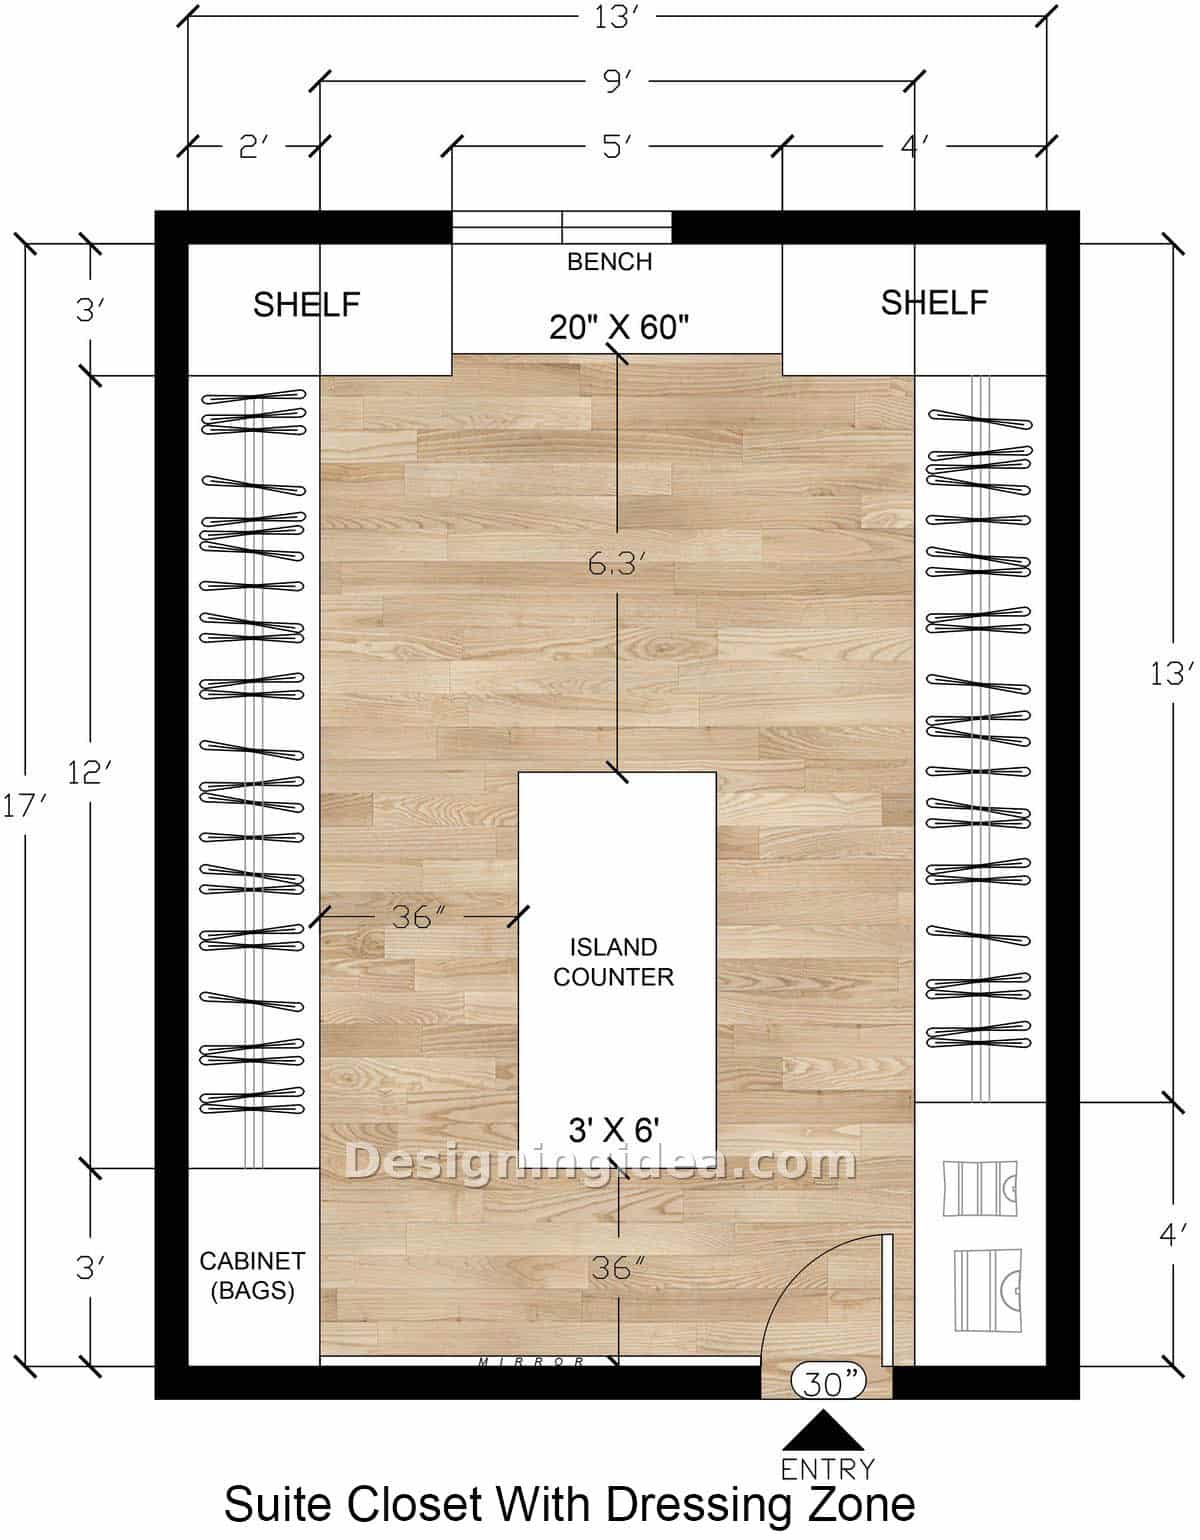
Layout Details: Long closets often waste their best wall by having shelves blocking the window or by leaving that space empty, and this plan for a 13 by 17 foot area includes a 20 inch by 60 inch bench underneath the window so that you have a place to sit and put on your shoes in natural light. The island has been reduced to 3 feet by 6 feet intentionally, since a 13-foot wide room requires 36 inches on each side and a wider island would take up one of the aisles. There are 6.3 feet of clear floor space between the bench and the end of the island, and it is this space that allows the dressing area to function. The storage is arranged according to the type of item it holds: each of the side walls has a long row of hanging space, there is a cabinet for bags positioned in the lower left hand area, and the laundry hampers are placed in the lower right near the door so that laundry leaves the room rather than piling up next to the island. At a depth of 3 feet, shelving is placed in the two top corners, and a mirror is fitted along the entry wall so that you can check your outfit as you leave. The 30 inch door is the only feature that should be altered if the framing permits it, as 36 inches would be more appropriate for a room of this length.
Dimensions:
- Room size: 13′ × 17′
- Island: 3′ × 6′
- Walk aisles beside island: 36″ on each side
- Bench: 20″ × 60″ under the window with 6.3′ of clear floor to the island
- Corner shelving: 3′ deep at the top of both walls
- Door: 30″ hinged door at the lower right
Design Tips:
- Put a shade over the top of the window so that the daylight can fall on the bench while at the same time blocking the view from outside.
- Split the bag cabinet; when handbags are stacked they collapse and develop creases at the bottom, so it’s necessary to include vertical dividers and store them upright.
- Leave the hampers by the door since laundry placed close to the exit will actually leave the room rather than accumulating beside the island.
- If the framing permits, increase the width of the door; in a room that is 17 feet long an opening of 30 inches is quite narrow and a 36-inch opening will make the entrance match the scale of the room.
- Slide the mirror along the entry wall; the full-height mirror placed opposite the window reflects the daylight back down the length of the closet.
- Put the bench light on its own switch. If there is a sconce or a small pendant above the seat, you won’t have to use the ceiling light when it’s dark in the morning.
15×15 Square Closet Layout Ideas With Twin Storage Towers
In this 15 by 15 square closet two identical 2 by 6 foot towers stand either side of a narrow island: one has a glass front and is used for shoes, the other is for laundry, thus the central area of the room gets its room without blocking the floor space.
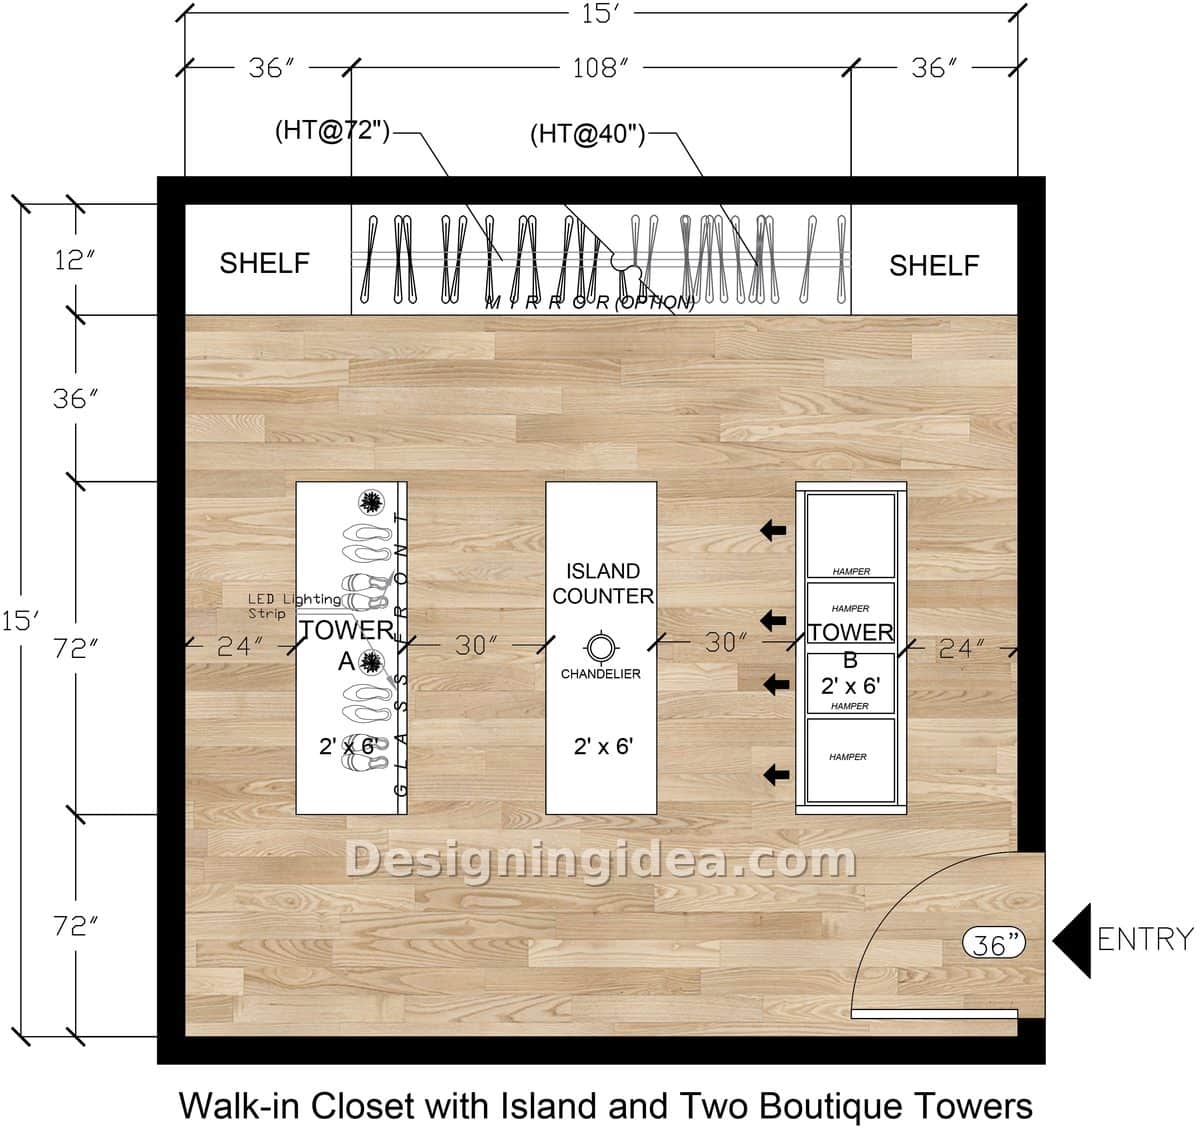
Layout Details: Square rooms are not well suited for closets because arranging storage along all four walls leaves the central area unused. The 15 by 15 plan makes use of that central space by incorporating three pieces rather than just one: a narrow 2 foot by 6 foot island with a chandelier above it, and this is set between two towers of the same size. Tower A acts as the display unit and has a glass front with an LED strip inside so that the shoes look like they do in a shop window, while Tower B is the opposite, consisting of four stacked hampers situated behind closed doors and carrying out the more mundane tasks. The two towers are the same size but have opposite functions, and it is this symmetry that prevents the overall layout from appearing haphazard. The clearances are more restricted than those in a plan with a single island, measuring 30 inches between the island and each tower and 24 inches on the outside, which is comfortable for one person to move through but will cause two people to bump into each other. On the back wall there is a 108 inch section for hanging, with spaces at 40 inches and 72 inches and 36 inch shelves on either side, together with an optional mirror in the center, and entry is made via a 36 inch door at the lower right.
Dimensions:
- Room size: 15′ × 15′
- Island: 2′ × 6′ with a chandelier centered above
- Towers: 2′ × 6′ each, one glass-front for shoes and one for hampers
- Walk aisles: 30″ between the island and each tower, 24″ on the outside
- Back wall hanging: 108″ wide at 40″ and 72″ with 36″ shelves on each side
- Door: 36″ hinged door at the lower right
Design Tips:
- Set the LED strip in a vertical position. When the light runs down the side of the glass tower, it makes the shapes of the shoes visible, but a strip placed across the top flattens them.
- Make the island narrow since at two feet it serves as a staging and folding surface and those aisle inches are more important here than additional drawer space would be.
- If the distance feels tight, pull the towers in by 3 inches; this will still leave 27 inches between the tower and the island.
- Match the front of the tower with the role it is to perform; use glass for the shoes you want to display and solid doors for those that you don’t.
- Add a back-wall mirror if you want to; it will make the apparent depth of a square room twice as much and provides a full-length view from the island.
- Vent the hamper tower; since solid doors tend to trap wet laundry, fit a slotted back panel or leave a gap at the toe kick.
16×18 Luxe His And Hers Closet Floor Plan With A Chandelier Island
This room has the largest plan of the group, measuring 16 feet by 18 feet, and includes a chandelier island that is 4 feet by 8 feet, situated in the center, with the men’s and women’s shelves extending down either wall, and a 6-foot glass-fronted shoe cabinet facing the entrance.
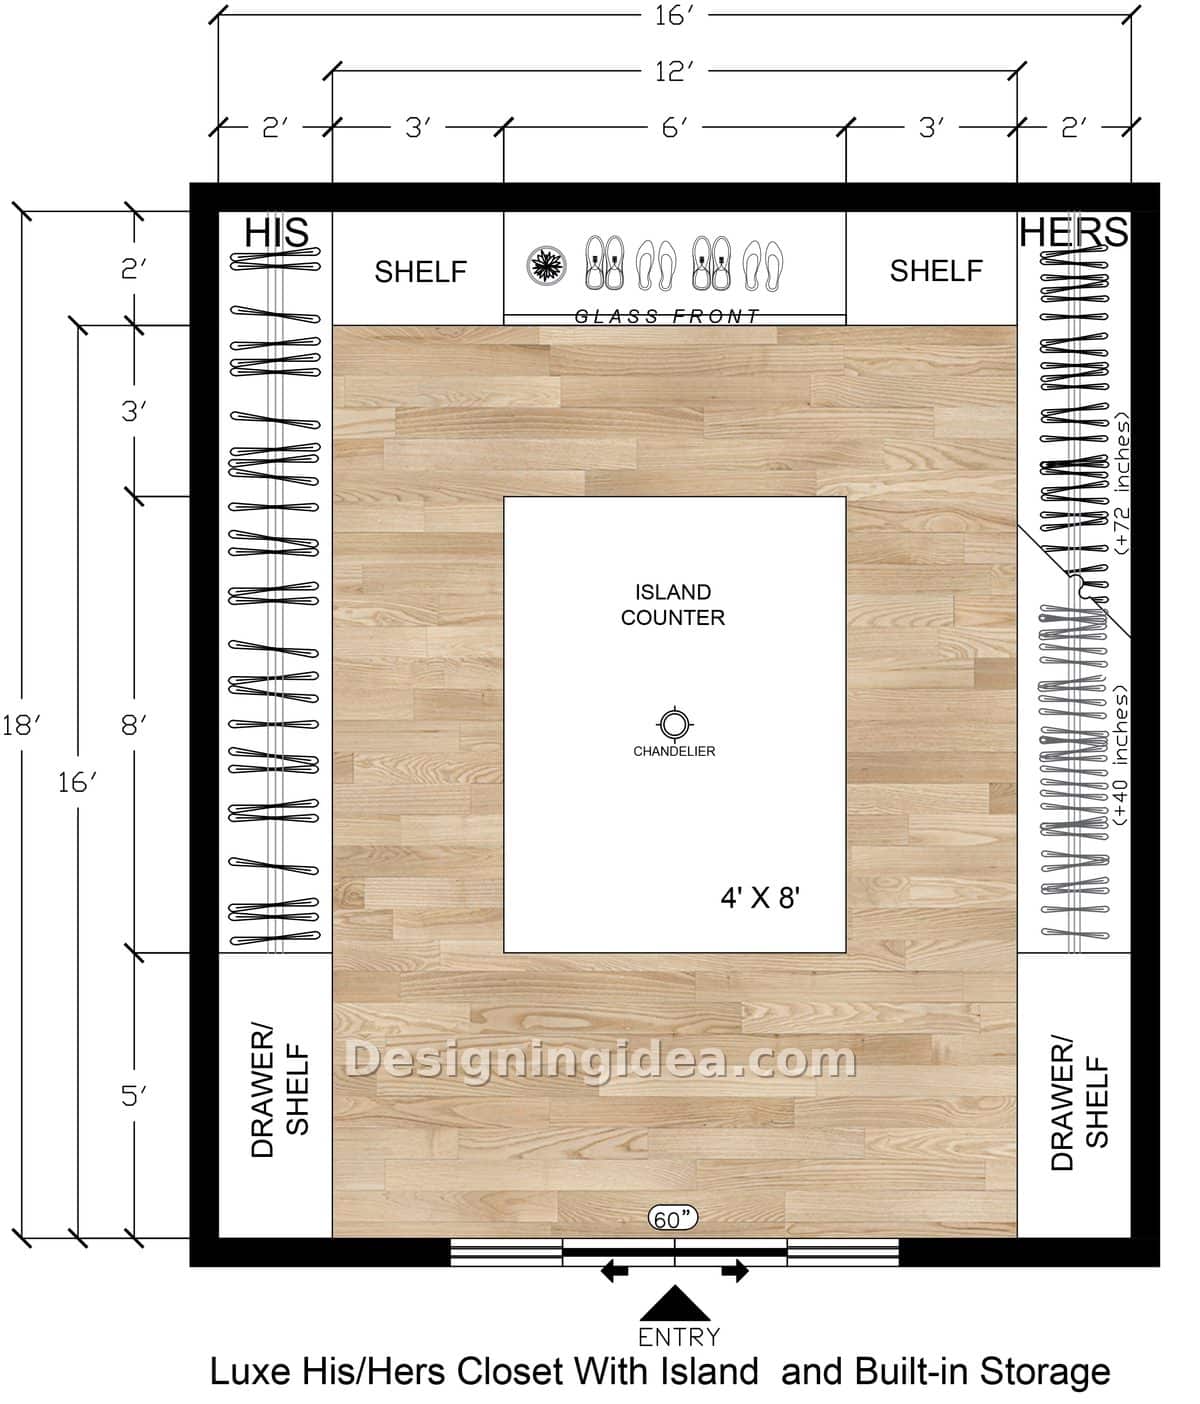
Layout Details: This 16×18 closet has enough room that the question stops being how to fit an island and starts being what the room is for. The 4′ × 8′ island sits dead center with a chandelier hung over it, which makes it the focal point of the room rather than a place to drop folded shirts. The split is clean: his runs down the left wall, hers down the right, each 24″ deep with double-hang rods at 40″ and 72″ over an 8′ stretch and a 5′ bank of drawers and shelves at the entry end, so neither of you has to reach across the other. The back wall is the shared one, with two shelf sections flanking a 6′ glass-front shoe cabinet, which puts the shoes front and center as you come through the 60″ entry. That’s a deliberate choice and it’s the detail that makes the room read as a boutique instead of just a large closet. The one thing to sort out before building is lighting, since a chandelier over an island is decorative more than functional and a single fixture leaves the rods along both walls in shadow. See examples of two-story closets with islands here.
Dimensions:
- Room size: 16′ × 18′
- Island: 4′ × 8′ with a chandelier centered above
- His and hers runs: 24″ deep with double-hang rods at 40″ and 72″
- Hanging sections: 8′ per side with 5′ drawer and shelf banks at the entry end
- Shoe cabinet: 6′ glass-front, centered on the back wall between two shelf sections
- Door: 60″ double door or cased opening at the bottom
Design Tips:
- Add task lighting under the shelves. The chandelier lights the island and leaves the rods dim, so run LEDs above both hanging walls.
- Use glass doors only if you plan to keep the cabinet neat, since a glass-front shoe cabinet encourages neatness and shows everything else, while solid doors are the more honest option in all other cases.
- Start by planning the interior of the island since it is large enough to include a pull-out laundry bin or jewelry inserts and it would be a real nuisance to retrofit an 8-ft island at a later stage.
- Divide the two sides according to habit rather than in equal parts; the person who hangs the clothes should be given the longer rod, as although equal halves may seem fair in theory they seldom do work in practice.
- Place a seat by the shoe cabinet; if you have a bench or stool against the back wall, then the shoes can be tried on where they are stored.
- Scale the chandelier to the island. A fixture around half the island’s length, hung about 7′ off the floor, reads right over a 4′ × 8′ top.
To showcase highly specific designs, some images on this website use advanced AI-generation software to illustrate ideas and room inspiration. See our editorial policy to learn more.