Beautiful Shiplap Kitchen Design Ideas You Can Use

Lately, interior design trends have seen many comebacks from past styles, updated and contextualized into contemporary applications. One of those trends is modern farmhouses, which, as its name suggests, mixes the clean lines and simple elements of modernism with the texture, rawness/rustic quality of farmhouses. One particular aspect of farmhouses we have seen more often recently is shiplap boards. These wall planks have been incorporated into many contemporary applications, whether on the walls, ceiling, or cabinetry.
Shiplap is easy to combine with more contemporary styles because it’s subtle enough to blend in, but it also has a distinct look that you can easily associate with farmhouse / rustic-style interiors. Aside from that, they’re fairly easy to install, they are now made in various materials (which you can choose depending on the application area or your budget), and they also come in many different sizes and colors. It’s a very easy way to “enhance” the look of any modern space.

Upload a photo and get instant before-and-after room designs.
No design experience needed — join 2.39 million+ happy users.
👉 Try the AI design tool now
If you want that subtle touch of rustic feel into your kitchen, putting these tongue and groove boards on your kitchen island or cabinets is an easy way to do it. The picture above shows shiplap boards on a small kitchen island. The boards were finished in the same color as the island, making it very subtle and blending in the contemporary look of the space.
Kitchen Shiplap Wall Ideas

For kitchens with paneled cabinetry, it could be easier to install shiplap boards on your walls instead. Depending on the effect you want to achieve, you can experiment with wide boards, narrow boards, or even horizontal and vertical applications. A very basic white paint color on these tongue and groove boards makes them subtly blend into the background yet still gives enough depth and texture to your room.
An all-white design using vertical shiplap boards on its wall to provides the illusion of a higher ceiling height. Using a slightly narrower board and a muted light color, horizontal shiplap makes the space look more balanced and symmetrical. Adding wide horizontal boards on walls completes the rustic farmhouse look and the boards are also a nice “grid line” you can follow when installing wall-mounted shelves and accessories.
Another installation technique is using nickel gap wall planks to provide a uniform spacing that creates a clean look. This offers visual continuity that works well with a subway tiles pattern behind the counter walls. But unlike subway tiles, these tongue and groove boards are easier and faster to install and create distinct shadow lines that adds more depth.
If you don’t have that much wall space in your kitchen to play around with, you can also consider putting the boards as your counter backsplash. Remember to keep it in dry areas using wood or other materials that easily warp with moisture. You can also treat your paneled kitchen backsplash with a waterproof and heat-resistant clear coat sealer.
Shiplap Office Nook
Turn a spare kitchen corner into a productivity zone by lining the back wall of your office nook with shiplap laid horizontally for a visually widening effect. Paint it a soft, low-sheen white or muted greige so laptop screens don’t glare, then float a slim wood desktop (¾-inch plywood wrapped in white oak veneer works well) right against the boards. Slip narrow picture ledges between shiplap courses for reference books and décor that can be swapped seasonally without extra holes. Finish with a petite sconce in matte black or aged brass, as the contrast highlights the linear texture and keeps the surface clear of desk lamps.

Horizontal planking in office nooks also adds a nice textural element to the surface and is also a useful guideline for installing frames and other wall-mounted accessories.
Shiplap Bar
For a kitchen-adjacent wet bar, wrap the front and side panels in vertically installed shiplap to draw the eye upward and separate the bar visually from prep zones. Opt for a mid-tone stain (think smoked oak or walnut) that hides scuffs from foot traffic but still reads rustic. Tuck LED tape behind the bar’s toe-kick and under the upper shelves; the grazing light skims the grooves and creates subtle depth for an evening lounge vibe. Pair with honed soapstone or leathered granite countertops so the tactile contrast feels intentional rather than theme-park rustic.

You can also install shiplap on areas you want to highlight or become the focal point. In this layout, for example, the small bar nook’s wall was clad with white-painted tongue and groove boards, making it stand out against the light taupe-painted walls of the kitchen.
Shiplap Dining Nook
Clad the lower two-thirds of a breakfast banquette in shiplap wainscoting, capping it with a hefty 3-inch ledge for coffee cups or phones. Running the boards horizontally sells the built-in look and makes the nook feel anchored, while a darker paint on the planks (stormy blue-gray, charcoal, even forest green) grounds lighter upholstery above. Finish the top third of the wall in a wipeable eggshell to avoid grease build-up near the table. A minimalist pendant in clear glass keeps sightlines open so the shiplap remains the star.

For this open plan kitchen, adding the light sage green boards on the walls of the banquette seating/dining area gives it an illusion that it is a separate space because of the difference in texture/pattern, even if technically, there is no wall separating it from the kitchen and the living area. See more shiplap dining rooms here.
Shiplap Wainscoting
Full-height shiplap can overwhelm the senses, instead of this, stop it at 42 inches to create classic wainscoting that protects walls from stool backs and kids’ sneakers. Use MDF shiplap in high-humidity kitchens as its crisp edges prevent warping, and apply a furniture-grade enamel for wipe-down durability. A simple 1×4 cap doubles as a narrow shelf for micro-art or herb jars and subtly transitions to the painted drywall above. Tie all millwork together by carrying the shiplap color onto window casings for a cohesive envelope.

If you don’t want to cover your whole wall with paneling (especially for those concerned with dust/dirt build-up between board grooves), a nice alternative is to install them on your walls as wainscoting. It gives a renovation the same subtle rustic effect but is only installed in accessible heights, making maintenance easier.
Small Kitchen With Shiplap
In tight footprints, paint shiplap the same tone as cabinetry so texture adds more visual interest without the clutter to the senses. Installing it vertically on the tallest wall draws the eye up and makes ceilings feel higher; running it horizontally on short walls can widen galley spaces. Keep board width slim (3–4 inches) so grooves don’t dominate, and choose recessed hardware to maintain clean sightlines. A single accent wall is plenty—use reflective finishes elsewhere (glossy subway tile, metallic fixtures) to bounce light and prevent cave syndrome.
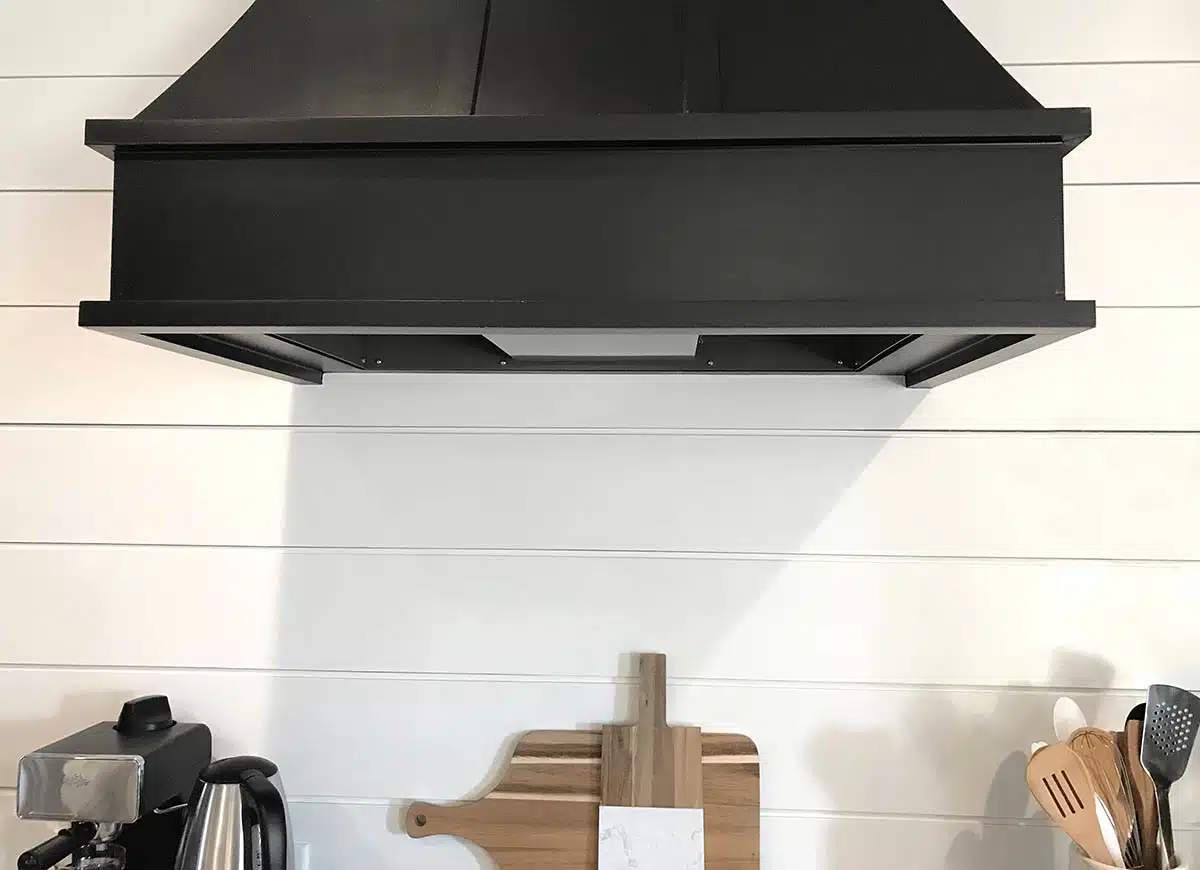
Shiplap Ceiling In Kitchen
A shiplap ceiling instantly warms a sterile white cabinet kitchen and camouflages existing ceiling cracks. Use lightweight tongue-and-groove pine planks pre-primed on all sides to minimize expansion gaps; install perpendicular to the room’s longest axis so boards feel uninterrupted. Hide seams with oversized faux-beam “strapping” every 6 feet and painted the same color as cabinets for subtlety or stained for contrast. Recessed can-lights work best; surface fixtures compete with the linear rhythm.

If your space has a gorgeous gabled ceiling like this example, you can spice it up using boards to add texture and bring more attention to the ceiling. Nowadays, you can get them in a variety of materials, finishes, and textures, so if solid wood is out of your budget or if your area is prone to termites, you might consider using uPVC with tongue and groove boards instead.
The horizontal board placement on the walls and ceiling adds a sense of continuity and harmony for simple rustic-style paneled kitchens. Open shelving and window ledge make an excellent place to bring in decor items to reinforce the country or farmhouse style you want. Using a plain white design helps tone down the dark, warm tones of flooring, creating a more balanced look. Using narrow boards on the ceiling of a small galley kitchen gives it a very retro vibe. Using these boards around the sink faucet and appliances like the oven and microwave must be properly sealed to avoid damage and make cleanup easier.
Shiplap Backsplash In The Kitchen
For a fresh alternative to tile, run PVC shiplap as a backsplash as its moisture resistance and paintability make cleanup easy. Seal seams with paintable silicone, then coat in semi-gloss enamel for wipe-proof protection. A standard 18-inch backsplash height looks balanced, but consider extending boards to the ceiling behind a range hood for a focal wall. Because shiplap reads casual, pair it with inset cabinetry or shaker fronts to keep the look cohesive rather than mismatched. For areas not exposed to too much moisture or heat, adding planks on the backsplash instead of using stone gives it a bit more grit and character, typical of country-style homes. See more pictures of shiplap kitchen backsplash here.
In this closeup of the shiplap backsplash in the kitchen, you can see how the tongue and groove planks were used to create a stylish design around the custom oven hood. Before installing these boards yourself, you’ll want to consider your options. Use a heat-resistant, Fire-rated Class 1 paneling with tongue and groove joints for any area around the stovetop. Further, protect it by sealing the product with a waterproof clear coat. During installation, make sure the board edges are not directly on the countertop, and caulk the gap to prevent any water from touching the wood.
Shiplap On The Kitchen Island
If you’re not ready to invest in covering your whole wall or ceiling with boards, maybe applying them on your kitchen island is enough to achieve the look you want. However, using this paneling for the ceiling and island together creates a harmonious design that works well together. Wrapping an island in shiplap turns it into a statement piece while guarding cabinet ends from kicks. Customize by running boards on a diagonal herringbone or chevron for modern flair, inset within simple 1×2 framing painted to match. If you prefer horizontal boards, accentuate the base with decorative X-braces at the short ends for farmhouse charm. A rich stain or contrasting color (deep navy, olive, charcoal) grounds a white-on-white kitchen and ties in with bar-stool upholstery or pendant shades overhead.

This shiplap installation on the kitchen island fascia is subtle yet is enough to give off that rustic home vibe. This is another great example of kitchen islands with painted boards. The island boards perfectly match the ceiling cladding, creating symmetry and harmony in the overall look. Homeowners can implement the design style on the front of an island with great results. By using wider boards, this central island looks bigger than it is! Visit this page for more reclaimed wood kitchen islands.
To showcase highly specific designs, some images on this website use advanced AI-generation software to illustrate ideas and room inspiration. See our editorial policy to learn more.