L-shaped Outdoor Kitchen Layout Ideas: 5 Plans From 8×8 to 16×12 (With Dimensions)

When creating an outdoor kitchen floor plan, you’ll want to carefully consider the size, required utilities, and social setting to get it right for your needs. Below, I’ve created five L-shaped outdoor kitchens, from smallest to largest, with design tips for each and why you should choose it. Each provides the measurements you’ll need, fixture placement, and pathways so you can easily see where the grill, appliances, and seating are going to be. The sizes shown in the headings are the counter footprint to the outside edges. Each drawing also has the patio space around it, so you can plan the entire space. I’ve seen an 8×8 kitchen dropped onto a concrete slab barely bigger than the kitchen itself, and it can cause problems since everything is permanent and do-overs are costly to fix. I’ve also tried to note what I’d change on each one as well because none of them are perfect; this way, you have additional options to consider based on your needs.
Compact 8×8 L-Shaped Outdoor Kitchen Layout
In this compact 8ft by 8ft outdoor kitchen, you can fit a grill, a sink, and a dishwasher in an L-shape with countertop areas on both runs.
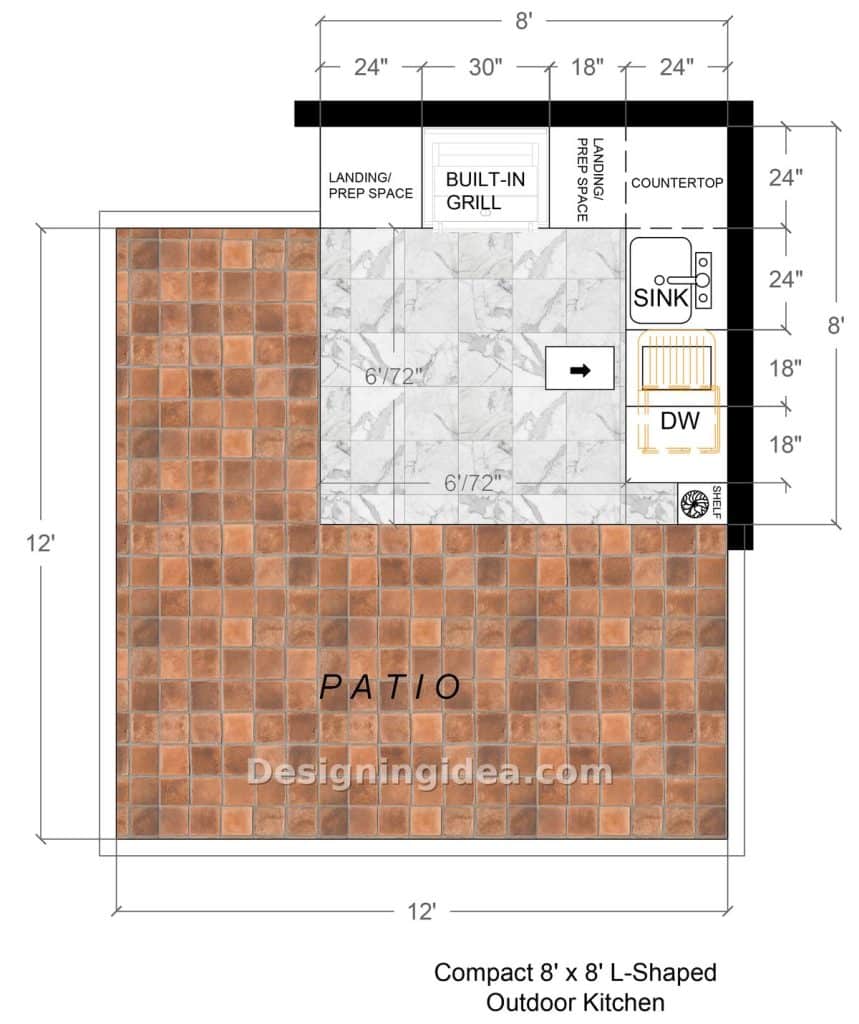
Starting with the top left leg in this compact 8×8 design, you get a 24″ landing, a 30″ grill, and 18″ on the right. Going around the corner and down, you have a 24″ sink, 18″ cabinet, 18″ dishwasher, and a small shelf shoved at the very end. 30″ is small for a grill size, but there are plenty of good 2/3 burner units that are only 30″ wide. However, if you were thinking of anything with a rotisserie, then you may want to consider cutting into the 18″ landing on the right side of the grill. When I’m cooking, I end up with the tongs and the plate that the meat comes out on. You can use the 24″ on the left as the working side for these things.
The floor inside the L area is 6 by 6, which is fine for one person, and you can squeeze in two if you’re coordinated with the other person. The total patio space is 12×12 and provides enough room for a small bistro table set for outdoor dining. If you don’t need it, it makes sense to question the dishwasher. The idea of putting it outdoors is good, but in a kitchen this small I’d think the 18″ could be better as a pull-out trash, which is something you’ll probably use every single time you cook.
Dimensions:
- 8′ x 8′ kitchen size on a 12′ x 12′ patio
- Top run: 24″ landing, 30″ built-in grill, 18″ landing, 24″ corner countertop
- Right run: 24″ corner, 24″ sink, 18″ cabinet, 18″ dishwasher
- Open floor inside the L: 72″ x 72″
Design Tips:
- Avoid adding anything tall in this plan, such as a fridge column or large pantry cabinet. On a 6-foot run, a tall unit will completely block the patio view from the grill and take up half of your counter space.
- If the house door is to the left of this kitchen, the plates come out and go onto the 24″ side. If the door is on the right, then swap the drawing so it functions well.
- That corner shelf at the end is where I’d hide the grill and appliance gas shutoff.
10×9 L-Shaped Layout With Grill and Fridge Floor Plan
With a couple extra feet of space, you can easily expand from a 30″ grill with one landing to a 36″ grill with two.
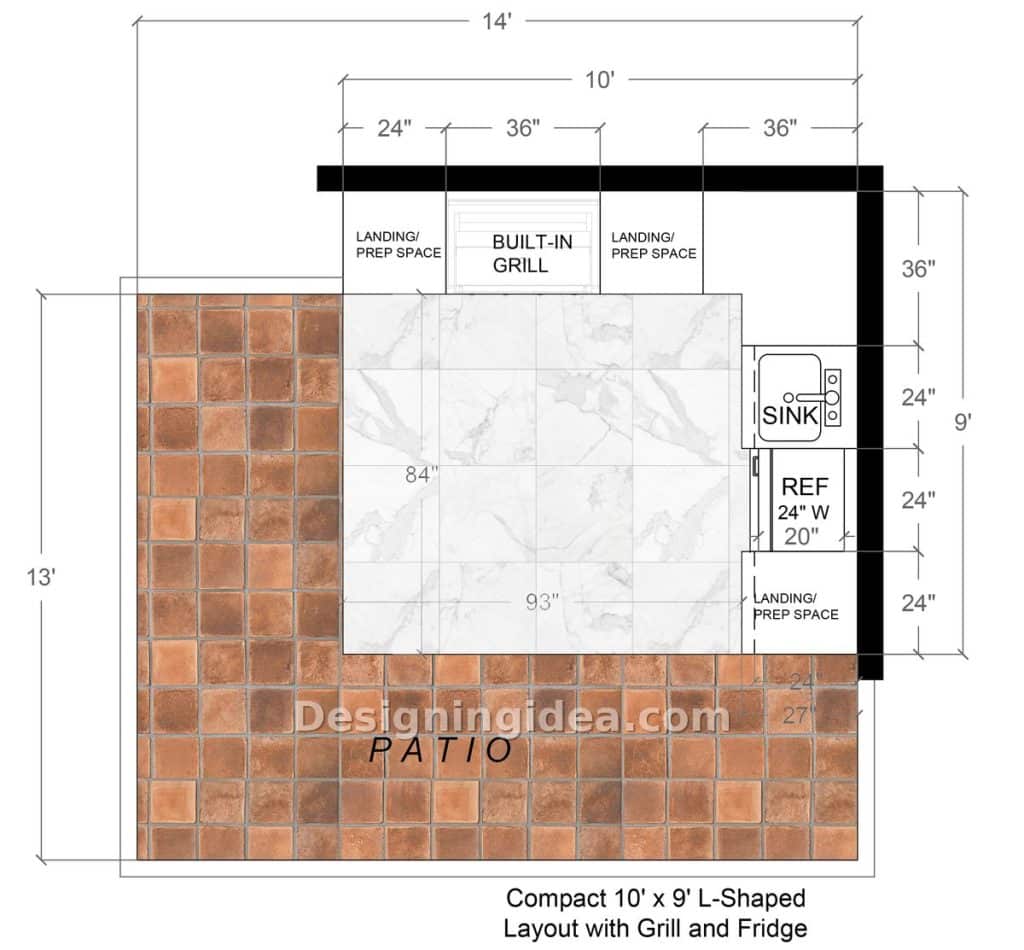
At this outdoor kitchen size, it starts to feel like you’re not fighting for each inch of space. The top 10 ft run starts on the left with a 24″ landing, 36″ grill, 24″ landing, to a 36″ corner. Both sides of the grill have the same amount of counter space, so you don’t have to worry about loading and unloading on only one side. The right leg is 9 ft and has a 24″ sink, a 24″ undercounter fridge, and then 24″ of landing at the end. The drawing shows the fridge at 20″ deep, which is typical for an outdoor-rated compact appliance. Having the fridge on the far side of the sink from the grill is a good thing, because if someone wants a drink, they go to the open end of the L and don’t interfere with the hot grill at all. Inside the L, you have an 84 x 93-inch floor area. The patio is 14 x 13, which could accommodate a table and chairs if you don’t mind cutting into some of the floor space dedicated to the kitchen.
Dimensions:
- 10′ x 9′ kitchen size on a 14′ x 13′ patio
- Top run: 24″ landing, 36″ built-in grill, 24″ landing, 36″ corner
- Right run: 36″ corner, 24″ sink, 24″ wide x 20″ deep fridge, 24″ landing
- Open floor inside the L: 84″ x 93″
Design Tips:
- The 36″ corner counter looks generous on the plan, but can be difficult to reach the back half of it. You can place some of your accessories here, but it will only be somewhat useful as a prep surface due to its reach.
- Get the gas stub and the fridge outlet in the right leg before any masonry gets installed so you’re not having to backtrack later.
- If you’re only cooking for four most nights, you can make the end landing a 24″ cabinet and keep the outdoor plates outside all year long for convenience.
12×10′ Entertaining Layout With Bar Seating Design
By adding a narrow peninsula with three stools on the back of the L, you suddenly have a place for eat-in dining and entertaining guests.
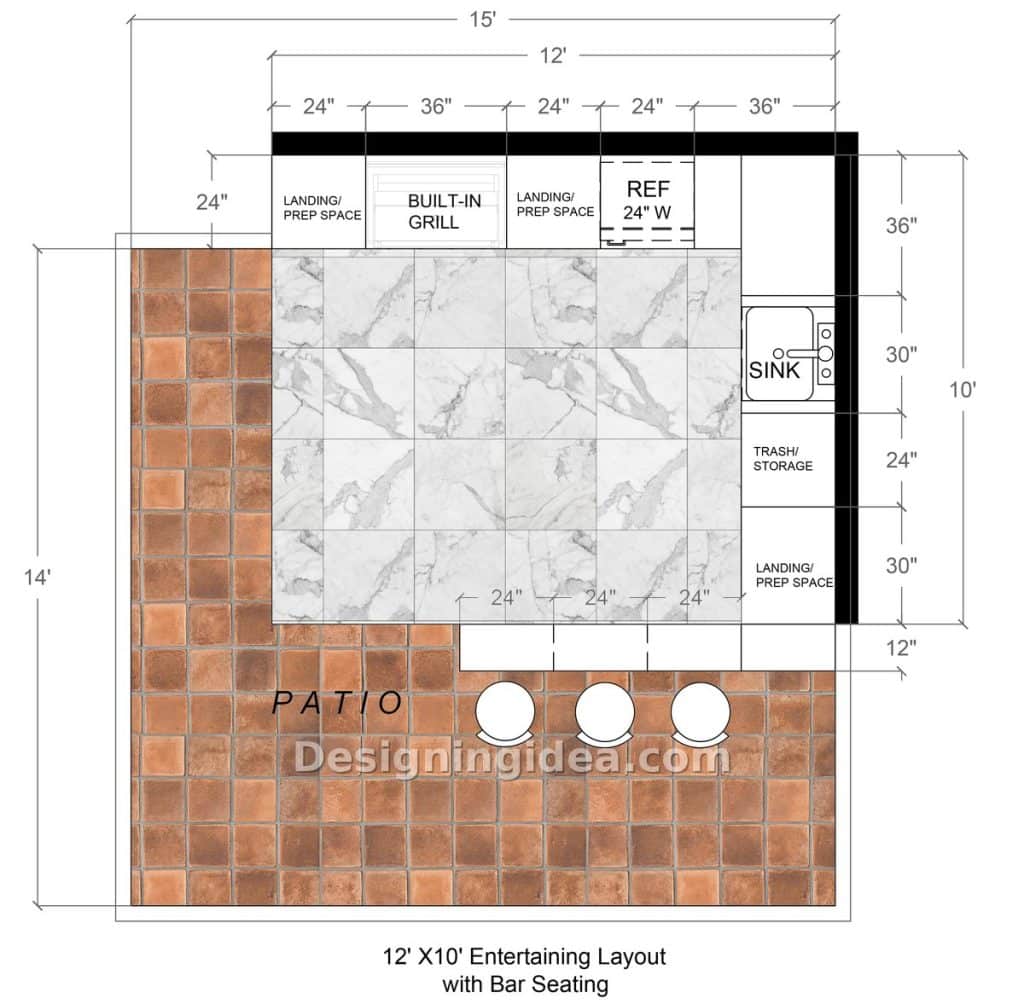
With twelve feet of length up top, it means the grill and fridge can share a wall. You get a 24″ landing, 36″ grill, 24″ landing, 24″ fridge, leading to a 36″ corner run. With the fridge moved to the upper leg, it opens up quite a bit on the lower side. You get a 30″ sink base, 24″ trash and storage cabinet, with a 30″ landing at the end. The 30″ sink is a good thing to have, since at only 24″ it feels more like a bar sink. A 30″ sink can fit items like larger bowls or a sheet pan.
An interesting addition to this layout is the bar. It runs along the bottom of the right leg, with room for three seats at 24 inches of width each. The downside is there is currently no room for the knees to go under the counter. To fix this if room allows, you would need a deeper peninsula with about a 12″ overhang to fit the legs under. If the bar is where your people are going to end up then go to 15″ of overhang and put a steel bracket underneath it.
The stools face the sink and grill, so guests have a perfect view of you doing prep work, but not so much when you’re at the grill. If that bothers you you could potentially mirror the whole thing. Put the bar behind the grill wall and the fridge on the shorter leg where the drinks are being served for a design that uses the same components, with a different presentation.
Dimensions:
- 12′ x 10′ kitchen area on a 15′ x 14′ patio
- Top run: 24″ landing, 36″ built-in grill, 24″ landing, 24″ fridge, 36″ corner
- Right run: 36″ corner, 30″ sink, 24″ trash/storage, 30″ landing
- Bar: three 24″ seats, 12″ overhang, 24″ counter depth
Design Tips:
- Bump the bar height up to 42″, and leave the working counter at 36″. A 6″ step will hide the sink from anyone sitting down and provide more of a focal point.
- Leave a minimum of 36 inches of patio behind the stools, since people will be walking behind the seated guests with plates, and anything less could create obstacles.
- Separate the lighting over the bar from the task light on the grill. Use low, warm lighting over the seats, and bright, aimed lighting on the grates.
14×10 Family Cooking Layout With Side Burner Floor Plan
By keeping the sink and fridge away from the grill, you create a more kid-friendly layout that offers separation from hot surfaces.
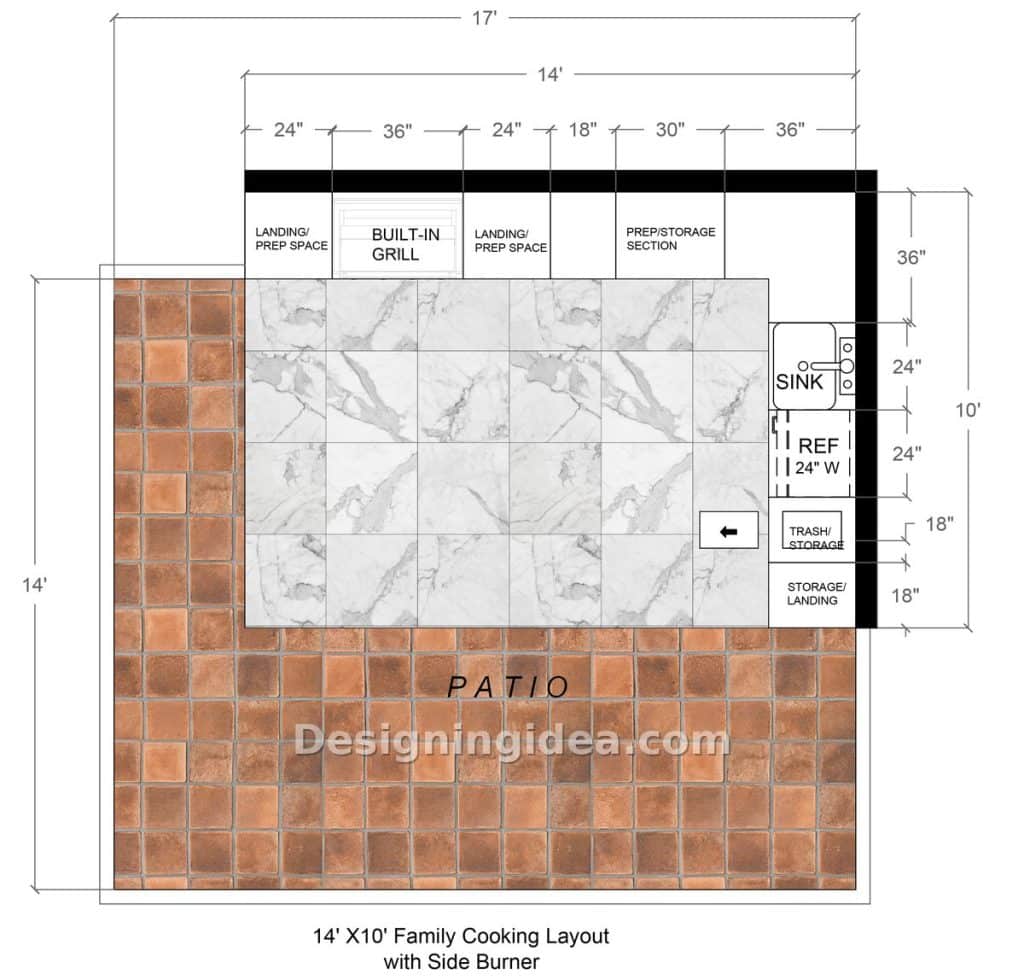
Most of the outdoor kitchens I see are just a grill and a lot of cabinet doors; however, when you add a large grill with a side burner, it’s a completely different proposition. You’ve got the space to do multiple courses of food on the grates. That’s what the extra 2 feet of top run is for on this one. The top sequence runs from the 24″ landing, 36″ grill, 24″ landing, 18″ extra space for plate warmers or other undercounter appliance, 30″ prep and storage, and to a 36″ corner. There’s a 24″ counter span between the grill and the burner, so you have room for holding multiple plates on either side.
The right-hand leg is the one that’s got the bulk of it, with a 24″ sink, 24″ fridge, and then two 18″ cabinets at the far end. One of those is labeled trash and storage; the other, storage and landing. Four different elements in 6 feet of counter, but none of them require the elbow room that a burner does, so it’s quite acceptable. There’s no seating drawn, which is intentional. The patio is 17×14 with a good 4 feet of paving right past the counters, so it’s a kitchen designed for a family that will eat at a table out there rather than at the counter. Inside the L, there’s approximately 7 by 8 feet of floor.
Dimensions:
- 14′ x 10′ kitchen area on a 17′ x 14′ patio
- Top run: 24″ landing, 36″ built-in grill, 24″ landing, 18″ side burner, 30″ prep/storage, 36″ corner
- Right run: 36″ corner, 24″ sink, 24″ fridge, 18″ trash/storage, 18″ storage/landing
Design Tips:
- The side burner base requires a vent cutout just like the grill base does. It’s a gas appliance in a sealed box. Vent the grill and burner separately if they’re far apart.
- If you have a home with natural gas, run a line from your home so you’re not constantly needing to change out propane tanks for more convenience.
- Build the 30-inch prep section as drawers. Doors outdoors mean crouching and reaching into a damp cave to find your skewers.
- Paper towels and the trash go on the same right leg to keep the grill area clear of all the stuff that would make it look like a mess.
16×12 Luxury L-Shape Outdoor Kitchen Layout
This outdoor kitchen layout offers a lot of storage and elbow room with an extra-large grill and range top.
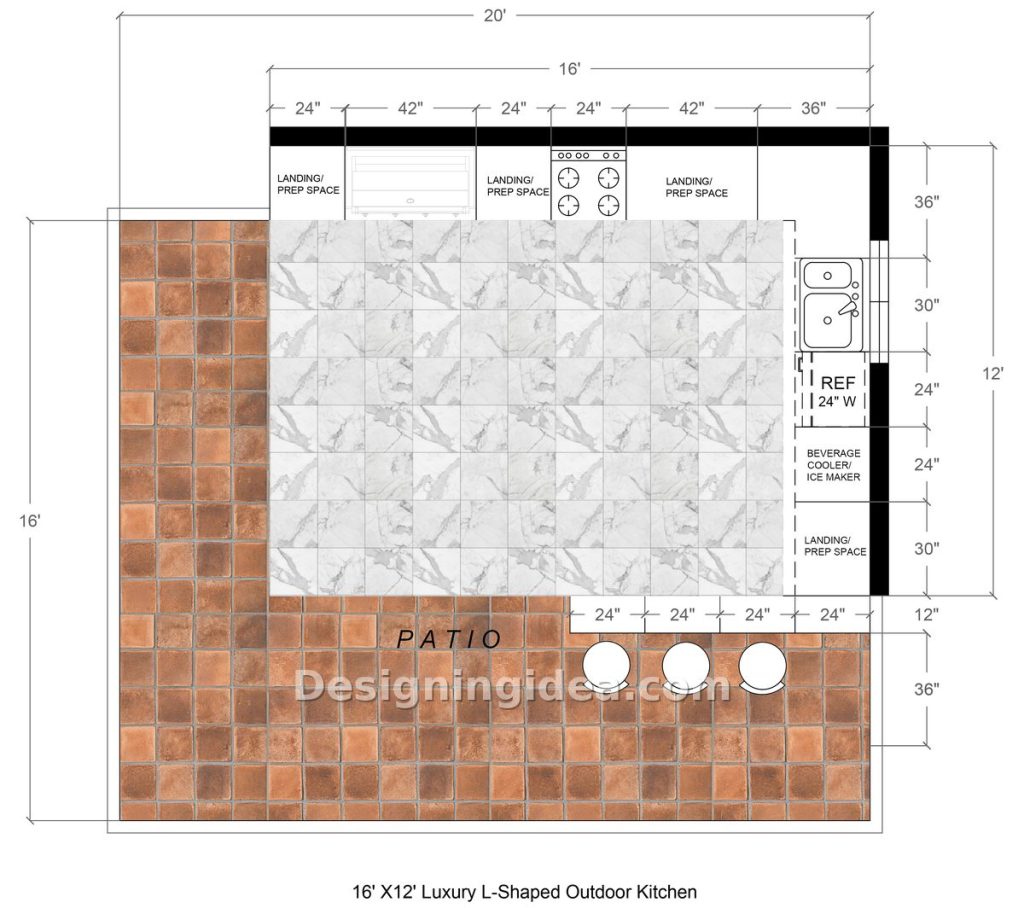
The top run is 16 feet long, spanning from a 24″ landing, 42″ grill, 24″ landing, 24″ 4-burner cooktop, 42″ prep counter, to a 36″ corner. A 42″ grill is a real piece of kit that generally offers a sear zone and a rotisserie motor, and the 42″ prep counter adjacent to the cooktop is the first large work surface in any of these five plans. You could lay out a full meal on that prep counter and still have space for a cutting board, bowls, and other fixings. Down the 12′ leg we have a 30″ double sink, 24″ fridge, 24″ beverage cooler/ice maker, and 30″ of landing at the end. Two cold boxes, actually: one for the chicken, one for the drinks, so you’re not opening the chicken fridge looking for a soda is a little luxury that makes sense, especially with kids around.
You get four bar seats this time, with 24″ each along the lower right, and 36″ of patio behind the stools. If space allows, go for a deeper peninsula countertop with a 12″ overhang for legs to go more comfortably. The bar drops behind the fridge and cooler run so the drinks are right at the bar end and you can just hand a beer across without anyone having to get up.
What you lose at this size is the kitchen being close, since the floor inside the L is about 10 by 9. One thing to consider is the grill-to-sink distance is eight or nine steps. If you’re cooking alone, this can become tiring, and I’d quite frankly rather have the 14×10 for a one-person operation. Two cooks, with one on the grill wall and one on the sink leg, is about as good a backyard as you can get. If you want the counter space without the walking, a U-shaped outdoor kitchen floor plan wraps the sink back toward the grill. The patio is 20×16, which is more than adequate for a full dining table, and you’ll want one, as four stools won’t feed the crowd that a 42-inch grill can.
Dimensions:
- 16′ x 12′ kitchen size footprint on a 20′ x 16′ patio
- Top run: 24″ landing, 42″ built-in grill, 24″ landing, 24″ side cooktop, 42″ prep counter, 36″ corner
- Right run: 36″ corner, 30″ double sink, 24″ fridge, 24″ beverage cooler/ice maker, 30″ landing
- Bar: four 24″ seats, 12″ overhang, 36″ clearance behind stools
Design Tips:
- Use two counter heights, with the grill wall at 36 and if the main cook is on the shorter side, then bring the 42″ prep down to 34.
- The cooktop needs its own range hood or an open roof over it. Four burners under a solid pergola roof will smoke the bar out and be unsafe and uncomfortable for anyone nearby.
- Light the long run in three zones with three switches, the grill, cooktop, and prep.
Designer Tips for Any L-Shaped Outdoor Kitchen Design
Consider the grill smoke – Watch which way the smoke goes before you pick a wall to put your grill. Stand where the grill will go and see how the wind usually blows to know the best place to put the elements such as the prep counters and seating.
Think about counter depth – Outdoor counters often go deeper than their indoor counterparts. Most built in grills will require about 30″ of depth as opposed to the 24″ you’re used to inside, so you’ll want to check the cutout size in the grill’s installation manual before you pour concrete or start framing.
Do you need to insulate the grill? If the base is constructed of wood or steel studs rather than solid masonry then the grill most likely will need an insulated jacket. The manual will specify the clearances to combustible siding. Both of those are frequently missed when the kitchen is against the house and are important to do right.
Don’t waste the dead corners – Put a removable access panel in the corner since it’s the obvious place for the gas shutoff and water valves.
Pick countertop materials that can handle the sun – Granite is good for handling UV rays, however, a lot of the quartz manufacturers won’t warrant their product if you use it outdoors as sunlight will discolor it. Tile is often used, but remember that grout cleaning is a maintenance issue that can become a problem later on.
Make sure you use outdoor rated appliances – Anything that’s cold such as a fridge or wine cooler has to be outdoor rated.
If installing a sink, plan the drain early – Depending on local code, it can either feed into the house drain or dump into a dry well. It’s expensive to decide after you’ve framed in the design and put the counters up.
Outdoor outlets will need to be GFCI protected – You need to have at least one protected outlet in a place where you’ll use it.
Consider your social space – An indoor kitchen is generally for cooking while an outdoor one is often for gathering. Check pathways and distances carefully, so friends and family aren’t accidently bumping into hot surfaces or breathing noxious fumes from the grill.
To showcase highly specific designs, some images on this website use advanced AI-generation software to illustrate ideas and room inspiration. See our editorial policy to learn more.