Mudroom Laundry Room Layouts: What Fits in 7×12, 8×10, 10×10, 10×12 & 12×12

By combining a mudroom and a laundry room, you keep dirty clothing from outside isolated to one part of the house, ideally off the garage or back door. Many houses combine these two functions because of space constraints; the problem is that their layouts aren’t always compatible. One brings in items like wet boots, dog leashes, and backpacks, while the other requires a clean countertop and somewhere to put down a basket of folded towels without any muddy clothing landing on it.
The five mudroom and laundry floor plans I’ve created below all follow the same fundamental design principles with machines and sink on one wall, and a bench and cubbies on the other side. The variation between each is in how much floor space you devote to each function and whether you use stacked or side-by-side machines. The smallest plan is a 7×12 corridor style, letting you walk straight through, and the largest is a 12×12 square with plenty of open middle space to park a stroller and a drying rack without getting in the way.
All the plans call for 30″ wide front loaders at 34″ deep, so if you’re using the more common 27″ units, you’ll gain 6″ somewhere, and I’ll indicate where that is most useful as we go along. One figure that applies to all five is that you need 36″ of open floor in front of the machines. The front loader door swings out about 24″, and you need to be standing behind it with a basket so it functions as it should.
7×12 Narrow Mudroom Laundry Walk-Through Layout
By stacking the washer and dryer with a folding counter and sink on one side, and a walkway, shelf, cubbies and bench on the other, you transform a narrow room into one that’s functional.
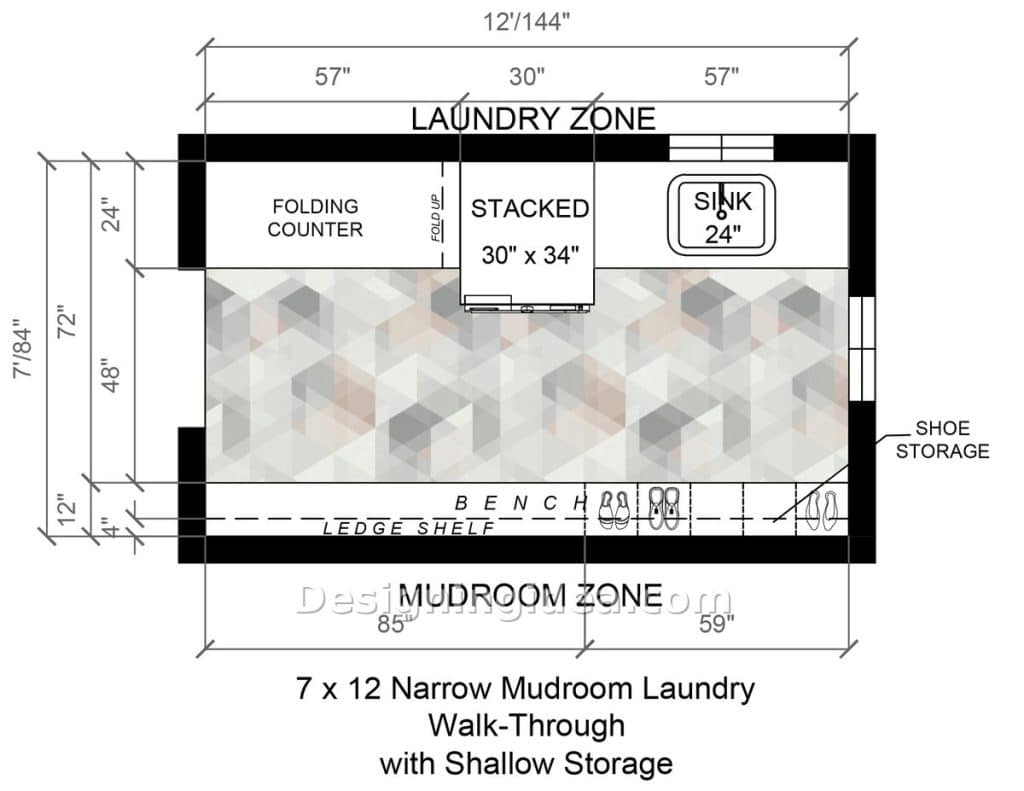
This design works best for off the back hallway that sits next to the garage. The door is on the short wall at one end, so you walk a full 12 feet through to get to the window at the end. Along the top wall there’s a 57″ folding counter on the left, followed by a stacked washer and dryer, and a 24″ sink. Stacking is why this works, because you gain extra space for a sink and more countertop for folding clothing. Two machines side by side would consume 60″ of the 144″ wall and push the sink or counter out. One machine column takes up 30″, and the counter is 24″ deep, which is more than sufficient to fold what you need. You could go with machines that are not as deep if you want to stop them from sticking out as much into the aisle.
The bottom wall is focused on the mudroom functions with a 12″ deep bench with a 4″ ledge shelf above it and shoe storage underneath at the far end. 12″ is a perching bench rather than a deep sitting bench, which makes it ok for taking off dirty boots, but not a place to sit for long. The trade-off is you get a wide 48″ aisle between the bench edge and the counter edge, which is enough for two people to pass by each other.
During planning, look at the height of your stacked machines. A stacked pair is around 75-80″ tall, and the dryer controls end up at eye level or above for anyone under about 5’6″. A washer/dryer stacking kit also requires a dedicated vent run that doesn’t snake, so you’ll want to ensure that it has proper vent access so there are no maintenance issues later on.
Dimensions:
- Room size: 7 feet by 12 feet (84 by 144 inches)
- Laundry wall: 57-inch folding counter, 30-inch stacked unit, 57-inch sink run with 24-inch sink
- Counter and sink depth 24 inches, stacked unit 30 by 34 inches
- Bench 12 inches deep with a 4-inch ledge shelf behind it
- Clear floor between bench and counter: 48 inches
- Bench run 85 inches, shoe storage section 59 inches
Design Tips:
- Hang the coat hooks above the ledge shelf at two heights, approximately 48″ and 60″ off the floor so that kids and adults can both easily access them when needed.
- Put your hooks, and hamper near the outside exit in the area closest to the garage or back door so that muddy clothes stay clear of the clean side.
- Choose a pocket door if possible, as an inswinging door takes up 30″ of the one spot where a laundry basket would most likely go.
- Run the folding counter all the way to the wall and keep it at the size specified so it can more easily be folded up with any problem.
8×10 Mudroom And Laundry Combo With Side-by-Side Machines Floor Plan
This plan places a side-by-side washer and dryer at the top, storage at the bottom, and a bench and shoe cubbies on the left so everything is easy to access without feeling crowded.
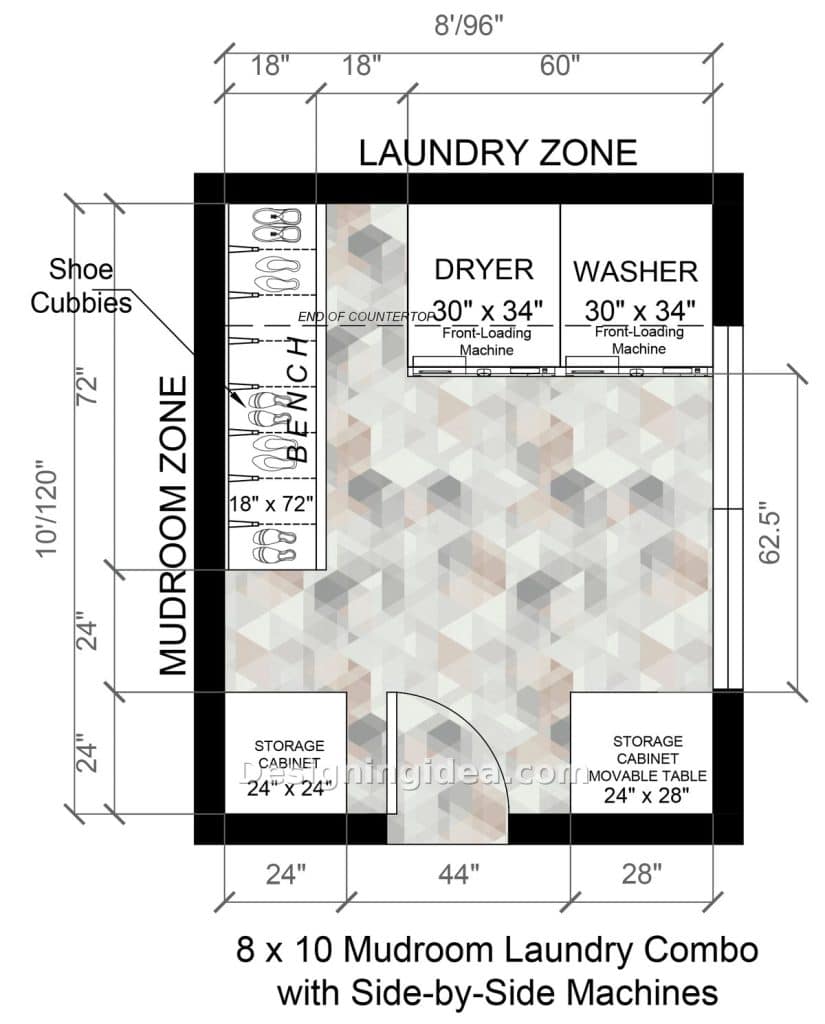
With an 80 sq ft laundry room, you have the space for side-by-side machines, a full bench, and two storage cabinets. It all fits, as nothing in the room is deeper than it needs to be. The washer and dryer take up 60″ of the 96″ top wall, with the remaining 36″ on the left shared with a bench and shoe cubbies underneath. The machines are front loaders and are placed so the bench doesn’t interfere with the machine doors.
The door is on the bottom wall, and it’s hinged to swing into the room with a 24″ x 24″ storage cabinet on one side and a 24″ x 28″ cabinet with a movable table on the other. The door swing clears both of those, but does cut into the walkway slightly, but doesn’t interfere with the seating. A 24″x28″ movable table is a smaller fold-up surface than the fixed counters in the other plans, but can be rolled out when needed and stowed out of the way when it’s not. For more folding space, you can run a countertop over the machines as specified in the drawing. With 27″ machines, it would be easier to reach the counter, which may be helpful for those who are shorter.
Dimensions:
- Room size: 8 feet by 10 feet (96 by 120 inches)
- Washer and dryer 30 by 34 inches each, 60 inches total on the top wall
- Bench 18 by 72 inches along the left wall with shoe cubbies below
- Storage cabinet 24 by 24 inches, second cabinet with movable table 24 by 28 inches
- Door opening on the bottom wall roughly 44 inches between the two cabinets
- Clear floor from bench edge to right wall about 62.5 inches
Design Tips:
- Swap the inswing door for an outswing or a slider if the room beyond will allow it, which would give you more interior floor space.
- Make the shoe cubbies open-fronted rather than adding a door so they don’t get in the way of the side of the machines.
- A wall-mounted drying rack above the movable table will fold flat when the table is parked somewhere else, and the two make a more efficient ironing setup.
- Since the bench is away from the entry, you’ll want a durable floor that can handle standing water, such as porcelain tile or luxury vinyl plank.
10×10 Mudroom With Laundry Room And Galley Layout
With a pass-through laundry and mudroom combo like this, having a large 62″ center aisle and every fixture flush against the side walls makes a lot of sense.
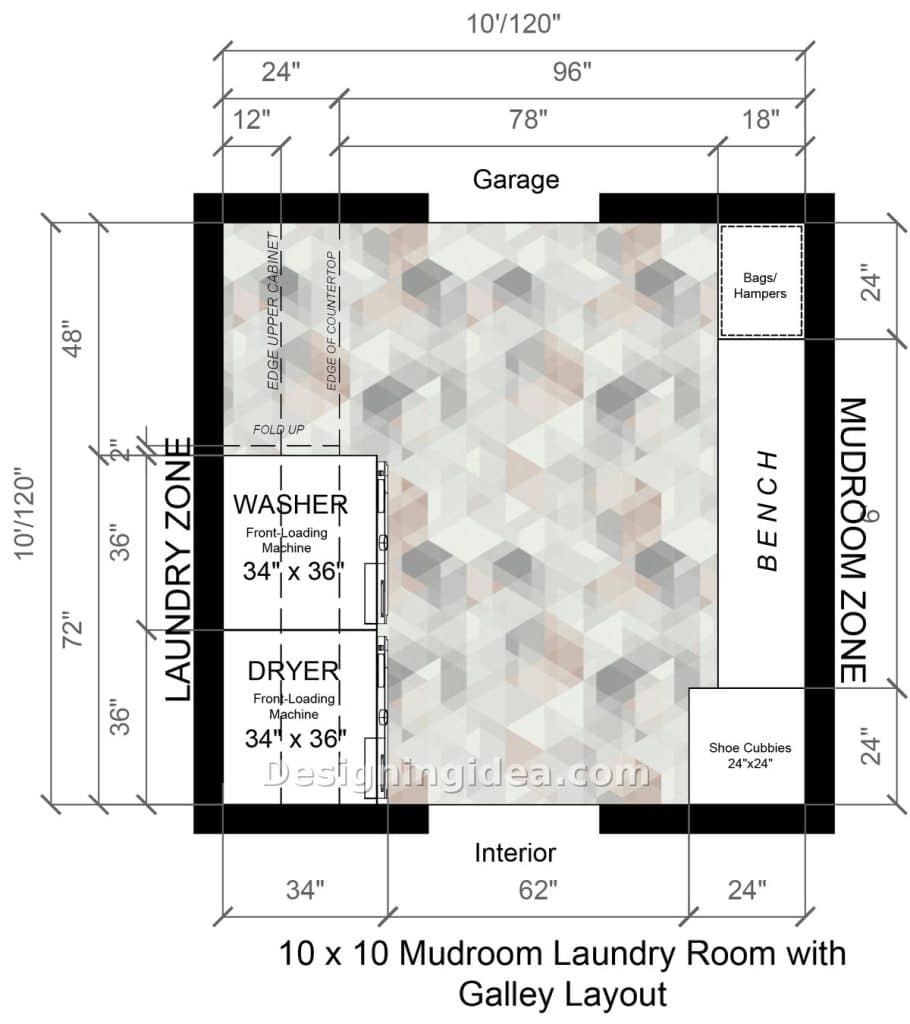
A hundred sq ft arranged as a galley works well for a shared laundry and mudroom design next to the garage leading into the rest of the home. The garage door is set at the top, with the internal door at the bottom and a path running straight down the middle. The laundry area takes the left-hand wall, and the mudroom takes the right. On the left, we have the side-by-side washing machine and dryer in a row along the wall, each measuring 34″ wide by 36″ deep, with the dryer closest to the interior door. Above them is a 48″ run of upper cabinets and a 24″ deep fold-up countertop.
The right-hand wall has a spot for a hamper, followed by an 18″ deep bench running most of the length of the room, leading to a 24″ x 24″ shoe cubby. The bags and hampers nook at the garage end makes perfect sense for shedding your muddy clothes so they never have to cross the room until you’re ready to deal with them. Walls at both ends have 18″ returns beside each door, which is where the hooks would go.
Dimensions:
- Room size: 10 feet by 10 feet (120 by 120 inches)
- Washer and dryer 34 by 36 inches each, side by side along the left wall
- Upper cabinet 12 inches deep, fold-up counter 24 inches deep, both 48 inches long
- Bench 24 inches deep on the right wall, 72 inches long between the hamper nook and the cubbies
- Bags and hampers nook 24 by 24 inches, shoe cubbies 24 by 24 inches
- Center aisle 62 inches wide at the bench, 78 inches between door openings
Design Tips:
- Mount the fold-up counter on heavy duty hinges that are rated for 50lbs or more. A basket of wet towels on a light-duty bracket is a sure way to end up with a counter that’s sagging after a short time.
- The 18″ wall returns beside each door are the hook walls. Use four hooks per side at 60″ to take the coats without the hems dragging on the bench.
- Protect the wall behind the hooks, as wet items can damage the paint after some use, by using a scrubbable semi-gloss paint.
10×12 Mudroom And Laundry With Sink and Folding Counter Design
This plan neatly divides the mudroom from the laundry with a folding counter next to the dryer and a sink next to the washer on one side and benches, storage, and cubbies on the other.
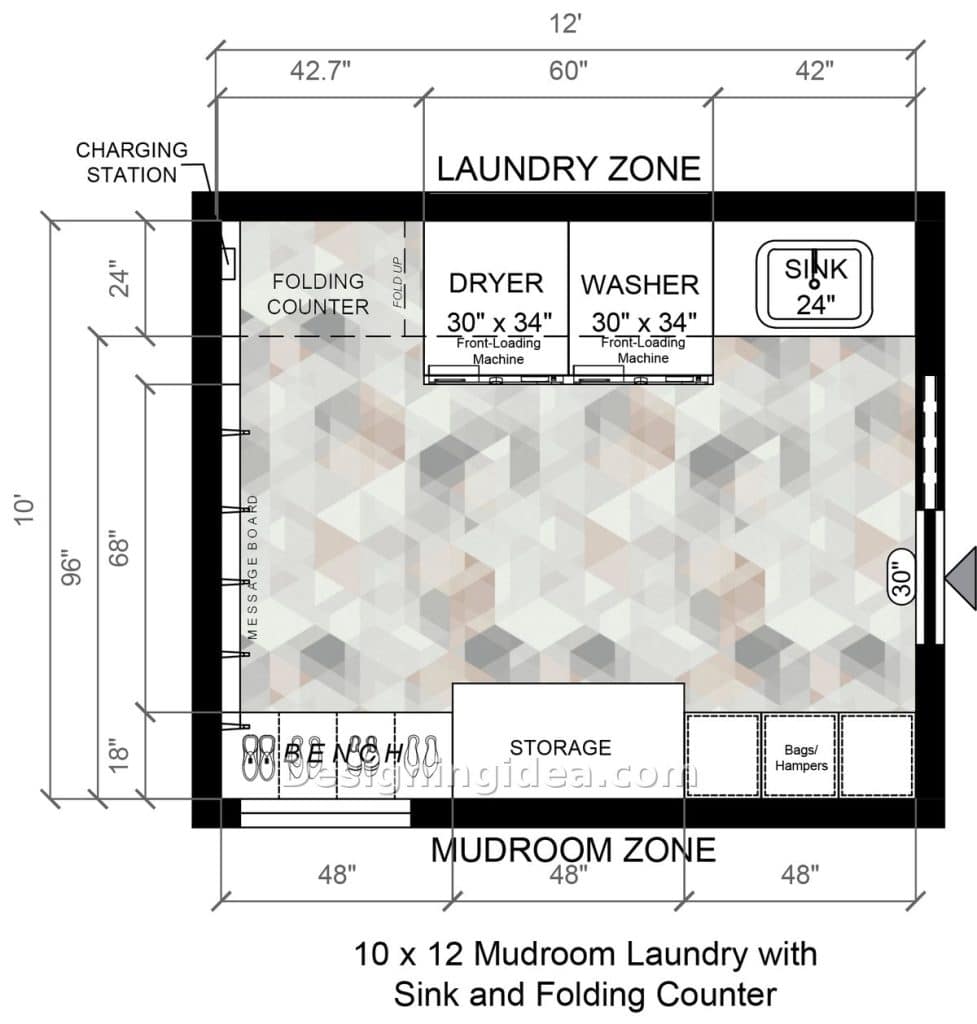
This is the plan I’d build if I had the room to build out a large laundry and mudroom combination. The laundry area runs along the entire 12′ top wall, starting from the left with a 42.7″ folding counter with a charging station, to the dryer and washer in the middle, and a 24″ sink on the right. The counter next to the dryer is the one I’d choose because it’s 24″ deep by 42″, which is big enough for folding bulky items and is close to the door of the dryer. Most combined rooms have the counter across the room from the machines, and you often end up folding on top of the dryer anyway.
The mudroom area runs along the full 12′ bottom wall in three 48″ bays, a bench with shoe storage, a storage unit, and then three slots for bags and hampers. There is a 30″ sliding door on the right wall, roughly center. A message board and hooks run down the left-hand wall between the two zones. The two zones don’t touch at all, and unlike the 10×10 galley, the traffic path doesn’t run between them. You can have one person at the sink rinsing muddy clothes and another at the bench with their back to them, and the 68″ of open floor in the middle will handle them both and still allow room for a basket on the floor.
Dimensions:
- Room size: 10 feet by 12 feet (120 by 144 inches)
- Laundry wall: 42.7-inch folding counter, 60 inches of machines, 42-inch sink run
- Washer and dryer 30 by 34 inches each, sink 24 inches wide, counter 24 inches deep
- Mudroom wall: three 48-inch bays (bench, storage, bags and hampers) at 18 inches deep
- Door 30 inches wide on the right wall
- Open floor between zones: 68 inches
Design Tips:
- Use a deep single bowl utility sink measuring 10″ or more, since a shallow bar sink is going to be used for soaking and it’ll splash.
- Run the charging station outlet in the upper cabinet above the counter rather than on the wall. Having cords on a folding surface tends to get buried under the laundry and pulled off.
- The 48″ storage bay in the middle of the bench wall is tall cabinet space, allowing things like a broom, stick vacuum, and a shelf for the dog towels; that’s what we’re putting in there rather than any more cubbies.
12×12 Family Mudroom With Laundry And An Open Center Layout
With a large open floor space between the machine wall and the bench, you have room for a busy household of kids to easily get through without bumps and bruises.
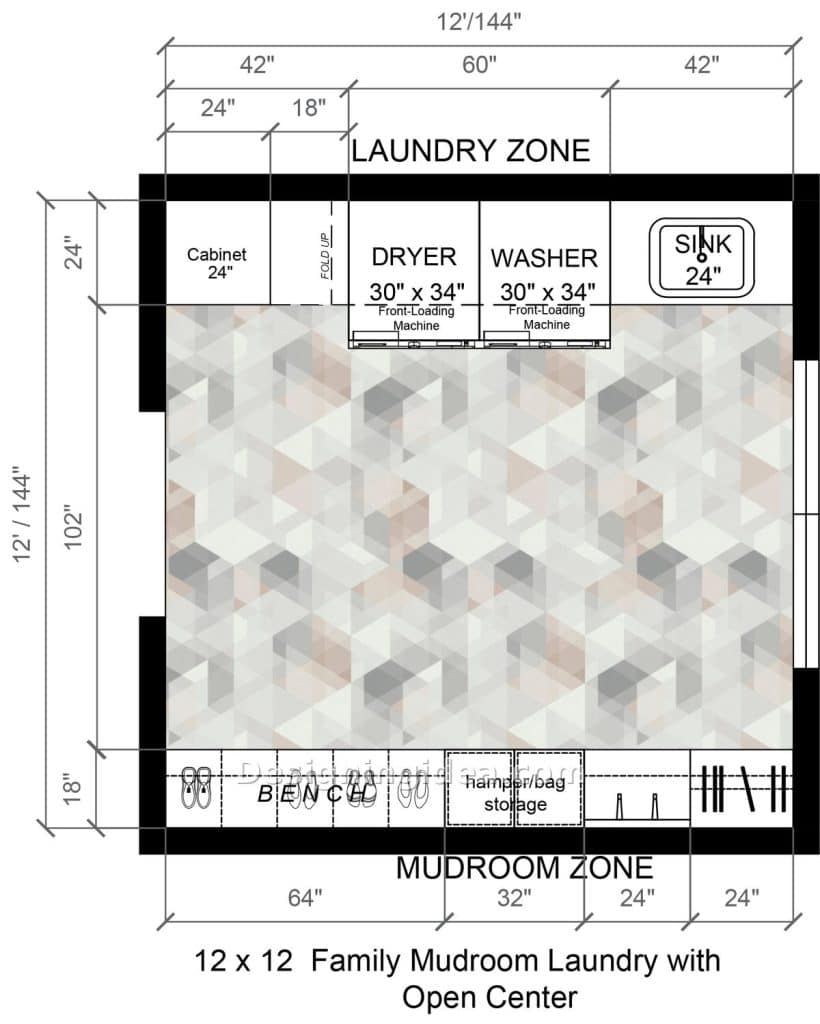
This 12×12 laundry mudroom design has the same top wall as the 10×12, almost exactly. On the left, we’ve got a 24″ cabinet and an 18″ fold-up. 60″ of machines, followed by a 24″ sink in a 42″ run. The middle section measures 102″ deep and is left empty. The extra 2 feet gives you more floor space in between, which is ideal if you have a busy household with many people using the room at the same time. Where the 10×12 gives you room for two people, this will give you room for more than two people, a stroller, and a folding drying rack, which you don’t have to take down. A family with three kids in sports will fill that floor up pretty fast. A couple, on the other hand, might find it too big and want to put an island in it. An island in a laundry room is a good idea until you measure it. For instance, a 24″ deep island with 36″ around each side requires 96″ of floor space, so a 12′ room could barely work, but you’d lose the open feel that makes it a proper mudroom, and any muddy traffic would have to split around it.
For the mudroom side, you’ve got a bench on the bottom wall that measures 64″ long with four shoe bays underneath it, then a 32″ hamper and bag section, and a 24″ open bay with the hooks in it, and a final 24″ tall storage section. Use the tall cabinet for items like brooms, vacuums, hockey sticks and umbrellas. The clothes hamper is in the middle of the mudroom side and placed directly across from the laundry machines so you can easily retrieve dirty apparel as it makes its way in.
Dimensions:
- Room size: 12 feet by 12 feet (144 by 144 inches)
- Laundry wall: 24-inch cabinet, 18-inch fold-up section, 60 inches of machines, 42-inch sink run
- Washer and dryer 30 by 34 inches each, sink 24 inches, cabinet and counter 24 inches deep
- Mudroom wall: 64-inch bench, 32-inch hamper and bag storage, 24-inch hook bay, 24-inch slot storage, all 18 inches deep
- Open floor between zones: 102 inches
Design Tips:
- If you do add an island, keep it to 24″ x 48″ on casters so it can be moved against the left wall when you need the room to work as a mudroom again.
- Four shoe bays under a 64″ bench give you 16″ wide slots, which is enough to hold two adult pairs in each bay or four kids’ pairs. Work out the family’s shoe requirements before you build, so they fit your needs.
- Give each person in the family their own spot and cubby so the room stays tidier and runs more efficiently.
Laundry and Mudroom Design Considerations
Plan the storage for long items – Items such as umbrellas, hockey sticks, and the broom often end up in a corner unless you build a narrow, tall cabinet or bay for them.
Ventilation – All of your family’s wet gear and a running dryer can make the room humid. Installing an exhaust fan helps, and it should be sized like a bathroom’s at about 1 CFM per square foot if you’re dealing with a lot of dripping boots, jackets, kids, or dogs.
Avoid long dryer vent runs – Maintenance is so much easier if you keep the dryer vent short and straight.
Lighting – For added convenience, add under-cabinet lights over any folding counter, at about 3000 to 4000K, so you can spot any clothing stains. Overhead lights by themselves will leave the countertops in shadow.
Outlets – Most area building codes require GFCI protection near a sink and in the laundry areas. If you want a charging station, put the outlet inside a cabinet so cords don’t spread across the counter and they don’t interact with wet items.
Noise – If the shared mudroom/laundry backs onto a kitchen or a bedroom, use anti-vibration pads under the washer make so that the spin cycles run much quieter.
To showcase highly specific designs, some images on this website use advanced AI-generation software to illustrate ideas and room inspiration. See our editorial policy to learn more.