7 Studio Room Layout Ideas With Dimensions (416 to 616 Sq Ft)

In a studio, the bed, sofa, and kitchenette must share the same room, and how you plan the layout determines whether it feels crowded or livable. These seven studio floor plans range from 416 to 616 sq ft, and each offers a different way to arrange pathways and key elements. You’ll find designs with a Murphy bed, 12″ open shelf, closet wall, kitchen island, and home office. Every plan is drawn up with precise measurements: zone sizes, the length of the kitchen run, and the width of the walkway between the sofa and the bed. If you’re comparing it to a unit you’re about to sign for, those are the measurements you need to tape out on the floor to get similar results. One pattern that is common to all seven of them is that the bathroom and the kitchen are on one side and the bed is as far from the entrance as the plan will allow. This setup offers the most functionality and keeps the bed as far from the common areas as possible, giving you more privacy where you need it.
Micro Studio With Murphy Bed, 16×26 Layout
By folding a queen Murphy bed into the wall, it turns a 13 x 11 sleeping area into daytime floor space, which is the only way 416 sq ft can accommodate the three zones and feel inviting.
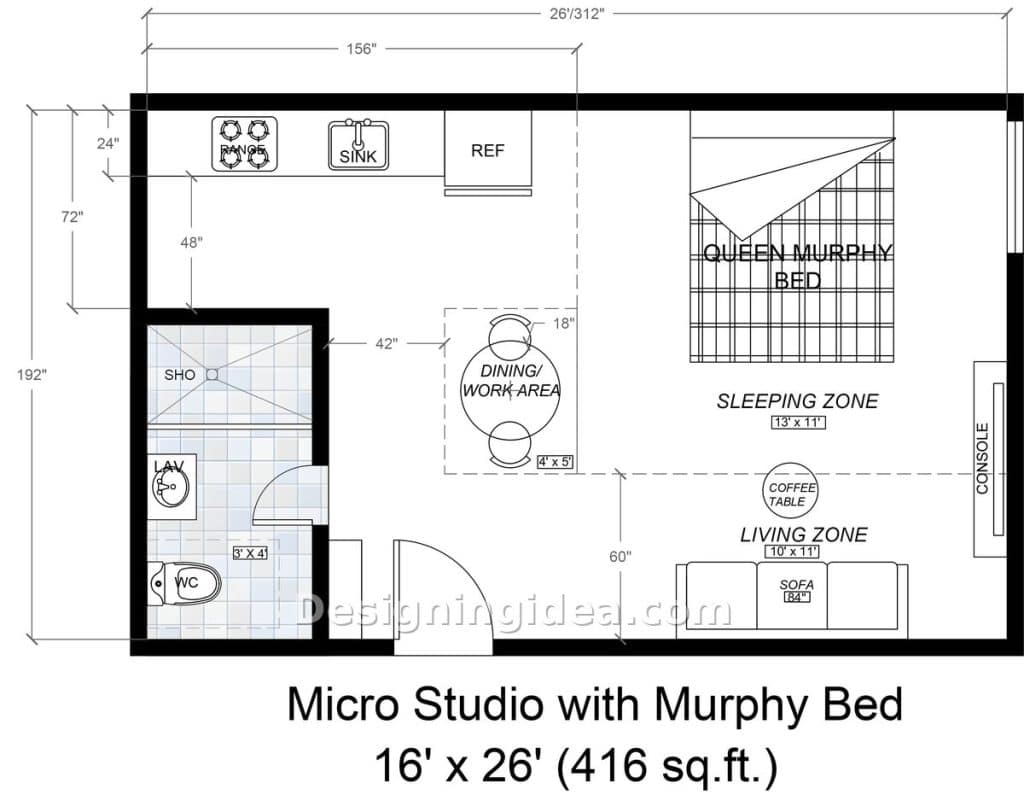
This 416 sq ft studio apartment is the smallest plan in the set and the one I’d go with if I was living on my own in an expensive city for a year. The queen-size Murphy bed is located on the far right wall inside a 13 x 11 sleeping area. The sleeping area faces toward the living area with an 84″ sofa, round coffee table, and console. In the sleeping area, with the bed down, there are about 60 inches between the foot of the bed and the back of the sofa, which is enough without feeling too tight in either space.
The kitchen is placed on one wall, running along the top, measuring 156″ long, starting with the range, to the sink and fridge in a line with a 24″ counter depth. The bathroom is tucked into the lower left corner with a 3′ x 4′ zone for the toilet and a sink plus a shower above it. That means all the plumbing is on one side of the unit so the rest of the floor can be left open. The dining and work area is a central 4 x 5 patch with a round table and two chairs, halfway between the kitchen and the entry door. You go past the dining set every time you walk from the door to the bed or kitchen, so you’ll want to size it correctly so it doesn’t interfere with your pathway through.
Dimensions:
- Studio size 16′ x 26′ (416 sq ft)
- Kitchen wall run 156″ with 24″ deep counters
- Sleeping zone 13′ x 11′, living zone 10′ x 11′
- Bathroom 3′ x 4′ plus shower, 48″ clearance in front of the kitchen counter
- Dining/work area 4′ x 5′ with 42″ to the bathroom wall
Design Tips:
- Buy a Murphy bed model with a built-in sofa or desk face if you can afford it. This way you can devote more space to the living area instead of leaving an open space during the day. The trade-off is potentially moving the coffee table every night.
- The 60″ gap between the bed and the sofa is a good place to place a low bench or a pair of ottomans. Anything taller than the sofa back will make the room look as though it’s been split in two when the bed is put down.
- Keep the dining table round, since a 4ft by 5ft square one would leave the corners of the table sticking into the only passage and cause an easier bumping hazard.
Classic Rectangular Studio Apartment With Bed Zone, 20×24 Floor Plan
A 3ft high open shelf divider is perfect to create separation between the 9×10 bed zone and the 10×11 living zone, without blocking any windows.
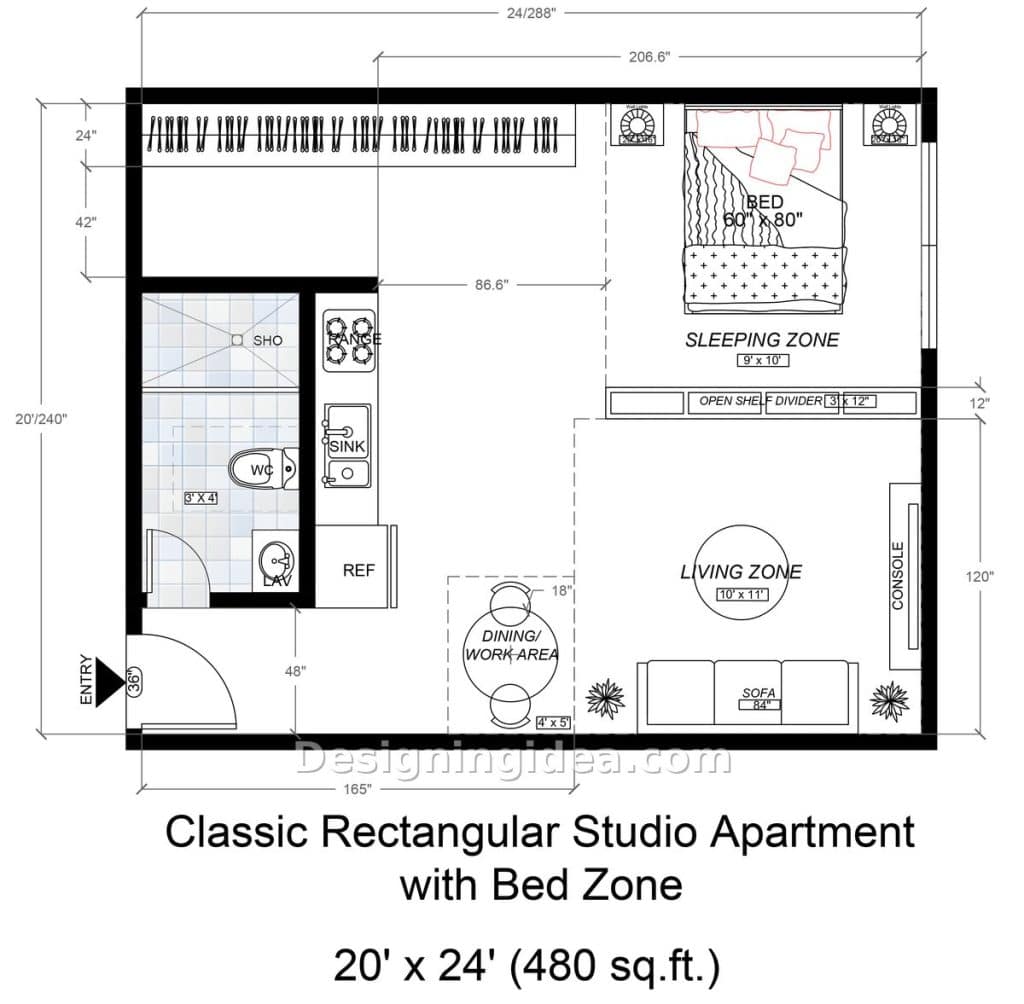
This is the layout most studio renters will be familiar with: an entrance that opens into the bathroom and kitchen on the left-hand side, and the room then opens out to the right with the bed and sofa. What makes this layout an improvement on the standard builder’s layout is the wardrobe wall along the top that’s 24″ deep and running the majority of the width. With this built-in storage, there’s no need for a freestanding wardrobe taking up floor space.
The bed is a 60 x 80 queen, with a wall light on each side, placed inside a 9 x 10 sleeping zone in the top right. Underneath it is a 3 x 12 open shelf divider, measuring 12″ deep, that acts as the divider between the sleeping and living areas. It’s low enough to see over from the sofa and deep enough to hold books on the living side and a lamp on the bed side. If you want additional privacy, you may want to consider going higher with the divider. However, you’ll want to keep it somewhat open near the top to allow in natural light from the large window. The living zone is 10′ x 11′ with an 84″ sofa up against the bottom wall and facing a console on the right side. The console is 120″ of wall, so a TV there is visible from both the sofa and the bed if you use a lower partition.
The kitchen is a short single-wall design with a range, sink, and fridge in an 86.6″ run, running right up against the bathroom wall with an open space in front. There is 48″ of walkway right at the entry door and the bathroom, which is important as it’s the main way in and out. There is a round dining table at the end of the entry corridor, so two people can be cooking and eating without anyone having to squeeze through.
Dimensions:
- Studio size 20′ x 24′ (480 sq ft)
- Wardrobe wall 24″ deep across 165″ of the top wall
- Kitchen run 86.6″ with 48″ clearance in front
- Sleeping zone 9′ x 10′, living zone 10′ x 11′, dining 4′ x 5′
- Open shelf divider 3′ x 12′, 12″ deep; entry door 36″
Design Tips:
- Put the TV on the 120″ console wall and if you want to watch from the bed use an adjustable wall mount so nothing will obstruct the line of sight.
- A 12″ deep shelf divider will tip if it’s tall and empty, so you’ll want to load the bottom shelf with the heaviest things you have or anchor it to the floor.
- The wardrobe wall has to have sliding or bifold doors, because any hinged doors would swing right into the 42″ walkway.
Long Narrow Studio With Zones in a Row, 15×34 Design
By lining up the bathroom, kitchen, dining, living, and sleeping area in one long 34ft run, each zone gets one side for the essential areas and the other for a walkway, so you don’t walk through the bed area to get to anything.
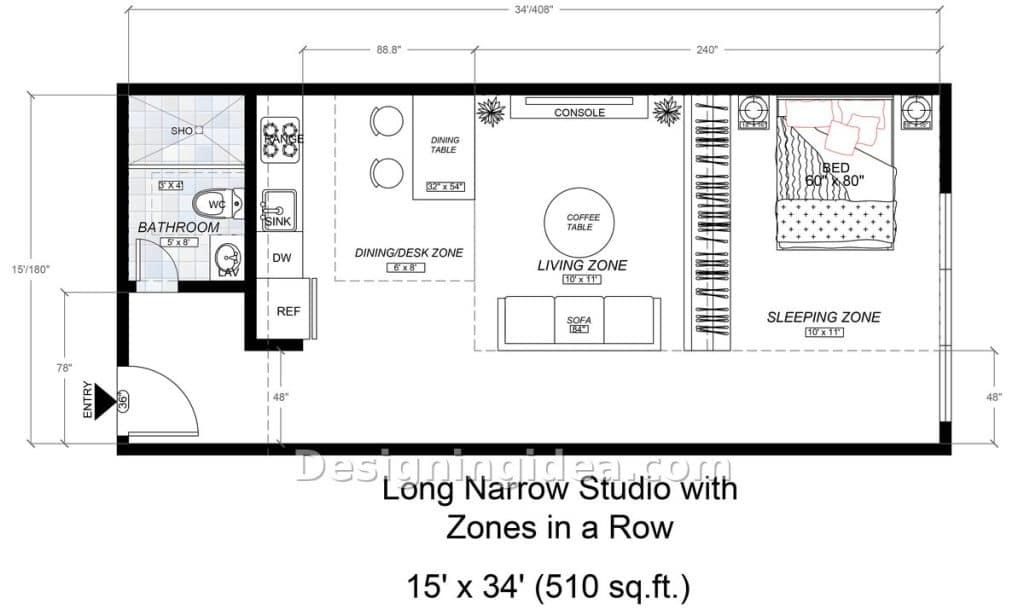
Narrow studios get a bad name generally because the owner just drops the bed in the middle and everything else has to be arranged around it. This plan is the opposite; it starts from the entry and opens to the bathroom, short kitchen, then dining and desk area, then living, and finally to the bed at the far end by the window. You walk the length of the studio down a single straight, 48″ corridor to access anything in the apartment.
Fifteen feet of width is wide enough to have the 84″ sofa facing a console on the other side with a coffee table in between and still leave a 48″ walkway along the bottom. The bedroom end has a full 15-foot closet rod, which also forms the wall between the living and sleeping areas. Both the bed zone and the living zone are 10 x 11, and due to the long closet, the bedroom at the end feels much more private from the rest of the living areas.
The kitchen is very small at approximately 128″ for the range, sink, dishwasher and fridge against the bathroom wall. Inside the kitchen area, there is a rectangular dining table and two stools or chairs. With the larger dining table, there’s no room for a second cook. If you prefer a larger kitchen footprint, ensure that the chairs can fit under the table so they don’t get in the way of the pathway.
- Studio Size 15′ x 34′ (510 sq ft)
- Bathroom 5′ x 8′ with a 3′ x 4′ toilet alcove
- Kitchen run 88.8″ with 48″ clearance
- Dining/desk zone 6′ x 8′, living zone 10′ x 11′, sleeping zone 10′ x 11′
- Walkway 48″ along the lower wall; sleeping zone spans 240″
Design Tips:
- Hang a curtain on the closet so your bedroom looks more styled.
- Use a 32 x 54 table as drawn, pushed up against the wall, and only pull it out when four people are eating. If it’s positioned in the center of the area, it blocks the way to the sofa.
- Run lighting in three separate switched zones, with one overhead so it doesn’t leave both ends very dim.
Studio With Home Office Wall and Hidden Bed, 18×30 Layout
With the entry opening from the center, you immediately gain access to the living room with the kitchen and home office on one side and the bathroom and bedroom area on the other.
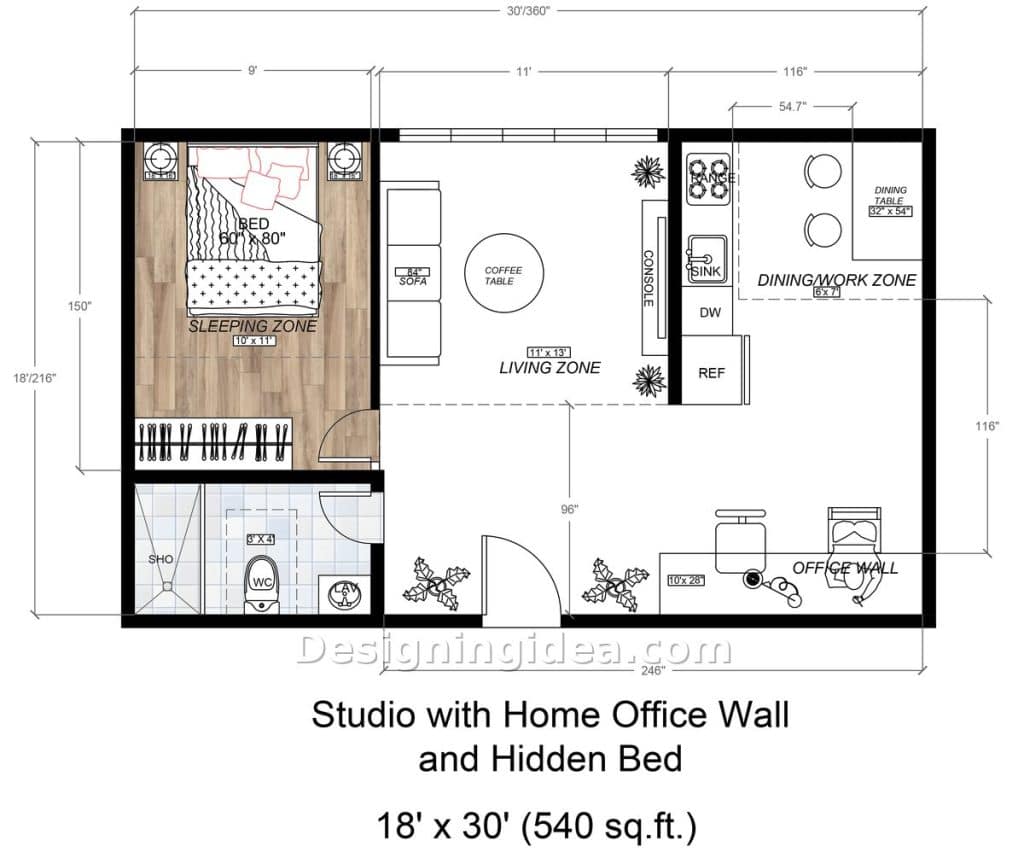
If you’re working from home, then this design makes perfect sense with its own 10ft office wall corner with space for multiple monitors and surface area for completing your work projects. Above the office area is the single-run kitchen with a range, sink, dishwasher, and fridge all stacked up along a single wall. The dining area is next to it with a 32″ x 54″ table against the opposite wall.
The living area is 11′ x 13′ in the center, with the sofa running along the wall that forms the bedroom wall, so the bedroom area is also the back of the sofa. Directly across from that is a console against the kitchen’s wall. The left 9 feet of the unit is effectively a 10 by 11 sleeping room with a door, a closet rod down the bottom and wall lights over the bed. It’s the only plan in this set that has a sleeping area you can shut a door in, and that door is why it feels like a one-bedroom when you’re on a video or phone call.
There are 96″ between the office and the living area so you can be at the desk with someone on the sofa and neither of you in the other’s way. The bathroom is down below the bedroom, and you access it from the living area so guests don’t have to walk through your room to get to it.
Dimensions:
- Studio size 18′ x 30′ (540 sq ft)
- Sleeping room 9′ wide, zone 10′ x 11′, 150″ deep
- Living zone 11′ x 13′, dining/work zone 6′ x 7′
- Kitchen wall 116″ with 54.7″ to the dining table
- Office wall 10′ x 28″ with 96″ clearance to the living zone
Design Tips:
- If you have the space to frame in the bedroom, make the door a pocket door. A hinged one takes up more floor space that you may not have to spare in a floor plan this size.
- For the office, use a 28″ deep counter on brackets with drawers below so it can hold two monitors and still leave you plenty of knee room.
- Carry the floor finish through the living and office areas and only change it in the bedroom, as the plan does with wood. The color change in the floor tells the eye where the bedroom begins without the need for a threshold.
Square Studio Apartment With Central Living Area, 24×24 Floor Plan
Splitting the 24′ x 24′ square studio apartment into a 12′ x 12′ sleeping half and a 12′ x 12′ living half, with a 30″ x 84″ dining table in the middle, means every zone is within a few feet of the center.
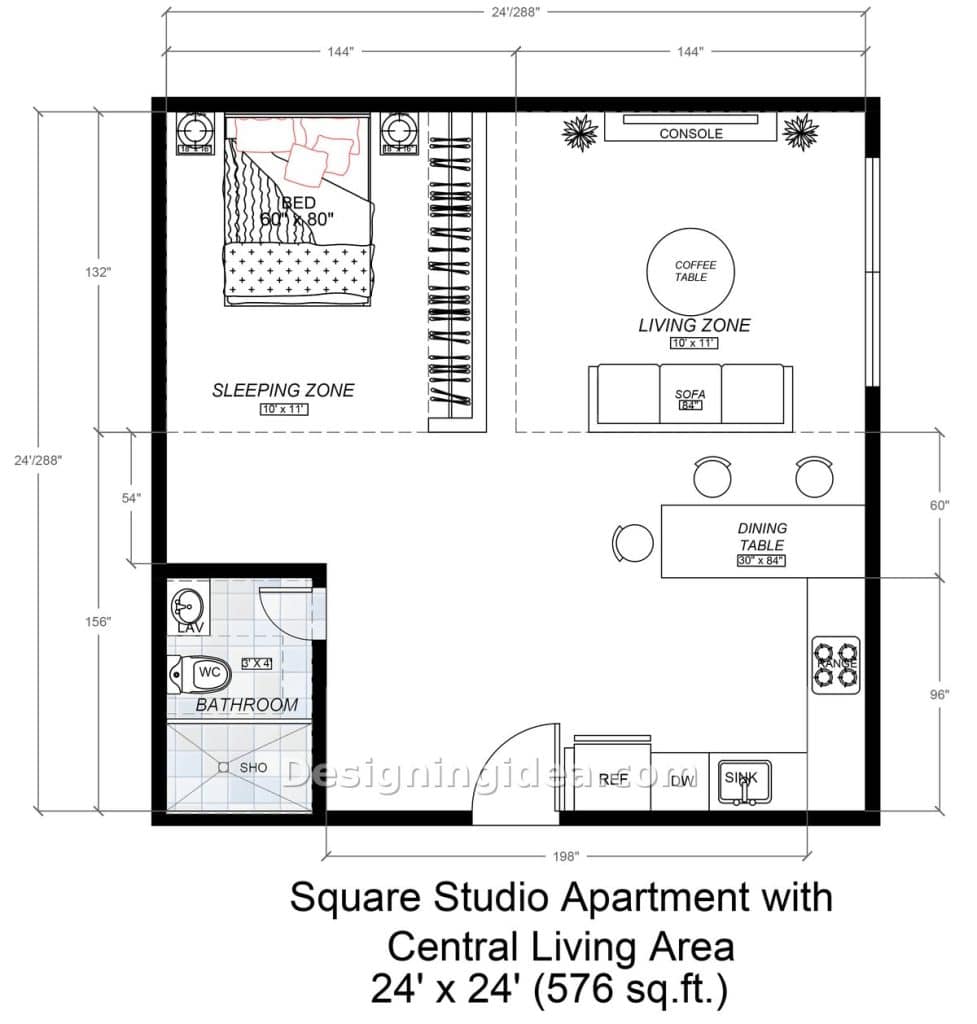
Square studios are rarer than rectangular ones and harder to plan as there’s no long axis to line things up with. The solution to this is to split the top half down the middle, with the bed and closet on the left 144″ and the sofa and console on the right 144″. A closet rod running down the side of the bedroom area takes the place of a wall to designate the zones.
The lower half is kitchen and bathroom. The L-shaped kitchen design has a bottom wall running from the fridge through to the dishwasher and sink and then up on the right wall to the range, making it the largest kitchen in the set. This leaves a wide space of open floor in front of the range for a dining table. The 30″ x 84″ table peninsula seats up to six, which is the only plan in the set to do that.
The bathroom in the bottom left is the full 3 by 4 toilet room with a shower, accessed from the open plan. The 54″ gap between the bathroom wall and the sleeping area is the walkway from the bed to the bathroom and still wide enough to easily pass through.
Dimensions:
- Studio size 24′ x 24′ (576 sq ft)
- Sleeping zone 10′ x 11′ and living zone 10′ x 11′, each 144″ wide
- Kitchen run 198″ along the lower wall with a 96″ range wall
- Dining table 30″ x 84″ with 60″ clearance
- Bathroom 156″ deep; 54″ walkway between bathroom and bed zone
Design Tips:
- Keep the closet rod as a double-sided unit, on the bed side, and on-use shelving on the living side so it is functional for both areas.
- Swap the 84″ table for a 60″ table or a narrower peninsula if you want a walkway on both sides of it. As drawn, the right-hand end is 24″ from the range wall.
- Rugs do the zoning in a square room, with one under the bed, one under the sofa and coffee table, and then bare floor in the kitchen half.
Studio With Kitchen Island Divider, 20×30 Layout
Using an island with three stools, set against a console, creates separation between the kitchen and living area and provides separation for both.
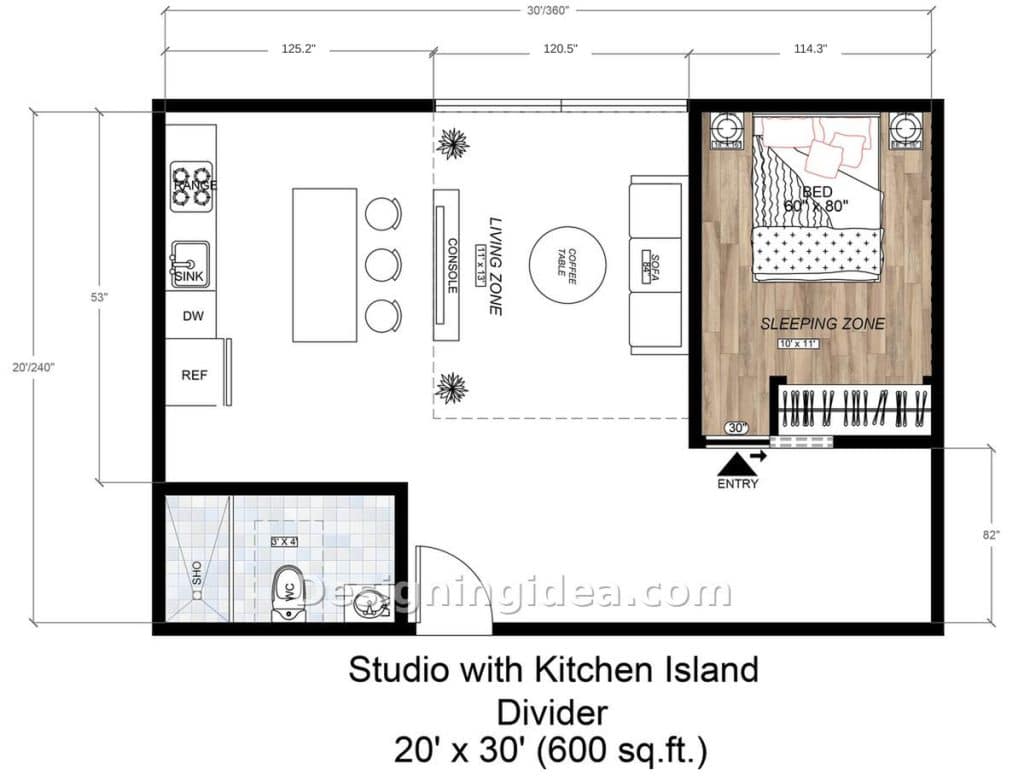
This is the plan for someone who cooks and likes to have people over to entertain. The kitchen takes the top left-hand corner, with the range, sink, dishwasher, and fridge running down the left wall, and an island floating in front with three stools. The TV console runs up the back of the stools on the living side, so from the sofa you see the console, not inside the kitchen. The living area measures 11′ x 13′ in the center, with an 84″ sofa against the bedroom wall.
The sleeping zone is in the top right, in its own 10 x 11 enclosed area with a different floor finish, a small closet along the bottom and a 30″ doorway into it. That doorway is right beside the unit’s entry which is beside the bathroom. The bathroom is in the lower left, as far from the bed as the plan will allow. The lower right is empty on the plan (82″ deep), and that’s where I’d put a small dining table, as that’s the only place you could eat on the plan besides at the island stools.
Dimensions:
- Studio size 20′ x 30′ (600 sq ft)
- Kitchen along the left wall with range, sink, dishwasher and fridge, plus island and 3 stools
- Living zone 11′ x 13′, sleeping zone 10′ x 11′
- Sleeping room doorway 30″
- Open corner below living zone 82″ deep
Design Tips:
- The island needs a minimum of 42″ of clearance on the range side so the oven door can open with someone standing at the sink. Check that before you go ahead and order one.
- A 30″ bedroom will be tight for a queen mattress, so you’ll need to buy a bed-in-a-box or confirm the mattress can bend, because a standard boxed queen won’t make the turn.
- Use the empty lower right-hand corner for the 36″ round dining table and two chairs.
Alcove Studio With Semi-Separate Sleeping Nook, 22×28 Layout
Having an 8 by 10 sleeping alcove with its own walls and a large entry makes this 616 sq ft plan feel much like a one bedroom apartment.
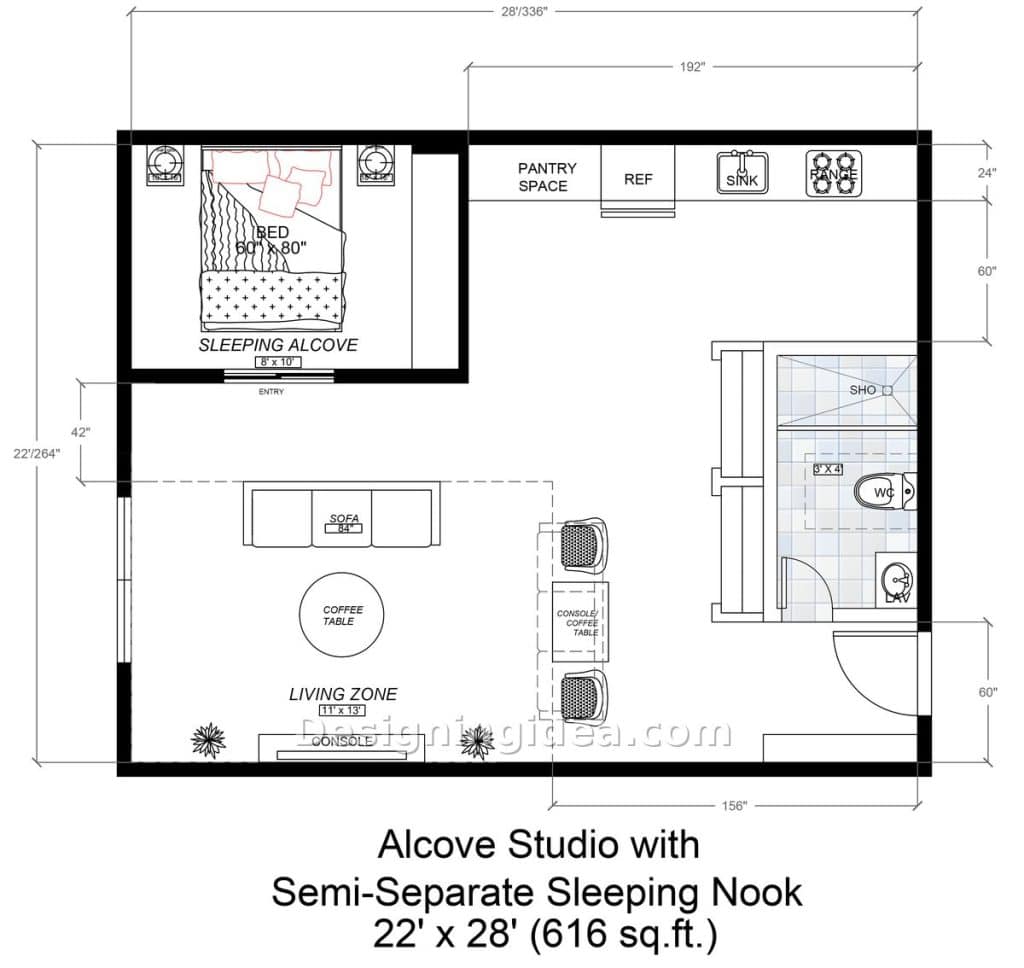
Listings often call alcove studios a junior one-bedroom when they’re trying to charge a premium. This one has the sleeping alcove in the top left, 8 x 10, with walls on three sides and a large opening at the bottom so you don’t need a door. The bed is a 60 x 80 queen size with a nightstand and table lamp on either side. There’s space on the right side for a closet, wardrobe, or long dresser.
The kitchen is a straight-line design measuring 192″ with a pantry, fridge, sink, and range, and a 60″ of space in front so that two people can use it at the same time. The bathroom is below that, with an entrance from the living side at the 60″ landing in front of the entry door. The living zone is 11′ x 13′ in the lower left, and is the biggest in this set, with an 84″ sofa, a round coffee table, and two chairs facing it with a table in between.
The 42″ strip between the sleeping alcove and the living area is the main pathway between the two areas and is kept clear as long as the sofa is pushed into the living area rather than up against the alcove wall. At 616sq ft, there’s absolutely room for that gap, which the 480 sq ft plan above doesn’t have.
Dimensions:
- Studio size 22′ x 28′ (616 sq ft)
- Sleeping alcove 8′ x 10′ with a 60″ x 80″ bed
- Kitchen run 192″ with 24″ deep counters and a 60″ return
- Living zone 11′ x 13′, 156″ wide
- 42″ clearance between alcove and living zone; 60″ landing at the bathroom door
Design Tips:
- A slider, barn door, or heavy curtain across the alcove opening will give you privacy in the bedroom area.
- Run the pantry as a full-height cabinet rather than using open shelving to help avoid the studio looking very cluttered from the sofa.
- The two accent chairs between the sofa and the console are optional. If you’d prefer a desk, that’s the space, and the monitor stays out of the living area behind the alcove wall.
Designer Tips for Setting Up a Studio Apartment Layout
Place the bed before anything else – When designing a studio apartment, a good rule of thumb is to put the bed in first and plan around it. It’s the largest piece of furniture, and once you’ve positioned it, it’s much easier to design the rest of the space. In all seven of the plans above, the bed ends up as far from the entrance as the plan will allow. I’d go with that in pretty much any studio, as the first thing you see when you walk in shouldn’t be an unmade bed. If you’ve ever spent time in someone else’s studio, if the bed is immediately noticeable, it can make things feel awkward.
Keep one open path from the door – Trace a line from the entryway to the bed and then another from the bed to the bathroom. There needs to be at least 36″ of open floor on each route, and nothing should block the way.
Divide low, instead of tall – Most studios only have a window on one wall, and by putting a floor-to-ceiling bookcase between the bed and the sofa, you block much of your available natural light, making the remainder of the room feel darker than it should. The dividers in these plans are mostly 3′ open shelves, a closet rod, a kitchen island, and a sofa back, which are all low enough to see over and let light through. If you want the bed hidden at night, then a ceiling track curtain gives you privacy and can be retracted to disappear during the day.
Size furniture to the zone instead of the room – A 10′ x 11′ living area will only accommodate up to an 84″ sofa. If your living area is less than 10′ wide, then an apartment-size sofa measuring 72″ to 78″ will provide space on one side for an end table. Keep about 14″ to 18″ between the sofa and the coffee table and go round on the dining table so you have room to move.
Give the kitchen the clearance it needs – The NKBA recommends a 42″ work aisle for one cook and 48″ for two. Studio kitchens tend to lose that space as a result of a dining table being pushed up in front of the counter. Measure from the edge of the counter to the back of the nearest chair that’s been pulled out, not tucked in, to see what you have to work with.
Choose doors that can slide – Every hinged door in a studio will take up about a 30″ to 36″ arc of floor space that you can’t put any furniture in. Use sliding or bifold doors on the wardrobe and a pocket door in any sleeping area so they don’t get in the way.
Zone the lighting and the rugs – A single ceiling light over the middle of the studio will mean the bed corner and the kitchen are in the dark. Provide a lamp or a switch for each zone so you can turn the light on and off for each area. When adding rugs to designate a living area, make sure the front legs of the sofa are placed on it to define the space without needing any walls.
Tape it out before you buy any furniture – Mark the bed, sofa, and table on the floor with painter’s tape with their sizes and walk the room for a day. A queen mattress is 60″ x 80″ and a queen Murphy bed will extend out roughly 7′ from the wall when it’s pulled down. Most layout errors will show up when you live with them for a little while, and it can be expensive to buy furniture that doesn’t fit.
To showcase highly specific designs, some images on this website use advanced AI-generation software to illustrate ideas and room inspiration. See our editorial policy to learn more.