Square 6×6 Bathroom Layouts That Make a Small Space Feel Bigger

At exactly 36 square feet, a 6×6 bathroom sounds like it’s small, and in some layouts it is. But, with the right floor plan arrangement, it feels livable and can provide enough space for a functional space that works for your needs. The square 6×6 bathroom layouts I’ve provided below all fit within the same 72″ x 72″ footprint and all meet standard U.S. residential code clearances, so you have a buildable idea you can use. This includes the 21″ minimum in front of the toilet and the 15″ minimum from the toilet centerline to the side obstructions. Some of these prioritize open floor space, while others focus on making the shower feel bigger, this way you can choose the one that fits your needs the best.
6×6 Bathroom with Corner Shower & Vanity Wall
This compact bathroom design provides a familiar layout that positions a corner shower and toilet on one side and the sink and doorway on the other for a space that’s easy to access and use.
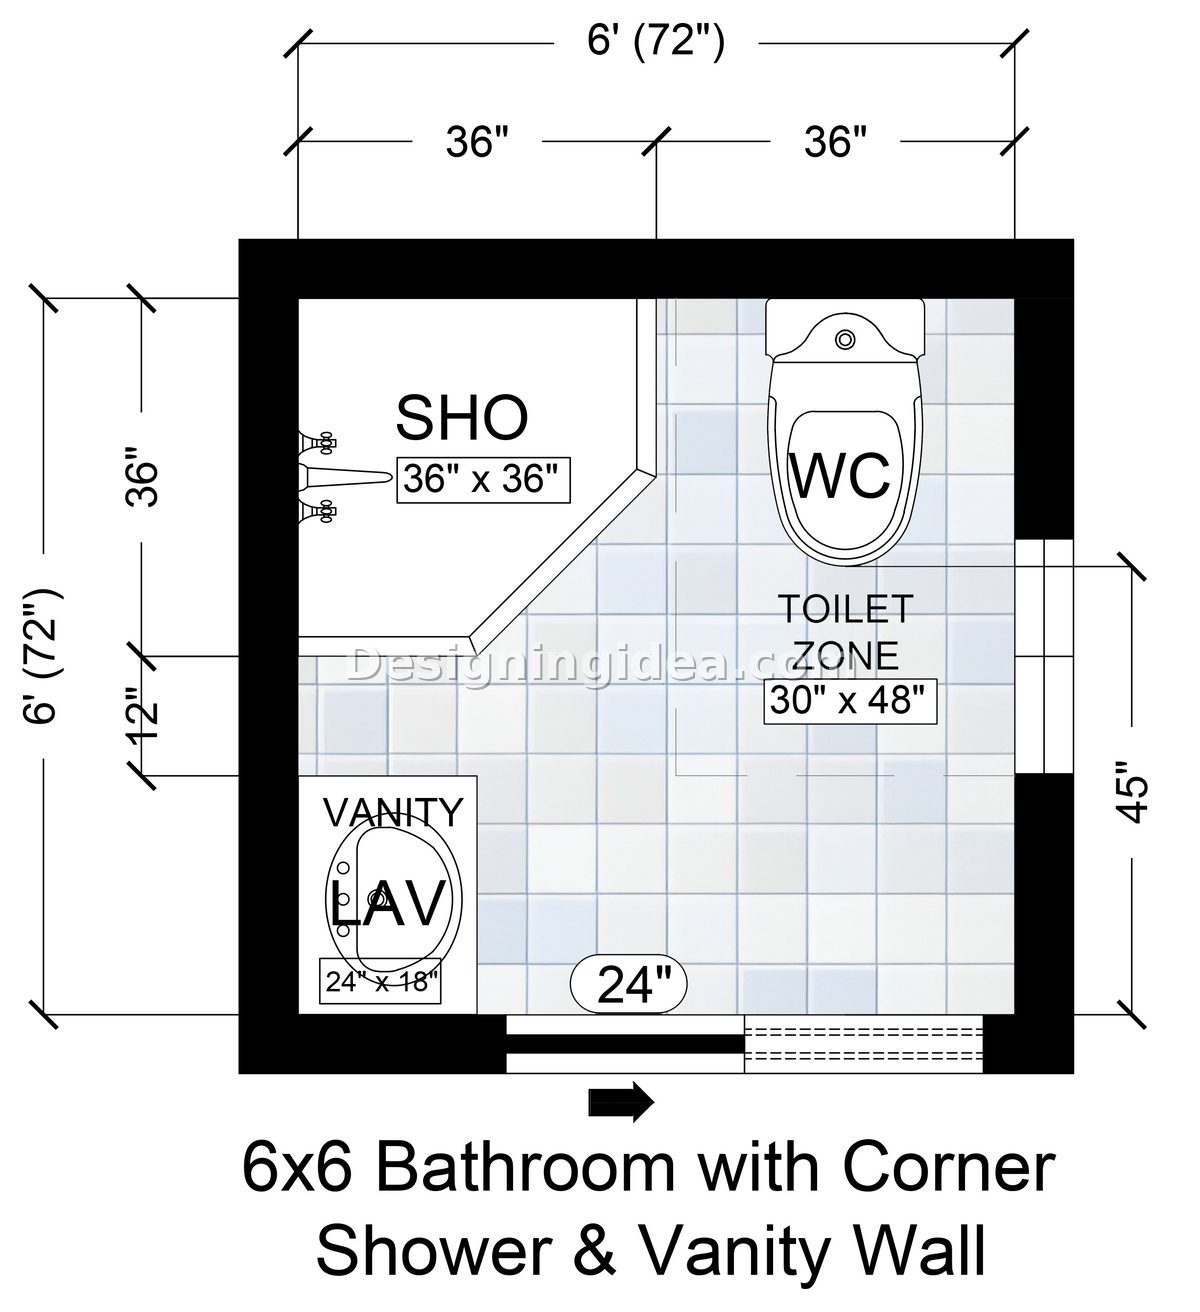
Floor Plan Details: This is a classic 3-piece bathroom setup that tucks the shower into the back corner, next to the toilet. The vanity lines a side wall and is near the sliding door entry. The corner shower measures 36″ x 36″ and the toilet occupies a 30″ x 48″ zone to the right wall. Toward the front, you’ll find the 24″ x 18″ vanity, next to a 24″ sliding pocket door on the front wall that allows you to avoid any door-swing headaches. This plan allows the center of the room to stay open, providing you with a larger amount of toilet clearance, so it is comfortable, and the space seems bigger than it technically is. What makes this layout feel normal is the way traffic flows as you walk in, and you have immediate access to the vanity. The toilet is within reach, and the shower is at the back, so it all feels cohesive and practical for your needs.
Dimensions:
- Room size: 72″ W x 72″ D
- Shower: 36″ x 36″ corner unit (back-right)
- Vanity: 24″ W x 18″ D (left wall)
- Toilet zone: 30″ x 48″ (right wall)
- Pocket door: 24″ (front wall)
- Center aisle: 45″ (right side), 36″ depth back half
Design Tips:
- Choose a corner shower with a frameless glass panel to keep the room feeling open.
- Selecting a 24″ wide vanity is compact, so to max its storage potential, go for a vanity with a deep drawer stack rather than a cabinet door.
- Having a pocket door is almost a non-negotiable here, as a standard swing door would disrupt the vanity clearance or the aisle in front of the toilet.
Bathroom with 60″ x 30″ Back-Wall Shower
The shower works as a visual anchor in this bathroom that draws the eye and makes the design feel more appealing.
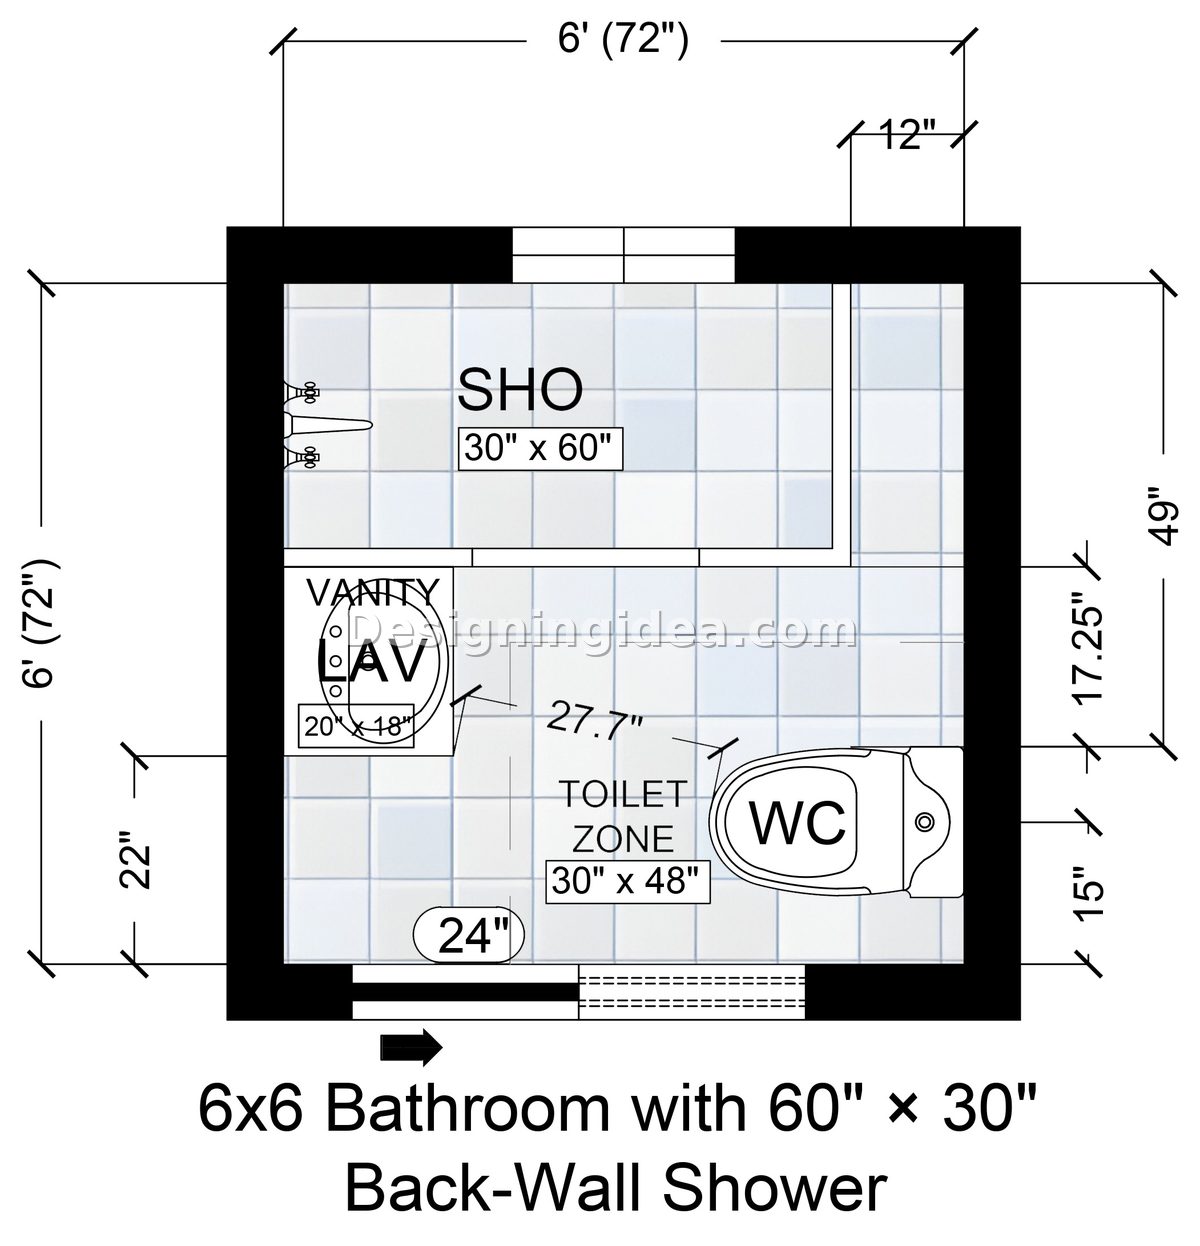
Floor Plan Details: The difference you notice immediately in this plan is the shower that spans 60″ wide, stretching almost the full width of the back wall. That’s a full 5-foot shower in a 6-foot room that completely changes how the space feels. With the shower spanning the upper wall, the toilet and vanity fall into the front half of the room on opposite walls. The toilet sits on the right side in a 30″ x 48″ zone, with its centerline 15″ from the wall. The vanity on the left side is compact at 20″ x 18″, which leaves enough of a center aisle for the toilet clearance to remain comfortable at 27.7″. A 24″ pocket door handles the entry on the lower wall. The trade-off to make it work is that the 30″ shower depth is shallower than that of a corner unit. You won’t feel cramped in it, but if you’re tall or tend to move around a lot in the shower, it’s worth considering. Another interesting point is that there is a small space left over to the side of the shower where you can add open shelves or a built-in linen closet for extra storage space.
Dimensions:
- Room size: 72″ W x 72″ D
- Shower: 60″ W x 30″ D (back wall)
- Vanity: 20″ W x 18″ D (left wall)
- Toilet zone: 30″ W x 48″ D (right wall), centerline 15″ from wall
- Center aisle: approx. 27.7″ in front of toilet
- Pocket door: 24″ on the lower side
- Shower-to-vanity zone split: 49″ back section, 22″ front section
Design Tips:
- Make the 60″ shower feel like the focal point by installing large-format tile on the back wall and a rain head.
- The 20″ vanity is slim, so go for a wall-mounted or pedestal sink to keep the floor visible, which helps the room feel bigger.
- Use the small area next to the enclosure if you need storage for linens.
- Add a recessed medicine cabinet above the sink for your essential daily grooming items.
- Keep the aisle in front of the toilet as clear as possible, as the 27.7″ meets code, but is not large.
6×6 Euro Bath Layout with 36″ x 60″ Side Shower & Floating Vanity
This bathroom gives a distinctly more open, modern feel as it opens right into the vanity on one side and the toilet on the other, facing directly to the shower.
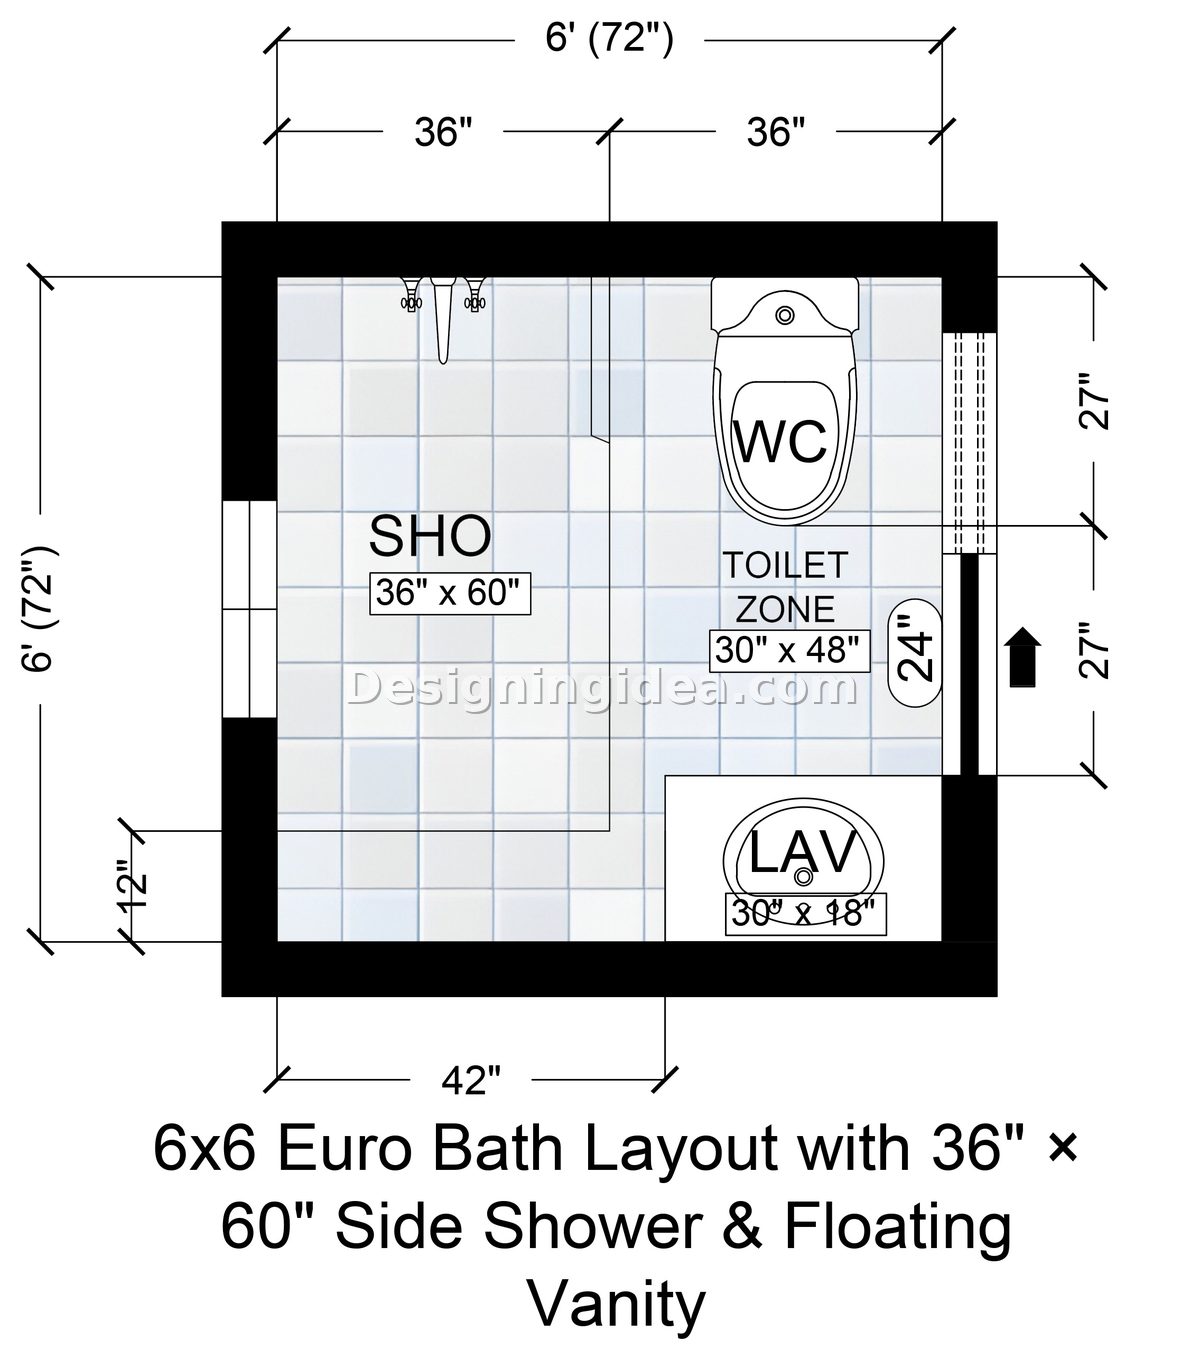
Floor Plan Details: This one has a shower that runs along the left wall, measuring 36″ wide and 60″ deep. That’s a large shower for a bathroom this size. The toilet sits in the back-right corner in its own 30″ x 48″ zone. And the floating vanity at 30″ x 18″ sits in the front-right area near the door. Because the shower is along the side, the right half of the room stays usable, and there’s a natural separation. The door opens from the right side, entering directly into the area in front of the vanity and toilet. Since you’re facing the shower as you enter, it looks more stylish and attractive for daily use.
Dimensions:
- Room size: 72″ W x 72″ D
- Shower: 36″ W x 60″ D (left)
- Toilet zone: 30″ x 48″ (back-right), centerline 15″
- Floating vanity: 30″ W x 18″ D (front-right area)
- Door: 24″ out-swing or pocket (right-side)
- Open floor zone depth: 42″ from front wall to shower threshold
Design Tips:
- Use a floating vanity so it keeps the 42″ floor zone feeling more open and allows access to the small storage space next to the shower.
- Stretch the shower across the side wall for more space inside and add a bench seat for a custom feel.
- If you need extra storage, add a reach-in linen closet beside the enclosure..
Bathroom with Back Corner Shower & Corner Sink
With all of the fixtures in a corner, it leaves the center of the room more open, so the floor plan feels larger.
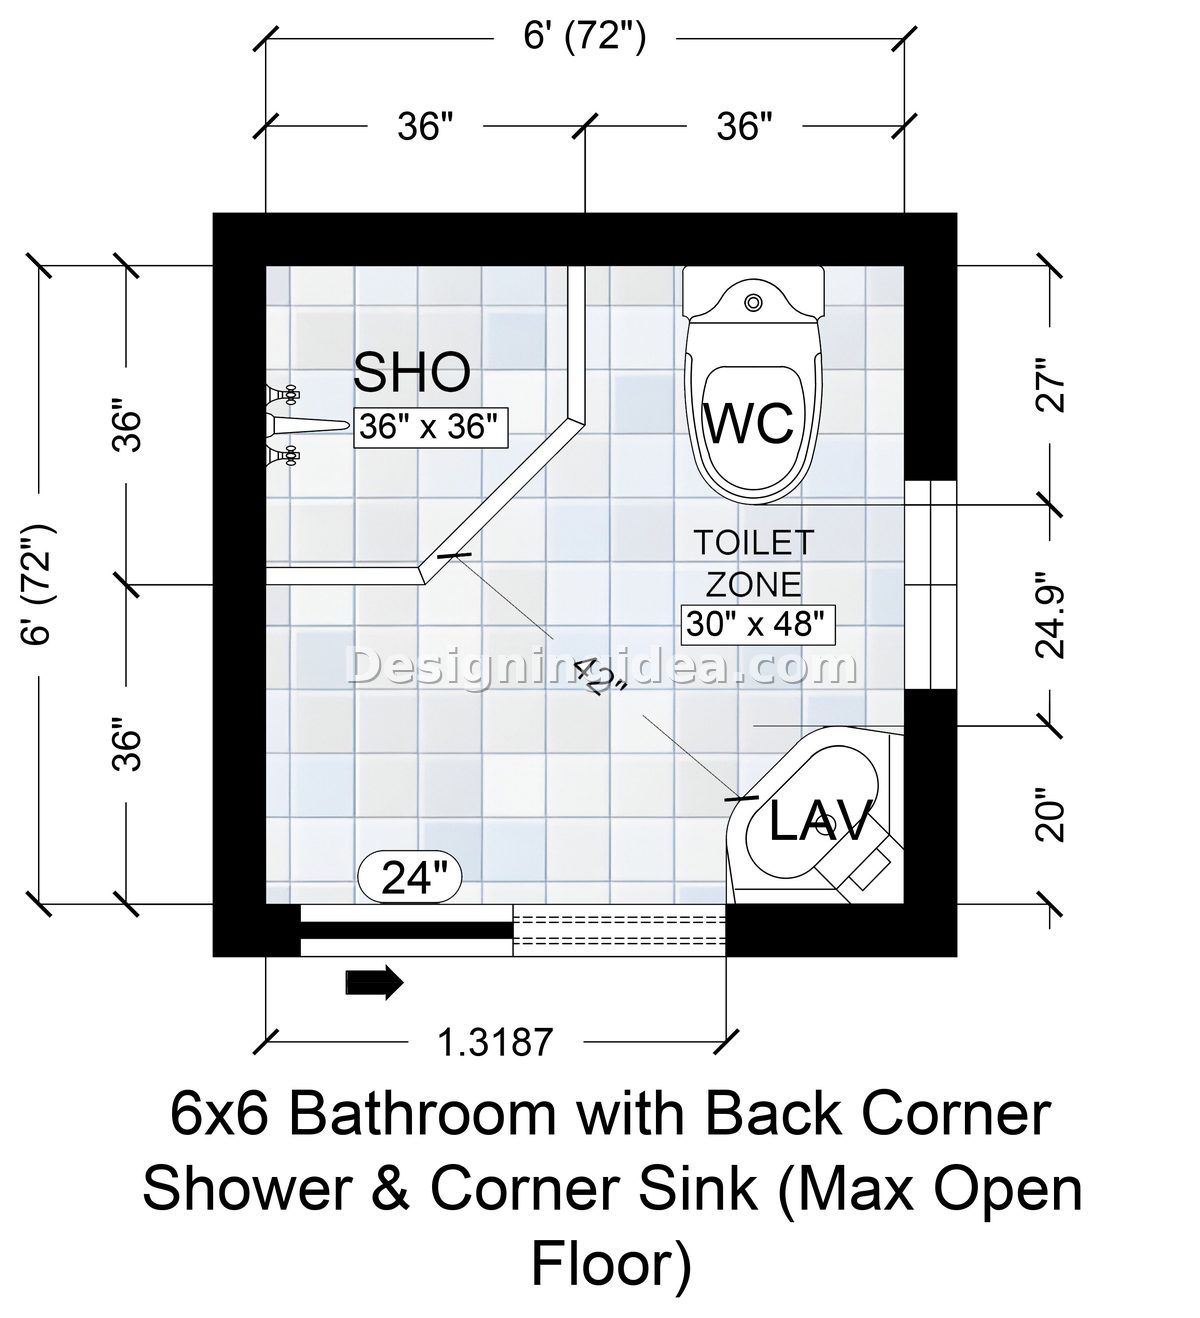
Floor Plan Details: The philosophy of this layout is to get everything out of the middle. It places its 36″ x 36″ shower in the back-left with the toilet sitting on the right, in its standard 30″ x 48″ zone with a sink in the front-left area. A 24″ pocket door is used for the entry. The result is a 42″ open diagonal that doesn’t feel like a hallway you can’t turn around in. The trade-off is that the corner sink has a shallow basin and limited storage. If it’s a guest bath or a second bathroom, it should work fine and allow a small area next to the shower for a portable storage unit or wall-mounted shelving.
Dimensions:
- Room size: 72″ W x 72″ D
- Shower: 36″ x 36″ (back-left corner)
- Toilet zone: 30″ x 48″ (right side), centerline 15″ from wall
- Corner sink: 18″-22″ across front edge (front-left)
- Pocket door: 24″ (lower wall)
- Open center diagonal: approx. 42″
Design Tips:
- A corner shower with a neo-angle or curved glass door works well here as it softens the corner and makes the transition into the open center feel natural.
- Choose a corner sink with an integral backsplash if possible.
- This layout is particularly good for kids’ bathrooms, since the open center makes it easy to help a child get ready.
6×6 Spa-Style Bathroom with Wet & Dry Zone
This bathroom layout divides the room in half to help deliver a real spa experience in its limited space.
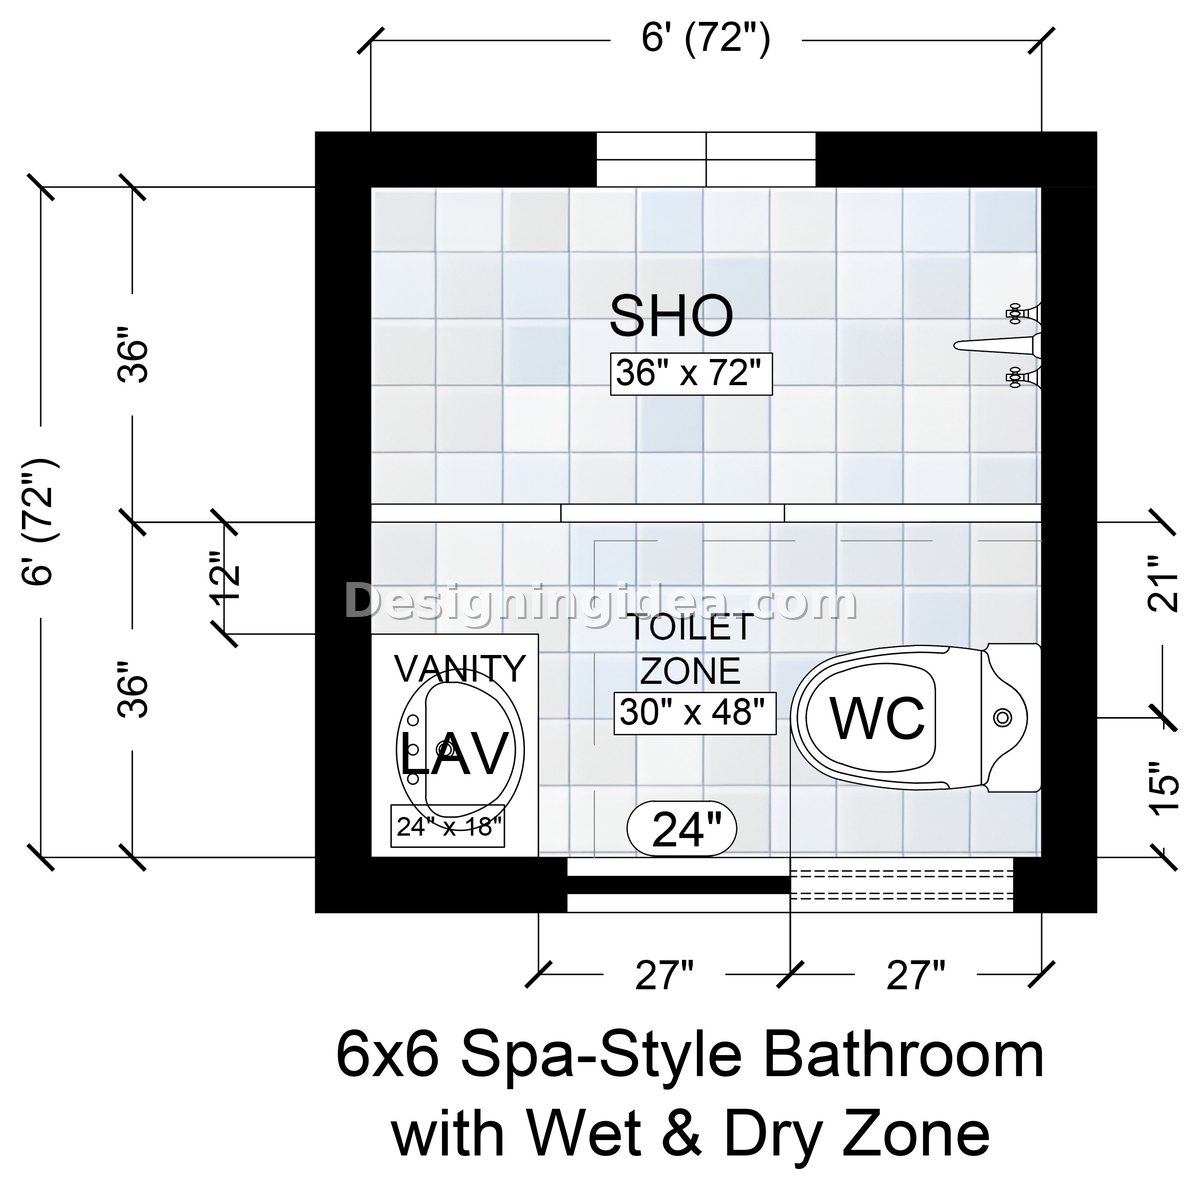
Floor Plan Details: Most 6×6 layouts hide the shower in a corner, but this one treats it as half the room. The entire upper half, measuring 36″ deep, 72″ wide, is devoted to a curbless entry wet zone. A fixed glass panel runs across the width of the room at the midpoint, creating a wet/dry boundary with a 24″ entry opening in the middle. The dry zone in the front half holds the toilet on the right and the 24″ x 18″ vanity on the left. What makes this design feel different from the other layouts is the scale of the shower enclosure. It feels more like a small master bathroom than a guest bath due to the shower’s size. To make it work, the dry zone needs to be protected by the glass panel with a slope inside with a linear drain, so it functions as well as it looks.
Dimensions:
- Room size: 72″ W x 72″ D
- Wet zone (shower): 36″ deep x 72″ wide
- Fixed glass panel: 48″ long, positioned at the 36″ depth line, with 24″ entry opening
- Vanity: 24″ W x 18″ D (left wall, lower/dry half)
- Toilet zone: 30″ x 48″ ( right wall, lower/dry half), centerline 15″ from wall
- Minimum space in front of toilet: 21″
- Pocket door: 24″ (lower wall)
- Recommended drain: linear drain along upper wall (72″)
Design Tips:
- The slope on the wet zone floor needs to drain properly, or water will pool and find its way to the glass panel.
- Add a linear drain along the upper wall to handle the floor slope, so the glass panel keeps the other half of the room dry.
- Lighting in the wet zone needs a waterproof ceiling fixture directly over the wet half, that is separate from the dry zone.
- The glass panel for the enclosure doesn’t need to be floor-to-ceiling. You can install a 60″-72″ panel to contain splashes while keeping the room feeling open.
For more tiny bath plans visit our page here.
For other dimensions, see bathroom layouts for other sizes.
To showcase highly specific designs, some images on this website use advanced AI-generation software to illustrate ideas and room inspiration. See our editorial policy to learn more.