Compact Kitchen Layouts Worth Copying (With Real Dimensions & Designs)

The way a small kitchen performs depends entirely on the placement of three items: the sink, the range, and the fridge; all the rest can be arranged however you like. The five floor plans vary from 8 by 10 to 10 by 12, and each one addresses the same problem in a different manner. The value in looking at the two layouts side by side is that the shape of the room affects the solution quite considerably. In a square room, an L-shaped or a modified U-shaped arrangement is required, while a long and narrow room calls for a galley kitchen or a single row of cabinets. If you put the wrong layout into a room with the wrong shape, you’ll end up spending years knocking into the dishwasher door.
The details given below relate to actual appliance sizes, including a 30 inch sink, a 30 inch range, and a 36 inch fridge, as well as the clearances which you can genuinely measure in your own room. So, get yourself a tape measure before you continue reading; it will be useful.
8×12 Compact One-Wall Kitchen Layout
Having all the appliances and countertop on one wall leaves the rest of the room to function as a room.
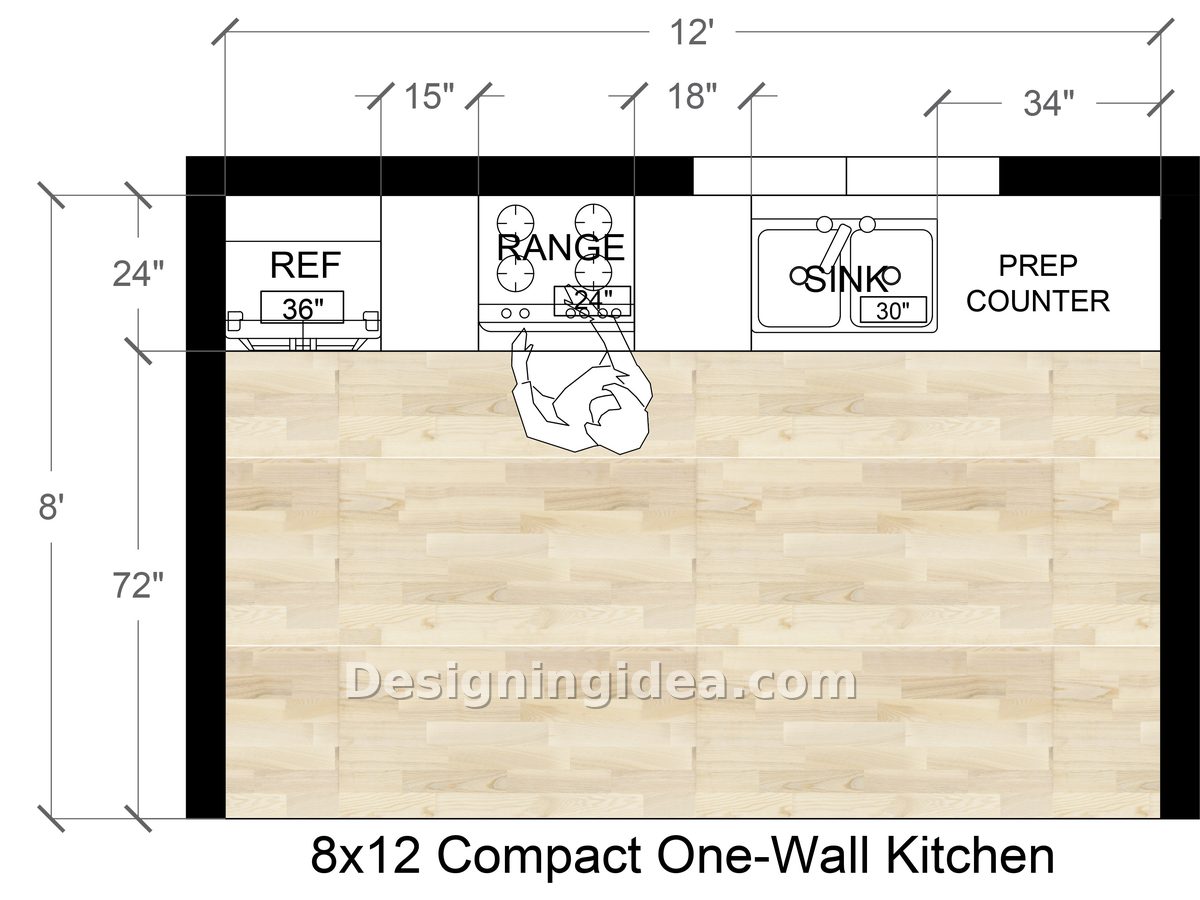
This small kitchen plan is the simplest type available. Along one 12-foot length, the fridge, the range, the sink, and the prep counter are all placed, leaving the entire 8-foot depth open in front. When the kitchen is shared with a dining area or a living room, this arrangement is generally the one that makes the most sense.
The arrangement is important: the fridge at one end, the range in the middle, the sink towards the other end, and then the prep counter comes after that. This setup provides a spot to place things on both sides of the cooktop and creates a good work area beside the sink. Although the 15 inch and 18 inch spaces on either side of the range are not very wide, they are still sufficient for setting down a hot pan.
There is a real compromise involved: rather than turning between three points, you are now moving sideways along a wall. Preparing a large meal involves taking more steps. In the case of one or two people, or when the kitchen is actually part of a larger open area, this is a reasonable exchange.
Dimensions:
- Room: 8’ x 12’
- Cabinet run depth: 24″
- Open floor in front: 72″
- Refrigerator: 36″
- Range: 24″ cooktop opening, with 15″ landing on one side and 18″ on the other
- Sink: 30″
- Prep counter: 34″
Design Tips:
- Install the wall cabinets as tall as possible. If all your storage is on one wall, then you shouldn’t just stop at 30 inches; make them go all the way up to the ceiling and retain the top shelf for items that you use twice a year.
- If the room permits, have a rolling cart or a narrow island. Although you have 72 inches of open floor space, a cart that is 24 inches deep will still leave you with 48 inches of walking space, which is more than enough, and it will double your prep area on the nights when you need it.
- Evenly illuminate the entire length. If you have a ceiling light in the center of the room, your own shadow will fall on the countertop. The under-cabinet strips, which cover the full 12 feet, solve this problem at a low cost.
8×12 Small Galley Kitchen Floor Plan
Two facing cabinet runs turn a narrow room into the most efficient kitchen on this list.
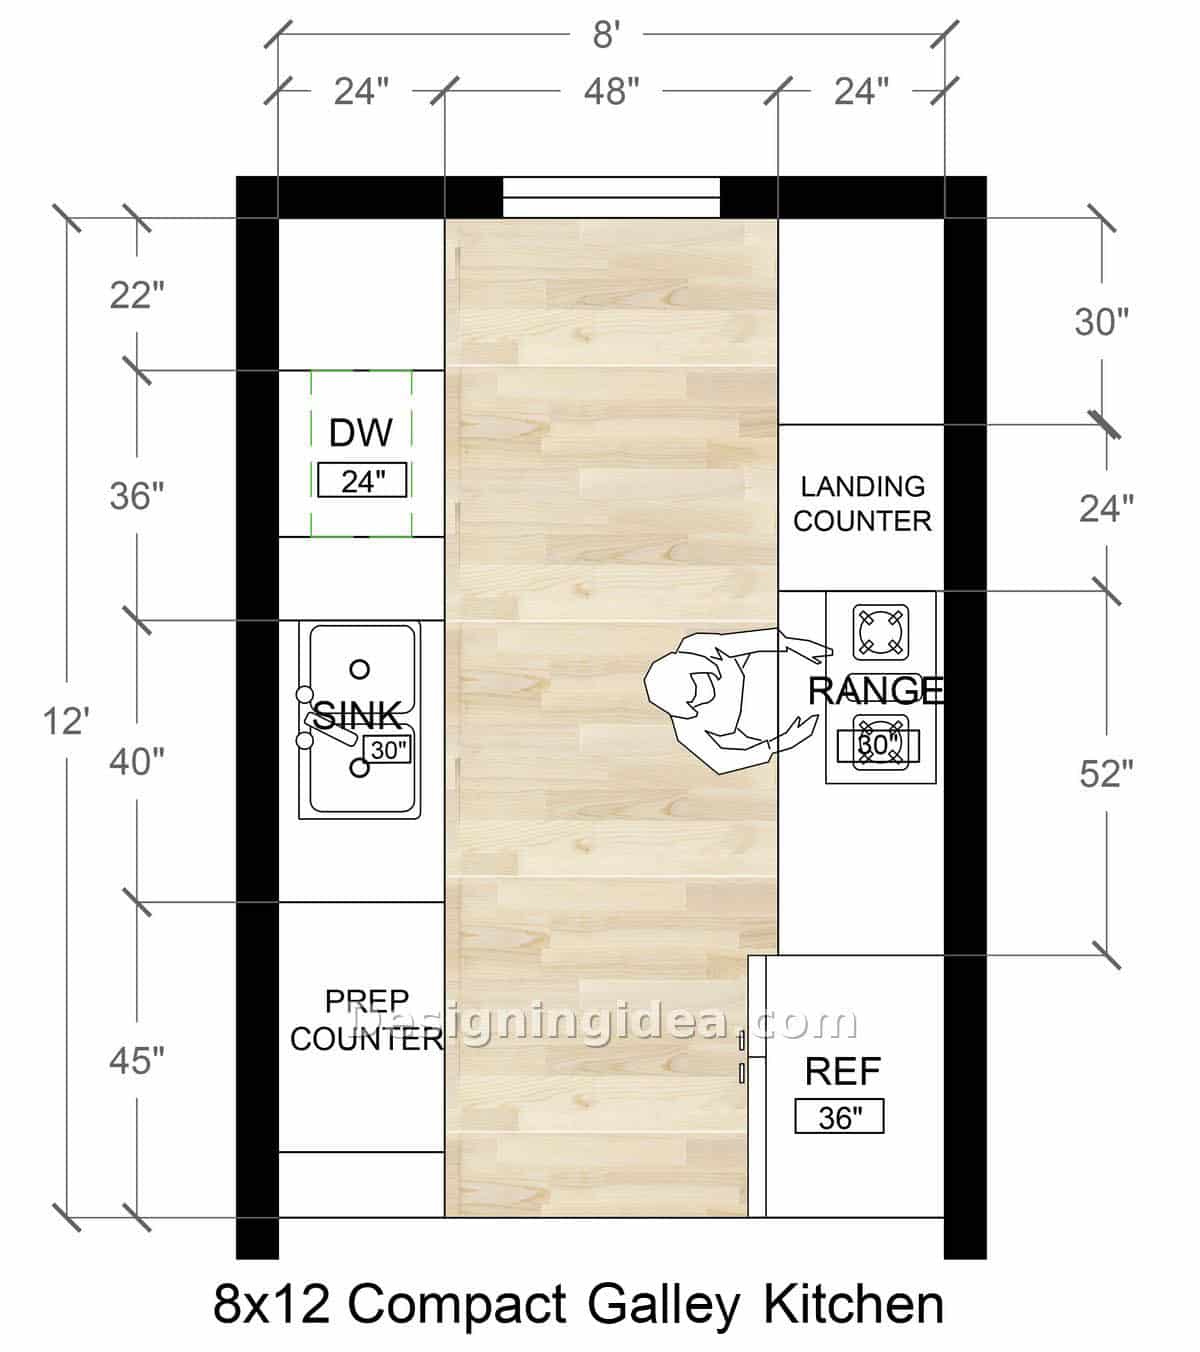
On one side you have the sink and the dishwasher, on the other the range and the fridge, with a 48 inch corridor running down the middle. That corridor is the key feature of the design. It is wide enough for two people to go through it, wide enough to be able to open the dishwasher while still walking past, and short enough to allow you to move from washing to cooking in one turn. The arrangement is thoughtful: on the left there is a wet area with the sink set at 40 inches from the countertop and the dishwasher placed right next to it; on the right there is a hot area featuring the range and a 30 inch landing countertop alongside it.
The fridge is located at the far end of the right-hand corridor, away from the main area where cooking takes place but still within easy reach. Something you should be aware of is that in a galley kitchen both ends are open, so people have to go through the space. If your kitchen is positioned between the front door and the back door, you can expect a flow of people right through the center of your working area. Simply having a door at one end or even reconfiguring the rest of the house to provide a more convenient route makes a big difference to the overall situation.
Dimensions:
- Room: 8’ x 12’
- Center aisle: 48″
- Cabinet depth both sides: 24″ (with a 22″ and 30″ offset at the ends)
- Sink: 30″, with 40″ of counter
- Dishwasher: 24″, with 36″ of run
- Range: 30″, with a 52″ zone including the 24″ landing counter
- Place the dishwasher on the sink side and on the side where you will stand—that seems obvious, yet it’s ignored all the time, and then every time you remove the dishes you have to reach across the open door.
Design Tips:
- If the room seems to be too small, don’t install upper cabinets on one wall.
- Using open shelving or simply laying a strip of tile on the sink side prevents the aisle from looking like a corridor. Although you will lose some storage space, you can compensate for this by using deep drawers underneath.
- You shouldn’t place the fridge in the middle of a run since it’s already at the end and that is correct. When the door of a fridge is opened, it swings out, and if it’s put in a position that is not right, it will obstruct everything in a 48-inch aisle.
8×10 Compact U-Shaped Kitchen Layout
In an area of 80 square feet, there are three counter walls and fewer steps for an efficient work triangle.
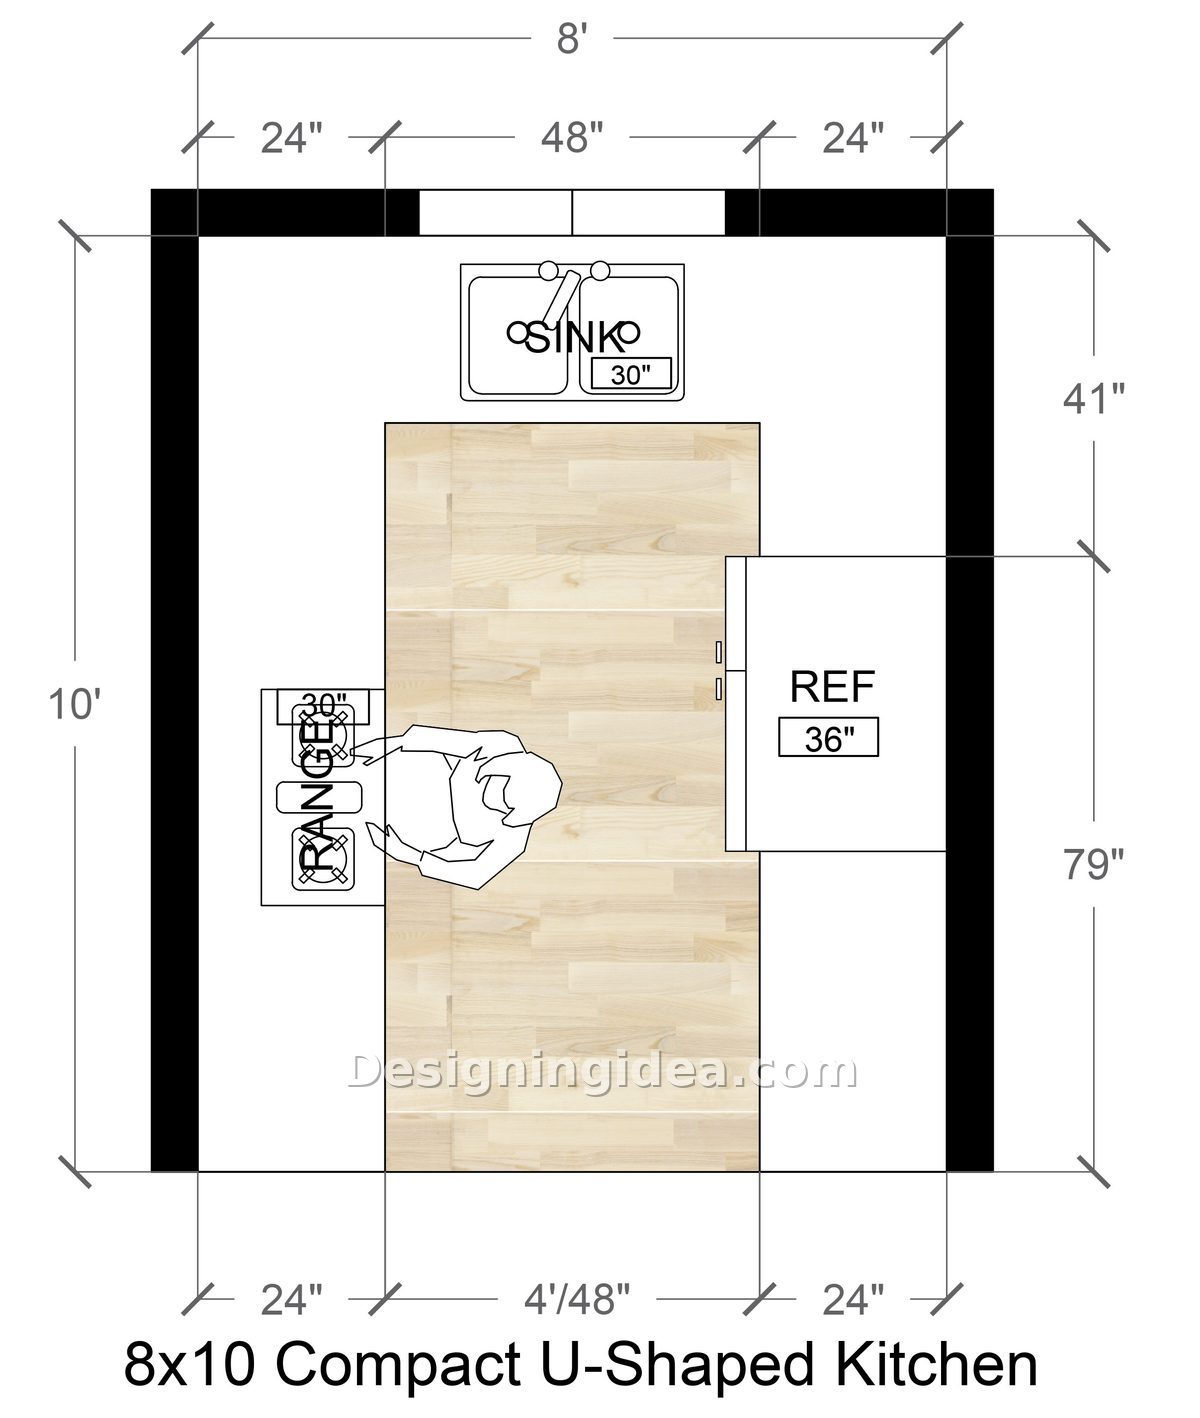
Here’s the tightest plan of all and probably the most efficient one: put the sink in the back area underneath the window, place the range on the left side, and the fridge on the right side. Turn left, then turn right, and turn around—that’s all there is to the kitchen. It is the 48-inch central opening that makes the unit suitable for everyday use; if it were any narrower, opening the oven door would cause you to end up against the other cabinet. With a 48-inch opening in front of the range, you can crouch down in front of it, and the 41-inch space in front of the sink provides a place from which to stand when you’re washing up.
The problem with a U-shaped layout is the corners; there are two of them, and corner cabinets will reduce storage space unless you make plans to accommodate them. The other problem is that a U-shape will only work if the room is actually a dead end; if you add a doorway to one of those three walls, the arrangement fails.
Dimensions:
- Room: 8’ x 10’
- Center opening: 48″
- Side runs: 24″ deep on both left and right
- Sink: 30″, centered on the back wall with a 41″ clearance in front
- Range: 30″ on the left run
- Refrigerator: 36″ on the right run
- Lower zone depth: 79″
Design Tips:
- Use the money on corner solutions; for example, a blind corner pull-out or a lazy Susan can turn two unused cabinets into useful storage space. That kind of improvement is not a luxury when you have only 80 square feet.
- Make the sink wall look light. Since there is a window in this area, don’t fit any upper shelves to that wall and let the daylight bounce off the surface. The two side walls can have all the storage that is closed.
- Observe the fridge swinging. Since the right-hand run is 36 inches, the door has to have a place to go to. Have it ordered with hinges so that it opens away from the centre of the U and not towards it.
9×10 Compact L-Shaped Kitchen Floor Plan
This corner layout leaves you a whole open side to work with.
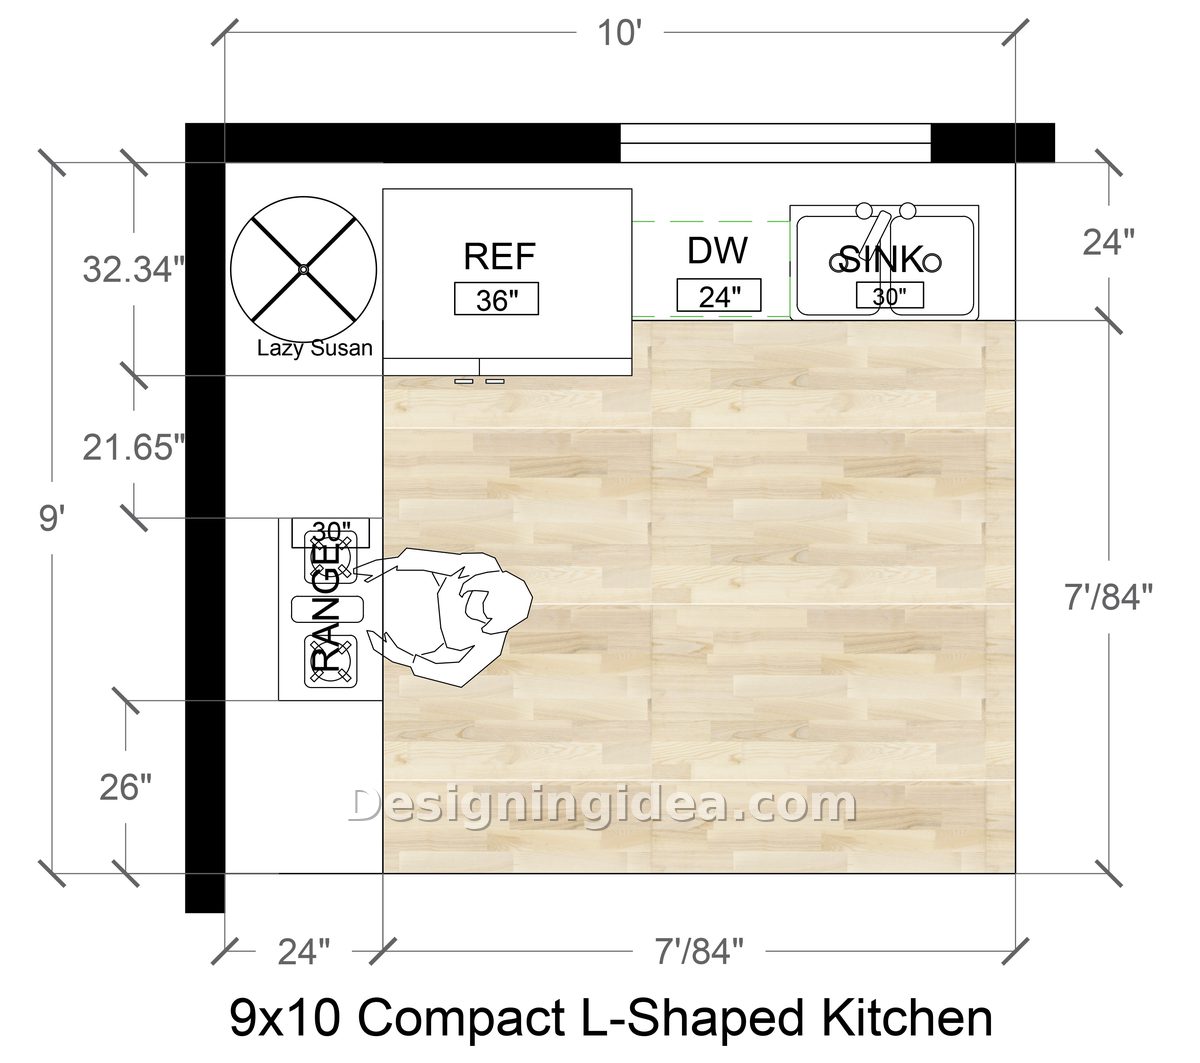
There are two rooms meeting at a corner, with the sink and dishwasher positioned along the upper wall and the range on the left side. The fridge is placed in the corner next to a lazy Susan cabinet. The result is a large open floor space, about 7 feet by 7 feet, which a one-wall or galley kitchen cannot provide. The open space is actually the reason to have an L-shaped layout in a small kitchen. Place a small table in it, or put in a 30 inch island, or just leave it empty and let the kitchen breathe. This layout is flexible in a manner that the other ones aren’t.
For this design, the work triangle is loose but still works. The route from the sink to the range is a short diagonal path, the sink and the dishwasher are next to one another, and the fridge is the one that stands out since it’s in the corner, meaning that if you want the eggs you have to take a few steps. It’s adequate for most kinds of cooking but a bit annoying when you’re unloading the groceries.
Dimensions:
- Room: 9’ x 10’
- Counter depth: 24″ on both runs
- Sink: 30″, with the dishwasher at 24″ beside it
- Range: 30″ on the left run
- Refrigerator: 36″ in the corner
- Left run segments: 32.34″, 21.65″, and 26″
- Open floor area: roughly 7’ x 7’
Design Tips:
- The rotating tray situated beside the refrigerator is carrying out a vital function. In the case of an L-shaped kitchen, the corner cabinets are by far the most common place for storage to be lost. Shelves that can rotate or a drawer set at an angle manage to retrieve most of it.
- If you include an island, then keep its width under 36 inches and leave 42 inches of clear space on the working side; if it’s any wider than that the open quadrant will no longer be open.
- In the corner, since the point where the two runs meet is always the darkest area in an L-shaped kitchen, fitting a puck light under the cabinet there means that the entire counter becomes usable rather than remaining just decorative.
10×10 Kitchen with Effective Work Triangle
This is one of the larger, smaller kitchen designs, with the appliances all being within a short distance of one another.
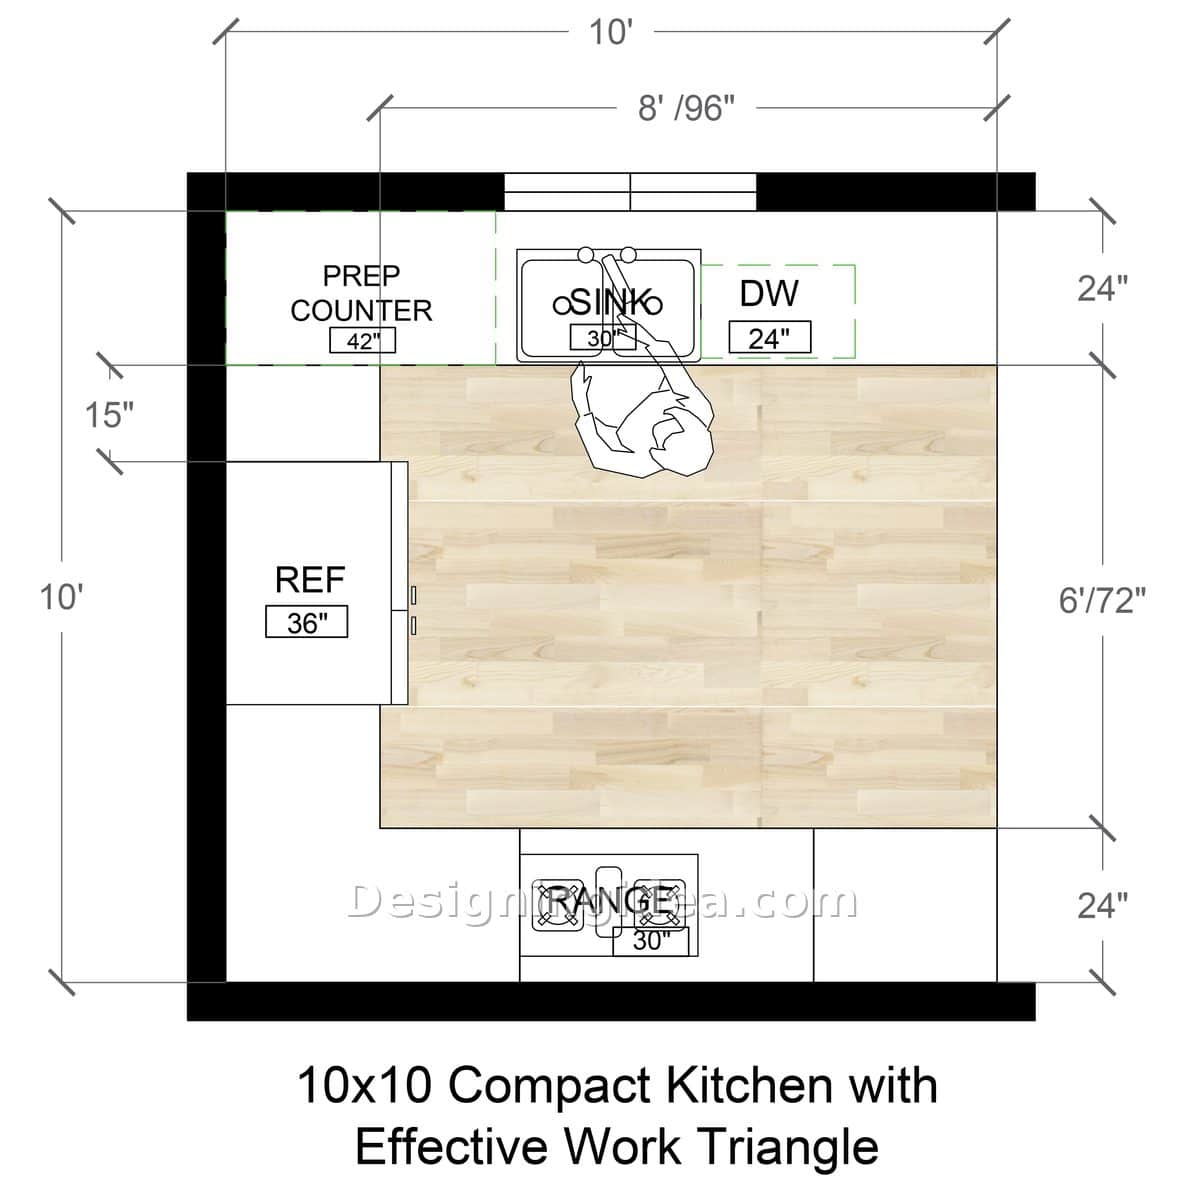
Ten by ten is the standard benchmark for a kitchen, and the present plan illustrates this. Along the top wall there should be a sink and a dishwasher, a 42 inch prep counter next to them, the fridge on the left and the range on the bottom wall. If you draw a line from the sink, through the range and the fridge, you will have a narrow triangle with each side being no more than a few steps long.
The prep counter is the feature worth copying; a section forty-two inches long that extends continuously from the sink is more useful than any appliance you can buy. This is where the cutting board goes, where the groceries are placed, and where you actually cook. Most small kitchens omit it and later regret doing so.
The clearances are comfortable all the way around: there is 72 inches between the top and bottom shelves and 15 inches of counter space between the fridge and the wall. The oven and the dishwasher can be opened without having to negotiate. For a family that cooks every day, this is most likely the most tolerant arrangement on the list.
Dimensions:
- Room: 10’ x 10’
- Upper run: 8’ / 96″ of cabinetry, 24″ deep
- Clearance between runs: 72″
- Sink: 30″, with a 24″ dishwasher beside it
- Prep counter: 42″
- Refrigerator: 36″, set 15″ from the side wall
- Range: 30″ on the lower run, 24″ deep
Design Tips:
- It’s best to leave the prep countertop free of any obstructions. Although it might be tempting to put a coffee station or a knife block on that forty-two inch stretch of empty counter, don’t do so; by keeping it open the kitchen will function properly. If you fill it, you’ll end up having to chop on a twelve inch strip again.
- Put the trash pull-out between the sink and the prep counter. That’s the path you walk most, and a bin you have to cross the room for is a bin that gets ignored.
- The range wall is your accent opportunity. It’s the one run without upper cabinets in the sight line, so tile it, hood it, and let it be the thing people notice when they walk in.
See if the kitchen work triangle works by using our free layout planner found here.
To showcase highly specific designs, some images on this website use advanced AI-generation software to illustrate ideas and room inspiration. See our editorial policy to learn more.