The bathroom sink faucet is just as important as any part of a room. They are often referred to as the “crown jewels” of a bathroom. Though it may be a small element in the design, it has the potential to create an impact on the overall look and feel of a bathroom. An antique brass faucet, for example, can give out an old-world feel, while high-end faucets can elevate the ambiance of a simple bathroom into a spa-like environment. Bathroomfaucets are available in various designs, finishes, and types. Some even have special features, which make them even more interesting. There are thousands of choices, and the design possibilities are endless.
With the myriad of bathroom faucet designs available in the market, selecting the right one can be quite confusing. Before choosing bathroomfaucets, it is important to have an idea on a few of their characteristics. Below, we give you our ultimate guide on bathroomfaucets to help you decide which is the best one for your home. [toc]
Types of Bathroom Faucets
Choosing the right type of faucet for your bathroom can be a daunting task especially that the market offers thousands of choices. What even makes it more confusing and overwhelming is that they are classified in several ways – from the way they look, their finish, the type of operation they use, and their size and configuration. However, having an idea of bathroom faucet types will help simplify this dilemma.
The configuration type pertains to the faucet’s general form – the number of pieces or parts it has, the position of the handles and the number of holes it requires to be fitted into a sink or counter.
Typically, bathroomfaucets require a provision of one to three holes drilled into a sink or counter. The handles, on the other hand, range from one to two pieces. Here are some of the most common types of bathroomfaucets:
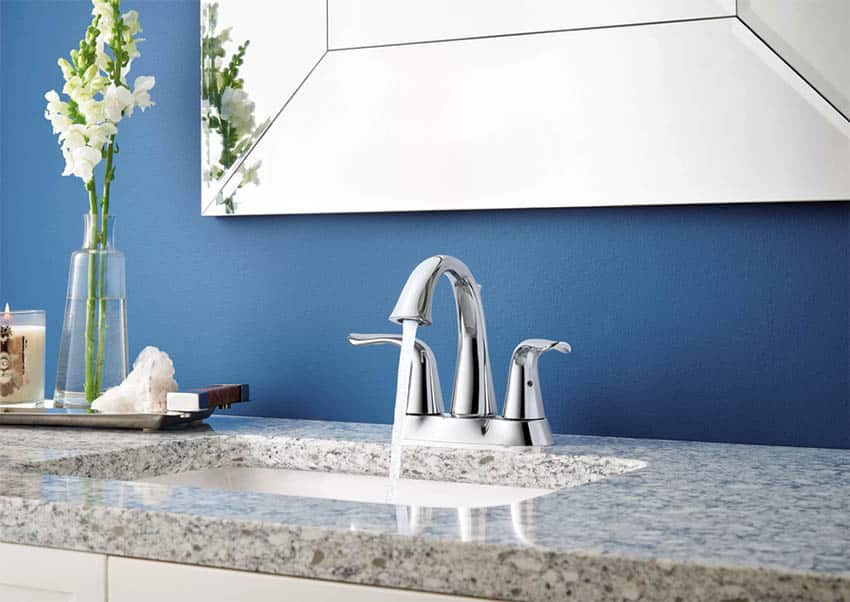
Center Set Faucet
Centerset bathroom faucet – See at Amazon [sponsored link]
The center set faucet is one of the most common types of bathroomfaucets available in the market. It comes in a single piece and is composed of a spout and a handle. Center set faucets may either have one or two pieces of handles mounted on a single base unit. These allow for the control of the hot and cold water.
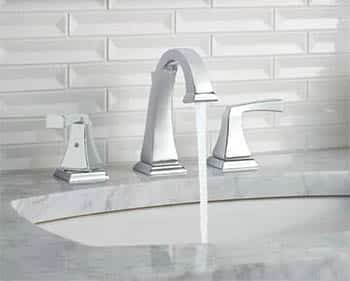
Bathroomfaucets that are center set are suitable for standard basins and sinks that have standard three holes. They are also usually referred to as a “4 inch center set faucet” because typically the measurement of the distance between the outer holes are drilled four inches apart (thus, the handles are also four inches apart). One of the most common types of center set faucets includes double handles which are mounted on a six inch plate.
Most homeowners opt for the center set design because of its simplicity – it comes in a perfect size and is convenient and easy to use. It is great for most bathroomsinks and comes in a variety of styles in the market.
Single Hole Faucet
Single hole design – See at Amazon [sponsored link]
Single hole faucets, as its name suggests, combines both the spout and the mixing handles into one unit, requiring only a single drilled hole for installation. It is composed of one stem and may have one or two levers or handles attached to a single spout which allow for the control of the temperature and water flow.
A faucet, whether it may have a single or double lever, as long as it only requires one hole for installation, is still classified as a single hole faucet. In some cases, wherein the sink has an existing three hole opening, a single hole faucet may be retrofitted using a model that has a wide bottom plate that will cover the excess holes. This type is ideal for smaller sinks and is more commonly used in small bathrooms, powder rooms and half baths.
Just like center set designs, single hole faucets are preferred by most homeowners because of their simplicity and easy operation. But it is much easier and simpler to install.
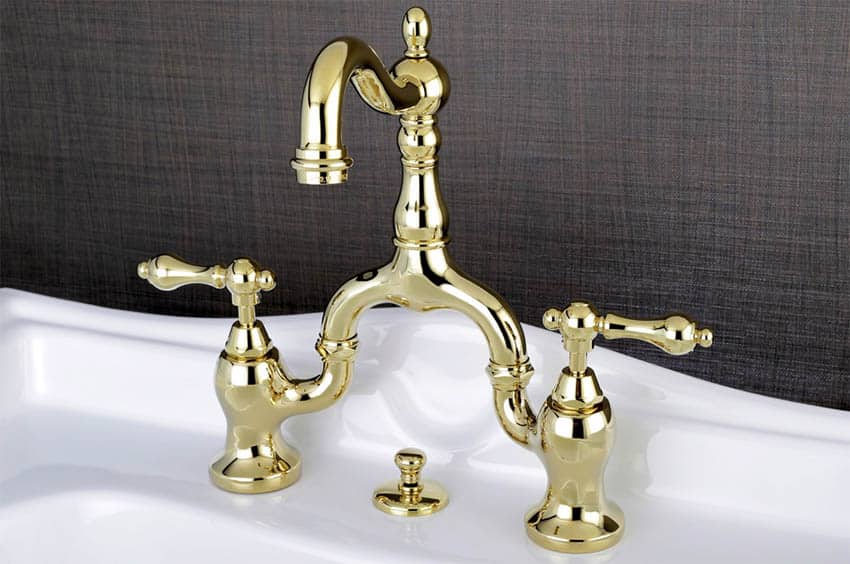
Bridge Faucet
Brass bridge unit – See at Amazon [sponsored link]
Bridge faucets is a single piece of tap wherein a spout and two levers branch off. Known for its bridge like design, this type of bathroom faucet has two separate levers for controlling the hot and cold water, connected to a spout in the middle.
If the two previous types of bathroom sink faucets require one and three holes for installation, the bridge faucet, on the other hand, requires two drilled holes on the bathroom countertop or sink. This type is mounted over the top of the bathroom countertop or sink, allowing for easy access in terms of cleaning and maintenance.
Known for its old fashioned design, the bridge faucet is typically used in classic style toilet and bathrooms. It is often used for undermount sinks.
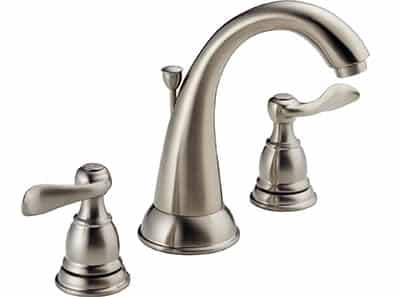
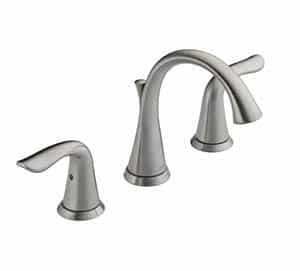
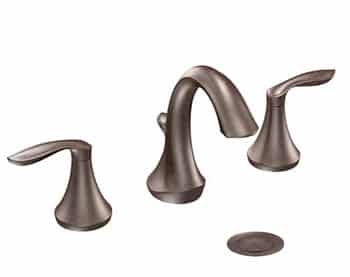
Spread Fit
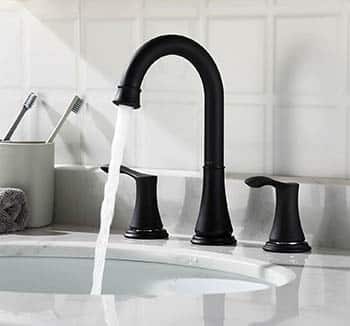
Unlike the center set faucet which is a single piece design that comes with a base, a spread fit models are composed of three separate pieces that are mounted on top of a bathroom sink or countertop- a main spout and two separate levers or handles installed on each side for controlling the water and its temperature.
In terms of installation, the spread fit faucet is very much similar to a center set design, but the difference is that requires three holes – one for each piece. Typically, these holes are drilled at a standard distance of 8 inches but may go up to 10 inches away from each other.
The parts of spread fit faucets tend to be larger than other types of bathroom sink faucets. Spread fit faucets are also sometimes referred to as “widespread mounts”. Smaller versions of the spread fit style, which are designed to be installed at 4 inches apart are called “mini spreads”.
One characteristic which sets spread fit faucets apart from the rest of the types of bathroom sink faucets is their versatility and flexibility in terms of design. In addition to the standard configurations, the layout of the spread fit’s main spout and handles may be modified and mounted in different ways.
Aside from the typical straight layout, you can install it in any way you like, allowing it to be used even in smaller bathroomsinks and countertops. For example, the main spout can be installed in the rear corner, while the two handles are both placed on one side.
If you are looking for a bathroom sink faucet that has a refined look to it, then this is the right choice for you. The spread fit faucet can be used in a variety of bathroom design styles, whether traditional, classic, contemporary or modern.
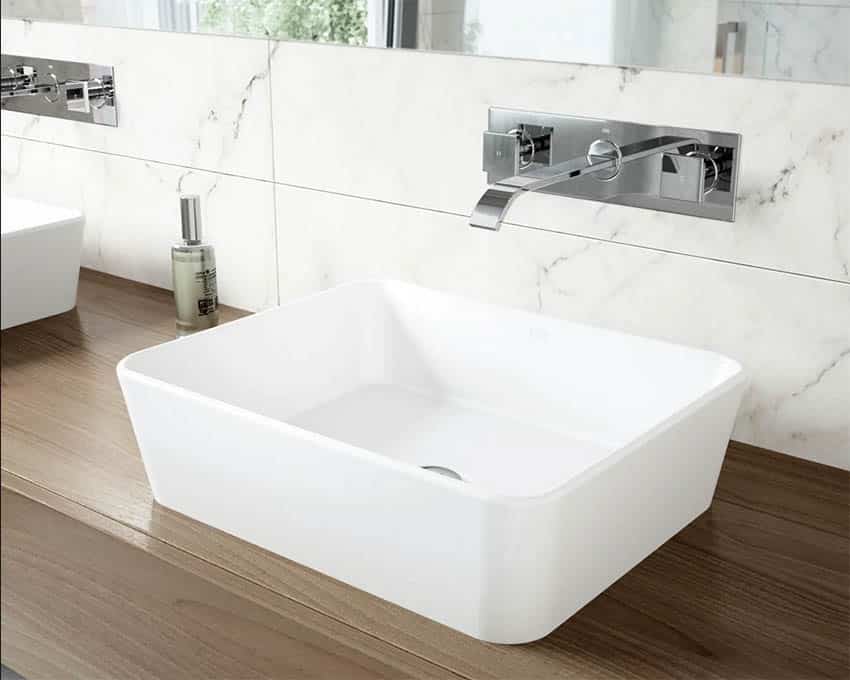
Wall Mount Faucet
Wall mounted spout – See at Amazon [sponsored link]
Wall mounted faucets, as its name suggests, are attached to the wall directly rather than being installed on top of the bathroom counter or sink. This type of bathroom sink faucet is typically used for vessel type sinks, freestanding sinks and basins which require longer spouts.
The length of a wall mounted faucet usually extends to the top of the bowl so that the water can flow fully into the basin without any spills. It is also highly suitable for vanity countertops which have a floating or cantilevered design.
The wall-mounted style is one of the most popular currently being used in interior design. Its streamlined look, clean appearance and utilitarian sensibilities make it highly suitable for modern and contemporary style bathrooms. You can find wall mounted faucets in a wide variety of finishes, styles, colors and sizes in the market.
Aside from its modern aesthetics, one of the extra benefits that a wall mounted faucet sink has to offer is easy maintenance. With this type, it is easier to keep the surrounding area of your bathroom sink clean.
There are no taps mounted on the deck of your bathroom sink, thus no calcium deposits and dirt build ups to worry about. Sometimes, a faucet mounted on top a sink or countertop gets in the way of cleaning.
There are several things to consider when choosing the right wall mount faucet for your bathroom sink. These are (1) existing plumbing layout in the bathroom walls, (2) the manufacturer’s specifications for the correct height of the faucet, (3) the size of your sink.
Before you decide on getting a wall mount design, make sure that the existing plumbing layout in your bathroom walls can accommodate it, if not, think of reorganizing the fixtures around the walls. In terms of installation, take note of the proper height and correct placement as this will minimize splashing.
Also, choose a wall mount faucet that correlates to the size of your bathroom sink. The length of the tap must be enough and the spout must be just above the center of the bowl. When the faucet is opened, the position of the water stream must be behind the sink drain and the clearance in between the tap and the top of the sink or basin must have a minimum measurement of one inch.
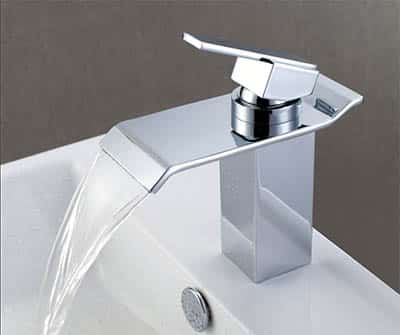
Waterfall
The waterfall faucet is another unique innovation in bathroomfixture design. It has been around for quite some time, but has only gained popularity in the recent years.
The traditional design of bathroomfaucets typically include an aerated hole through which the water flows or passes,almost as if lacking “movement” and dynamics. This is what the waterfall spouts address — as it is designed in such a way that the water pours while mimicking its natural flowing motion.
(See this waterfall spout at Amazon) [sponsored link]
The waterfall faucet is the best choice for homeowners who plan on achieving a spa-like ambiance, as the water gently falls from a wide opening, creating a soothing sight and a calming sound.
Single-Handle Faucets
Single handle faucets, also known as single lever faucets, are composed of one main spout and one handle or lever. The single lever, which can be maneuvered from left to right, controls both the flow and temperature of the water.
This type may either be mounted to the deck of a sink or on top of a vanity countertop and often require only one drilled hole for installation. Single handle faucets do not require much space and can fit in an area that is about two to three inches wide.
Deck Mount
A deck mount faucet is a type that is directly installed on top of the bathroom vanity countertop. It differs from faucets which are mounted to the bathroom sink itself or installed on the wall. These often have a one handed design which controls water flow rate and temperature.
Sprinkle
The sprinkle faucet is modern innovation in design. Unlike a traditional style in which water is released in a cylindrical shaped spout, the sprinkle faucet uses a unique type of spout wherein the water comes out in a rectangular pattern.
Faucet Parts
Knowing the parts of a faucet is extra handy when it comes to repairs and installation. By having an idea of how your bathroom faucet works, assembly is much easier and quicker. Below, we give you a quick overview of the different parts of a bathroom faucet:
Ball faucet
Ball faucets are a type of washerless design. This type only has one handle or lever for controlling the hot and cold water. The same handle also works for regulating the pressure as well as the flow rate of water – it just depends on where you position it. The handle of ball faucets rotate up and down and also move from side to side — each direction or position corresponds to what it controls.
The ball faucet is composed of different parts, namely the main spout, the handle, and the ball. The ball faucet’s handle controls a rotating ball, which is also known as the lever ball assembly. Found inside the faucet’s body, the lever ball assembly is composed of a system of springs and a series of inlets. When operated, the slots inside the ball are aligned with the inlet seats, controlling the amount of water flowing in the spout.
Disc faucet
Disc faucets are also what their name suggests. This type is made up of two highly polished, perfectly flat ceramic discs. Disc faucets have a newer design and a more durable built compared to ball and compression faucets.
However, it is similar to the ball faucet as it is also washerless and has handles that move side to side and in an up and down motion. The only difference is that ball faucets rotate semi freely, but disc designs do not have as much free motion.
Another main characteristic of the disc design is its large cylindrical body. It is typically wider than other types of faucets simply because its body contains the two discs inside. These discs are known as the upper and lower discs. The lower disc stays locked in place while the upper disc moves when the handle rotates.
When the faucet is opened, the upper disc separates from the lower disc, and the gap in between is where the water passes. When the faucet is not in use, the lower and upper discs are pressed together and form a watertight seal – blocking any drop of water from flowing. Just like the ball faucet, the disc design is a washerless type.
Cartridge faucet
If ball faucets are operated using a rotating ball, and disc designs are made up of two discs, then cartridge faucets are, as their name suggests, made up of a cartridge. Cartridge faucets have a hollow metal cartridge inside its body. The cartridge controls the flow of the water – it blocks water from both hot and cold sources when not in use. When the faucet is opened, the cartridge is pushed forward and unseals the waterlines, allowing the water to flow freely. To control the temperature,the cartridge rotates slightly, blocking either the hot or the cold water inlets. This type is washerless
Cartridge faucets can either have one or two handles. It operates in a very simple, easy and smooth motion and there is no need to rotate the handles in order to control the water flow.
In single handle cartridge faucets, the “on” and “off” switches are controlled by moving the handle up and down, while the temperature is adjusted by moving the handle side to side. It is easier to operate than compression faucets.
Compression
Known as the oldest type of faucet mechanism, compression faucets require the most effort to use. All compression faucets are composed of two separate handles which control the hot and cold water. They operate by means of turning or rotating the handles manually – simply loosen it for water to flow or tighten it to stop the water.
Unlike the three types of faucets mentioned earlier, the compression design relies on washers for operation. The handles of a compression faucet connect to two stem assemblies, one for each handle, which is made up of screws and washers.
When the handles are operated, these stem assemblies move down to the valve seat, compressing it thus water flow is stopped. On the other hand, the washer rises, and pressure from compression is removed, allowing the water to flow through the faucet.
Aerator
An aerator is a small attachment that’s fixed to the end of the faucet’s spout. Its primary use is to add air to the water to reduce the amount of water while maintaining a high-pressure flow. This helps maintain a steady stream of water that helps prevent splashing. Some aerators are fitted with mesh that can filter sediment and particles from the plumbing system.
Faucet Sizes
Not all faucet types work with every sink, so it’s important to make sure the one you choose will fit your sink or basin. Knowing the standard sizes of bathroom faucets and the provisions for each type comes in handy when selecting the right one for your home.
Here are the answers to the most frequently asked questions about faucet sizes:
Are all bathroomfaucets the same size?The size of bathroomfaucets varies. When we say “size”, this often refers to its height. The standard height of bathroomfaucets ranges from an average of 3 inches to 13 inches. In terms of length, bathroomfaucets are typically 12 to 16 inches long.
What is the standard faucet hole size?The type you use will determine the number of holes that needs to be drilled in your sink or vanity. Standard drill holes may either be centerset, widespread or single hole.
The number of holes ranges from zero, one , two and three – zero for wall mounted types, one for single hole bathroomfaucets, and three for those with double handles.
Standard bathroomfaucets and taps generally require a hole with a minimum diameter of 22 millimeters. Sensor activated faucets and touchless bathroomfaucets, on the other hand, need a provision of 28 millimeter diameter hole in a sink or vanity counter.
In some cases, a 25 millimeter hole would also work for some touchless models. Single hole faucets which usually incorporate a monobloc mixer that combines both hot and cold water supplies into one piece, often require a drilled hole of 32 millimeters in diameter.
The standard “spread” or the total measurement of the distance between the holes in the sink or vanity counter ranges from 4 inches to 8 inches. For faucets with a singular plate, allot at least 6 inches of space fo the design.
Bathroomfaucets that have separate parts and pieces will take at least 3 to 4 inches of distance in between each item — meaning, 3 to 4 inches in between the cold water handle and the main spout, and 3 to 4 inches in between the hot water handle and the main spout.
Standard widespread faucets measure between 8 to 16 inches on center.
How do you measure a bathroom sink faucet? When measuring a bathroom faucet, take note of the “inches on center” principle, meaning, the measurement of the distance is taken from center to center of the holes on the sink or a vanity counter.
For example, if your bathroom sink has three drilled holes, measure the distance from the center of the hole on the left to the center of the hole on the right. The resulting number will determine the type of faucet that you will be using. A quick guide will be:
Distance of less than 6 inches = centerset, mini spread or 4 inch spread faucet
Distance of 6 inches and more = widespread faucet, 8 inch spread faucet
What does 4 inch centerset mean? Most centerset bathroomfaucets are often referred to as as 4-inch centerset. This simply refers to the measurement of the distance between the faucet’s handles. Four inch centerset bathroomfaucets require three holes, which are drilled at 4 inches apart. This type is also often referred to as a “4 inch minispread”.
The distance of the holes for a 4 inch centerset bathroom faucet is measured center to center — or between the center points of the two outer holes in the sink or vanity counter.
What is an 8-inch faucet spread? An 8-inch spread faucet is intended for use in sinks or vanity counters with three pre-drilled holes eight inches apart. The three holes are for installing three pieces: the tap and the hot and cold handles.
Faucet Cost
Average cost – Generally speaking, bathroomfaucets are inexpensive, and fortunately, even the average cost of replacing and installing faucets is low. Whether you are adding one for a new project or replacing an old worn out piece, it is considered to be a simple job that requires minimal effort and materials and, thus, wouldn’t cost you that much. Due to the fact that faucets are inexpensive, some homeowners opt to replace them every five years or so.
The average cost of faucets ranges anywhere between $100 to $200 for the traditional type. But options which have added features, special finishes and more elaborate designs will, of course, set you back a little more, falling in between $200 to $300. In general, faucets cost less than kitchen faucets, both material and installation wise.
Cost depending on types, brand , finish and features – There is a large variety of bathroomfaucets available in the market, categorized according to their type, mechanism, material, configuration, finish and feature. Materials are also very diverse – ranging from metals, alloys to plastic. Each of this factor affects the price.
Here is a look on the average cost of bathroomfaucets for each category:
Cost depending on design
Cross handle faucets – Cross handle faucets are those that feature the “X” design. These are inexpensive and typically costs a minimum of $10, however, the high end models can go up to $900 a piece.
Knob type faucet – The knob type is an older design for faucets and its price runs between $10 and $150.
Lever type faucet – Lever type faucets cost a minimum of $30 and can go up to $200, but you can still find high end options with special handles and their price can go all the way up to $1,000.
Joystick faucets – Joystick designs have a simple design and its price range from $50 to $400.
Push Button faucets – Because of the difficulty of installing push button models, this type costs more than others and typically has a minimum cost of $100.
Touchless faucet – High quality and innovative, touchless units fall on the high end spectrum, and its price starts at $150.
Cost depending on type and configuration
Bridge faucets – Bridge faucets cost more than other types because of their elaborate design. Its price can run anywhere from $200 to $300.
Wall mounted faucet – Wall mounted models are more expensive than deck type and typically cost $200. Since they are more complicated to install, wall-mounted products also incur more labor costs and material costs, especially when it comes to customizing your plumbing to accommodate them.
Cost depending on brand
There are hundreds of manufacturers in the market and these brands may either be classified into low end, mid range and high end options. Here are some of the most popular brands of bathroomfaucets and their average cost ranges:
Peerless: $15 to $200
Premier Faucet: $25 to $200
Kraus: $50 to $400
Kokols USA: $50 to $400
Danze: $50 to $600
Hansgrohe: $100 to $2,000 (high end range)
Cost depending on the material and finish
The finish and color of the bathroom faucet also play a key role in its cost. The finish also determines the material composition of the unit, thus affecting its overall price. Here is a look at the average prices based on their finish and material:
Chrome: $5 – $2,000 (least expensive of all finishes)
Bronze: $10 – $900
Nickel: $10 – $2,000
Brass: $300 – $1,000
Black: $50 – $500
Gold: $500 – $800 (most expensive of all finishes)
Bathroom Faucet Installation Costs
The average for total installation costs of bathroomfaucets, including labor and materials is about $250, depending on several factors.
Labor – If you will be hiring a professional to install your faucet, expect to pay between $150 and $450 for their fees. A plumber who completes the job in less than two hours would typically charge $200 on the average. Aside from the labor costs, there are other factors too which may affect the total installation cost.
Faucet Finishes
Here are some of the most common bathroom faucet finishes available in the market:
Stainless steel
Stainless steel is best known for its sharp look and bold aesthetic. But not only is it prized for its appearance but also for its extreme durability and high quality. Stainless steel is probably the most hard wearing of all faucet finishes.
In general, stainless steel is much better than chrome in terms of resistance and endurance. It has a stylish look which is perfect for contemporary and modern style bathrooms.
Pros: Having the ability to retain its appearance for years, stainless steel finishes are also corrosion and rust resistant. Although not fully stain resistant, maintenance is easy, and any water spots or marks can be cleaned with just a cloth. It can also be polished easily and is proven to be very hygienic.
Cons: Stainless steel is not offered by all manufacturers and those that do, sell it at a higher cost. In general, stainless steel faucets cost more than chrome, black, white, or brass finishes. (See a similar stainless steel faucet at Amazon [sponsored link]
Zinc
Zinc is a type of metal alloy, made by combining tin and lead. In terms of appearance, zinc faucets have a shiny look and a color which is somewhat similar to stainless steel. This type of finish suits most interior styles but works best with modern and contemporary bathrooms.
Pros: Zinc faucets are among the cheapest finishes. If you are working on a budgeted bathroom remodeling project, zinc can save you a lot of money.
Cons: While zinc faucets may be the cheapest, they are also the least durable. It is not stain resistant, not rust proof and it corrodes when it is in contact with water. As soon as the plating wears off, zinc models must be replaced. So if you are looking for a finish that can withstand the wear and tear of daily use, then this is not your best option.
Oil rubbed bronze
If you are looking for a finish with a traditional look and feel, then oil rubbed bronze is the best for you. Its aesthetic is a a perfect match for bathrooms with a classic setting. It is also well suited with Tuscan or Mediterranean inspired interiors.
Pros : Oil rubbed bronze finishes have a unique aesthetic quality, making them a great alternative for brushed nickel and chrome finished hardware. It is highly durable and easy to maintain and clean, as it does not show any fingerprints or watermarks.
Design wise, oil rubbed bronze is easy to match with accessories and bathroom fixtures, so it is easy to work around with the color palette of your room design. It can either be matched with other brass items or it can be used as an accent.
What’s even better is oil rubbed bronze finish items , in general, are widely available in the market. So aside from faucets, you can buy classic cabinet knobs for your sink and a stunning light switch plate to match the aesthetic.
Cons : The only drawback of oil rubbed bronze finish faucets is that it is more expensive compared to other finishes such as brushed nickel and chrome.
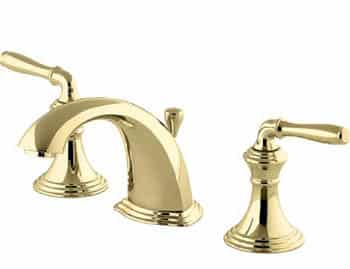
Brass
There are two types of brass finish for faucets available in the market, namely (1) polished brass and (2) satin brass. Polished brass is one of the highly favored finishes for classic bathroom settings because of its exceptional timeless shiny gold like color.
It is typically used for interiors with a vintage look and feel. Satin brass, on the other hand, has the same timeless look, but instead of being shiny it has a brushed gold like color. It has a more subtle appearance but still has the same bold aesthetic which can bring in a lot of class to a interior.
Polished brass finish faucets are highly suited for classic and traditional settings, but it also goes well with eclectic and modern themed interiors.
Its satin counterpart is also a good go to for traditional style bathrooms, but because of its “tamed” look, it can also be a perfect match for modern and contemporary settings. (See this brass faucet at Amazon) [sponsored link]
Pros: Polished brass finish is highly durable and its shiny appearance makes it easy to clean. It is also easy to match with other bathroom fixtures, hardware, and accessories. Since they are considered to be an all-time favorite, polished brass faucets are easy to find in the market.
Satin brass finish also has the same durability. Because of its matte appearance, fingerprints and water spots are not as highly visible as compared to with a shiny finish. It also works as a great accent color.
Cons: Brass finish faucets are generally more expensive than other other finishes, such as chrome and brushed nickel. But between the polished and satin varieties, the latter will set you back a greater amount.
Unlike polished brass finish, which is easy to find, satin brass finish is a bit of a challenge to look for in the market. Satin brass is also a bit more difficult to match with other accessories, hardware and fixtures.
Chrome
Chrome is known to be the most popular finish for faucets. Its sharp color gives it high versatility and makes it a perfect match for all styles of interiors.
Pros : Chrome is the most inexpensive finish for bathroomfaucets. But despite not costing a lot, it it highly durable and very easy to clean. You can also find chrome finish faucets easily in home improvement stores and manufacturers.
As mentioned, its high versatility makes it a perfect match for any style and theme, and it is easy to match with accessories, hardware and other fixtures.
Cons: Despite being easy to clean, one drawback of chrome faucets is they show water spots and fingerprints more easily. So, if you are very particular with marks and maintaining a spotless sheen, you might have to wipe it every now and then.(See this chrome product at Amazon) [sponsored link]
Black
One faucet finish, which continues to pick up steam nowadays, is Black. Black bathroomfaucets often come in a matte finish.
Pros: Black goes with everything, and there is no doubt that this finish will match easily with any color palette and style. It is also very versatile and can go well with most accessories, sink counters, vanities, hardware and accent pieces.
In addition, black finishes give out a classy vibe and a bold statement. It works best for modern and eclectic style bathrooms, but with the right style of faucet, can also go well with farmhouse themed designs.
Another advantage of using black faucets is easy maintenance. Its dark color has the ability to mask fingerprints and water spots.
Cons: Unlike other finishes like chrome and brass, which are easy to find in the market, the options for black faucets are quite limited and hard to find. It also costs more compared to nickel and chrome. (See this black finish product at Amazon) [sponsored link]
Brushed nickel
Nickel has a darker color than chrome and it’s a good option for homeowners who prefer a smooth a shiny finish. Nickel, in general, has two popular finishes, brushed and polished.
Brushed nickel has a soft metallic color and a more subtle appearance compared to its polished counterpart. Brushed nickel faucets can be used for almost any style of interior whether it may be traditional, contemporary or modern.
Pros: Brushed nickel faucets offer a lot of possibilities when it comes to design because it can pair well with almost any color and type of accessories and fixture. Aside from its versatility, one notable characteristic of brushed nickel faucets is its high durability.
Compared to chrome, nickel will practically stay the same throughout the years, showing no signs of wearing and keeping its finish and appearance. Brushed nickel faucets also do not show water spots and fingerprints easily because of its matte color. Although they cost more than chrome, products with brushed nickel finishes are generally inexpensive.
Cons: Brushed nickel has the tendency to blend in with other fixtures and accessories, so if you are looking to make a bold statement in your bathroom, then this may not be the best option. Also, if you are planning to use it with stainless steel accessories, brushed nickel faucets will not coordinate well.
Faucet Designs & Additional Features
Below is a list of common bathroomfaucets designs and additional features:
Cross handle
Cross handle faucets are those that feature an “X” shaped handle. This type is simple and easy to use – just turn the x shaped knobs to allow the water the flow or to stop it. Cross handle faucets come in single and double handle designs.
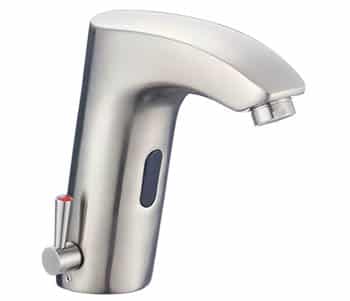
Touchless faucet
Touchless bathroomfaucets are innovative and more modern. This type is also sometimes referred to as an automatic, sensor, motion sensing, hands-free, touchless, electronic, or infrared faucet. It is more commonly found in public restrooms, specifically in hotels and airports.
Compared to traditional faucets, which typically require turning a knob, lever or joystick to operate, this type operates without the need to touch it.
Touchless models are equipped with proximity sensors, often incorporating active infrared devices, that detect the presence of hands.
Once the hands hit the sensors, it automatically opens the valves to release water flow, and it closes the valves again to shut down the water once hands are no longer detected.
Most touchless faucets are battery operated. This design is supposed to control and reduce water consumption significantly. (See this sensor model at Amazon)
Waterfall flow
Designed to mimic the natural flow of water, waterfall faucets are soothing to both the eyes and the ears. This type is commonly used to achieve a spa like feel in the home. Unlike traditional types, which usually have an aerated hole in the spout, waterfall faucets have bigger openings, often rectangular or curved in shape.
Bathroom vessel sink faucets
Vessel faucets are tall faucets that are specifically designed to be paired with vessel sinks and basins. This type of faucet clear the high rim of a vessel type sink.The height of bathroom vessel sink faucets typically ranges from 4 inches and above. Most vessel sink faucets feature a simple single handle design which makes them easy to use.
In addition to their easy operation, vessel sink faucets also have a more sophisticated look because of their height. Installation of vessel sink faucets is also more easy because most of the vessel sinks already have pre drilled holes as provision.
How to Replace a Bathroom Sink Faucet
Replacing a bathroom faucet is an easy-to-moderate job and can be undertaken as a DIY remodel project. It can take almost an hour to finish the task and may cost anywhere between $60 to $160.
Check out our comprehensive guide on how to replace your bathroom sink faucet.
Access is more tricky when replacing a bathroom faucet as compared to installing a new one because with the former, you are working with an existing counter and a sink that is already mounted in place, so chances are, you will be working underneath the cabinet and your work space is limited.
Replacing an old faucet is also an opportune time to check other parts and fittings in your sink, so if there are any water supply tubes that are old and corroded, this is a good time to replace them.
Tools needed:
adjustable wrench
Basin wrench
Pliers
Putty knife
Materials needed:
new faucet
safety glasses
work gloves
Bucket
rags
plumber’s putty
plumber’s tape
Silicone caulk
WD-40
flexible water line extension (two per faucet)
Steps to replace a bathroom faucet:
Determine the type of faucet you have. Identifying the existing type of faucet you have is the most crucial step because each type of faucet requires different tools and varies in terms of installation. Understanding the type of faucet that you have will also help you get an idea on how you’ll work around. Also, a little extra research on you faucet type can go a long way in DIY projects like this.
Note all existing connections and the space you have above and under your sink. Again, this will give you an overview on how you put back everything into their respective places later on.
Purchase a new faucet that matches the type of the existing faucet that you have. If you wish to, you can go with a different type of bathroom faucet, however, matching your existing faucet with the same type will make installation easier as there will be no need to adjust holes or drill new ones.
You can also use this opportunity to check your existing water flexible lines, p traps, sink drain and other fittings so you can also replace them if needed.
Declutter your working area by removing all of the items above and under your sink. As a precautionary measure, place a bucket underneath the bathroom sink and lay down rags before you remove the old faucet. This will catch any remaining water later on when you start disassembling.
Assemble all the parts you need. After picking out and purchasing your new bathroom faucet, prepare everything you need. Assemble all the parts such as the fittings and hardware. Prepare installation specifications and double check if your existing water line matches the end of your new faucet.
Keeping everything at hand enables you to finish the work faster. This will also save you from taking multiple trips to the store which sometimes cause delay to get the job done.
Turn off the water supply. The “on and off witch” of your bathroom sink’s water supply is a small wall valve located under it. Shut it off to prevent flooding and to avoid further damage. Once the valves are closed, turn on the faucet to remove any residual pressure.
Remove the water supply connections. Use an adjustable wrench and turn into a clockwise motion to loosen the water supply connection. Once loose, you can use your hand to remove it completely. Do not forget to catch any water that leaks with a bucket.
Remove all existing hardware. A bathroom sink faucet is typically fastened using nuts and washers. You can find all of these under the sink. Aside from this, a clamp bolt is also attached to the drain rod extension of the sink. Remove all of these existing hardware using an adjustable wrench.
Loosen the flexible extension of the faucet and remove it from the unit. Then remove the flexible extension from the shutoff valve. Drain any excess water in the bucket
Remove the old faucet. Once all the hardware which secures the unit are removed, slowly pull out the faucet from the top. If it does not move easily due to corrosion or if it is sticky, try applying more pressure when lifting it up. You can also apply some WD40 to loosen it.
Clean the area around the old fixture. Remove any old plumber’s putty or silicone caulk using a knife.
Mock assemble your new faucet. A mock up of the assembly of your new unit will give you a better visual of its actual installation. This is particularly helpful if you are working underneath the sink and things are not as visible.As mentioned earlier, keep your manual ready and consult and double check it as needed.
Install your new faucet. Fit the new unit into the hole in the bathroom sink. Assemble according to the instruction manual. The typical arrangement on top of the sink would be the faucet, plumber’s putty, or gasket, then underneath the sink would be a large washer or saddle and a mounting nut.
If needed, take a small piece of plumber’s putty and mold it into a ¼ inch diameter rope. Apply the putty around the base of the new faucet and tighten the mounting nut and washers below the unit using an adjustable wrench to secure it in place.
Connect the mixing valves. If you are using a single-hole faucet,there is no need to assemble the mixing valves as they only come in one piece. Typically, this step is done by tightening a large nut and washer from below the bathroom sink and a large washer and clip on top of the sink.
You can use an adjustable wrench to adjust the tightness of the nuts and washers. Make sure to position the valves in the right place, hot on the left and cold on the right.
Reconnect the water supply tubes. Attach hoses to the tailpiece of the faucet. One hose goes to the hot water valve and the other goes into the cold water valve. Tighten the nut by hand by turning in a clockwise motion, then finish it off with a basin wrench.
Once the hoses are attached to the tailpieces of the faucet, attach them to the water supply using an adjustable wrench. Remember not to over tighten your connections.
Reinstall the drain rod and the drain pipe. Reinstall the drain rod to the extension by unscrewing the pivot nut, placing the drain rod inside the hole and tightening back the nut. After this, screw on the drain pipe.
Test your new faucet. Turn on the water and let it run for several minutes to see if there are any leaks. Make any necessary adjustments by tightening connections using an an adjustable wrench.
Watch this video on how to replace a bathroom faucet:
How to Install a Centerset Faucet
The level of difficulty of installing a new faucet greatly depends on the type you will be using. But it is safe to say that installing a new one is much more easier than replacing an old one, because as most people say removing an existing faucet sometimes takes up much of the effort.
You can assemble your faucet before installing your sink, cabinet or countertop, which gives you more room to work and better access to the underside of the sink and the plumbing layout of your home.
Bathroomsinks also have different types of configurations. The number of holes drilled onto your bathroom sink (ranges from one to three holes) will help you determine the type of faucet you will be needing. It may be set up for a single piece , a three hole centerset, or a wide spread faucet. Just make sure it will fit the existing provisions of your bathroom sink.
In this step by step guide, we will be showing you how to install one of the most common bathroomfaucets,the centerset style.
Tools needed:
adjustable wrench
Basin wrench
Pliers
Putty knife
Materials needed:
Faucet (and other parts included)
safety glasses
work gloves
Bucket
rags
plumber’s putty
plumber’s tape
Silicone caulk
Thread seal tape
Steps to replace a centerset bathroom faucet:
Prepare all necessary tools and materials. Preparation is always key to an effective and hassle free workflow. Unpack your new faucet and double check if all the necessary parts are complete. Keep your instruction manual at hand as you will be needing it later on.
If any pre-assembly is required, proceed with it according to the directions on the manual. Assembling and installing a bathroom faucet is easier if you work with your sink upside down. Lastly, before installation, make sure to clean the surface of your sink or vanity where your new fixture will sit. You can do this using a rag or damp soft cloth.
Fit the rubber gasket onto the faucet. A gasket is a piece of rubber or plastic that is placed in between the faucet and sink to create a watertight seal and prevent any leaks or spills from flowing down the counter or from damaging the cabinets.
Put it under the bottom part of the faucet, matching the holes on its components. This is easy because it typically just snaps into place. In some cases, faucets don’t come with a gasket – you can use a plumber’s putty or apply a thin layer of sealant into the perimeter of the base before inserting it into the sink or countertop holes.
Wrap the end of the faucet’s tail pipes and the threads with a layer of plumber’s tape. Plumber’s tape, also known as Teflon tape, is a thin, elastic white colored tape that is used to lubricate and seal plumbing fittings and components. Make sure that the tape does not extend beyond the pipe’s end.
Insert the new faucet in the mounting holes of the sink. Carefully set the faucet into position and push the tailpiece into the mounting holes drilled in the sink. Once set, thread a washer and twist a mounting nut over the tailpiece. Do this by hand in a clockwise motion to tighten it and then finish it off with an adjustable wrench to full secure.
Do the same thing for the valves and tailpipes – drop them onto their respective holes and tighten them in position using an adjustable wrench. Avoid overturning the nuts as you secure it in place as this may cause damage to your sink.
Connect the water supply hose or flexible tube to the tailpieces of the faucet. First, attach the hoses to the tailpipe of the faucet. Tighten the nut by hand by turning in a clockwise motion, then finish it off with a basin wrench.
Connect the water supply hose or flexible tube to the water supply. Once the hoses are attached to the tailpieces of the faucet, attach them to the water supply shut-off valves found in the wall. Gently bend the flexible tubes. Use the same process to tighten it – turn the nuts by hand in a clockwise motion and finish it off with an adjustable wrench.
Turn on the faucet to test it. Slowly turn it on and let the water run to flush out any debris. Double check if the fixture and the supply lines have any leaks.
Some important considerations:
This simple guide is a generalized instruction for installing a bathroom sink faucet. Make sure to follow the instructions in the manual provided by the manufacturer.
Tools may be provided with your new faucet once you purchase them. Use it wisely as it can help you save time and effort.
Be careful not to over tighten nuts and screws.
If going with other types of faucet, make sure to accurately measure the distance between the required holes.
To showcase highly specific designs, some images on this website use advanced AI-generation software to illustrate ideas and room inspiration. See our editorial policy to learn more.
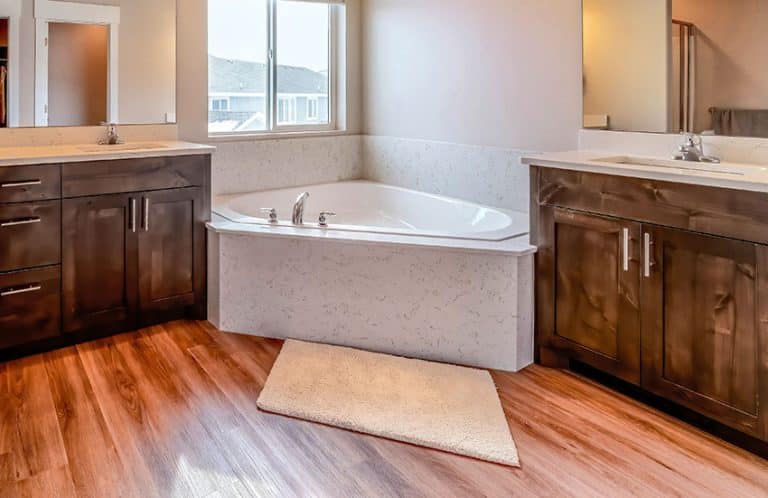
Here’s our corner tub dimensions guide including standard, small and two-person corner tub dimensions and corner tub benefits. If floor space is the biggest problem…
Bathrooms are among the most frequently redecorated and renovated rooms. They must also convey cleanliness, and all the materials used must withstand changes in moisture…