For most homeowners, a three-car garage represents the sweet spot in home design, with enough space to protect multiple vehicles and offering enough room for storage, hobbies, and projects. Yet when you walk into most three-car garages, you’ll often find there’s barely enough room to open the doors, tons of items piled against the walls, and wasted potential. The truth is, a three-car garage is 700 to 1,000 square feet of potential that most people underutilize. The difference between a garage that works and one that doesn’t comes down to proper layout planning that considers your needs and how you actually use the space day to day. Below, I’ve crafted five different 3-car garage layouts that offer secure vehicle storage, storage options, and a variety of features you’ll want depending on your lifestyle.
Classic 3 Bay Front-Load Garage Floor Plan (Everyday Family Setup)
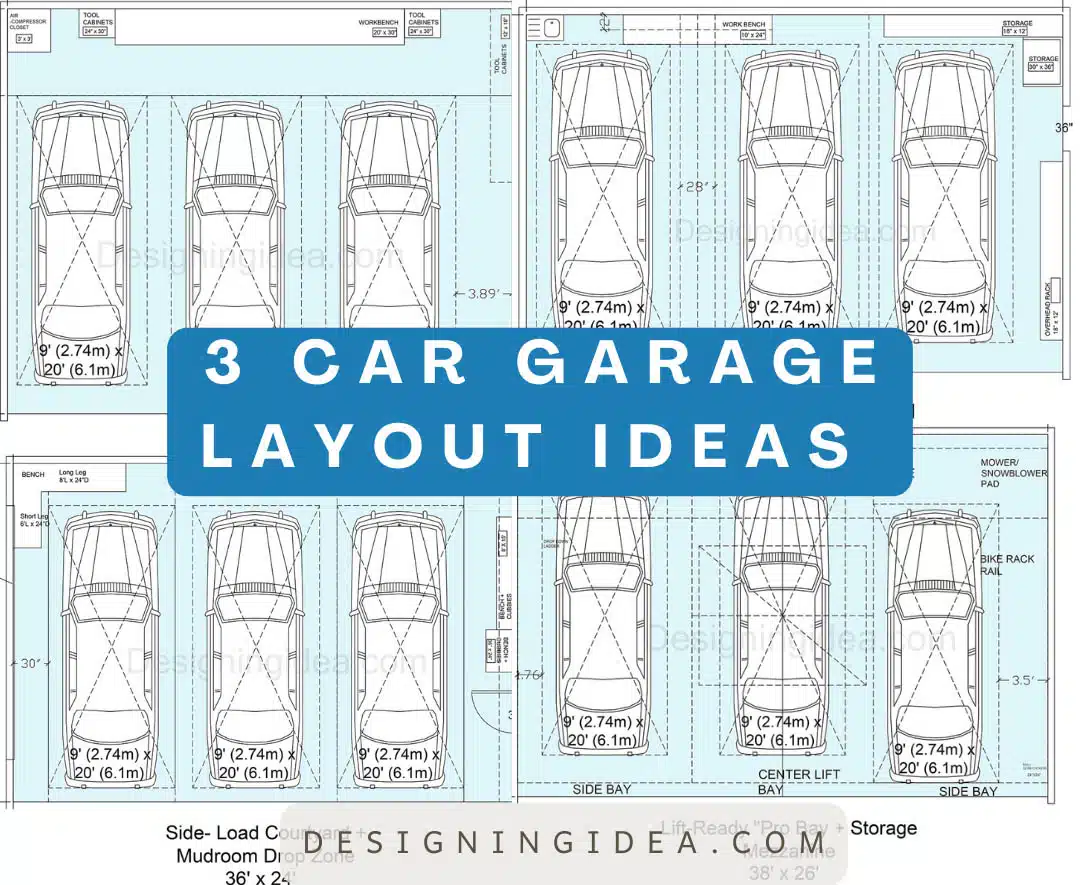
This 36′ x 22′ three-bay garage balances everyday needs with practical storage and workspace so you can have room to do all of your favorite hobbies without sacrificing parking space.
Easily Create Your Own Room Makeover
Upload a photo and get instant before-and-after room designs. No design experience needed — join 2.39 million+ happy users. 👉 Try the AI design tool now
Layout Details: This classic 36′ x 22′ three-car garage layout offers an ideal configuration for families who want accessible parking and efficient space for storage and household DIY tasks. The front-load design accommodates standard-sized vehicles measuring 9 feet wide by 20 feet long, with storage along the back. The layout maximizes the 792 square feet of total space while providing comfortable clearances for opening doors, walking around vehicles, and accessing the work and storage areas.
On the right side, there’s an 18″ x 72″ overhead rack for storing seasonal items and in the back right corner there’s storage cabinets for household items, tools, or sports equipment. A work bench measuring 10′ x 24″ is positioned along the back wall between the first and second parking bays, for workspace for your projects, repairs, or hobbies. There is also space for the water heater installation and utility hookup near the left rear corner.
Dimensions:
Overall garage dimensions: 36′ wide x 22′ deep (792 sq ft total)
Individual parking bay width: 9′ (2.74m) per vehicle
Vehicle length accommodation: 20′ (6.1m) per bay
Aisle spacing between vehicles: 28″ (2.33′) between each parking bay
Work bench dimensions: 10′ x 24″
Storage unit 1: 18″ x 12″
Storage unit 2: 30″ x 36″
Overhead storage rack: 18″ x 72″
Clear depth for vehicles: Approximately 36″ clearance behind vehicles
Design Tips:
Maintain the center aisle spacing: The 28-inch gaps between parking bays provide room for walking and loading items.
Utilize the workbench strategically: Use the 10-foot workbench to create an efficient workspace and space to hang your tools for easy access.
Consider installing a pegboard: Place this on the wall above the bench for vertical tool storage with task lighting overhead for detailed work.
Leverage your overhead and vertical storage: The overhead rack above the storage area is useful for seasonal items, camping gear, or luggage.
Install additional ceiling-mounted storage racks: Position these in other areas where ceiling height permits.
Consider your traffic flow: The left bay provides the easiest access for in and out traffic since it’s closest to the entry door. Use this space for the primary household vehicle.
Expand the workbench: If you only need parking for two cars, you can center the workbench and create a larger workshop area in the middle.
Why it works: The double and single door combo gives flexibility for daily parking while maintaining room for storage and a workbench.
3 Bay Deep-Shop Garage Floor Plan With Hobbyist’s Bench And Tool Wall
This 34′ x 28′ deep-shop garage offers a traditional three-car layout with a hobbyist’s area in the back with an extensive workbench and tool storage.
Layout Details: This 34′ x 28′ three-car garage layout is designed with the hobbyist or DIY enthusiast in mind who needs a large workspace and vehicle storage. The deeper 28-foot depth provides an additional 6 feet compared to standard garage designs. This extra space creates room for an expansive workbench, and tool wall along the back. The three parking bays offer the same 9-foot width and 20-foot vehicle length as the classic layout, but extra depth for a complete workshop. This configuration totals 952 square feet, offering over 200 additional square feet compared to the standard 36′ x 22′ layout.
Dimensions:
Overall garage dimensions: 34′ wide x 28′ deep (952 sq ft total)
Individual parking bay width: 9′ (2.74m) per vehicle
Vehicle length accommodation: 20′ (6.1m) per bay
Additional depth beyond vehicles: 3.89′ (approximately 3’11”) of clearance
Central workbench dimensions: 20′ x 30″
Tool cabinets (flanking workbench): 24″ x 30″ on each side
Vertical tool cabinet: 19″ x 30″
Air compressor closet: 9′ x 3′
Total workshop wall length: 34′ continuous workspace
Design Tips:
Create dedicated workshop zones: Organize your 34-foot back tool wall into specific activity zones such as a space for woodworking, metalworking, electronics, automotive repair. Each section can have its own dedicated tools and supplies.
Maximize the air compressor closet: The 9′ x 3′ closet in the back left corner is large enough to house an air compressor and a shop vacuum, pressure washer, and related pneumatic equipment.
Use windows for natural light: Adding windows in the doors or along the walls will help naturally brighten the deeper plan.
Consider adding soundproofing insulation to the closet: This will help minimize noise during your hobby projects.
Install proper electrical infrastructure: With a 20-foot workbench, plan for multiple dedicated 20-amp circuits with outlets spaced about every 4 feet along the bench. Add 240V outlets for larger power tools and equipment.
Design flexible tool storage: The matching 24″ x 30″ cabinets on both sides of the bench can be segmented into one for hand tools and the other for finishing supplies, fasteners, or specialized equipment based on your hobby.
Plan for dust collection: If woodworking is your primary hobby, the deep layout provides opportunities for a central dust collection system with ductwork running along the ceiling to various tool stations. This way you’ll maintain a clean and safe working environment.
Optimize lighting: Install task lighting above the entire workbench with adjustable fixtures, and add general overhead lighting throughout the overhead areas. Consider the longer 28-foot depth when calculating light coverage to avoid dark corners.
Think vertical: Install pegboard, or slatwall above the workbench and cabinets to multiply your storage capacity.
Maintain access paths: Even with the extensive workshop area, ensure there’s still adequate walkway space between parked vehicles and the tool section.
Why it works: The extra depth creates space for a workshop and tool storage without needing to move cars for most projects.
3 Car Garage Layout With Fold Down Worktable, Tool Cabinet, And Kayak Hoist
This intelligent 40′ x 24′ three-car garage floor plan is great for busy active families that want vehicle parking, workspace, and storage for their recreational equipment by using a ceiling-mounted hoist system.
Layout Details: This expansive 40′ x 24′ three-car garage design aims to maximize functionality and storage capacity, and is perfect for active families who need both vehicle and recreational equipment storage. The floor plan accommodates three standard 9-foot-wide parking bays and a fold-down worktable in the right back section. This 72″ x 24″ fold down table provides workspace when needed but collapses flush against the wall when not in use or when a car is parked. A 48″ x 16′ ceiling-mounted kayak hoist system occupies the airspace above the middle-right area. This can better use this often-wasted overhead space for bulky recreational equipment storage for kayaks, canoes, paddleboards. Adjacent to the worktable, there is a tall tool cabinet measuring 36″ x 24″ that provides vertical storage for tools, and supplies. This layout totals 960 square feet and can accommodate vehicles, workspace, and bulky equipment storage when needed.
Dimensions:
Overall garage dimensions: 40′ wide x 24′ deep (960 sq ft total)
Individual parking bay width: 9′ (2.74m) per vehicle
Vehicle length accommodation: 20′ (6.1m) per bay
Fold-down worktable: 72″ x 24″ (6′ x 2′)
Tool cabinet: 36″ x 24″
Ceiling kayak hoist zone: 48″ x 16′ coverage area
Right bay width (multi-function zone): 16′ total width
Rear clearance: Approximately 4′ behind parked vehicles
Design Tips:
Optimize the fold-down worktable placement: Mount the worktable at a comfortable working height, which is usually 36 to 38 inches off the floor, with heavy-duty folding brackets rated for at least 300 pounds.
Select the right hoist system: Choose a motorized or manual pulley hoist system designed to hold kayaks or canoes, with a weight capacity appropriate for your equipment which is usually 100 to 150 pounds.
Create a dedicated gear zone: Use the area around the ceiling hoist for storage of paddles, life jackets, and related water sports equipment on wall-mounted racks.
Design worktable storage integration: Add pegboard, magnetic tool strips, or small shelving supports above the fold-down table.
Maximize tool cabinet efficiency: The long cabinet should have adjustable shelving, and drawer organizers. Consider a cabinet with lockable doors if storing chemicals, sharp tools, or any items you want to keep secure.
Plan electrical for the worktable: Install outlets at worktable height on the wall where the table folds up.
Consider lighting strategically: Add under-cabinet LED lighting to the tool cabinet and position a bright task light above the folding worktable. Add overhead fixtures at intervals to avoid shadows.
Why it works: Overhead storage area for kayaks or canoes, along with a fold down work surface and a full wall of storage cabinets.
Garage Design With Side-Load Courtyard And Mudroom Drop Zone
This innovative 36′ x 24′ garage design offers parking for three with a corner L-shaped bench, slat wall system and a side entry next to a comprehensive mudroom organization area.
Layout Details: This 36′ x 24′ three-car garage layout features a side-load courtyard design that fundamentally reimagines how families interact with their garage space. This design provides a sheltered breezeway area from the side entry with immediate access to mudroom style bench and cubby storage. This approach creates a transitional zone that connects outdoor living areas with the home’s interior. The design is particularly well-suited for properties with side-entry walkways, corner lots, or homes where the garage faces a courtyard, backyard, or side yard rather than the street. The left side of the garage features an integrated slatwall organization system, with an L-shaped bench measuring 6′ x 8′ x 24″D for hobbies and projects. The plan results in 864 square feet of total space with enhanced maneuverability and comfort.
Dimensions:
Overall garage dimensions: 36′ wide x 24′ deep (864 sq ft total)
Individual parking bay width: 11′-6″ per vehicle (more spacious than the standard)
Vehicle length accommodation: 20′ (6.1m) per bay
Long-leg mudroom bench: 8′ x 24″D
Short-leg mudroom bench: 6′ x 24″D
Slatwall organization system: 8’L x 1’D (system depth)
Right-side bench cubbies: 18″ x 18″
Right-side storage cabinet: 18″ x 18″ + 18″WB (workbench component)
Courtyard opening: 36′ wide open frontage
Side clearance zones: 30″ marked on both left and right sides
Rear clearance: 36″ radius swing zone marked
Design Tips:
Maximize the slatwall system: The 8-foot slatwall creates a flexible storage zone. Invest in quality slatwall accessories including hooks at different heights for small items, tool and sports equipment holders, and adjustable shelving.
Create family-specific zones: With 8 feet of mudroom bench and cabinet space, assign each family member their own vertical section (approximately 2 feet per person for a family of four). Use different labeled hooks to organize for each person.
Optimize the bench configuration: The two-bench system at 6′ x 8′ provides flexibility for a various activities and projects.
Utilize the generous 11′-6″ bay width: The extra 2.5 feet per bay (compared to standard 9-foot bays) provides significant comfort when opening doors, loading cargo, or working around vehicles.
Consider weather protection and lighting elements: While the side-door design provides additional access, the opening may require additional weather management and a light fixture. Explore options like weatherstripping and a step to control wind, and rain.
Why it works: The mudroom with bench and storage and help keep the garage clean and gives the family a drop zone to keep their wet belongings out of the house.
Pro Home Mechanics Garage With Lift-Ready Bay And Storage Mezzanine
This professional-grade 38′ x 26′ home mechanics garage offers a lift-ready center bay and expansive 228-square-foot storage mezzanine that provides home automotive capability, and the space needed for restoration projects, major repairs, and professional-level vehicle maintenance while providing daily parking for three vehicles.
Layout Details: This 38′ x 26′ three-car garage layout is purpose-built for the serious automotive enthusiast or home mechanic with professional-grade capabilities and everyday parking convenience. The defining feature of this design is the center “lift bay” that’s engineered to accommodate a two-post or four-post automotive lift, enabling underneath vehicle access for maintenance, repairs, and restoration projects. The 26-foot depth provides extra space beyond the standard 22 to 24 feet, which translates into adequate clearance for lifted vehicles, overhead work, and extra tool storage. A large 38’W x 6’D storage mezzanine spans almost the entire width of the garage, and this adds another level of storage capacity for seasonal items, parts inventory, and other equipment. This way, seldom-used items are kept elevated and organized, allowing for more floor space below.
The left side bay includes a 12′ x 30″D tool bench on the back wall with a drop-down ladder providing access to the mezzanine above. The center bay maintains 3.75 feet of spacing from the left bay and 2 feet from the right bay that’s optimized for lift equipment installation while allowing safe movement around raised vehicles. The right side bay features a bike rack rail system and incorporates a mower/snowblower pad with a small gear locker measuring 24″x24″ on the wall. The entire 988-square-foot layout represents a professional automotive workspace and practical family garage, designed to support both serious mechanical work and daily vehicle storage needs.
Dimensions:
Overall garage dimensions: 38′ wide x 26′ deep (988 sq ft total)
Individual parking bay width: 9′ (2.74m) per vehicle
Vehicle length accommodation: 20′ (6.1m) per bay
Storage mezzanine dimensions: 38’W x 6’D (228 sq ft of overhead storage)
Tool bench: 12′ x 30″D
Center bay spacing (left side): 3.75′ (45″) from left bay
Center bay spacing (right side): 2′ (24″) from right bay
Left bay clearance: 4.76′ behind vehicle
Right bay clearance: 3.5′ behind vehicle
Mower/snowblower pad: Dedicated floor space (dimensions not specified)
Wall gear locker: 24″ x 24″
Design Tips:
Prepare the center lift bay foundation properly: Before installing any lift equipment, make sure the concrete slab in the center bay is properly reinforced with rebar and is at least 4 to 6 inches thick (many lifts require 6 inches minimum). Consult the lift manufacturer’s specifications during the construction phase.
Choose the right lift type for your needs: Two-post lifts maximize floor space underneath and are ideal for brake work, suspension repairs, and general maintenance. Four-post lifts are better for storage, engine work, and provide more stability for long-term storage.
Maximize the mezzanine strategically: The massive 38′ x 6′ upper mezzanine at 228 sq ft is equivalent to adding a large storage room above your garage. Use this space for items you don’t need to access frequently. Install decking that can support at least 40 to 50 pounds per square foot.
Design safe mezzanine access: The drop-down ladder on the left bay provides access. Ensure there’s adequate landing space at the bottom for the ladder so it doesn’t interfere with your tool bench work area.
Optimize the 12-foot tool bench layout: Organize the bench into distinct zones for your different tasks and tools.
Install power outlets every 3 feet: Include at least two 20-amp circuits dedicated to the bench.
Plan electrical infrastructure for lift operations: Most automotive lifts require 220V service with dedicated circuits. Install the electrical rough-in during the construction phase and position outlets near where the lift columns will be located. Also include multiple 110V outlets around the center bay for work lights, battery chargers, air compressors, and other power tools.
Utilize bay spacing intelligently: The 3.75-foot spacing on the left and 2-foot spacing on the right of the center bay allow for tool cart placement, parts storage, and safe movement around any car that is on the lift.
Implement proper lighting for lift work: The center bay requires exceptional lighting, especially underneath lifted vehicles. Install high-output LED shop lights on the ceiling with a minimum of 75 to 100 foot-candles of illumination. Add portable LED work lights on retractable reels for seeing underneath vehicles.
Consider air system integration: Serious mechanics need compressed air. Install airline drops from a ceiling-mounted or wall-mounted air compressor to multiple locations like the center lift bay on both sides, the tool bench area, and on the right bay.
Plan for proper ventilation: Automotive work generates a lot of fumes, especially when running engines for diagnostics. Install an exhaust ventilation system with a fan rated for garage use, or at a minimum, plan for a large wall-mounted exhaust fan. Never run vehicles in a closed garage.
General Sizing & Builder Notes (applies to all)
Bay width target: 11′ to 12′ per car. 12′ feels premium and improves door swing.
Depth: 22′ is workable, but 24′ is comfortable.
Bench math: If the depth is 24′, plan 24″ for a bench and a 36″ aisle and 36 to 40″ bumper buffer.
Overhead storage: Keep the lowest edge ≥80–84″ so people can walk under and SUVs can fit.
Door headroom: Standard 7′ doors fit most SUVs; consider 8′ high doors for lifted vehicles or roof racks.
Ceiling height: 9′ standard; 10 to 12′ is ideal for lifts or tall overhead storage.
Power: At least one dedicated 20A circuit per bay, and add 240V if lifts/welders/EVs are planned.
Lighting: Aim 50 to 70 foot-candles (500 to 750 lux) over benches; use LED strips or high-bay fixtures.
To showcase highly specific designs, some images on this website use advanced AI-generation software to illustrate ideas and room inspiration. See our editorial policy to learn more.
If you’re designing and building a garage, you’ll need more than just the standard dimensions especially if you want to utilize the space to accommodate…
Garages are full of possibilities. Indeed, they are primarily for keeping vehicles secure and could be utilized for storage, but they also make wonderful home…
A Jack and Jill bathroom is a shared bathroom accessible from two separate bedrooms, making it an efficient space-saving design often seen in family homes….