RV Garage Floor Plans With Workshops, Lofts, and Pull-Through Bays

Single RV Garage with Side Storage
The tiny garage depicted has a wall-mounted workbench with storage space and a bench providing a 36-inch walk-around aisle.

For individuals seeking their RV to be covered without having to build a second house in the backyard, the plan measures 20 feet by 50 feet. The RV bay is 16 feet by 46 feet and has an internal ceiling height of 16 feet, providing enough space for a roof air conditioning unit, a raised antenna, and the occasional requirement of getting up onto the top of the vehicle for maintenance. There is a 14 foot by 14 foot roll-up door at the front and the depth of the bay allows a 23-foot travel trailer or a mid-length coach to park with plenty of extra space.
Dimensions
- Overall building: 20′ x 50′
- RV bay: 16′ x 46′
- Interior ceiling height: 16′
- Overhead door: 14′ wide x 14′ high, roll-up
- Rear work wall: 4′ deep (48″)
- Counter/bench section: 8′ wide
- Side clearance at rig: 36″
- Pedestrian doors: 32″ (two, opposite walls)
Design Tips
- Use the hooks and fittings on the pegboard before the shelves become full since with a 16-foot ceiling it is tempting to stack bins up against the rafters and in that case all the items you need will be difficult to reach at a height of 12 feet. Keep the heavy items that are used often at counter level and reserve the upper shelves for your seasonal possessions.
- It is important to have proper lighting since in a narrow bay it is more significant than in a wider one; even though the RV blocks the light from one side whatever you do, LED strips should be installed along both side walls at a height of about 8 feet rather than depending on the ceiling lights to prevent shadows.
- Make the front pedestrian door the one that you use every day, so that you don’t have to open the 14-foot roll-up door every time you need something.
Pull-Through RV Garage
Since there are two doors, it is unnecessary to back up, and that is an advantage instead of having to continually reverse a 40-foot coach into or out of a narrow bay.

Layout
This garage layout, which is 18 feet by 55 feet, includes a 14 foot by 14 foot roll-up door at each end so that you can drive straight through without having to back out. You enter from one side and exit from the other, which is perfect if your property has a circular drive or road access on two sides. It is normally very difficult to back up a long vehicle when you have a tow car behind it. This plan eliminates the problem and makes operating the garage much easier.
The RV bay extends the full length of the 18′ by 55′ space, giving it a good depth. With fifty-five feet you can accommodate a long coach together with a hitch, as well as provide room at the front for a generator or a small workbench. Storage is positioned along the right wall in two sections, one 21 feet long at the front and the other 21 feet long at the back, there being a 13-foot gap in the middle where a 32-inch pedestrian door is installed, the gap serving to keep the main entrance clear rather than requiring you to go past the shelving.
The only drawback is that the footprint measuring fifty-five feet in length requires a deep lot; furthermore, since there are two overhead doors, there are two door openings that need to be insulated, sealed, and maintained. You also lose the solid end wall, which is normally the place where people hang their largest storage system or keep their workbench or other hanging items.
Dimensions
- Overall building: 18′ x 55′
- RV bay: 18′ x 55′
- Overhead doors: 14′ wide x 14′ high, roll-up (front and rear)
- Storage runs: 21′ front, 21′ rear along one side
- Center clear zone: 13′
- Pedestrian door: 32″
Design Tips
- Elevate the slab a little in the direction of the doors and fit a floor drain if your climate permits it. A garage with a pull-through design has more water tracked in than one with a single door.
- The central section, which is 13 feet long, is prime space and should be used for items that you use frequently, such as leveling blocks, chocks, and the water hose; the rest of the items can go in the 21-foot sections on one side.
- If you have the opportunity, position the building so that the main wind blows against the side wall rather than hitting either of the doors. In that way, the two large doors will not turn the garage into a tunnel each time you open both of them.
Oversized RV Garage with Loft Storage
It has the same footprint as a large garage, but with twice the storage since it is constructed upwards rather than outwards.

Layout
The exterior shell measures 24 feet by 52 feet and includes an RV bay that is 18 feet wide and 48 feet long, together with a 14 feet by 14 feet roll-up door, and a loft which extends 24 feet across the front part of the building. This loft offers approximately 10.9 feet by 16 feet of usable deck space and can be accessed via a switchback stair that is placed in the corner so as not to take up any of your parking area. This is the best option when you can’t spread out but can go up.
After allowing for the RV bay, you’ll have approximately 6 feet of open space by the side of the rig, which is sufficient for the slide-outs, allows all the storage compartments on the coach to be opened at the same time, and provides room to set up a folding table while you’re loading. When you compare this to the 36 inches available in the single-bay plan, you will immediately notice the difference.
You do have a good deal of flexibility in the loft, but at the same time you need to take certain things into account. Since anything stored there has to be carried up the stairs, it is more suitable for storing boxed items, seasonal goods, and lightweight objects rather than a table saw. And if you eventually enclose the loft, you should plan the HVAC system before you frame it, because heat tends to collect quickly in that area under a metal roof.
Dimensions
- Overall building: 24′ x 52′
- RV bay: 18′ x 48′
- The loft deck measures about 10.9 feet by 16 feet.
- Loft section width: 24′
- Front offset to loft area: 4′
- Overhead door: 14′ wide x 14′ high, roll-up
- Stair run: 10.9′
Design Tips
- When framing the loft floor, it is important to take into account the actual load rather than just meeting the minimum code requirements for safety; people generally end up putting up there more than they had originally intended, and 40 pounds per square foot can quickly add up if you have a few hundred pounds of holiday bins and spare auto parts.
- Fit a pulley or a small hoist to the loft edge. It will then be possible to carry the awkward boxes up the switchback stairs without breaking your back, since a $60 hoist provides a permanent solution.
- Instead, leave the space directly under the loft unblocked. This will make the area seem more natural for use as a workbench, for carrying out auto repairs or for housing a second fridge, and it will make the main area feel wider.
RV Garage with Workshop and Bathroom
The plan is intended for those who intend to spend a lot of time in the building, not merely to park in it.
Layout
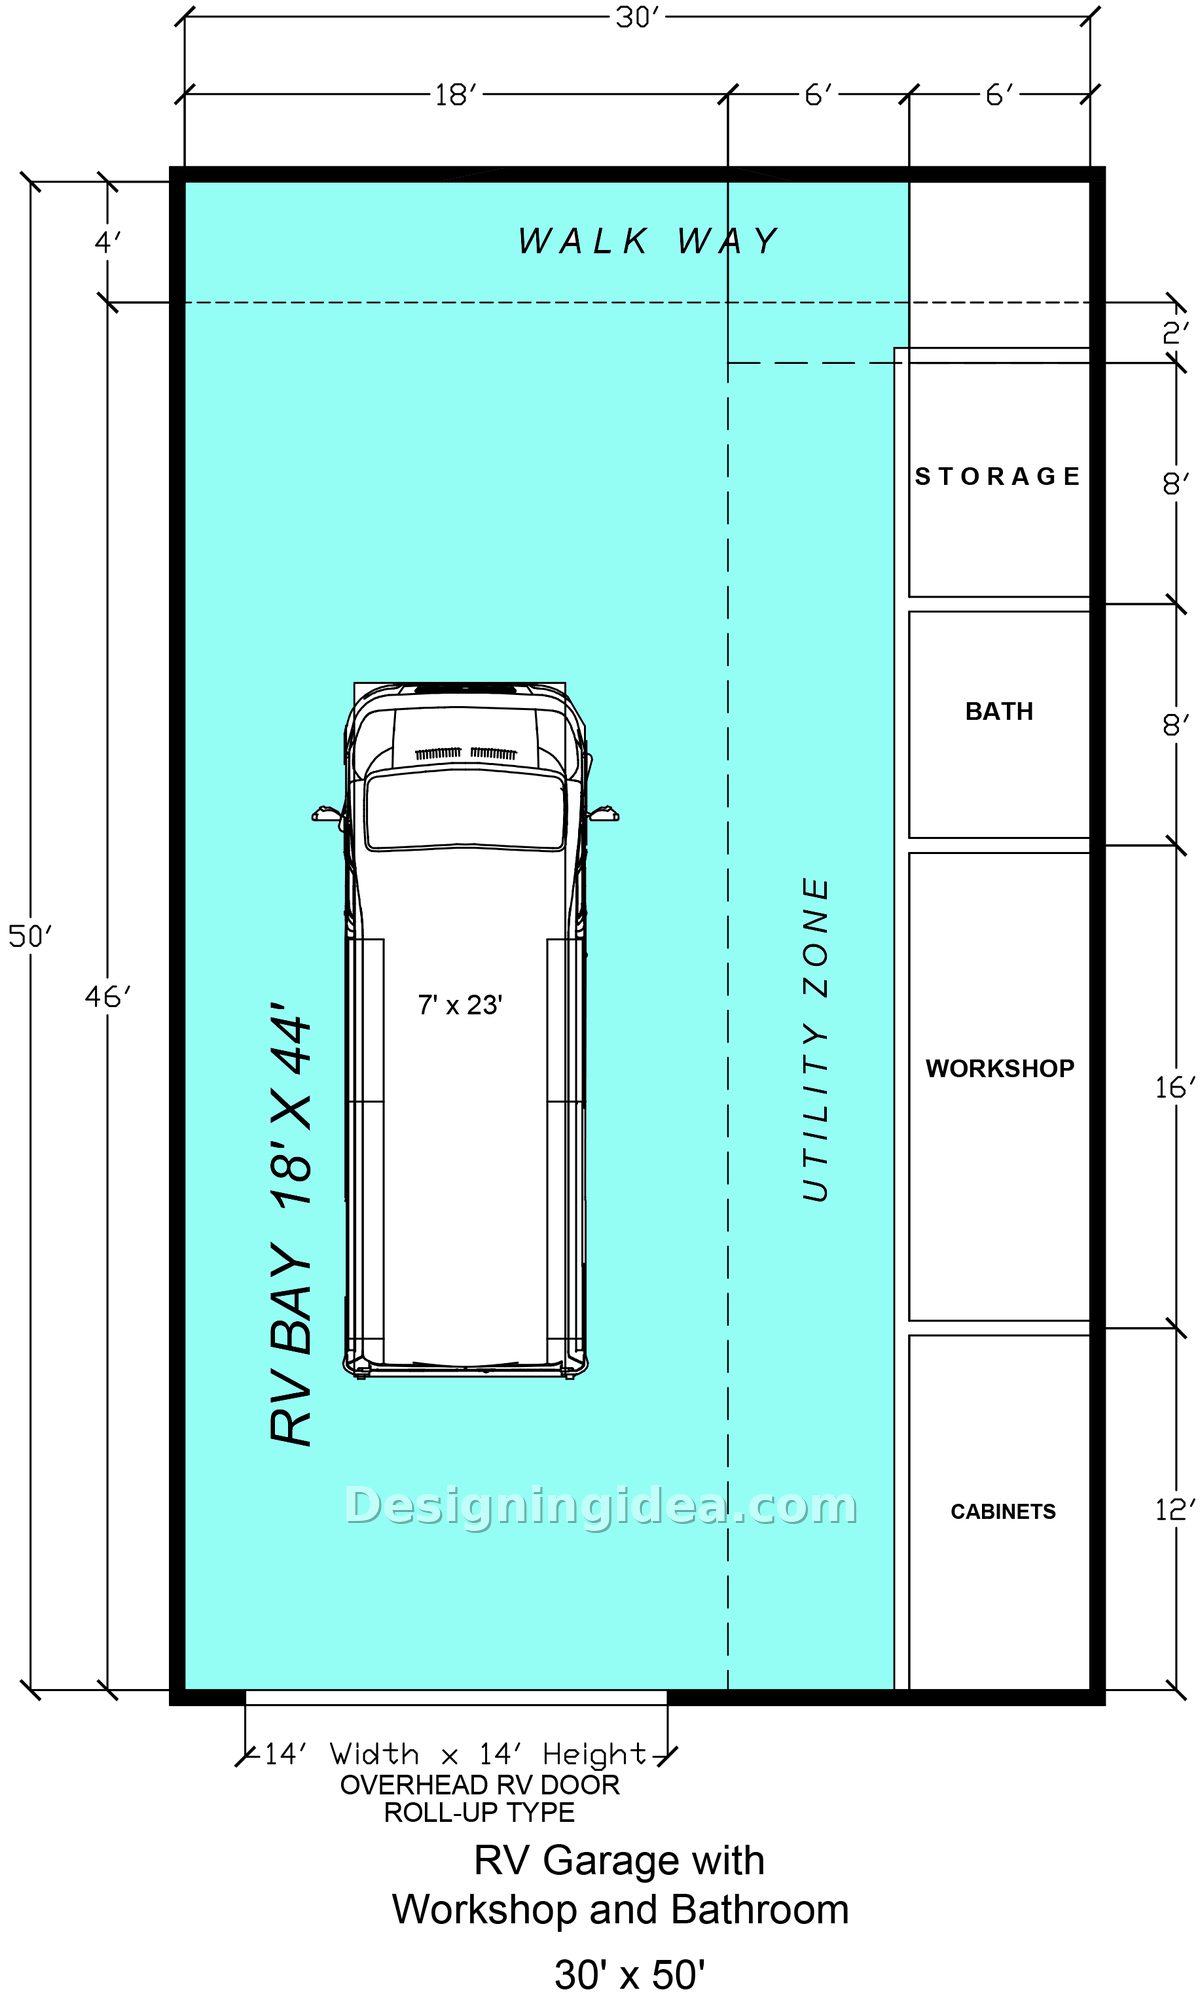
This layout measures 30 feet by 50 feet and includes an 18-foot by 44-foot RV bay on the left-hand side together with four separate areas arranged along the right. There is an 8-foot storage room, an 8-foot bathroom, a 16-foot workshop, and a 12-foot row of cabinets. The 6-foot utility area is positioned between the RV bay and those rooms, and this feature makes the overall arrangement work together much better. Rather than putting the electrical panel, water heater, air compressor, and shop vac behind the RV, you have a dedicated corridor for them.
There is also a 4-foot path that runs across the front of the bay, enabling you to go through directly at the front of the RV and thus get from the pedestrian door to the workshop without having to turn sideways and awkwardly shuffle past the bumper.
The bathroom is the feature which most owners of RV garages say that they wished they had included. It eliminates the need to go back to the house when you’re in the middle of a project and enables you to clean up before going inside. Since installing plumbing is something you would normally leave out, you should lay the pipes in during the pouring of the slab; it is expensive and frustrating to fit the drain lines later on in finished concrete.
Dimensions
- Overall building: 30′ x 50′
- RV bay: 18′ x 44′
- Utility zone: 6′ wide
- Room block: 6′ deep (storage, bath, workshop, cabinets)
- Storage room: 8′
- Bathroom: 8′
- Workshop: 16′
- Cabinet run: 12′
- Front walkway: 4′
- Overhead door: 14′ wide x 14′ high, roll-up
Design Tips
- Insulate the workshop and heat it separately; it is a room 16 feet in size with a door, and it is therefore best to consider it as its own conditioned space. It is neither affordable nor effective to heat the whole 30′ x 50′ volume in order to work on a project in January.
- In the bathroom, install a utility sink, not just a toilet and a small basin, since it is very useful when you have been working with greasy hands or when using paint brushes and want to avoid using the kitchen sink.
- Don’t decide how many circuits you’ll need for the utility area until you’ve actually got them—equipment such as an RV shore power unit, a compressor, a welder, and a battery charger each require their own individual circuit, and if you add the conduit afterward you’ll have to break into a wall that’s just been finished.
RV Garage Plus Two-Car Garage
There is one building for three vehicles, and you don’t have to constantly move the cars about in the driveway each time you want to take the RV out.
Layout
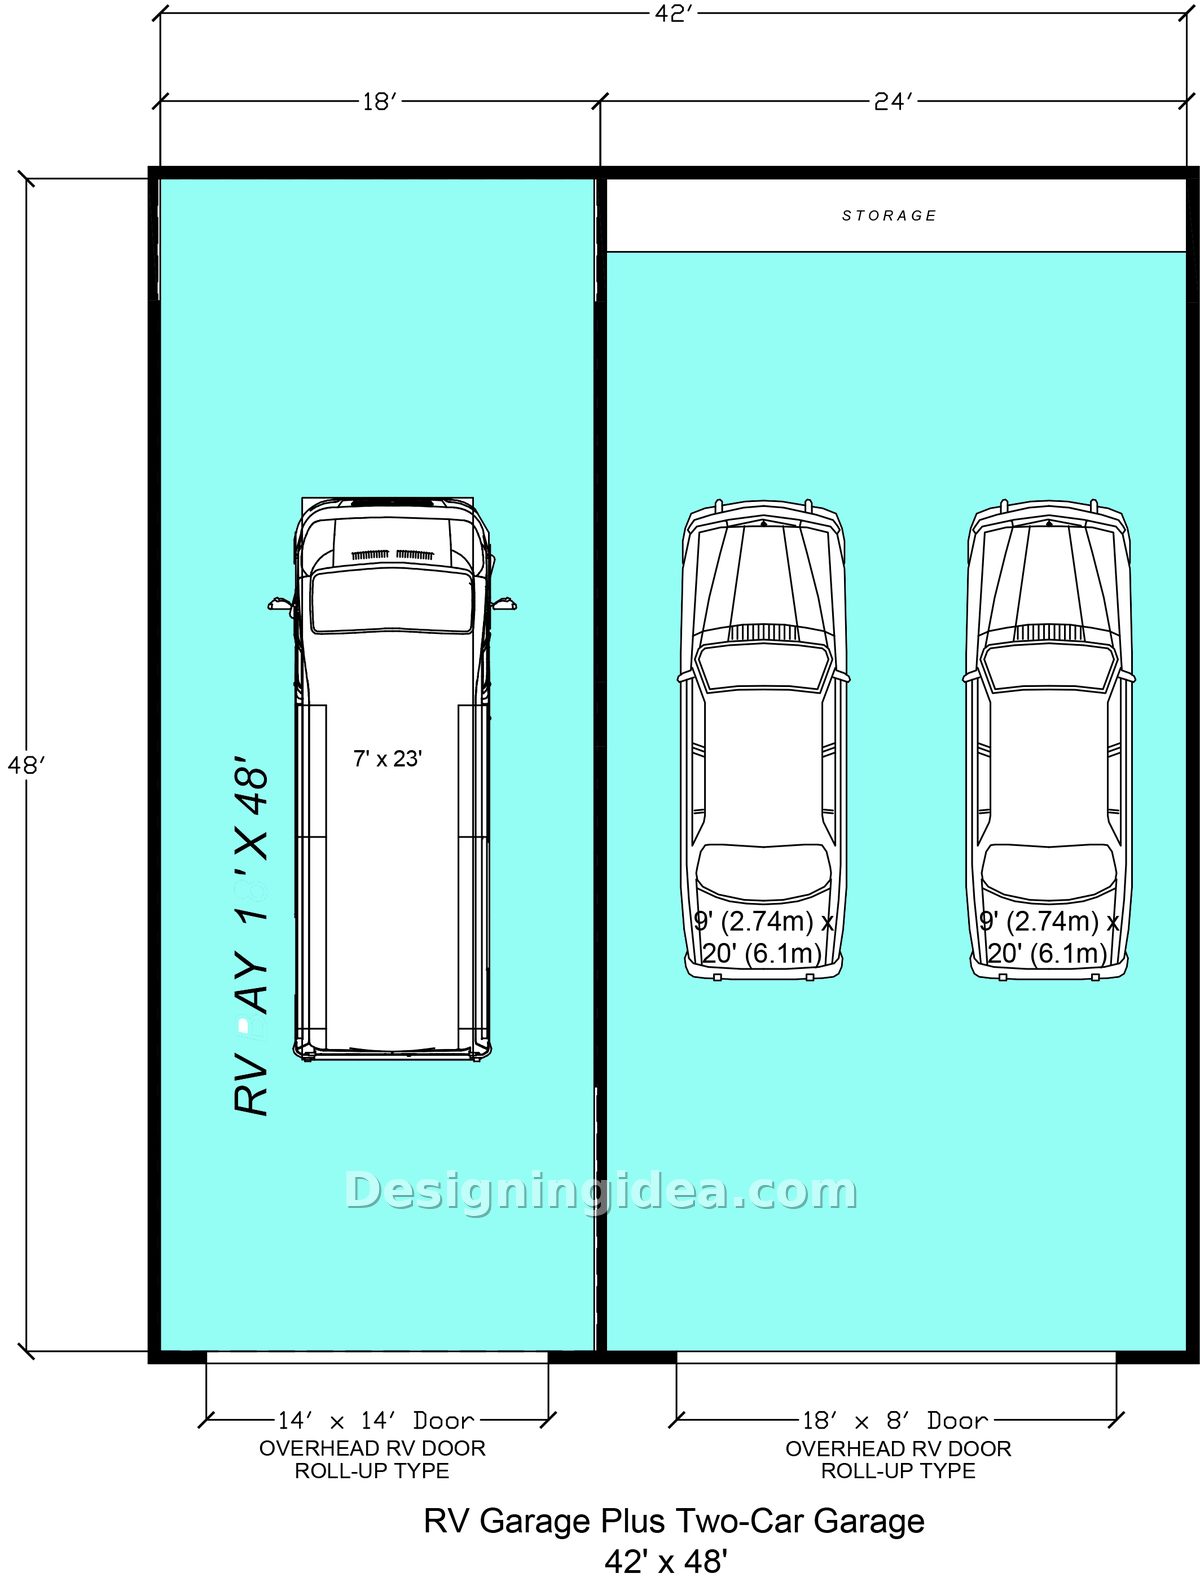
The plan, which measures 42 feet by 48 feet, is divided into two bays by a common central wall; on the left is an 18-foot by 48-foot RV bay situated behind a 14-foot by 14-foot roll-up door, and on the right is a 24-foot-wide two-car garage having an 18-foot by 8-foot overhead door and a full-width storage shelf at the back. Each car is provided with a 9-foot by 20-foot parking space, which is quite comfortable as opposed to the 8-foot space you encounter in most tract-home garages.
The reason to build this instead of two separate structures is simple: you use one slab, one roof, one set of permits, and a shared wall. It’s much cheaper per square foot than building an RV garage next to an existing two-car garage. The width is the limiting factor since forty-two feet across gives you a great deal of frontage and, as you’ll discover, many lots won’t be able to accommodate it when set-backs are taken into account.
Make sure you measure it carefully before you become taken with this property. It’s also important to decide at an early stage whether or not you want a pass-through door in the central wall; the possibility of walking from the car bay into the RV bay without having to go outside is a small improvement which you will probably use every day. It allows one to go into the car bay from the RV bay without going outside and is a minor upgrade that you’ll most likely use every day.
Dimensions
- Overall building: 42′ x 48′
- RV bay: 18′ x 48′
- Two-car bay: 24′ x 48′
- Each car parking space measures 9 feet by 20 feet (2.74 metres by 6.1 metres).
- RV overhead door: 14′ wide x 14′ high, roll-up
- Car overhead door: 18′ wide x 8′ high, roll-up
- Rear storage shelf: full width of the car bay
Design Tips
- If possible, make sure the central wall extends all the way to the roof since this will give you the simplest fire separation you can achieve and also prevent exhaust and fumes from the RV bay getting into the area where the cars are parked.
- Closed cabinets are more suitable than open shelves for the rear storage area in the car bay since car bays tend to get dusty and open shelves end up displaying all your possessions, which gives the appearance of a messy arrangement.
- When the height of the ceiling in the RV bay reaches 14 feet or above, there’s no need to bring the car side ceiling down to the same height. Doing so will give you extra storage space in the attic above the car bay and reduce the volume that has to be heated.
RV Types and Garage Dimensions Needed
All the plans listed on this page begin with the same question: what kind of vehicle are you parking? A camper van and a diesel pusher present different building requirements. The van can easily go through a 12-foot door size with plenty of room left over, whereas the pusher requires 16 feet and a great deal more concrete and budget. You should match your vehicle to one of the rows listed below. The final column tells you how the extra length you’ve got is being used, since the garage bay sizes here are intentionally larger than the absolute minimum.
| RV Type | Rig Size L / W / H |
Bay to Build W x D |
Door Opening W x H |
|---|---|---|---|
| Camper Van Class B. Winnebago Travato, Winnebago Revel, Airstream Interstate |
19′ to 24′ 6’9″ to 7’6″ 9’4″ to 10’6″ |
12′ x 28′ | 10′ x 12′ |
| Cab-Over Motorhome Class C. Winnebago View, Thor Chateau, Thor Four Winds, Jayco Redhawk |
22′ to 33′ 8′ to 8’6″ 11′ to 11’6″ |
14′ x 38′ | 12′ x 13′ |
| Travel Trailer Bumper pull. Jayco Jay Flight, Airstream Classic, Forest River Rockwood |
21′ to 40′ 8′ to 8’6″ 10′ to 11’6″ |
14′ x 46′ | 12′ x 13′ |
| Gas Motorhome Class A. Winnebago Forza, Winnebago Adventurer, Thor Palazzo |
26′ to 37′ 8’6″ 11’11” to 12’9″ |
16′ x 44′ | 14′ x 14′ |
| Fifth Wheel Gooseneck. Grand Design Solitude, Keystone Montana, Jayco North Point |
30′ to 43′ 8’5″ 13′ to 13’5″ |
16′ x 50′ | 14′ x 15′ |
| Diesel Pusher Class A. Newmar Dutch Star, Tiffin Allegro Bus, Winnebago Horizon |
36′ to 45′ 8’6″ 12’10” to 13’5″ |
18′ x 52′ | 14′ x 16′ |
Heights include a rooftop air conditioner. Bay and door sizes are sized for daily use rather than the tightest possible fit, so check your own spec sheet before finalizing a plan.
The Dimensions to Confirm Before You Commit
To showcase highly specific designs, some images on this website use advanced AI-generation software to illustrate ideas and room inspiration. See our editorial policy to learn more.