All homeowners want to protect every square inch of their properties, from the foundation to the walls, roof, and, yes, even the gutters. Unfortunately, the wind can blow leaves, particles, and other debris and cover the gutters, reducing water flow when it rains. And that’s why a drainage system is essential. Knowing the correct size is as crucial as determining the right type. Homeowners must know how to measure for gutter guards if they want to avoid costly problems.
Measuring For Gutter Guards Preliminary Steps
Although measuring gutters can be a DIY activity, safety is a top concern. No homeowner should injure themselves because they failed to observe some easy preliminary steps.
• Time the measurement – Going up the roof on a windy, snowy, or rainy day is an invitation for disaster. DIYers could fall to the ground because the roof edges are slippery. A strong gust can tip the ladder, sending the homeowner to the hospital. Timing is crucial.
• A sturdy ladder is a must – Nobody wants to climb on a rickety, creaky platform. Every step on the rung can send nervous energy to the brain, making the DIYer feel more anxious going up. Hence, homeowners must prepare a sturdy ladder with intact and fully functioning components.
• A ladder stabilization system is crucial – Homeowners and DIYers must also protect the gutter against dents and other damage due to the ladder resting on the edge.
Experts recommend attaching a standoff on the ladder’s upper section, allowing DIYers to plant the mechanism’s feet securely on the roof. This accessory stabilizes the ladder, complementing the nonslip ladder feet.
• Prop the ladder on firm and level ground – Solid and level ground is essential for avoiding falls and similar accidents when climbing ladders. If the terrain is uneven, homeowners can place levelers on the ladder’s feet to stabilize the platform and keep it from tipping. DIYers must also observe the 4-to-1 rule, allotting a foot of wall distance for every 4 feet of roof height.
• Get a helper – Somebody must be present when a homeowner climbs the ladder to measure. This person can hold and stabilize the ladder, jot down called-out measurements, and pass tools and other resources to the person on the roof. An assistant is also handy in emergencies.
• Wear the correct gear – Climbing ladders might seem easy, but it’s fraught with risks. One can slip on a step, or the ladder could tip. Work gloves are crucial to protect the hands against sharp objects, while rubber-soled, nonslip footwear can stabilize the climb. Tool pouches or belts are also essential, allowing the climber to free their hands to measure.
If a tool belt is unavailable, a bucket strapped or hooked to the ladder is sufficient. Any container can accommodate tools necessary for measurements.
Gutter Covers Tools and Materials Needed
Climbing the roof to measure for gutter guards is easy if one has the correct tools. However, these resources vary across homeowner needs. So, DIYers must plan their approach before climbing.
A sturdy ladder, long enough to reach the roof line
• Tape measure
• Bubble level
• A standoff or ladder-stabilizing system
• Writing instrument, preferably pencil (a pen also works)
• A piece of paper or a tickler notebook
Measuring the Length of the Gutters
Measuring for gutter guards is as easy as climbing the stabilized ladder, anchoring the tape measure on the channel’s end, and extending the tape measure sideward without stretching too much.
Mark the measurement’s end with a pencil and have the assistant write down the value. Climb down the ladder and reposition it to the next section.
DIYers must look at the marker and estimate the next “correct” ladder position. Ideally, they will want to continue from the mark’s location until they finish the drainage channels’s expanse.
Adding the individual “sectional lengths” will reveal the gutter’s overall length.
Accounting for End Caps and Downspouts
Some folks consider the gutter a single-element structure. Unfortunately, the channels have several parts, including downspouts and end caps. These components have significant implications for the measurements.
For instance, end caps have sections extending over the gutters, like a roof overhang. Installing a foam- or brush–typecover won’t be problematic, but other versions might.
One can compress the foam types and fit under the end cap’s overhang. Meanwhile, screen, reverse-curve, and micro-mesh protectors must sit flush with the end cap, indicating that the guard is slightly “shorter” than the gutter itself.
Determining Gutter Width
Some homeowners don’t know how to measure a gutter’s width or front-to-back section. After all, they don’t climb the roof often, if at all.
Measuring the width requires hooking the tape measure’s tang on the channel side next to the roof’s fascia and extending it outward. Alternatively, a 12-inch ruler works because most homes have gutters with a 5- to 6-inch front-back section.
Considering Gutter Slope or Pitch
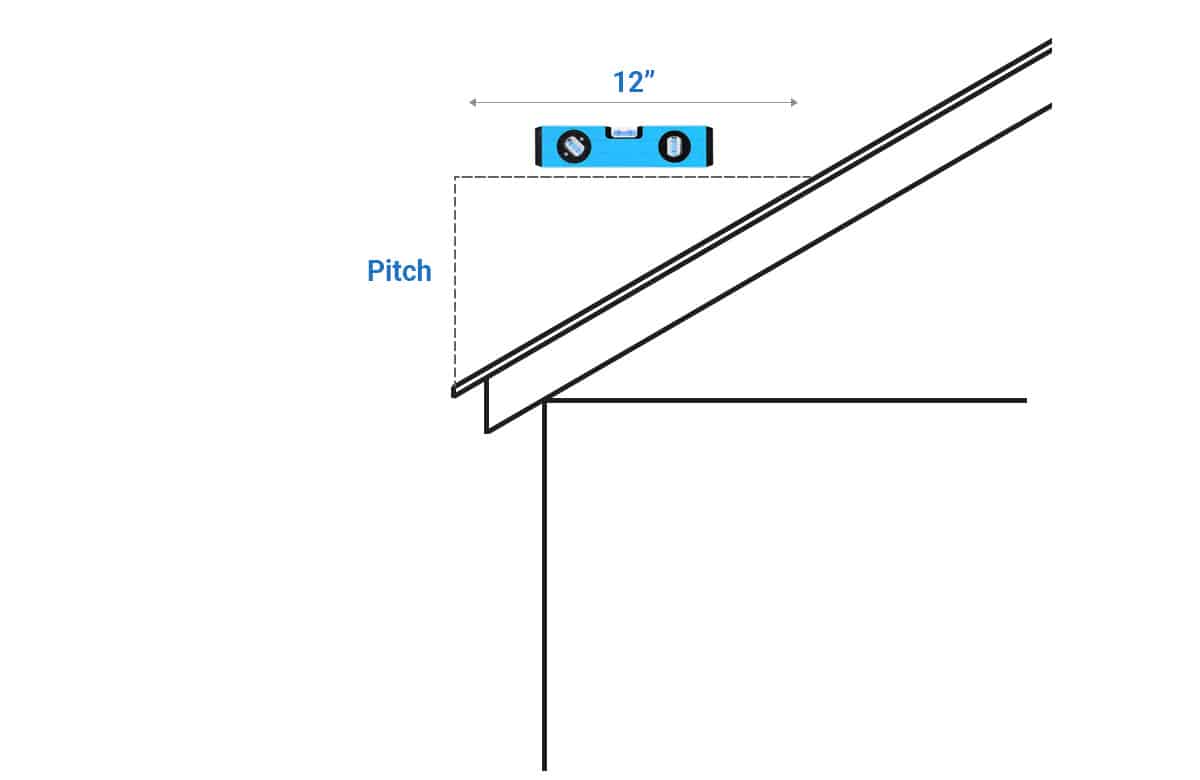
Although an optional metric, the roof pitch or gutter slope can help homeowners choose the most appropriate type. It is worth noting roof pitch describes the roof’s angle (not the gutters) relative to the ground. DIYers can factor this into their measurements.
Determining the roof or gutter pitch requires placing a bubble level on the roof, raising one end until the device shows the air bubble is in the middle. This observation shows the instrument is parallel to the ground.
Ideally, DIYers will want to use a bubble level with graduations to determine the 12-inch mark from the roof. While maintaining the bubble level’s parallel orientation to the ground, DIYers measure the distance from the device’s 12-inch mark to the roof’s surface, forming a right angle.
Here’s how to interpret the roof slope measurements.
Bubble Level-to-RoofDistance
Factor
4 to 5 inches
1.05
6 to 8 inches
1.1
9 to 12 inches
1.2
Over 12 inches
1.3
Calculating Total Gutter Protector Needs
Measuring for installation of a drainage system only requires the gutter’s length and width, although homeowners can always factor in end caps, downspouts, and roof pitch.
The task is as easy as multiplying length by width. For example, suppose the channel spans 5 inches front to back and 50 feet side to side. In that case, the gutter guard must have these dimensions. Unfortunately, no one-piece product exists for this situation. Hence, homeowners must determine the dimensions and factor them into the equation.
For example, suppose a 5-inch-wide screen mesh is only 5 feet long. In that case, 10 pieces of this screen protector should be sufficient to cover the 50-foot-long gutters. See our guide to gutter sizes for more related content.
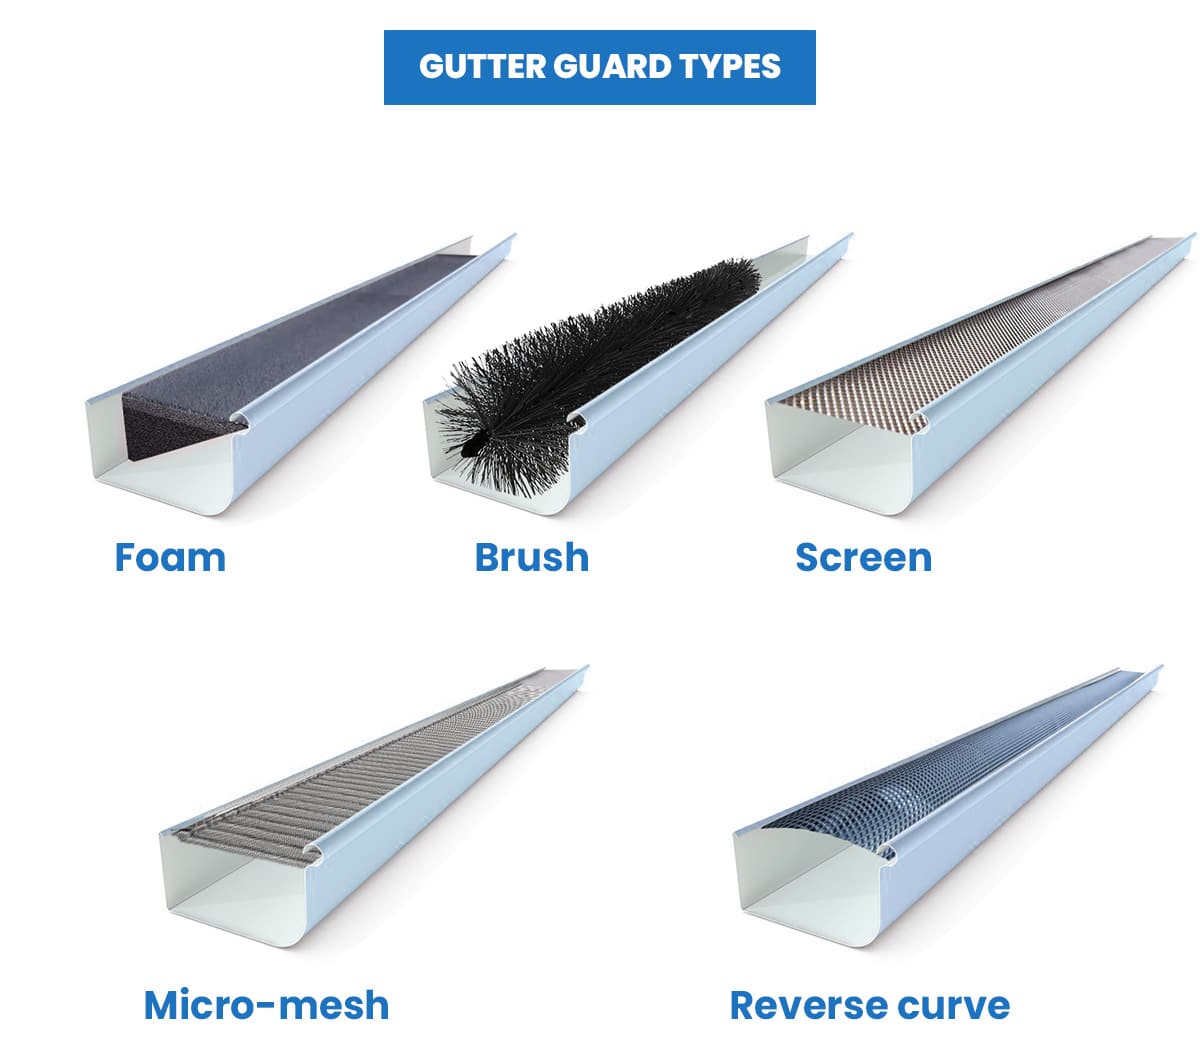
Understanding Different Gutter Screen Types
Learning how to measure for gutter guards assumes homeowners want to add these protective elements to their roof. Knowing the different roof drainage types is essential.
• Foam guards
As the name suggests, foam gutter guards are soft, spongy blocks no different from the sponge homeowners use in cleaning. It is the same material as the cushions in beds, sofas, and other furnishings.
Foam is porous, trapping large particles (i.e., leaves, twigs, bird droppings, and more) on the surface (preventing them from reaching the gutter’s bottom) while allowing water to seep through, pass along the rain trough and down the spout.
Because foam is compressible, DIYers can fit these barriers in gutters seamlessly and effortlessly. These products are also inexpensive and available in different sizes and shapes.
Sadly, foam is not a sturdy material. Rain, debris, UV radiation, and wind can hasten foam deterioration. These products might be affordable, but foam products require periodic replacement every few years. Visit our foam gutter guards pros and cons here.
• Brush guards
Resembling bottle brushes, a brushgutter guard is more durable than foam. The stiff bristles radiate from a central rod brush against the rain channels sides, preventing debris and particles from reaching the bottom. This style is also cost-effective, outlasting foam guards with proper maintenance.
Unfortunately, spaces between bristles can allow small particles to pass through. Debris, fallen leaves, and twigs can also get stuck between bristles.
One must climb the roof, remove the brush protectors, and clean them thoroughly every few months.
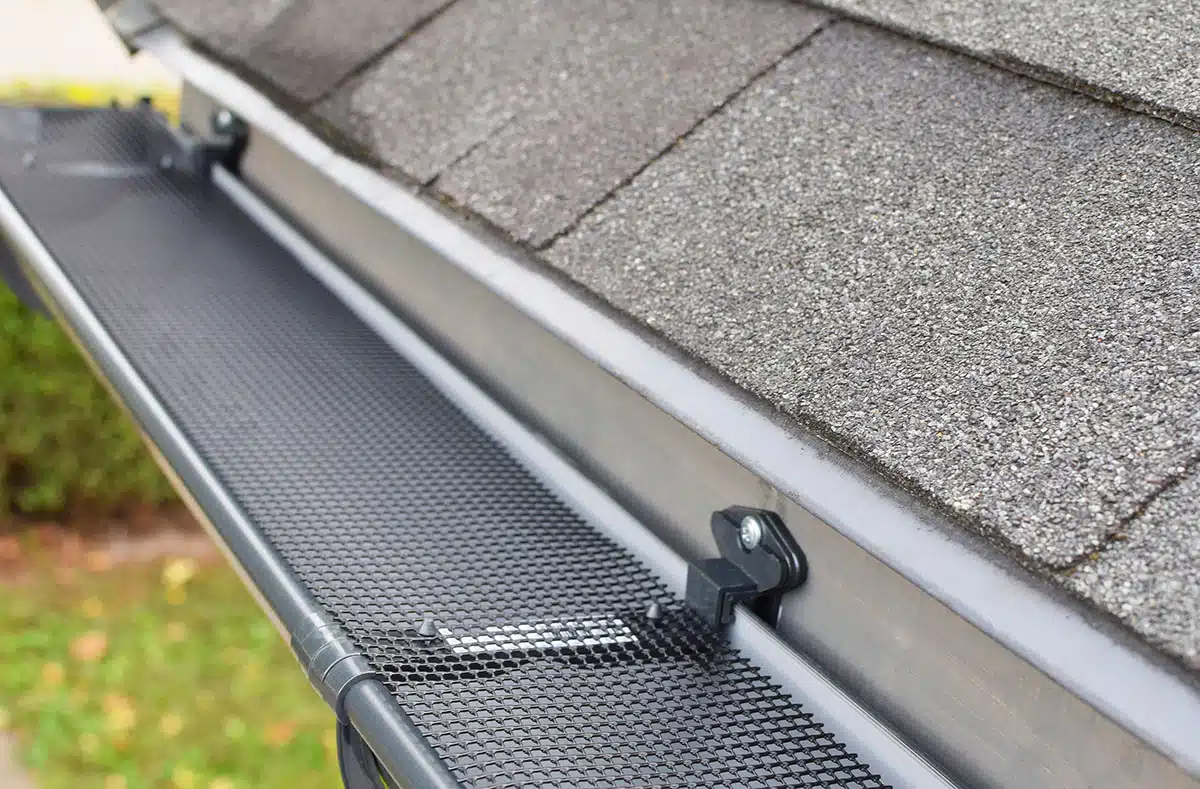
• Screen covers
Screen mesh covers differ from foam and brushtypes in that they do not sit “inside” the gutter but “on” it. A screen gutter guard slides under the roof’s first line of shingles, preventing objects and particles from falling into the rain channel.
Screen covers can be affordable (plastic) or slightly expensive (metal). Although not as effortless to install as brush and foam barriers, screen-type guards offer excellent longevity.
• Micro-mesh covers
Micromesh systems are nearly identical to screen types except for smaller holes. Some are easy to install, while others require a professional approach. One issue with these products is their price.
Still, effectiveness and durability can offset cost concerns.
• Surface tension or reverse-curve screening
The most effective way to protect gutters and reduce maintenance frequency is to use reverse-curve guards. A reverse curve design has a curved leading edge extending beyond the gutter’s outer edge. Water slides down and into the drainage channel because of surface tension, while debris and particles wash and fall to the ground. This type requires professional installation and can be as expensive as micro-mesh screens.
To showcase highly specific designs, some images on this website use advanced AI-generation software to illustrate ideas and room inspiration. See our editorial policy to learn more.
Here’s our coffee maker dimensions guide including the standard sizes, popular brands dimensions. Coffee has become integral to many, fueling their mornings, boosting their productivity,…
Bathrooms are multipurpose areas that are guaranteed to get heavy use. A well-laid-out, streamlined, and attractive bathroom is an asset to any home. Whether you…