How To Remove a Drop Ceiling (Remodel & Replacement Tips)

Dropped ceilings, by definition, are those that are comprised of removable panels as well as grids that have been suspended from up top. Getting rid of a dropped ceiling is a pretty understandable and straightforward process. The main purpose of most of the dropped ceilings out there is that they are meant to cover damaged ceilings or any unsightly features that may be a part of them. Another reason for putting dropped ceilings in is to lower the ceiling’s height with the intent of making heating or cooling energy consumption more cost-effective.
A dropped ceiling feature can effectively conceal plumbing or other visible wiring located in the ceiling. Ultimately, the best way to remove a dropped ceiling to open the space is to reverse the process. But there’s so much more to it than meets the eye, no matter how simple it may seem to be. Thankfully, we’ve looked into it for you. Anything and everything you need to know about a dropped ceiling is already right in this article. We’ve covered most of the FAQs as well as most of the common concerns homeowners have when it comes to getting rid of one.
Why Get Rid Of A Dropped Ceiling In The First Place?
Dropped ceilings tend to deteriorate over time: Here’s the thing, a dropped ceiling deteriorates so much faster compared to the rest of all of the other options out there.
If you want to preserve the aesthetic as well as real estate value of your home, you might want to start getting rid of your dropped ceiling; or at least replace the old one with a new one. One small leak in the roof and you’ll almost immediately start to see staining overhead.
These stains are almost impossible to remove. This means that your ceiling tiles will need to be removed and replaced with new ones. The ceiling will also sag from the moisture and over time, will have the unsightly appearance of it “drooping”.
It makes the room look smaller or more compact: A dropped ceiling almost immediately reduces the height of any room. This is because of the fact that the tiles are suspended as an add-on from the main or original ceiling.
A room that initially stands 9 feet in height could immediately feel 7 feet because of the dropped ceiling feature. It would take away the benefits of a larger and airy-looking room at the end of it all.
It also makes it almost impossible to install tall lighting fixtures, such as most types of pendant lights, chandeliers, and other low-hanging fixtures in the room where you have the dropped ceiling installed.
Required tools for your dropped ceiling removal project: One thing that can save you time and a lot of frustration if you’re planning to do a removal project on your own is to make sure that you have all of the tools needed right from the start.

Here are some of the basics for you to secure before you move forward with that said project:
• Tin snips
• Carpet knife
• Tape measure
• Chalk line
• Hammer
• Clamps
• Drywall circle gauge
• Drill bit set
• Drill or driver, preferably cordless
Materials Needed To Remove
You also need to make sure that apart from the tools, you have extra materials handy. This will save you the hassle of having to step away from your project to do some last-minute shopping. You don’t really need a lot of materials per se, just a couple.
• Acrylic caulk
• Ceiling grid materials
Removing A Drop Style Ceiling
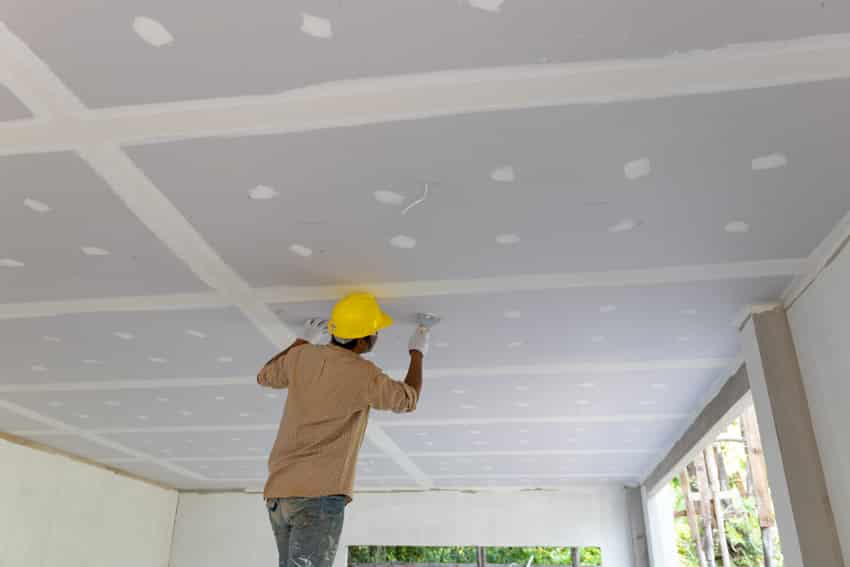
To start the entire project off, you would need to work on removing the old panels first. These are usually comprised of lightweight acoustical panels. These panels are fit in between the grids. They need to come out before you can ever come to remove anything else in your installed dropped ceiling. This is a pretty simple process.
This is mainly because each tile is placed lightly on the grid. All you need to do is to push up the end of the tile so that you will be able to slip its other end down and then out of the grid. If the ceiling is painted, you might need to cut the paint bond first. Make sure that you cut along the edge of the grid so that you’ll be able to free up the tile.
Removing the tile panels from your dropped ceiling can turn out to be a messy task but it’s a pretty simple one. There might be mice droppings present so make sure that you have a full mask and goggles on.
Take care of the lights and wiring: Once you’ve already gotten rid of the acoustic tiles, it’s time for you to take care of the lights and wiring.
Any existing types of lighting fixtures, their bases, or visible wiring should be removed before you proceed with the rest of the grid removal. Please know that you should only attempt this if you’re pretty handy with the electrical wiring systems. If you aren’t, it would probably be best if you just hire a professional electrician. You might spend a little more on the side but it’s not something that you should compromise on.
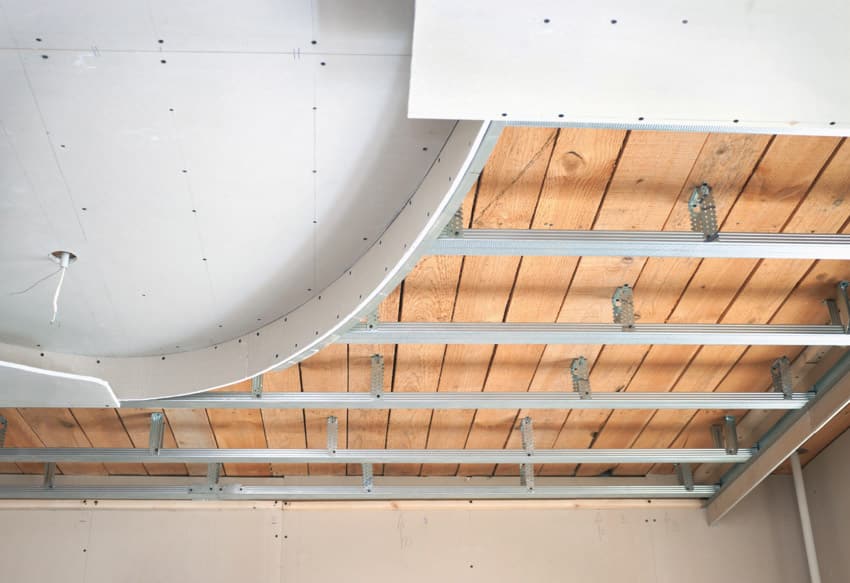
Cut out the Cross Ts: Your dropped ceiling’s support grid basically hangs off of wires from the main ceiling above. It connects to a perimeter wall anchor that then runs along the walls. This grid has a main T-shaped supports and cross Ts. The main supports essentially run from one side of the room to the other. The shorter cross supports run in between the main supports.
Taking out your heavy-duty tin snips will work marvelously when it comes to cutting right through the cross supports that are attached to the main support frames.
Time to remove the main grid: If your main support frames aren’t thin enough, you can also use your tin snips to cut through them. Cut along the area where the main grid meets along with the perimeter wall anchor.
If they happen to be way too thick to be cut up with the use of tin snips, you can cut through it with the use of a reciprocating saw. Each and every single main grid support connected through wires in the ceiling needs to be cut or snipped. Leave the perimeter wall anchor until the last part. You need to take out the screws that hold it in place in order for you to get it removed.
Lastly, you need to work on the finishing touches: Once you’ve gone ahead and taken the grid down, you will need to take care of the remaining nails and screws that have been embedded in the ceiling.
If your ceiling is still in great shape, you can just fill in these holes with some putty and then get them sanded down and then painted. If the cracks are way too big and putty wouldn’t be enough, use some drywall compound and drywall tape to repair them. An alternative to this is that you can get furring strips installed to hang your new drywall panels on.
Repair The Old Ceiling
If possible, you need to go out of your way to get the old ceiling repaired. If the original drywall is left sagging, make sure that you either replace sections of the drywall or screw plaster washers to patch them up.
It’s important to scrape up any debris coming from the screw holes and nail holes that originally held your dropped ceiling system in place. Smooth out the surrounding area and make sure that there aren’t any bulges or loose debris hanging from the holes.
Get the compound sanded down. Apply another layer of that same compound with a drywall knife, let it dry, and then get that extra layer sanded down and smooth.
Replace the Ceiling
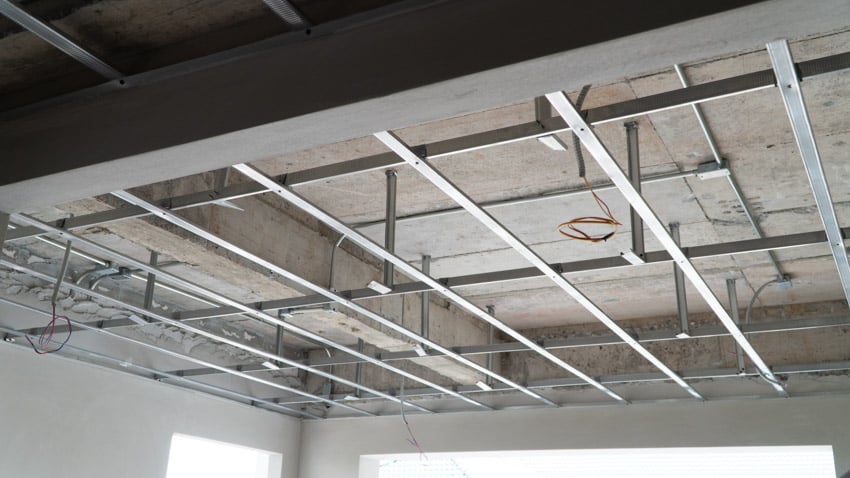
Lay out your ceiling grid sketch on paper: Similar to an actual interior decorating or construction project; you need to make sure that you’re laying everything out accordingly to make sure that you have all of the materials that you will possibly need.
Sketch and measure everything out. This will allow you to go ahead and position the grid and more or less accurately measure up all of the materials you need. Even professional contractors use the aid of graph paper to lay out the ceiling grid for each room that they happen to work on.
Not only does this help immensely with the materials list, but this also allows you to effectively get equally sized panels for every side of the room that you’re planning to work on. You need to make sure that other types of ceiling lights and fixtures, such as heat registers, are all figured into the equation.
The first step to doing this is to make sure that you bisect the ceiling area at the center by a centered row of tiles or the main tee. Here’s a ceiling installation tip from the pros: always order your materials by even numbers.
For example, if you’re room area has a measurement of 9×11 feet, for example, order materials in for a 10×12 room instead. Always notch it up to an even number. It’s always better to have a little bit of excess in materials than to come out lacking mid-project.
Nail up your wall angle: The trick here is for you to make sure that you get to pick a ceiling height that will clear out the lowest obstruction possible. Think about the ductwork and other possible plumbing lines while you’re at it.
Mark out the top of the wall angle with a chalk line. Nail out the wall angles with the use of a 1 ¼ inch nail stud in your drywalls. Avoid nailing into the corner beads as much as you possibly can. Doing so is a sure way for you to get your nail pops to crack.
What you should do instead is to run the wall angle long. Snip the bottom of the stud and bend it around the corner. Finish up with a slip-on outside corner while you’re at it.
Hold your angles tight with the use of fence staples: Drill out your preferred angle and slip in your fence staple. This will anchor your angle to your walls in the event that there don’t happen to be any nearby studs. The use of fence staples will ensure that the wall angle is secured to the studs.
This is particularly crucial for when there happen to be gaps between the angle and the wall. If there happens to be a severe bow in the wall, you would have to cut the lower part of the channel as an adjustment. This will cause that area to flex and follow the contour that you’ve mapped out.
Run in your guide strings and drive in your hanging screws: Measure out your guide strings to keep your hanging fasteners in line. Make sure that you do this as you begin your dropped ceiling removal project. The stings should be used as a guide as you position your hanging screws.
This will keep the main tees straight as they’re hanging. It’s also good to offset the strings by ½ inches to make sure that they line up with the side of the tees instead of at the center. Make it a point to wrap the strings around a nail and secure them to the wall angles with the use of a spring clamp.
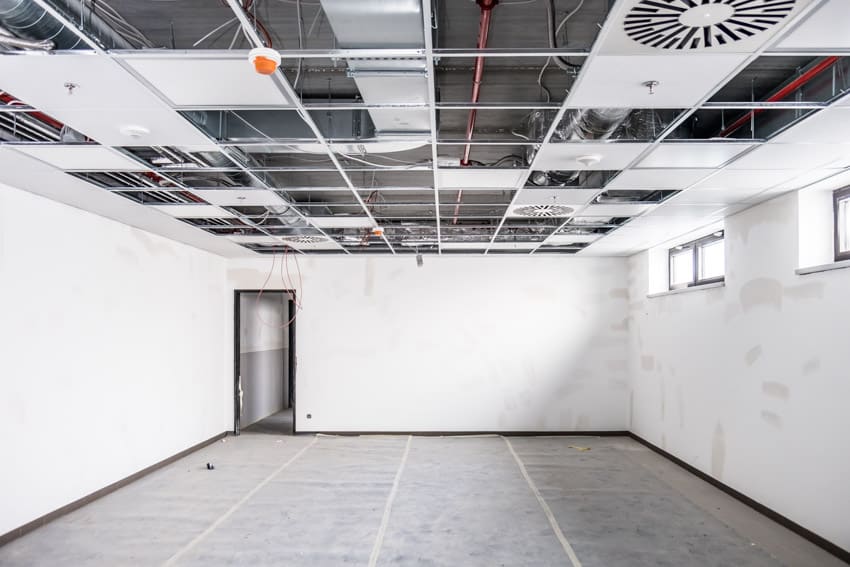
Hidden Surprises (Exposed Utility Pipes, Duct And Wiring)
Dropped ceilings are great for concealing utility pipes, ducts, and wiring, especially in locations like the basement. You basically have a few choices; you can reroute them, create boxes out of wood framing and install some drywall around them, or create a whole new suspended ceiling by getting a framed ceiling put in.
Some building codes will require drywall boards that have been fire-rated especially if the ceiling happens to be in between floors or in places such as the kitchen that have open flames. Make sure that you get things checked out with your local codes department for you to be up to date with the regulations in your area.
To be on the side of safety, also make sure that you consult a professional electrician and plumber to really get everything smoothed out. Always get an estimate before hiring a contractor for installation projects and check their reviews and references to get an idea of their level of experience.
To showcase highly specific designs, some images on this website use advanced AI-generation software to illustrate ideas and room inspiration. See our editorial policy to learn more.

Upload a photo and get instant before-and-after room designs.
No design experience needed — join 2.39 million+ happy users.
👉 Try the AI design tool now