How to Mix Metal Kitchen Hardware Like a Designer & Avoid Overdoing It

Mixing your kitchen cabinets’ hardware and finishes is one of the fastest ways to make your kitchen feel designed. The trick isn’t to add more, which leads to overwhelm, but instead to choose well. To make it work, designers advise selecting one hero finish, adding one bold accent, and repeating it with intention. Do that, and you’ll have a room that looks curated, balanced, and stylish, without overdoing it. Below, I share how to mix metal kitchen hardware like a designer, without trying too hard.
Quick look at how to mix metal hardware

Upload a photo and get instant before-and-after room designs.
No design experience needed — join 2.39 million+ happy users.
👉 Try the AI design tool now
- Pick one dominant metal. Add 1 to 2 accents.
- Repeat each finish in 2 to 3 places so it feels more intentional.
- Group by zones, for instance, lighting, plumbing, and cabinetry hardware, to stay stylish and cohesive.
- Contrast your warm finishes, such as brass and bronze, with cool ones, like nickel and chrome, or black, for balance.
Kitchen Hardware Mixing And Matching Tips
Choose your one dominant finish – Pick the finish you’ll want to see the most. This is usually the cabinet hardware or lighting. This anchors the color palette. Here are a few examples:
- Polished nickel (cool, classic)
- Aged brass (warm, character)
- Matte black (neutral, grounding)
Use this finish on 60 to 70% of all of the visible metal.
Add one accent (two max) – Bring in 1 to 2 accents for added depth. Here are some good pairings to use:
- Aged brass combined with matte black (warm + neutral)
- Polished nickel along with unlacquered brass (cool + warm)
- Stainless steel with oil-rubbed bronze (cool + warm, and high contrast)
Keep the total amount of kitchen finishes to two or three to align with the designer rules above.
Map by “zones” to avoid extra visual noise – To do this, you’ll want to divide the kitchen mentally into thirds. Here’s a breakdown of how it’s done:
- Top: pendants and sconces
- Middle: faucet & pot filler
- Lower: cabinet knobs and pulls
Match two zones and let one zone contrast, for instance, lighting and hardware that match, with a faucet that contrasts. This creates order without monotony.
I never incorporate any more than three finishes in a kitchen, says designer Shea McGee of Homes & Gardens.
Repeat intentionally – Repeat every finish at least twice, and ideally three times. For example, use aged brass on pulls and on sconces, polished nickel on the faucet, and on the appliance pulls.
Designer Emily Henderson recommends peppering mixed metals around evenly, which helps keep it from feeling accidental.
Use contrast wisely – If two metals feel almost the same, they can clash with each other. To avoid this, pair different temperatures and finishes such as polished vs satin, and warm vs cool, so the mix reads deliberate.
Decorator Maggie Burch from Southern Living recommends using black and glass as an easy finish, since both read as neutrals in most spaces, making them reliable partners when mixing metals.
Start with hardware (lowest risk) – If you’re not ready to fully commit to making the switch you can try swapping knobs and pulls first. This is an easy DIY task that’s reversible, budget-friendly, and instantly shows how your combo will play with the light and cabinetry in your kitchen. Designers often recommend hardware as an easy entry point.
The Do’s & Don’ts
Don’t get caught overdoing it by following these tips:
Do
- Limit to 2 to 3 finishes in total.
- Repeat finishes across zones for cohesion.
- Choose one standout star (lighting or faucet) and let all the others support.
Don’t
- Mix too many metals (4 or more looks indecisive).
- Pair two nearly identical silvery finishes, for example, using chrome and satin nickel, go for contrast instead.
- Split plumbing finishes. Always keep the faucet & pot filler consistent.
Quick Metal Mixing And Kitchen Color Combos That Always Work
- Sage cabinets: Aged brass and black (earthy + crisp)
- White oak: Brushed brass and polished nickel (warm + cool)
- High-contrast black/white: Matte black and unlacquered brass (graphic + warm)
- Stainless appliances: Stainless and bronze (tie the steel, add warmth)
Here’s a chart to help you plan out your kitchen design.
| Cabinet Color / Style | Recommended Dominant Metal | Accent Metals to Mix | Why It Works | Designer Tip |
|---|---|---|---|---|
| Sage, Olive, or Green Cabinets | Aged brass or antique bronze | Matte black or dark bronze | Warm metals balance the cool, organic green and add richness. | Repeat brass in the faucet or sconces so the warmth feels intentional. |
| White or Cream Cabinets | Polished nickel or chrome | Brushed or unlacquered brass | Cool silver tones keep things bright; brass warms up the all-white palette. | Try polished nickel hardware with brass lighting for a classic, layered look. |
| Black or Charcoal Cabinets | Brushed brass or soft gold | Stainless steel or polished nickel | Metallic finishes pop against dark cabinetry and create a luxe, high-contrast effect. | Use brass on the island hardware and lighting to keep the space from feeling too heavy. |
| Wood Cabinets (Oak, Walnut, Maple) | Matte black or oil-rubbed bronze | Brushed nickel or stainless steel | These finishes echo the warmth of the wood while still giving a subtle contrast. | Pair one warm metal (bronze/brass) with one cool metal to balance the natural grain. |
| Blue or Navy Cabinets | Polished nickel or chrome | Antique or brushed brass | Cool, reflective metals make blue feel crisp; brass adds warmth and depth. | Use polished nickel on hardware and antique brass on lighting for a tailored, designer look. |
| Gray Cabinets | Matte black or chrome (depending on undertone) | Brass or brushed nickel | Gray is a natural bridge color and shifts warm or cool depending on the metal. | Check the undertone: warm gray loves brass; cool gray pairs best with chrome or nickel. |
| Two-Tone Cabinets (White Uppers + Dark Lowers) | Choose one metal to repeat on both uppers and lowers (e.g., brushed brass) | Add a second finish for lighting or plumbing (e.g., black or nickel) | A single “bridge” metal ties both cabinet colors together while the accent adds interest. | Use one metal per “zone” (hardware vs lighting vs faucet) and repeat each finish at least twice. |
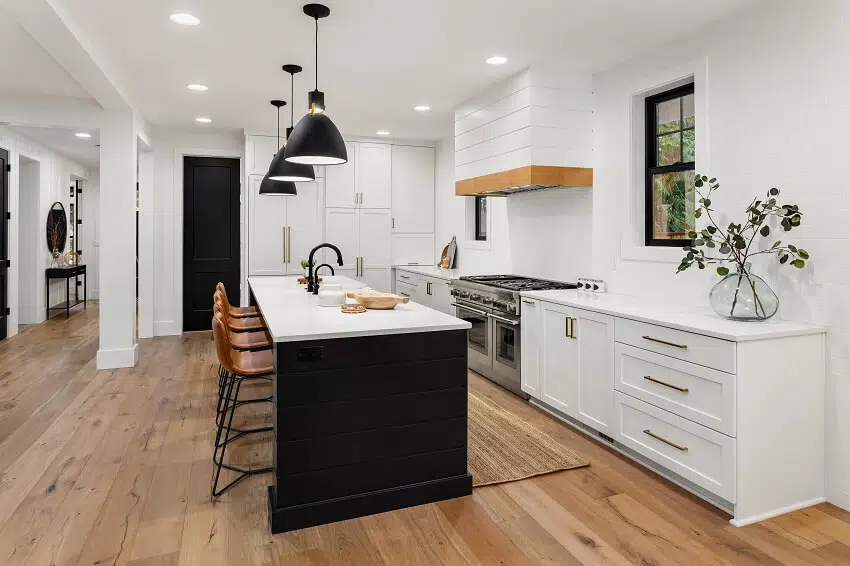
Where to Use Each Finish (Example Layout)
Dominant (polished nickel): Used on the faucet, pot filler, and appliance pulls
Accent 1 (aged brass): Used on the cabinet hardware and island pendants
Accent 2 (optional, matte black): Used on the door hardware, small rail or rod, or picture light
To showcase highly specific designs, some images on this website use advanced AI-generation software to illustrate ideas and room inspiration. See our editorial policy to learn more.