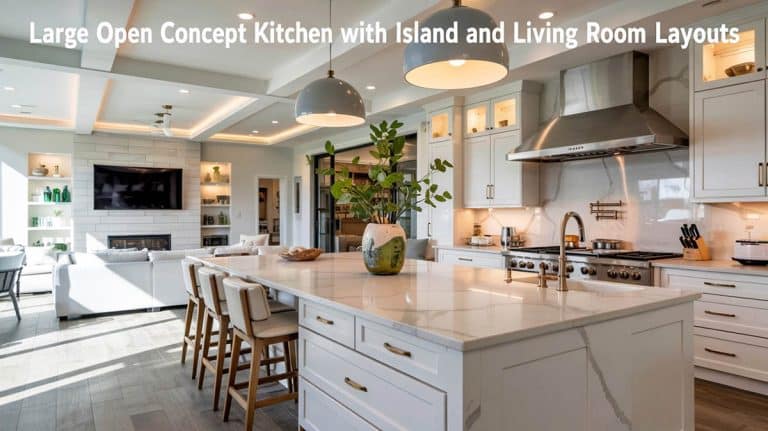
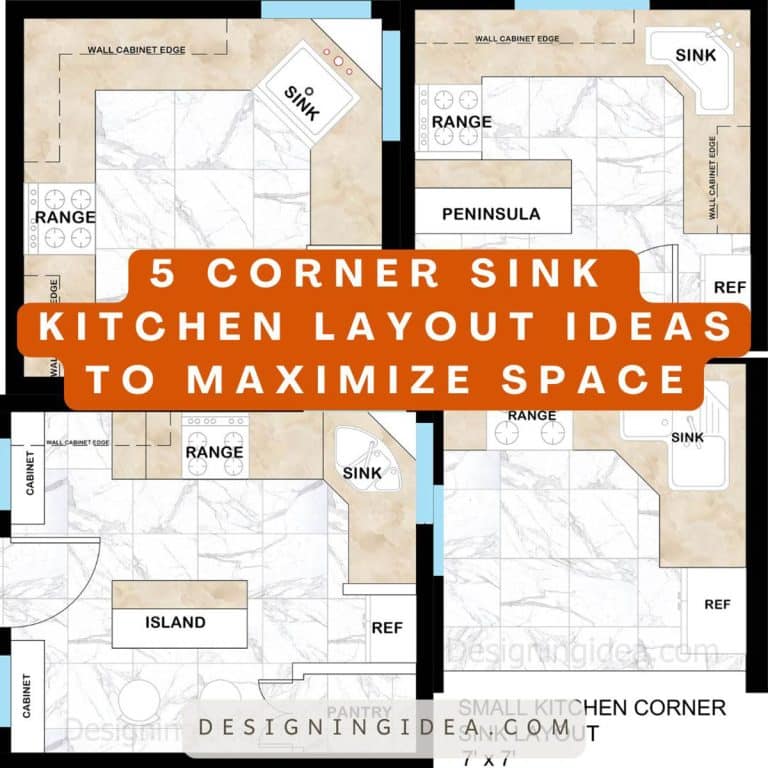
5 Corner Kitchen Layouts That Make the Most of Every Square Foot

Corner kitchens turn an L-shaped design into a space that makes sense. Smaller kitchens often use a tight work triangle layout to maximize their efficiency. Larger floor plans can benefit from the addition of an island, a pantry wall, a dining table, and room for the whole family to move around. Having the right layout has less to do with the amount of space you have and more to do with how you actually cook. The five corner kitchen layouts I’ve created here cover the full range of options. You’ll see a compact 10×10 L-shape built for the solo cook, a 13×13 island kitchen created with entertaining in mind, a peninsula plan that gives you a social divider , a long layout designed for serious home cooks, and an open pantry-wall design with a standalone prep table. Each plan includes the dimensions you’ll need, design tips, and detailed floor plans, so you can see exactly how the appliances and cabinets are arranged for use in your own home. [toc]
10×10 Compact L-Shaped Corner Kitchen Layout
This design provides an efficient version of a corner kitchen that fits in a full appliance lineup into a 10×10 floor plan and avoids feeling cramped.
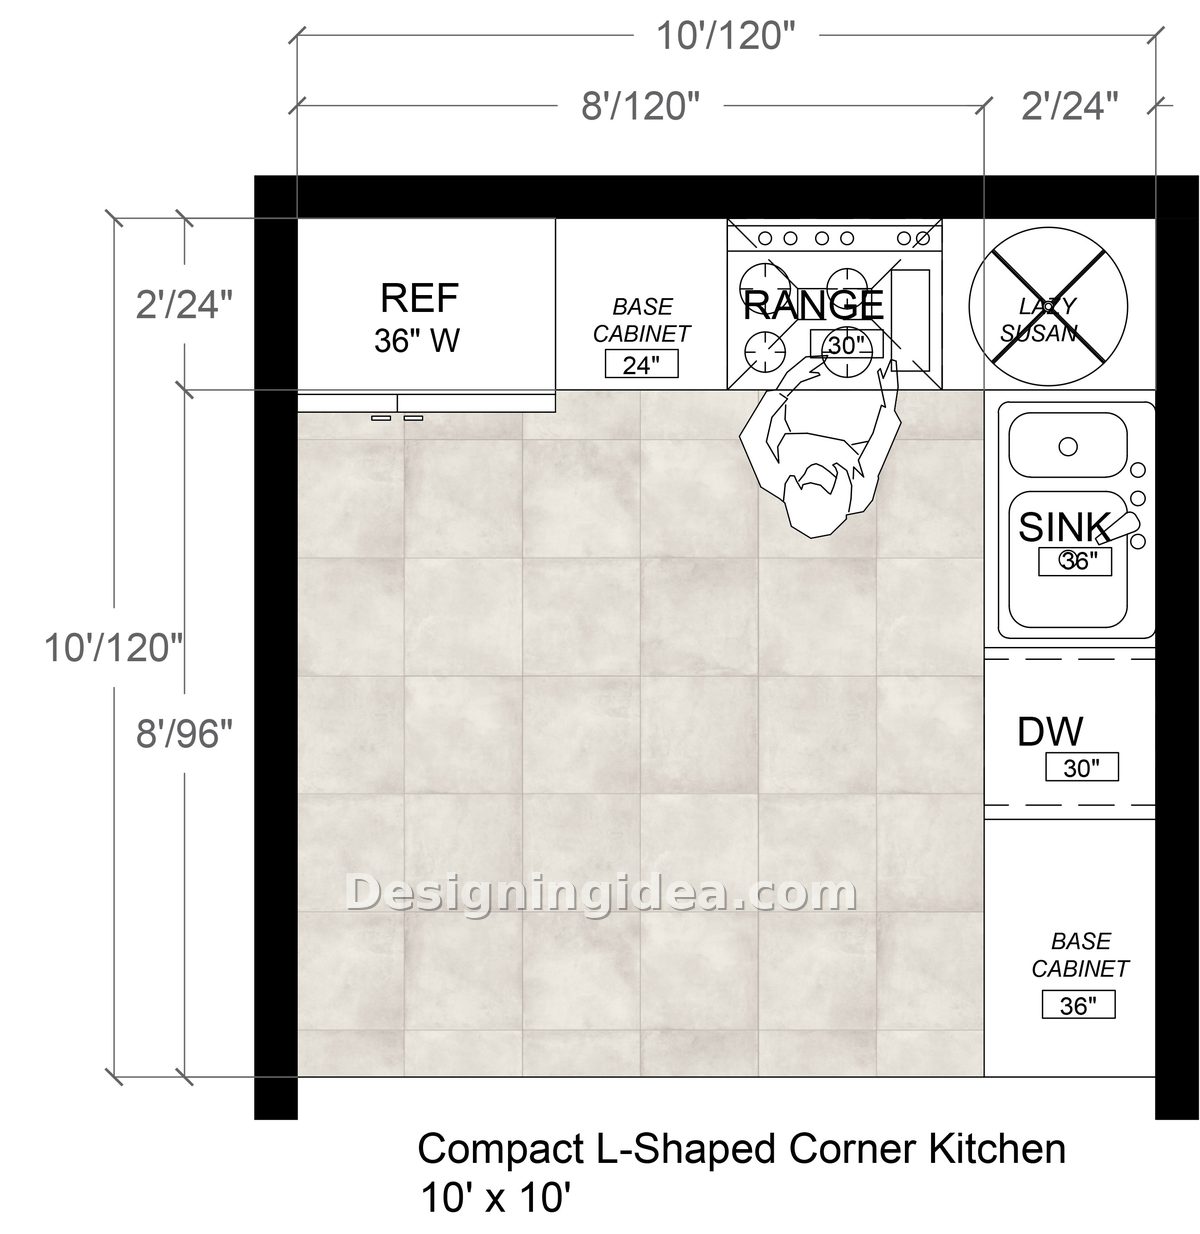
Floor Plan details: A 10×10 kitchen at just “100 square feet” may feel like it’s barely the space to give you a narrow galley or a room where two people can’t stand side by side. But an L-shaped corner layout changes that completely by running cabinets along two walls and leaving the entire center floor open. This results in a more open feel that’s surprisingly comfortable to cook in on your own. This layout works by placing the refrigerator, a 24-inch base cabinet, and the range along the top wall, then turning the corner with a lazy Susan before continuing down the right wall with the sink, dishwasher, and extra base storage. That corner cabinet with a lazy Susan reclaims any potential dead space and gives you options for storing pots, pans, or dishware. The work triangle between the fridge, range, and sink is tight and effective, which is what you want in a compact space like this. With everything within a couple of steps, and the open floor in the center, it feels more open and creates a practical layout that is what a small kitchen needs.
Dimensions:
- Room size: 10′ x 10′ (100 sq ft)
- Top wall cabinet run: 8′ of usable counter depth (24″ cabinets)
- Refrigerator: 36″ wide
- Range: 30″ wide
- Sink: 36″ wide
- Dishwasher: 30″ wide
- Corner unit: lazy Susan
Design Tips
- Pull the lazy Susan all the way to the front of the corner cabinet. Install a full-rotation lazy Susan with a lip around the edge to keep things from sliding off when you spin it.
- With the range centered on the top wall, you’ll want upper cabinets on either side of any range hood instead of above it. This way, your most-used items are kept at eye level and within arm’s reach while you’re cooking.
- Maintain the open floor space in the center of this kitchen for a more open feel.
- Bring in a compact rolling cart if you need a central prep space and addition countertop.
13×13 L-Shape Kitchen Floor Plan With Island
By providing an extra three feet on each wall, it makes an island possible that gives this kitchen extra style and functionality.
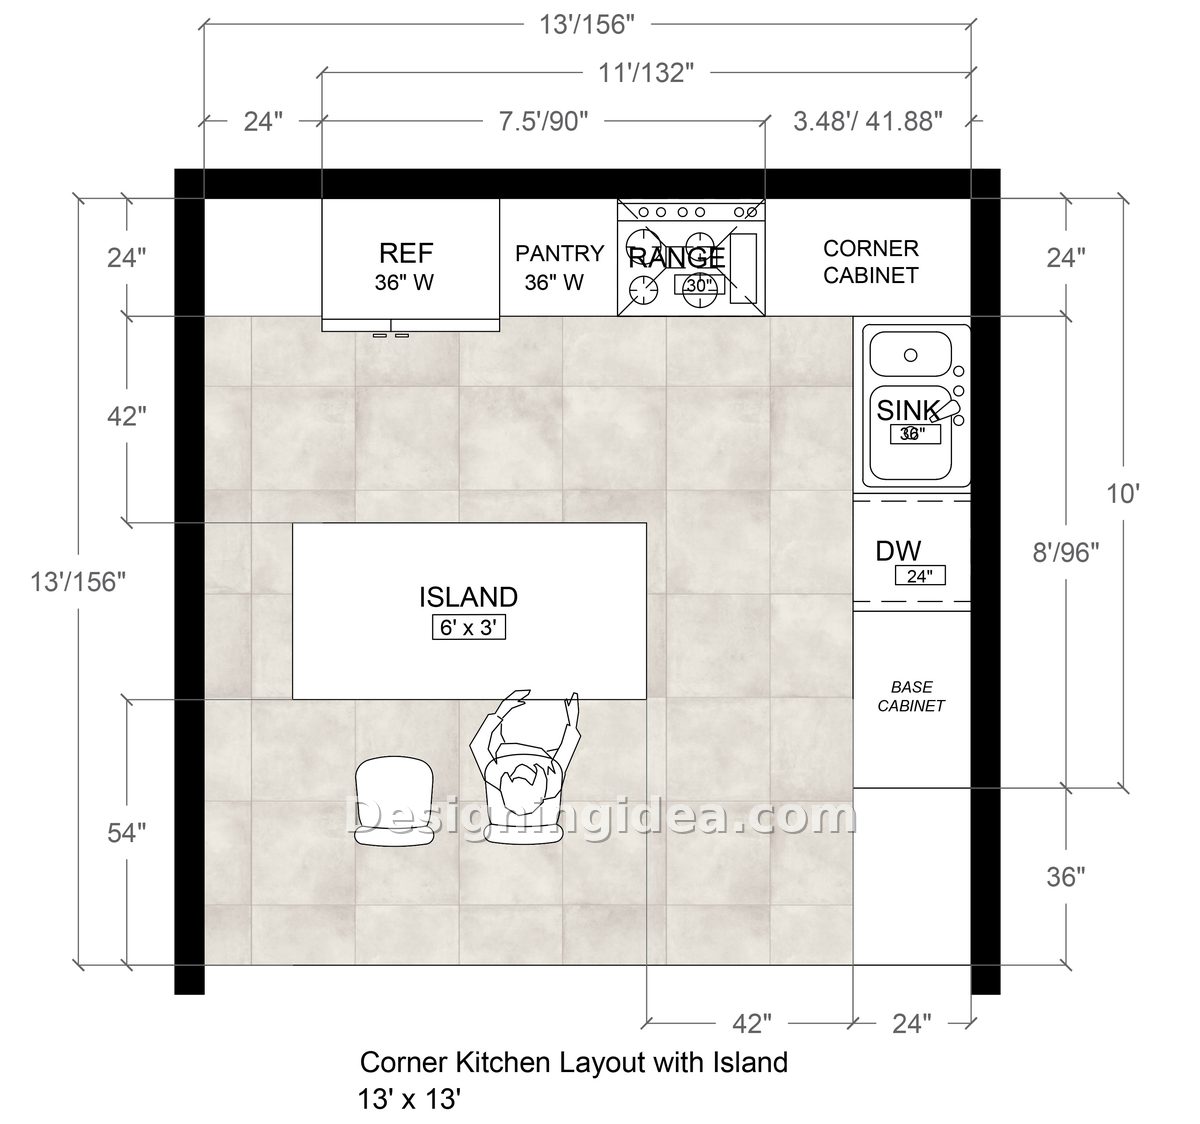
Floor Plan details: This 13×13 corner kitchen provides an extra three feet per side compared to the 10×10 design, but the differences are pretty outstanding. The island in this plan is 6′ x 3′, and is placed in the center with seating on the lower-left side so you can enjoy entertaining and eat-in dining. The kitchen’s perimeter follows the same L-shape logic as the more compact option, but with more room to breathe. The refrigerator sits at the top-left, followed by a 36-inch pantry and then the range. The right wall runs down from the corner cabinet to the sink, dishwasher, and a base cabinet. The pantry cabinet next to the fridge makes meal prep much easier, and its location is convenient when you’re cooking food. Traffic flow around the island kitchen flows easily with wide 42-inch lanes between the island and the surrounding counters. The island also adds a large amount of prep surface all in reach of the primary work triangle, so there’s plenty of efficiency within the design.
Dimensions:
- Overall footprint: 13′ x 13′ (169 sq ft)
- Top wall working run: 11′ (132″) with 24″ cabinets
- Right wall working run: 8′ (96″) with 24″ cabinets
- Island: 6′ x 3′
- Refrigerator: 36″ wide
- Pantry cabinet: 36″ wide
- Range: 30″ wide
- Sink: 36″ wide
- Dishwasher: 24″ wide
- Lower clearance zone (bottom): 54″ from island to bottom wall
Design Tips
- Use the island for prep by installing a butcher block top on one end, which keeps it functional without looking like a bar counter.
- Keep the seating on the island to one side so the cook always has a clear area near the appliances.
- Use the corner cabinet as a reach-in pantry for all of your dry food goods.
- Consider adding a pull-out drawer system or a blind corner pull-out to the corner, as they’re easier to access than a lazy Susan in a larger kitchen when you’re not standing directly in front.
- Position the island lighting carefully and use two pendants spaced roughly 30 inches apart over the long axis of the island to light it properly.
11×12 Kitchen With Corner Design and Peninsula
A kitchen with a peninsula gives you all of the social benefits of an island without needing the same amount of square footage.
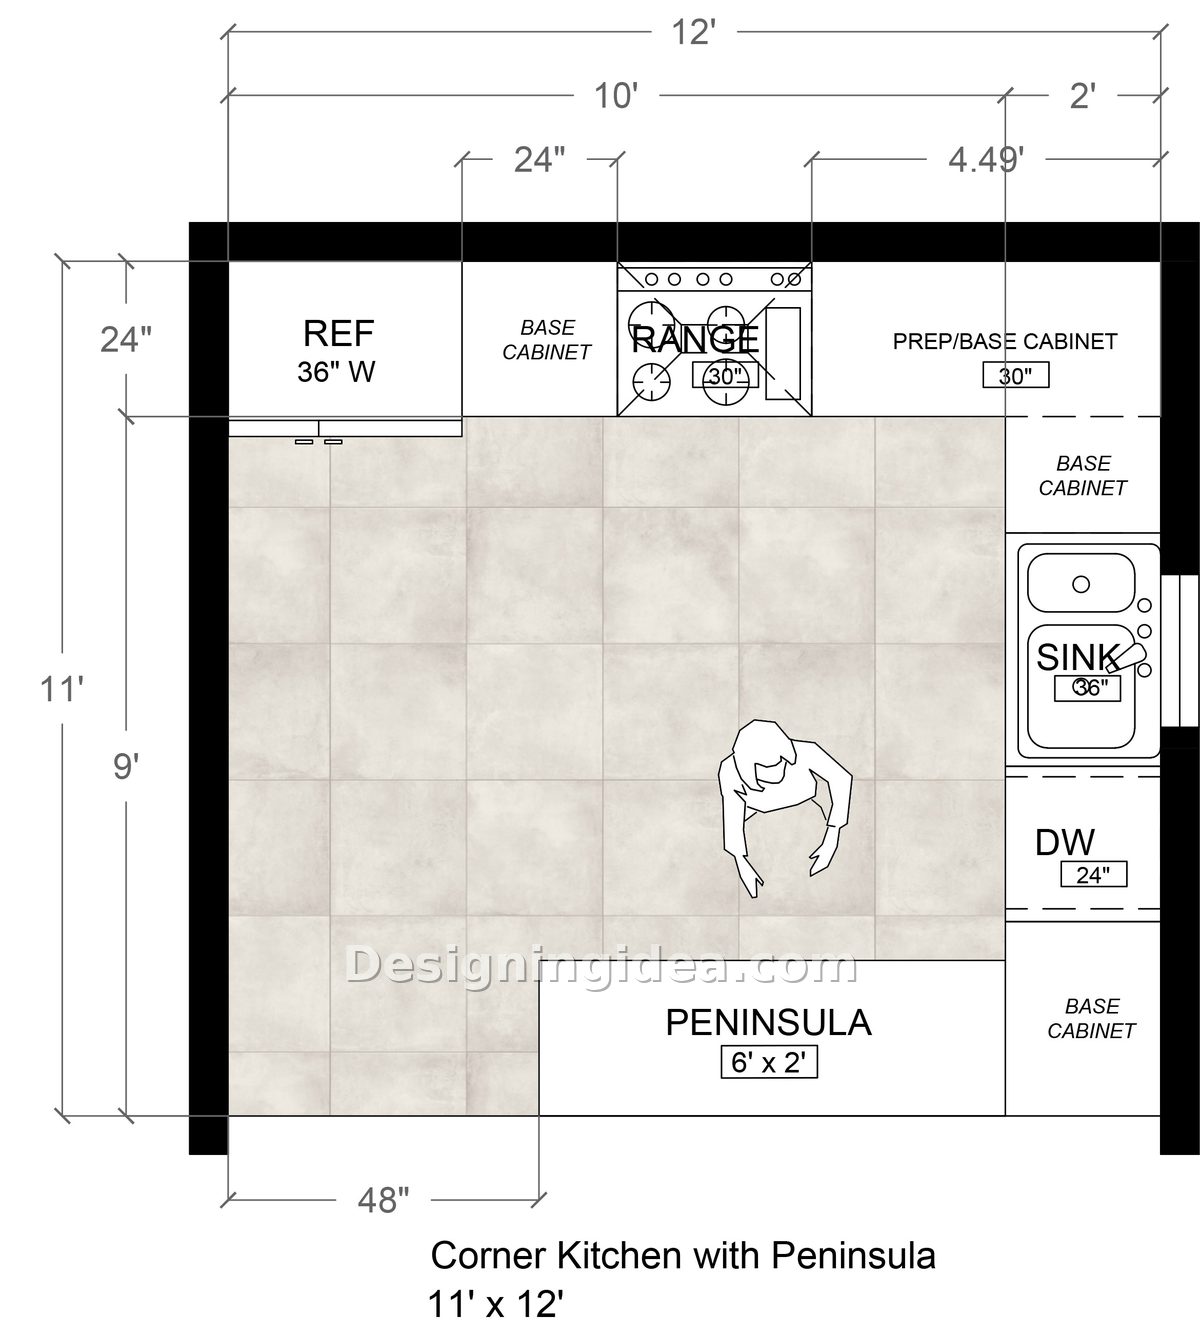
Floor Plan details: A peninsula is often the smarter choice in a kitchen that isn’t quite big enough for a freestanding island. In this layout, it attaches to the right wall and extends 6 feet out into the room at a depth of 2 feet. That gives you a counter surface that can seat two people facing into the kitchen while the cook works outside the area of visitor foot traffic. For this plan, the perimeter runs the refrigerator at the top-left, a base cabinet, and the 30-inch range along the top wall. The right wall carries a 30-inch prep and base cabinet at the top, with another base cabinet at the bottom, a 36-inch sink, and a 24-inch dishwasher in the middle. The peninsula spans 6×2 from the bottom base cabinet, with 48 inches of clearance on the left side, giving the cook and guests a wide aisle to move through. What this layout handles particularly well is the social dynamic of cooking. The peninsula creates a natural barrier between the kitchen and whatever space is beyond it, whether it’s a dining area or a living room, while still keeping everything feeling open and connected.
Dimensions:
- Overall footprint: 11′ x 12′
- Top wall working run: 10′ with 24″ cabinets
- Right wall working run: 9′ with 24″ cabinets
- Peninsula: 6′ x 2′, attached to right wall
- Left-side clearance (cook’s aisle): 48″
- Refrigerator: 36″ wide
- Range: 30″ wide
- Prep/base cabinet at top-right: 30″
- Sink: 36″ wide
- Dishwasher: 24″ wide
Design Tips
- Finish the peninsula with a waterfall edge to give it a stylish look.
- For the seating side of this peninsula, go for stools with a footrest around 8 inches from the floor if the counter height is 36 inches, or 12 inches if the peninsula is counter-height at 42 inches.
- Consider adding a statement backsplash on the top wall and right wall sections visible from the main room, as it’s what anyone seated at the peninsula will be looking at.
12×16 Large Corner Kitchen With Extended Prep Leg Layout
This L-shaped design gives the longer horizontal run up top to the sink, dishwasher, and an open countertop space, so there’s an abundance of prep space while cooking.
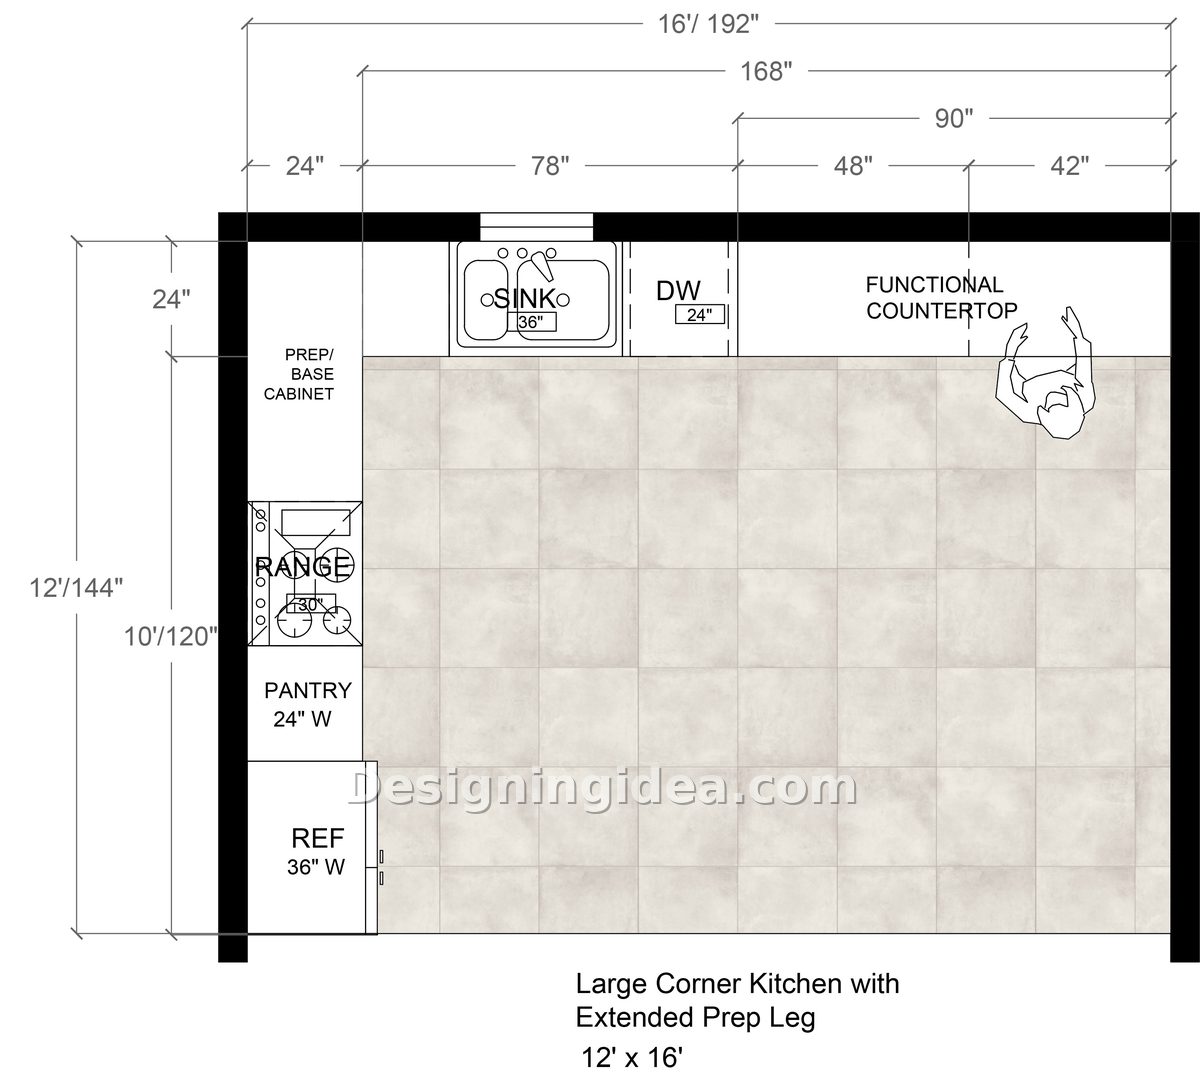
Floor Plan details: This L-shaped kitchen has no island and a top wall that runs the full 16 feet (192 inches) of the room’s width and contains the sink, dishwasher, and an expansive countertop area that spans 7.5 feet on its own. The left wall at 12 feet stacks the prep and base cabinet near the corner, followed by the range, pantry, and refrigerator from top to bottom. This layout gives a separation of functions so that cleanup and open prep happen along the top and cooking happens on the left side. The 90-inch countertop section at the top-right of the horizontal run is not interrupted by appliances, giving you plenty of space to set up meals when cooking for a crowd. The 12-foot left wall offers a pantry at 24 inches wide that’s near the 36-inch refrigerator at the bottom. The range is in the middle, so it’s more accessible from anywhere in the room.
Dimensions:
- Overall footprint: 12′ x 16′ (192 sq ft)
- Top wall total run: 16′ (192″)
- Top wall cabinet sections: 24″ + 78″ + 48″ + 42″ (left to right)
- Functional countertop zone: 90″ (7.5′)
- Left wall working run: 10′ (120″) with 24″ cabinets
- Sink: 36″ wide
- Dishwasher: 24″ wide
- Range: 30″ wide
- Pantry: 24″ wide
- Refrigerator: 36″ wide
Design Tips
- The range is positioned about midway down the left side. Consider installing a retractable wall-mounted pot filler to fill large pots without having to carry them across the room, which can get old.
- Use the long functional countertop on the top-right as a prime spot for a coffee station, a toaster oven, or any countertop appliances you use daily.
- Consider installing under-cabinet lighting across the entire top wall so it becomes the visual anchor of the space and makes the kitchen look bigger, brighter, and more stylish.
12×14 Open Kitchen With L-Shape Layout, Prep Table and Pantry Wall
This 12×14 layout trades a traditional built-in island for a dedicated pantry wall and a small freestanding prep table, making the kitchen feel more open.
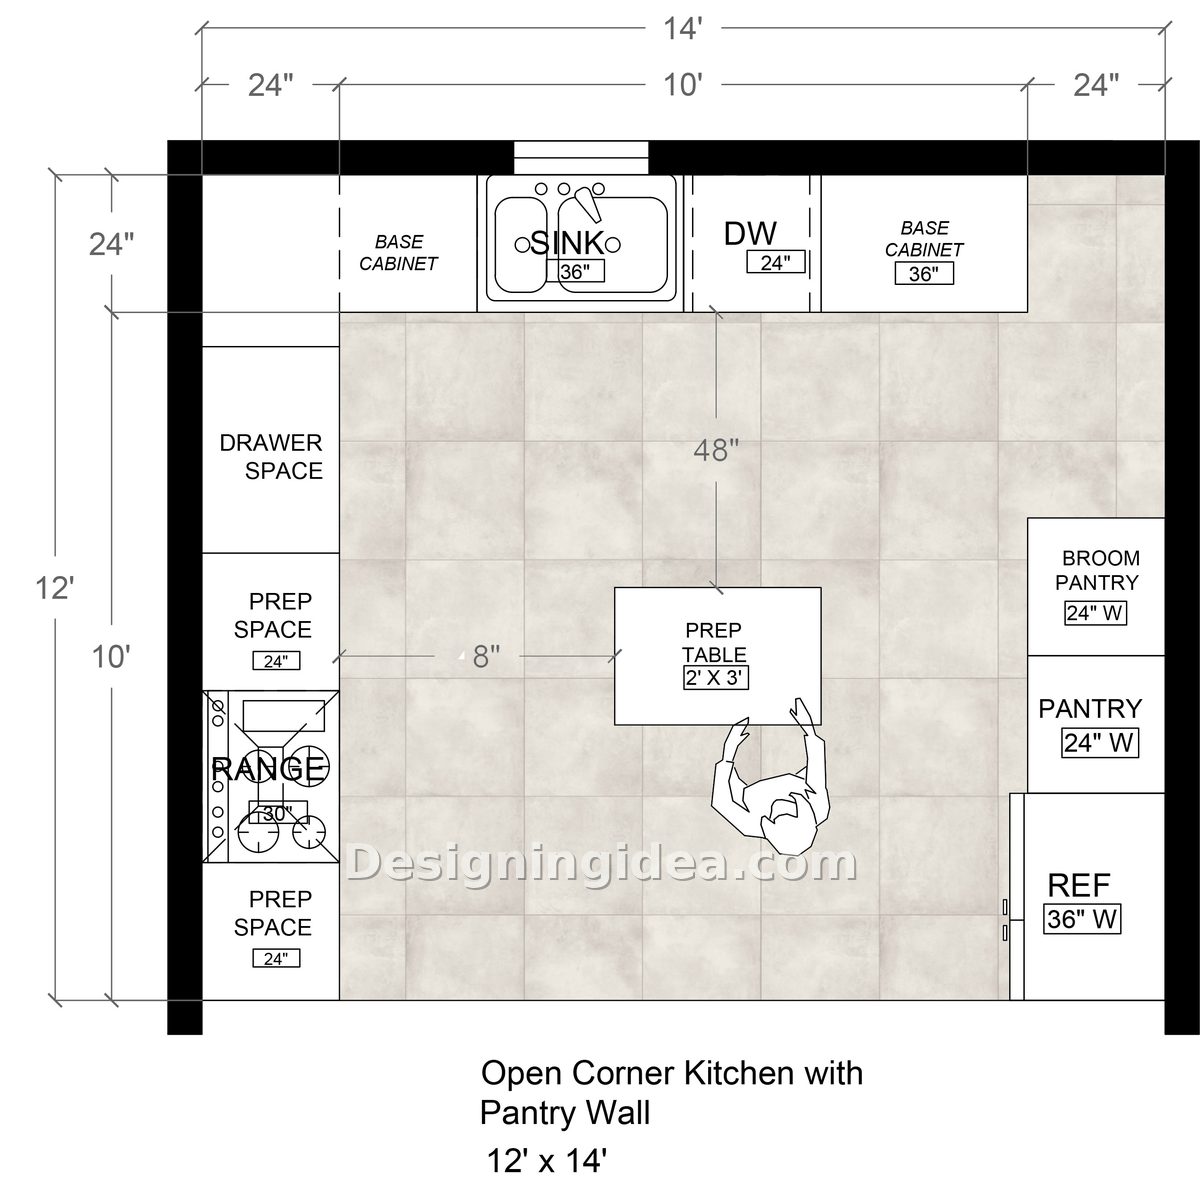
Floor Plan details: Instead of committing a large chunk of floor space for a fixed island, this layout puts a pantry wall along the entire right side of the room and places a small 2×3 movable prep table in the center of the floor. The result is a kitchen that feels more spacious than if a built-in island structure were installed in the center. The top wall has a sink near the center, 36 inches wide, followed by a 24-inch dishwasher and base cabinets on either side. The left wall offers drawer space at the top, a 24-inch prep counter, a 30-inch range in the middle, and another 24-inch prep counter at the lower end. This setup gives you a working counter on both sides of the range, which is useful when you’re cooking multiple courses. The far right wall, from top to bottom, runs a 24-inch broom pantry, a 24-inch pantry cabinet, and a 36-inch refrigerator. It’s basically a storage wall that handles all of your dry goods, cleaning supplies, and cold storage in one place. The prep table measures 2×3 feet and sits in the center of the room, with 48 inches of clearance to the top wall and 8 inches to the left wall. However, it’s not a permanent fixture and can be easily moved for use as a prep surface or a quick spot for eat-in dining.
Dimensions:
- Overall footprint: 12′ x 14′
- Top wall run: 14′ wide with 24″ deep cabinets
- Left wall working run: 10′ with 24″ deep cabinets
- Clearance from top wall to prep table: 48″
- Prep table: 2′ x 3′ (freestanding, centered)
- Sink: 36″ wide
- Dishwasher: 24″ wide
- Range: 30″ wide
- Prep space on left wall: two 24″ sections (above and below range)
- Broom pantry: 24″ wide
- Pantry: 24″ wide
- Refrigerator: 36″ wide
Design Tips
- Choose a prep table with casters and a locking mechanism so that when you’re not actively using it for prep, you can roll it toward the left wall for cleaning, entertaining, or just opening up the space.
- Use the two prep sections flanking the range on the left for setting hot pans and the other for active prep items while cooking.
- Install a heat-resistant trivet built into the countertop by the range to make the landing side more useful.
- Keep your most-used necessities in the cabinet directly above or below the range rather than making a trip to the pantry. Reserve the pantry wall for bulk storage and less-frequently-used items.
To showcase highly specific designs, some images on this website use advanced AI-generation software to illustrate ideas and room inspiration. See our editorial policy to learn more.

Upload a photo and get instant before-and-after room designs.
No design experience needed — join 2.39 million+ happy users.
👉 Try the AI design tool now