
Tongue and Groove (Ceiling, Flooring & Walls)

Tongue and groove boards are a wooden planking system that joins an adjacent board by interlocking the ridges and grooves built into the sides of the pieces. This method gives a great deal of support in any application and makes for a more solid structure. Tongue and groove-installed surfaces also tend to be more level than other methods of installation.
The tongue part of the pieces is a ridge that juts out of the side of the entire board. The groove portion is an inverted section the same shape and size as the ridge so they can fit tightly into each other. When tongue and groove pieces are installed the pieces are fit together. The short end of the pieces also has the same tongue and groove parts to fit together throughout the entire floor.

Upload a photo and get instant before-and-after room designs.
No design experience needed — join 2.39 million+ happy users.
👉 Try the AI design tool now
The main benefits of tongue and groove boards are their interlocking planks that allow for easy installation and remove the need for exposed nail heads. They were first mass-produced in the late 1800s and soon after became the primary way wood flooring was produced. The technology behind tongue and groove boards is now used on much more than flooring and includes, wall siding, ceilings, and decking. Below we explore a variety of tongue and groove design ideas for your home.
Tongue and Groove Ceiling
Installing tongue-and-groove planks to your ceiling is an inexpensive method to panel your ceiling. This can be done as a DIY project with the help of another person. Tongue and grove or T&G can be installed directly over bare wood framing, plaster, or drywall to spruce up the look.
Typically ceilings are done with drywall, screwed into the joists above, which is not a simple task. A wood tongue and groove can be a great alternative. The tongue and groove option not only creates a simpler installation but also gives a beautiful natural ceiling that adds dimension and interest to the space.
Another great thing about adding a wood tongue and groove ceiling is that you can stain in any color. This should be done before installing though, as it is difficult once the pieces are in place.
Before you begin the installation process you will need to measure the length and width of your ceiling. You’ll find that most ceilings are not exactly the same on all corners. With that in mind make sure your measurements take into account the longest and widest measurements to ensure you have sufficient materials to complete the job. With your measurements in hand, the next step is to choose the type of boards or panels you want. Get the dimensions of each board including the width and length of a single board or panel.
Installing Tongue and Groove Ceiling
Installing a tongue and groove ceiling can potentially be a one-person project, but as with most things, would be easier with two. To begin, you must cut each piece of wood to make sure it fits with all neighboring pieces.
On top of that it is important to make sure that the ends of the board stop at the center of a ceiling joist. This is so that planks can be nailed to the ceiling joist to stay in place using finish nails. You should nail through the tongue of the planks to hide the nail heads within the grooved edges of the adjacent plank.
While that sounds easy, the tough part is getting all the pieces to fit into each other perfectly. This is important to keep everything in straight lines and stay parallel to the walls.
Tongue and Groove Flooring
Tongue and groove flooring replaced the haphazard method of nailing in wood floors. Wood floors were nailed to the baseboards resulting in uneven, rugged and somewhat unflattering floors. Tongue and groove removed the need for each board to be nailed down, instead connecting all the planks.
This method makes for a much more desirable and safe floor covering. This method began with just wood flooring but has expanded to many different types of flooring, wood remaining the best use of the tongue and groove method.
Installing Tongue and Groove Flooring
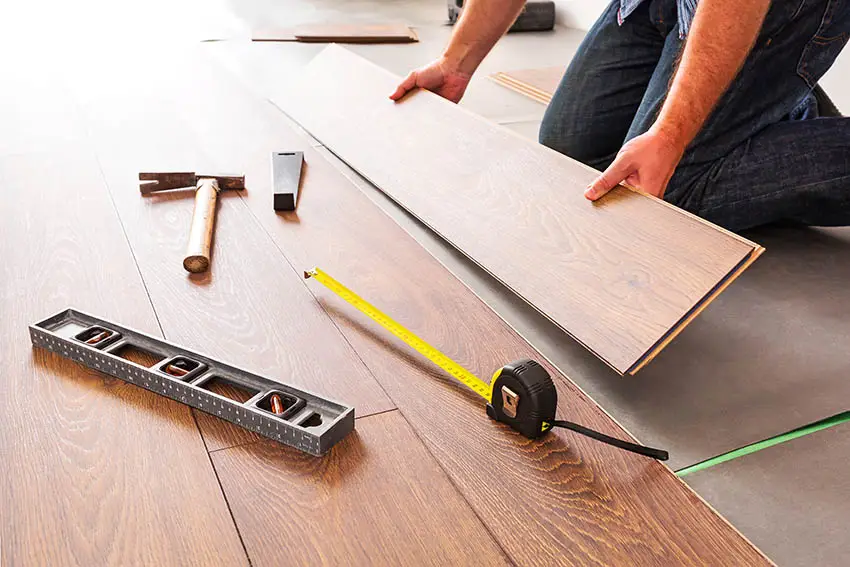
As mentioned above the tongue and groove system was created to avoid an access of nails needing to be used. Unfortunately, they cannot be completely removed from the project. The pieces still require nailing to the subfloor when it comes to hardwood flooring. On the contrary, engineered hardwood flooring does not need to be attached to the subfloor at all, creating what is known as a floating floor.
Tongue and Groove Hardwood Flooring
Most hardwood flooring manufactured these days uses a tongue and groove assembly method for ease of installation. As previously mentioned hardwood flooring needs to be attached to the subfloor. With the tongue and groove system, it needs to be nailed in a few spots, but it does still need to be attached. This is typically (And most recommended) done with a hardwood flooring nailer. These can be rented or purchased depending on how many projects you plan on completing.
Another way to install tongue and groove flooring is to drive the nails at an angle through the tongue part of the piece of hardwood into the subfloor. This is a physically demanding as well as time-consuming process; on top of that it is typically not done well, which defeats the purpose of having a tongue and groove system anyways.
Adding an underlayment beneath the hardwood flooring is important to avoid squeaking and excess noise. Felt paper is one of the most commonly used underlayments when it comes to wood-on-wood situations.
Tongue and Groove Engineered Flooring
Engineered wood flooring is recommended to have an underlayment. This underlayment is specific to each product and situation as engineered flooring can be placed over existing flooring or concrete. Engineered flooring can be installed over existing flooring or concrete because of the tongue and groove system allowing it to create a floating floor and not have to be nailed to the subflooring. The underlayment helps with sound absorption, cushioning, and moisture resistance.
With the tongues and grooves on engineered flooring, everything should snap together. You need to push down and in at the same time for these to snap into place properly. Then use a manufacturer-approved block to tap everything into a snug fit.
Tongue and Groove Porch and Deck Flooring
Let’s keep in mind that porches and decks are extremely similar, and their flooring is built similarly to any other flooring. The biggest difference is that porches and decks are outside, which means the materials are going to need to withstand the weather. Porches need less care than decks since they are often enclosed or have a roof to protect them from the elements. Either way, the wood used in outdoor areas needs to be strong.
Some good options are: Pressure treated pine, Ipe, tigerwood, angel’s heart, mahogany, or redwood. Ipe is good because of its natural ability to resist decay, insects, and mold, as well as being fire resistant. Mahogany is a strong and dense piece of wood that is rot-resistant, so much so that boats used to be made out of it – so it must be good for a deck or porch. Redwood is known for its resistance to shrinking, cracking, insects, decay and warping. There are other options for outdoor flooring besides wood too.
Composite wood can be a great choice to look like wood while getting different qualities that could be better for the space that it is in. Composite decking is comparable to interior luxury vinyl tile in the sense that is a hassle-free alternative to wood.
Composite wood is made to be fire resistant; it is cheaper, and easier to get your hands on. Also, instead of having to select a certain type based on its ability to withstand the elements, composite flooring is known for its easy cleanability and resistance to typical outdoor challenges. Composite flooring and wood flooring for decks and porches can both be done in the tongue and groove method. The other options (brick, tile, artificial grass, etc) cannot be.
Tongue and Groove Siding
Similar to the above-mentioned flooring for decks and porches, the material for tongue and groove siding must be a material that can handle the great outdoors. Tongue and groove siding is done in wood, which is good for the environment in the sense that it does not give off any pollution and is a biodegradable resource. This choice will likely last decades and can add a great deal of value to a home.
There are a few kinds of wood that are specifically recommended for tongue and groove siding (due to resistance, weight, etc.): Pine, spruce, fir cedar, redwood and cypress.
Tongue and Groove Paneling
Tongue and groove paneling is similar to the installation and features that tongue and groove ceilings have. Fortunately, when putting these on as paneling, they are a lot easier than the ceiling, and this brings installation costs (or difficulty level if this is a do-it-yourself project) down.
Tongue and groove paneling is done as a decorative piece to (typically) the bottom of a wall to add texture and dimension to the space. This can be done in almost any wood as the weight is not as much of a concern as it was for the ceiling. There are multiple types of paneling that can be done.
Tongue and groove shiplap wall siding is an option for the interior for those who want a nautical-themed design. Typically shiplap boards sit on top of each other while overlapping. On the other hand tongue and groove planks are joined by interlocking together.
Tongue and Groove Wainscoting
Wainscoting is a decorative paneling that is typically done for both decorative and practical uses. Wainscoting can be used as insulation for the lower half of the wall. It is also sometimes used to cover up imperfections or holes in the wall. Wainscoting is also used as purely a decorative piece.
Wainscoting itself has multiple different types that can be used on the paneling done – only some use the tongue and groove method of installation. Popular types of wainscoting are: raised panel wainscoting, flat panel wainscoting, board and batten, and bead board.
Tongue and Groove Beadboard
Beadboard is the most well-known for being done by the tongue and groove system. In this case, the ridge mentioned before is referred to as the “bead”. Where the tongue and groove connect is typically covered by strips of molding to create a more finished decorative look. Any of these paneling options can be stained or painted in almost any color imaginable, letting the decorative part of it take control. See more beadboard kitchen cabinets here.
Installing Tongue and Groove Wall
Installing the tongue and groove paneling, whether it is just part of the wall or the whole thing, is done in relatively the same way. After selecting the patterns and materials it comes down to getting these pieces on the walls!
Based on the decisions you made in the planning process can have an effect on which steps need to be taken to install the planks. Planks that are different sizes or have a V shape give a different aesthetic and could have additional steps, but most of the process is pretty straightforward. Some of the supplies needed are: a nail gun, nails, a rubber mallet and a level or chalk line (for guidance).
Starting with a clean wall, it can be painted or not, depending on if any of the surfaces going to be shown, but either way, you will need to repaint afterward. Start by finding the studs behind the wall and marking them for easy visibility in the future. The only places that nails are going to stick are into studs, so you should mark as many as are there.
Start from the bottom up when placing the planks. As wood is a fickle material and is known for expanding and contracting based on the temperature, so do not be directly against the floor (and don’t forget to save room for the baseboard too). This is also the point where it is decided if the planks are going to be parallel with the floor and/or ceiling or if they are going to be level. This is a personal choice, and sometimes you cannot have both, sometimes you don’t even get a choice, depending on the skill of the installer.
When beginning to install the studs make sure that the planks are inserted with the tongue facing up so there will be the least amount of visible nails. Nailing at an angle through the tongue is a good method. After all the pieces are installed (And any other decorative pieces – like bead board molding) the paneling can be pained or stained to the color desired.
Other things that should be considered when completing this install are: if there are going to be any exposed ends, if there are any outlets or switches, if there are any cracks or knots that need to be filled, and if there are any doors or windows that need to be addressed.
Tongue and Groove Cost
The cost is dependent on a few factors; what materials are being used, where the materials are being installed, how much material is bought, the location of the project, how difficult of an installation, etc.
See below for a few examples of certain projects that can differ in price. It is always good to get quotes from the contractors doing the work before buying any material. It is also beneficial to shop around to find the best pricing for the materials that are needed for the project.
Tongue and Groove Ceiling Cost
Starting with the ceiling installation and looking at the average square footage and material quality we come to a quite reasonable price range. Materials for this project range from $2 to $3 per square foot.
This price is very similar to the cost of drywalling a ceiling. Labor for installing a ceiling is a bit more due to the difficulty level, and if the ceiling is of an abnormal shape it could raise the price. For instance, installation on a vaulted ceiling may increase labor costs. Typically outsourcing labor costs about $75 to $125 per hour.
The time to complete a 350 square foot area typically takes 11 hours, which is roughly the size of the average living room. Estimating a few hundred dollars for additional supplies or tools can spare you from going over budget.
Overall to add a tongue and groove ceiling of about 350 square feet it will run around $1,500 to $2,250. A way to cut down on labor costs is to do it yourself, but that adds additional money to the supplies needed category and adds quite a bit of stress and risk factor.
Tongue and Groove Flooring Cost
As for the installation of tongue and groove flooring and looking at the average square footage and material quality we come to a quite reasonable price range. The two categories we are breaking the cost analysis down into are softwood and hardwood (keep in mind there are many types of materials that can be used but these are just two options).
Materials for this project range from $4.50 (softwood) to $6.50 (hardwood) per square foot. Labor for installing flooring is quite a bit more reasonable than the ceiling, but that is because it is an easier task, typically outsourcing the labor costs about $40 per hour. This is a good task to try your hand at saving a few bucks while learning the trade.
Tongue and groove flooring is a pretty easy install since the pieces snap together like a puzzle, and in some cases do not even need to be nailed down to a subfloor. Make sure to check the specifications of each product before doing an install yourself. A few other costs that could come up on a project like this is the removal of any below surface, adding an underlayment, and any prior disposals or supplies that may be required per the chosen product.
Shiplap vs Tongue and Groove
One of the more common terms in the home improvement and interior design field right now is shiplap. This product is a great similarity with the tongue and groove that we have been discussing here. What is the difference between these two materials?
While all three of these methods look similar, they all have distinct aesthetic differences. These methods were brought into existence for siding purposes, but in recent times they have been used for interior walls to create a decorative accent wall, or another intentionally decorative purpose for interior spaces. A shiplap ceiling can be constructed by attaching the boards directly to the studs or over drywall.
Shiplap has boards that are made with rabbit joints or V-groove boards, so that they can be stacked, typically to look like siding. Shiplap has increased strength and stability. These boards overlap each other and rest on top of one another. Shiplap planks cut in form the face where a step-like cut is created from the overlapping.
Tongue and grove boards, on the contrary, join together and interlock. Tongue and groove planks have the groove running through the center of the edge of the planks.
Another popular and seemingly similar technique to get this look is just creating a planked wall. This is just nailing in pieces of plywood in a decorative fashion, not having and grooves or ridges or overlap or interlock into anything. This method requires a lot more visible nails unlike the competing two techniques mentioned.
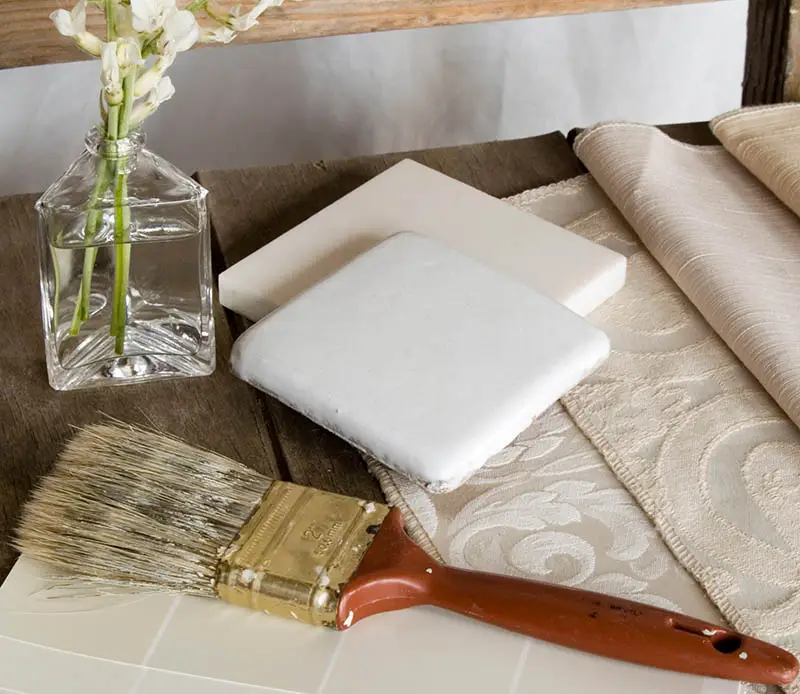
How to Whitewash Tongue and Groove Planks
As described above tongue and groove planks are used for a number of different applications and can come in a variety of different materials. Frequently when choosing wood for these types of projects the resistance to certain elements is a more important concern than what the piece of wood looks like in the moment. This is because most woods have the ability to be stained, painted, or whitewashed. Depending on each type of wood gives the ability to do either of these things.
Whitewash is a particular type of paint with lime and water, or whitening, water and paint. This is sometimes referred to as calcimine, kalsomine, calsomine, or lime paint. Basically it is for giving the wood at hand a white paint, while still being able to see the natural graining and knots of the wood. To do this you first stain the wood to the color of your liking (or if it is a good color for whitewashing then you can leave it in its natural state).
You can next either mix two parts white paint to one part water, or you can buy specific whitening products for differing qualities and effects. If mixing yourself you can add more water for a lighter wash, for a thicker finish with less stain or wood color showing through the paint, more white paint should be used.
Once the paint is mixed and ready, brush it onto the wood with the grain. This helps keep as much of the natural grain without causing any unnecessary streaking. After that, before it dries, use a rag to wipe off any access pigment, again with the grain to avoid streaking. The longer you leave the paint on the surface before wiping it off gives you a thicker, whiter surface.
Wiping off the paint is extremely important though, you do not want it to dry on the surface. Wiping in long even strokes gives the best look as it avoids any lazy brush marks. This can be done on any unfinished wood; this is not recommended for any shiny or glossy finished piece of wood.
Whitewashing leaves a beautiful weathered look and due to its makeup (differing from regular paint) the paint doesn’t penetrate the wood. For a more weathered look, you can then sand off some places of the wood. For a more durable situation, you should add a topcoat of polyacrylic, especially in high-moisture areas such as bathrooms or outdoors.
For more wood kitchen ceiling designs visit our gallery page.
To showcase highly specific designs, some images on this website use advanced AI-generation software to illustrate ideas and room inspiration. See our editorial policy to learn more.


What are some pros and cons associated with going with a 1 X 6 vs. 1 X 8 ceiling tongue & groove plank; I’m thinking about a great room consisting of a living room, kitchen and dining room? Why might I choose one over the other?
I think it mainly depends on your personal taste in styles. Wider planks are generally used to create a traditional or rustic look. You can also find a lighter color wide plank used in many contemporary designs.
How can I share this article on my facebook
Thank you for the question. We’ve added a Facebook sharing widget to the bottom of each article.
would it work to do both tongue and groove and shiplap in a home? the sawmill planed my wood shiplap when I wanted tongue and groove. some areas shiplap and some tongue and groove?
Horizontal or Vertical? Looking at knotty pine in a 4-season porch. Horizontal seems like it might accumulate dust. But Vertical would require more work as the planks are parallel with the wall joists and would need some kind of extra support for the areas between the wall joists. Which is best? .