8 Kitchen Peninsula Layouts For All Floor Plan Sizes
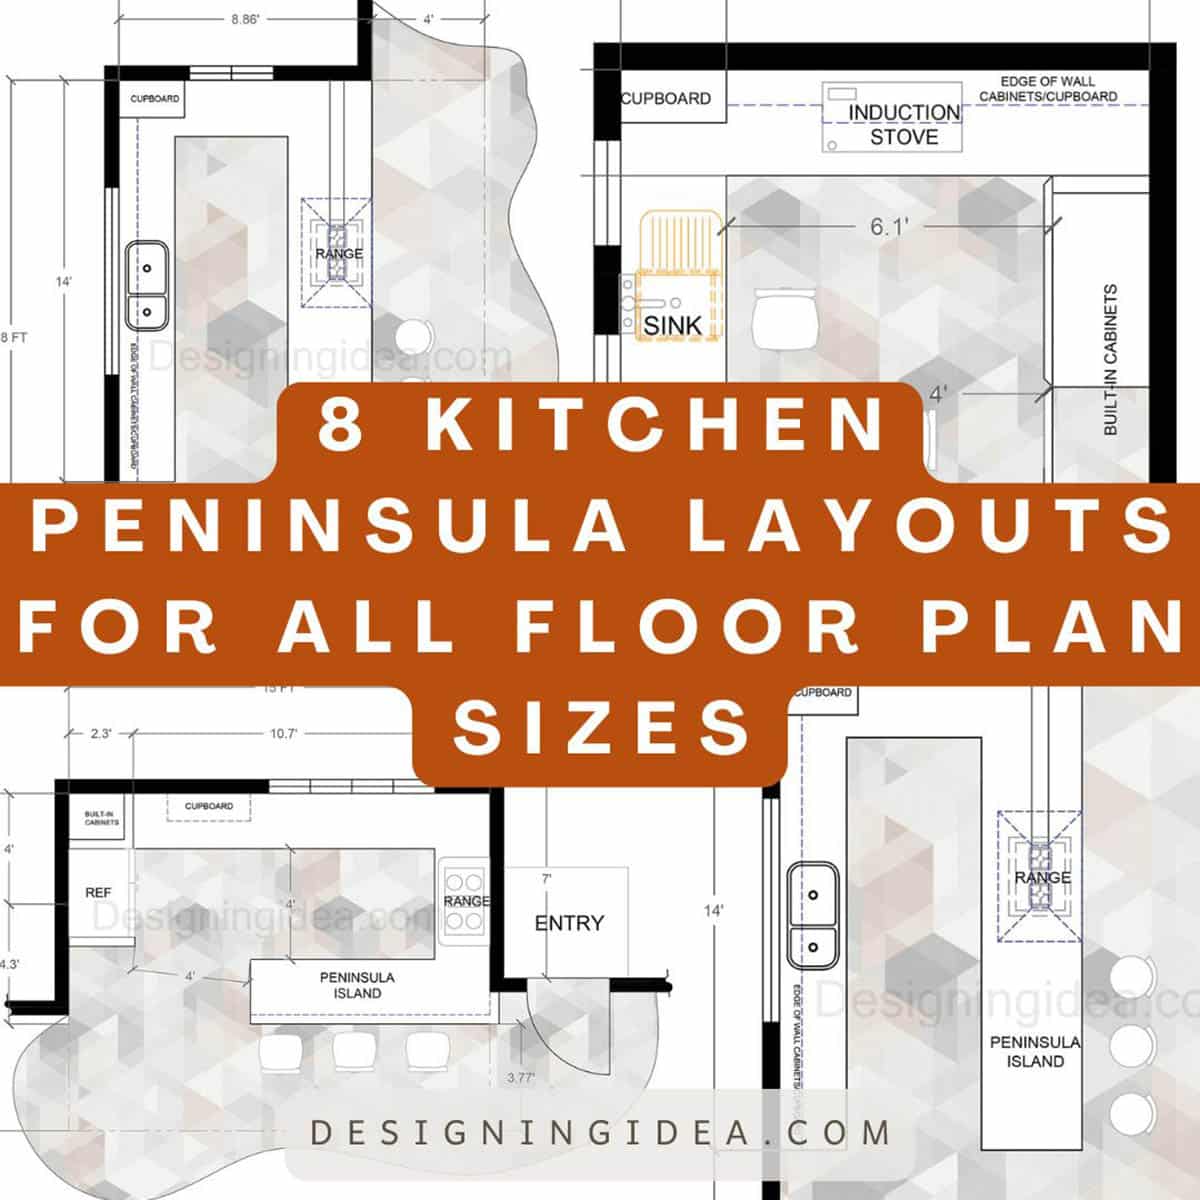
Adding a peninsula layout to your kitchen can have some very beneficial results, like increasing your cooking, storage, and socializing space. In this guide, we’ll explore eight versatile peninsula configurations that range from classic L-shapes, efficient galley styles, to show-stopping G-and T-shapes that offer real-world dimensions and pro tips you can use. You’ll discover how each design maximizes workflow, appliance, and seating placement while promoting visual appeal so that you can choose the perfect peninsula plan for your next renovation project.
Kitchen Peninsula Layouts For All Floor Plan Sizes
Standard Kitchen Peninsula Layout
A peninsula addition to the kitchen floor plan adds additional counter space for preparing meals, entertaining, or eat-in dining.
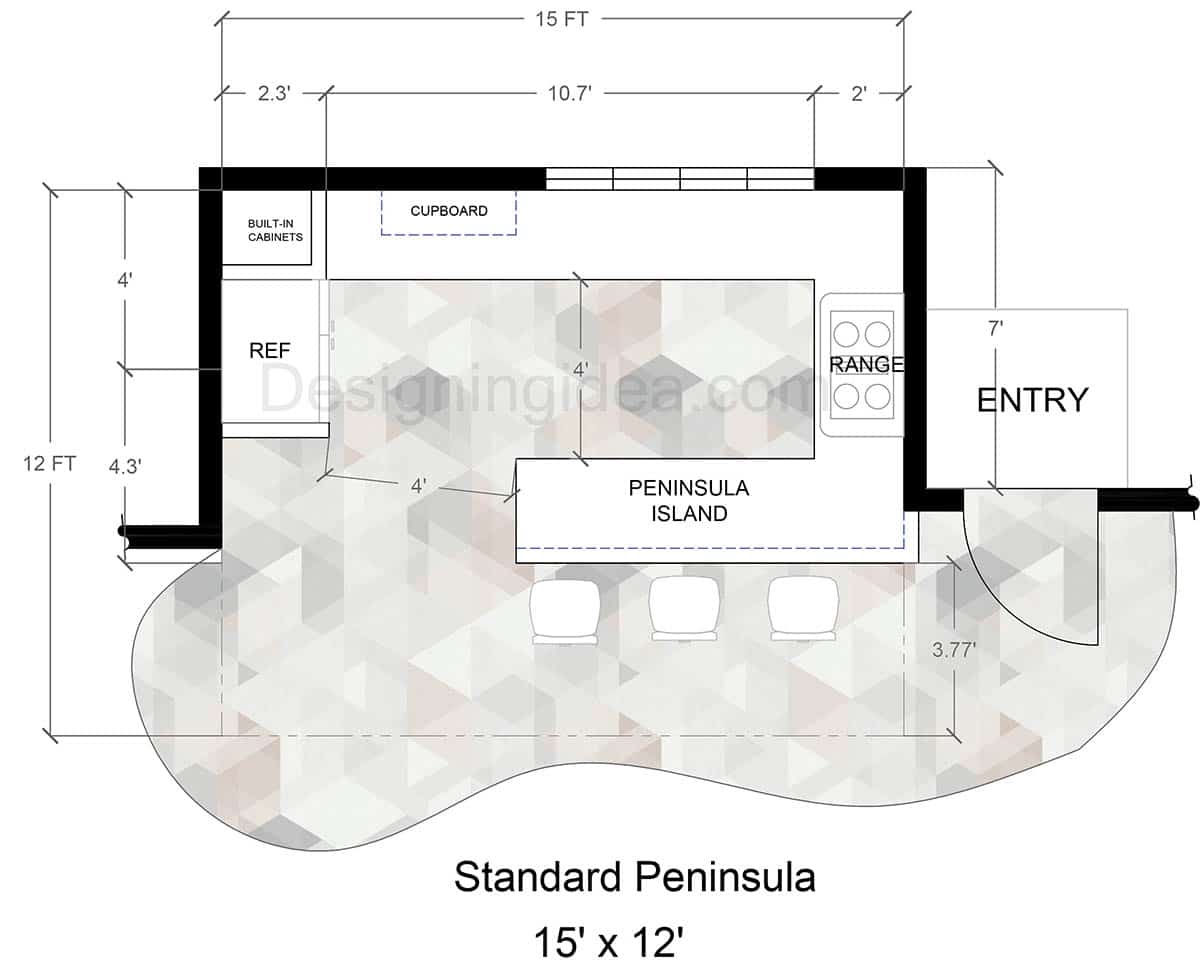
Floor Plan Details:
This kitchen features a standard work-efficient design, built around a “peninsula island”, which is simply a three-sided counter that projects into the room rather than floating in the middle like an island. It has an effective work triangle that flows from the refrigerator to sink (omitted here/under window placement), to range. The fridge, sink and range are all under 10′ apart forming a compact triangle that keeps meal prep, cooking, and cold storage within reach. The long run against the back wall of 10.7′ gives plenty of counter space for all the cooking and cleaning jobs and room for two to work side by side. The kitchen peninsula is helpful as an extra prep surface and casual seating/dining bar.
Dimensions:
- Overall size 15′ (left-to-right) × 12′ (top-to-bottom)
- Top run (main counters) 10.7′ clear countertop between built-ins, plus 2.3′ to left wall and 2′ to right wall
- Counter depth 2′ standard depth along the top wall
- Built-in cabinets 2.3′ wide at left end of top wall
- Fridge run 4′ deep nib extending at left wall, with 4.3′ of aisle clearance in front
- Range location On right end of top run, next to 7′ wide entry alcove
- Sink should be positioned under the window between the fridge and range.
Design Tips:
- Clearance: Aim for at least 42″ to 48″ clearance around the peninsula to prevent bumping into corners, chairs or others.
- Stool spacing: With three stools, provide 18″ to 24″ per seat.
- Accent lighting: Consider installing a row of 2 to 3 pendants above the peninsula to brighten and define the seating zone.
- Zone the finishes: Adding a contrasting finish or color on the peninsula base (darker stain or a painted color) can distinguish it from the other cabinetry.
- Integrated storage: Add cabinets and deep drawers on the peninsula’s inside face to store pots, pans, or even recycling or trash receptacles.
Kitchen With Peninsula And Island Layout
By combining a kitchen island with a peninsula you get distinct prep, cooking, and seating areas for a highly functional design that is highly functional and looks amazing.
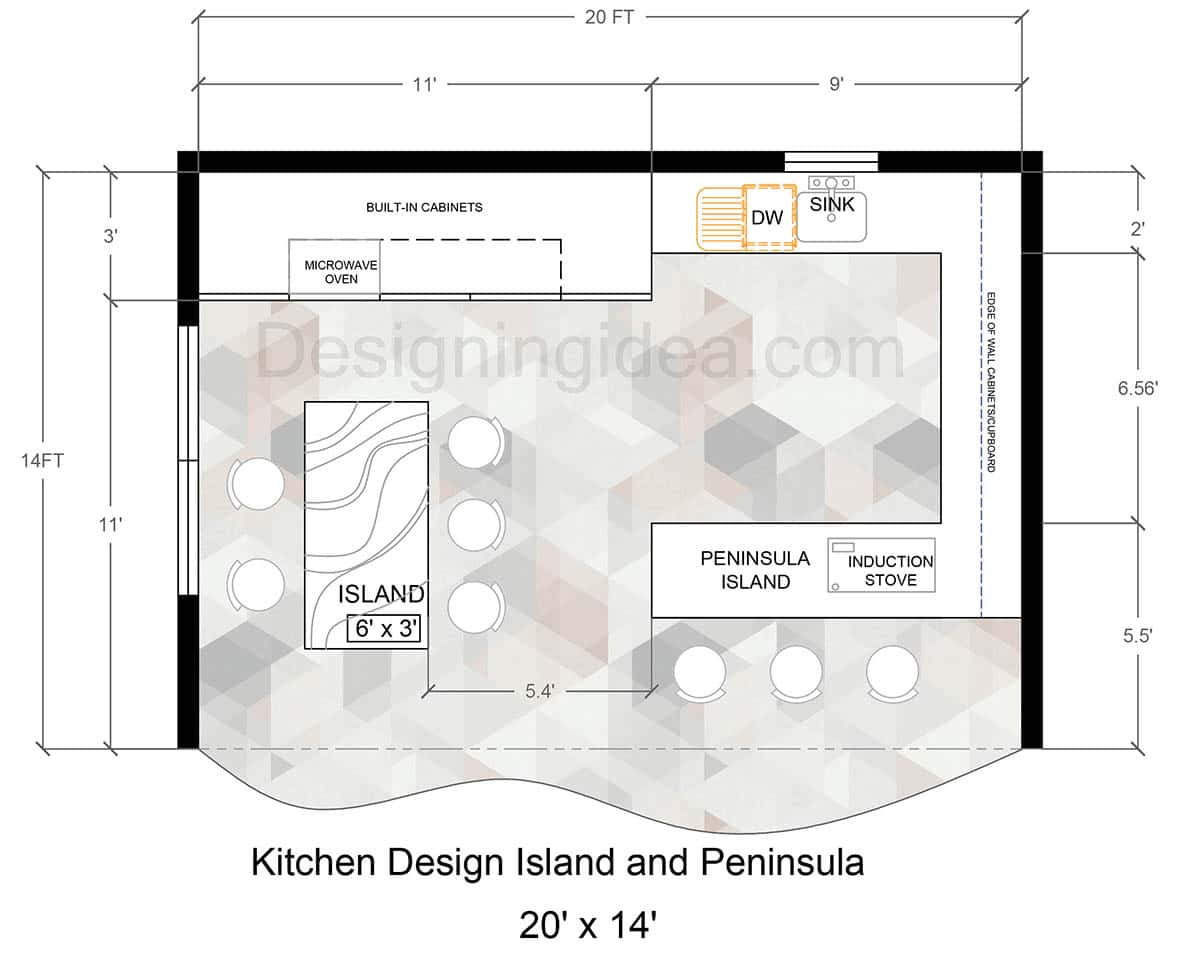
Floor Plan Details:
This spacious 20′ × 14′ kitchen layout combines a freestanding island and a peninsula bar that delivers a smooth, open workflow. The long perimeter cabinets run and appliances in the back form one leg of the classic work triangle (fridge, to sink, to stove), with the induction cooktop moved to the peninsula. The design features an efficient workflow that offers cold storage on the left wall, leading to a long prep counter on the back wall. Across from this sits the induction cooktop on the peninsula within a short distance. For cleanup the sink and dishwasher reside under the window to maximize views while doing tasks and sits close to both the prep zone and the seating bar for easy dish clearing. The island acts as a secondary prep station or casual dining spot that offers an additional space for sitting with friends or family.
Dimensions:
- Overall room size: 20′ (left-to-right) × 14′ (top-to-bottom)
- Back wall run: full 20′ span, divided into an 11′-wide cabinet/microwave zone at left and a 9′-wide sink & dishwasher zone at right
- Cabinet depth: 2′ or 24″ standard size
- Window wall height: 14′ room height with an 11′ tall window opening on the left
- Island: 6′ × 3′ footprint, centered in the left prep zone near the appliances like the fridge and microwave.
- Peninsula: offers seating for up to three bar stools
Design Tips:
- Target at least 42″ to 54″ between all major features like the island, peninsula, and fridge, so multiple people can move freely.
- Stool spacing & overhang: Allow 18″ to 24″ per seat and 12″ to 15″ of countertop overhang depth so legs fit underneath the counter.
- Position the primary entry away from the cooking zone.
- To make the design more family-friendly consider moving the cooktop away from the peninsula, add an elevated breakfast bar or remove seating from that area to protect children from potential burns.
- Ensure there adequate venting above the cooktop area by installing a venting system overhead.
Open-Galley Kitchen With Peninsula Design
An open galley style has a countertop on one side rather than a wall, which allows for a more open feel while providing surface area for meal prep or sitting.
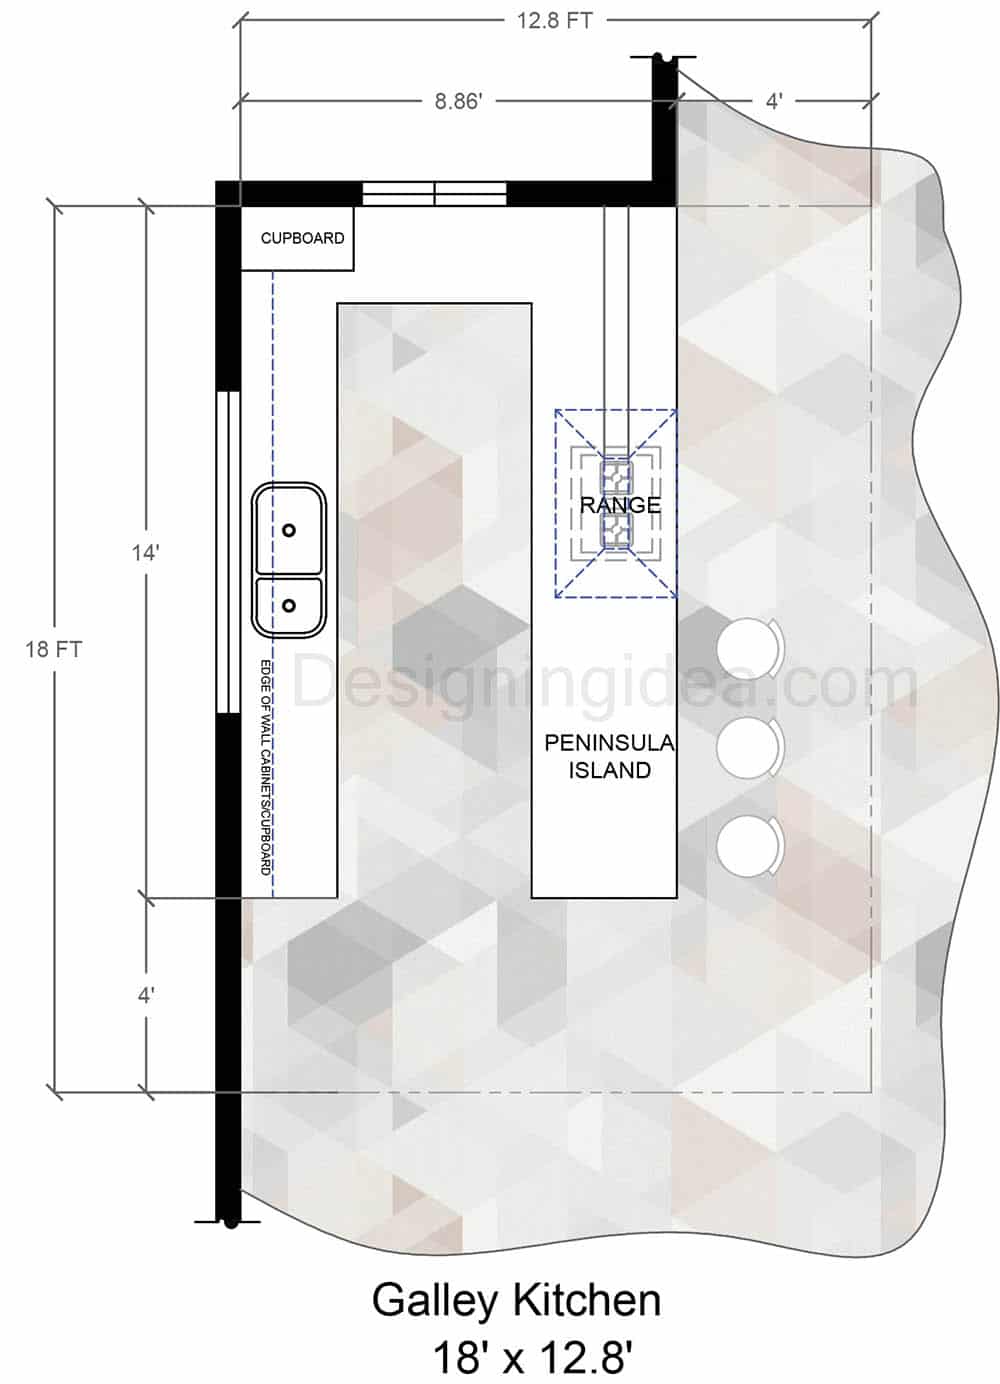
Floor Plan Details:
This open galley-style kitchen has a straight peninsula that turns a narrow space into a multi-zone workstation and dining area. The design limits foot traffic in the main cleanup, cooking, and serving corridor, while the peninsula adds prep surface and seating without blocking the central aisle.
Dimensions
- Overall room size: 18′ (top-to-bottom) × 12.8′ (left-to-right)
- Left wall run (sink zone): Total length: 14′
- Top wall clearance: 8.86′ of clear wall space beside the cupboard, then 4′ of open pass-through to the adjacent room
- Peninsula “island”: Depth: 2′ for a standard countertop and a length or 6′ (supports three stools at 18″to 24″ spacing)
- Range location: centered on the peninsula’s work surface
- Aisle clearances: Between sink run and peninsula: ~4′ of open walking space, enough for two people to pass each other.
Design Tips:
- Maximize Aisle Space: Keep at least 42″ to 48″ of clearance between the peninsula and opposite cabinet wall so two people can work side by side comfortably.
- Optimize Storage: Use deep drawers beneath the sink run for pots, pans, and small appliances.
- Add pull-out trays or spice racks in the peninsula’s base on the cooktop side for ingredients and accessories.
- Lighting: Add under-cabinet LEDs along the sink run for food prep and clean-up.
- Keep Sightlines Open: Limit overhead cabinets on the peninsula side to keep the open feel.
U-Shaped Kitchen With A Peninsula Design
A U-shaped design is ideal for an effective work triangle and close interactions with guests.
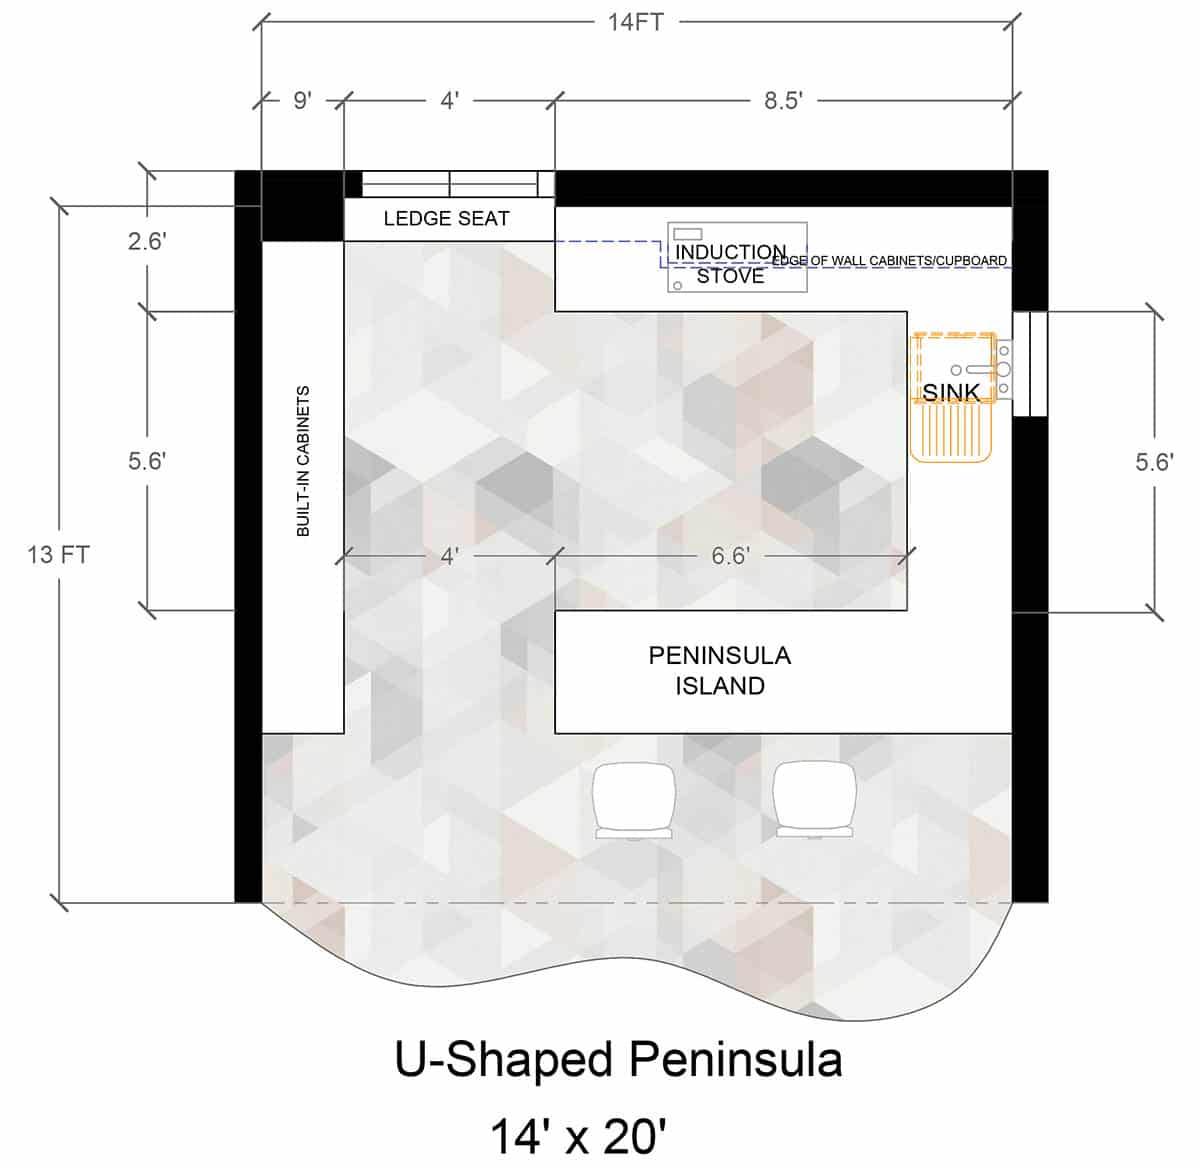
Floor Plan Details:
This U-shaped kitchen with a peninsula is an effective footprint that maximizes efficiency by using a tight work triangle. There’s a perimeter run of built-in cabinets on the left wall that flows into a back-wall counter with a window seat, and then wraps around into a peninsula seating area. The sink sits on the right wall, near the stove for an effective cooking, and cleanup zone.
Dimensions:
- Overall size: 14′ (left-to-right) × 13′ (top-to-bottom)
- Left wall (built-ins): 5.6′ of tall storage/cabinets
- Back wall: 9′ of countertop from left corner to window seat
- Window seat: 4′ wide window seat/ledge
- 8.5′ of countertop (with wall cupboards above) from window seat to right corner)
Design Tips:
- Window Seat Integration: The built-in ledge under the window can double as a casual coffee nook or prep surface. Add storage or pull-out shelf underneath.
- Seating zone: Room for two stools on the peninsula’s outer face.
- Refrigerator Placement: Position the fridge near the entrance to the room for easy access.
- Sink Placement: Install the sink under the window to better appreciate outdoor views.
Kitchen With T-Shaped Peninsula
This unusual design allows for lower level seating off the main peninsula to enhance social interactions while maintaining proper cooking height for better ergonomics.
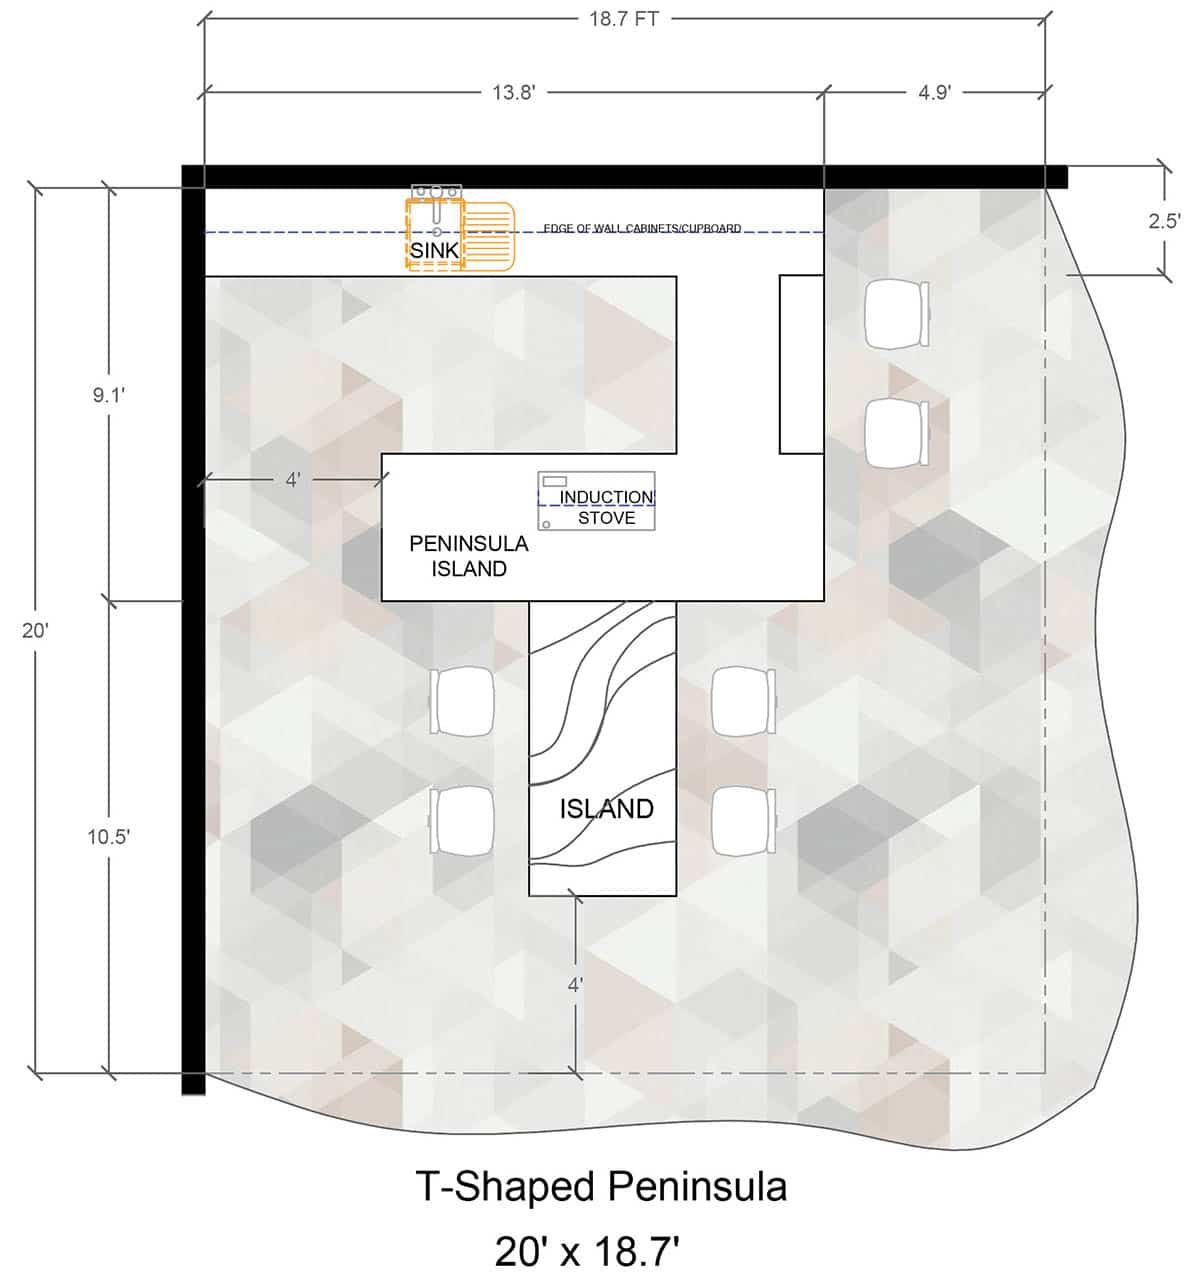
Floor Plan Details:
With a large footprint there’s room to get creative and this T-shaped kitchen floor plan does just that. It’s designed to combine a peninsula with an attached “island”, essentially creating a clearly defined prep/cooking, and dining zones, all within easy reach of one another. This is ideal for those looking for the ability to have social engagement with others while being able to prep and cook looking out. With the cooktop situated along the outer countertop one can better socialize and be part of the conversation or keep an eye on young children.
Dimensions:
- Overall room size: 20′ (top-to-bottom) × 18.7′ (left-to-right)
- Back wall run: Total width of 18.7′
- Left segment: 13.8′ of uninterrupted countertop with the sink centered on the wall
- Right segment: 9.1′ of landing space past the sink with an area for additional seating if desired
- Cooktop location: Centered on the horizontal leg of the peninsula
- Attached Island: Approximately 6′ long × 3′ deep with seats for four by using two on each side
Design Tips:
- Dining & Socializing: The island’s four-seat arrangement combined with the peninsula’s two-seat bar creates two distinct dining spots.
- Keep Sightlines Open: Limit upper cabinets around the peninsula/island to avoid blocking views and engagement.
- Best Counter Height: Use an optimal height of 36″ for standard countertop cooking and dining.
- Bar Height: For a bar height seating arrangement, use a height of 42″ with bar stools with a 28″ to 30″ seat height.
- Ensure Proper Lighting: Hang pendant lights over the peninsula to adequately light up the worktop and dining area
Kitchen With G-Shaped Peninsula
This design uses a sprawling perimeter run similar to a single-line kitchen for all of the essential appliances, with the sink and dishwasher in close reach on the attached wing, and the peninsula for dining.
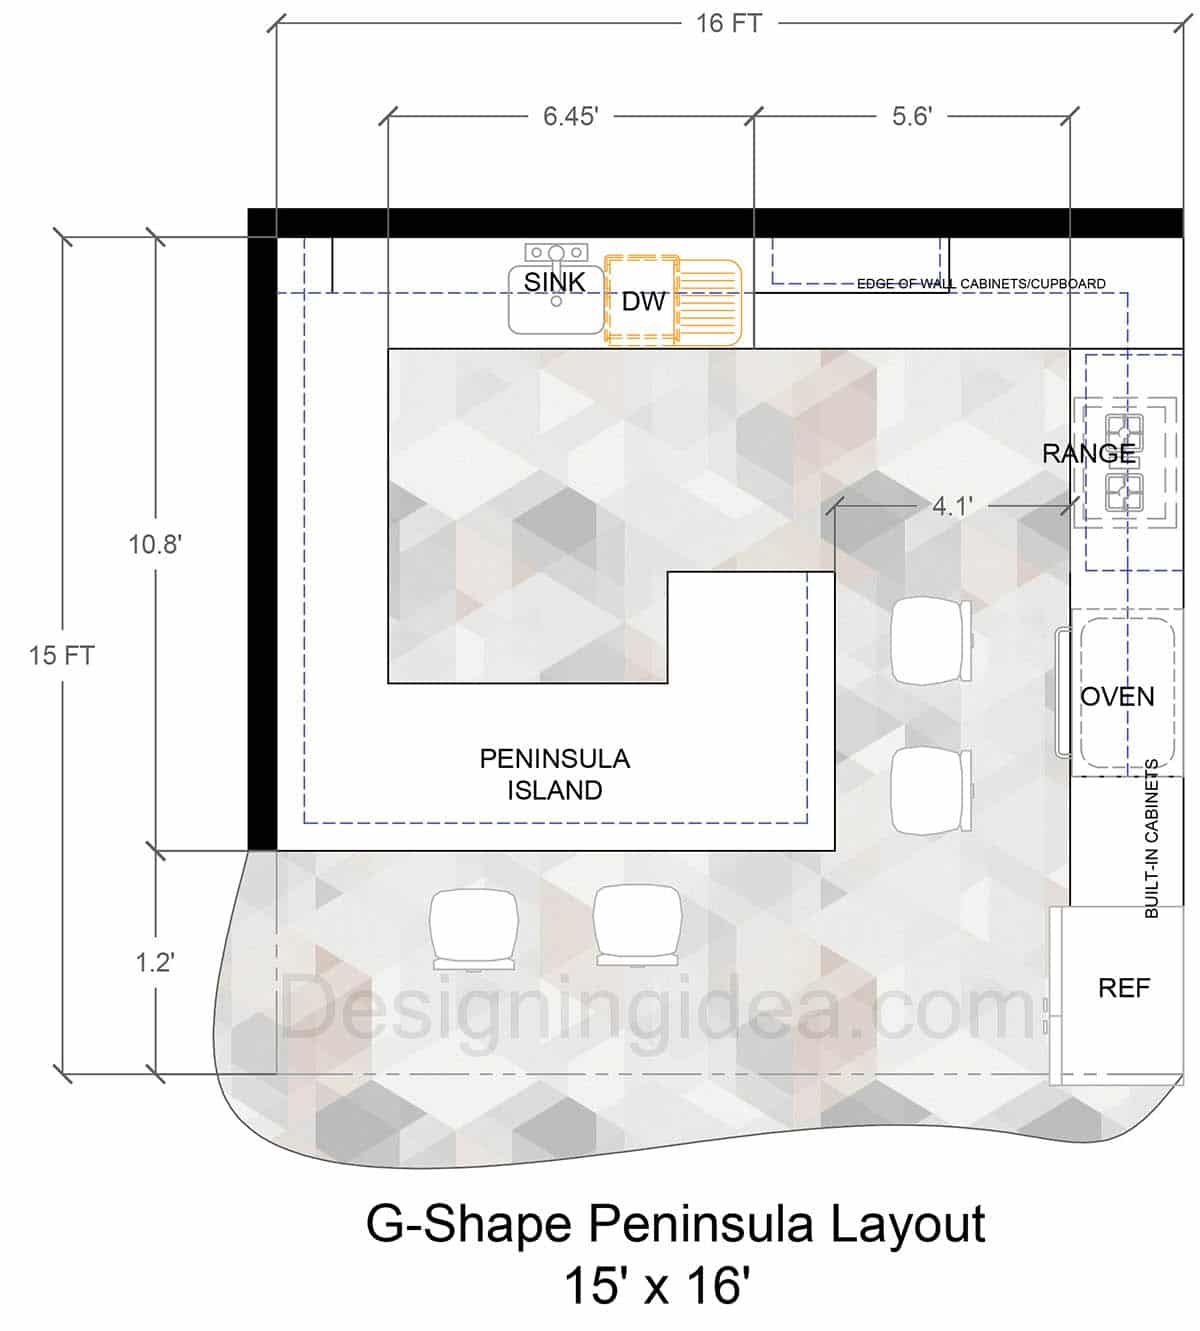
Floor Plan Details:
This wraparound G-shaped kitchen design uses a U-shaped peninsula configuration to create a central prep zone and dining area. On the long right-hand wall sits a row of built-in appliances, with the sink and dishwasher sitting on the back wall. The large seating bar is ideal for entertaining, making this floor plan perfect for a basement bar or man cave.
Dimensions:
- Overall room size: 16′ (left-to-right) × 15′ (top-to-bottom)
- Back wall run (sink zone): 6.45′ of countertop left of the sink and 5.6′ of countertop (with dishwasher to the right of the sink)
- Right wall run: Built-in range and oven inside the cabinetry, with the refrigerator positioned at the bottom-right corner for ease of access
- Seating bar: Runs along the bottom edge, ~9′ long, fitting three stools at 18″–24″ spacing
- Aisle clearances: 4.1′ between cooktop peninsula and opposite counter with stool knee-space overhang of 12″ to 15″
Design Tips:
- Use Generous Aisles: Provide 42″ to 54″ between the peninsula and the opposing side so multiple cooks can work at the same time
- Stool Comfort: Provide 18″ to 24″ of bar frontage per stool for better comfort.
- Seating Overhang: Ensure 12″ to 15″ countertop overhang for knee room and add a continuous toe-kick beneath.
- Layered Lighting: Use under-cabinet LEDs for task lights and a line of low-hung pendants above the seating bar for accent lighting.
- Pull-out Organizers: Add rotating Lazy Susans or pull-out corners to utilize awkward nooks.
- Pantry Space: Install tall pantry cabinets flanking the oven for storing dry goods and bakeware.
Outdoor Kitchen With L-Shaped Peninsula Floor Plan
Perfect for an outdoor kitchen, this L-shaped plan is all about accommodating guests at a raised breakfast bar for entertaining.
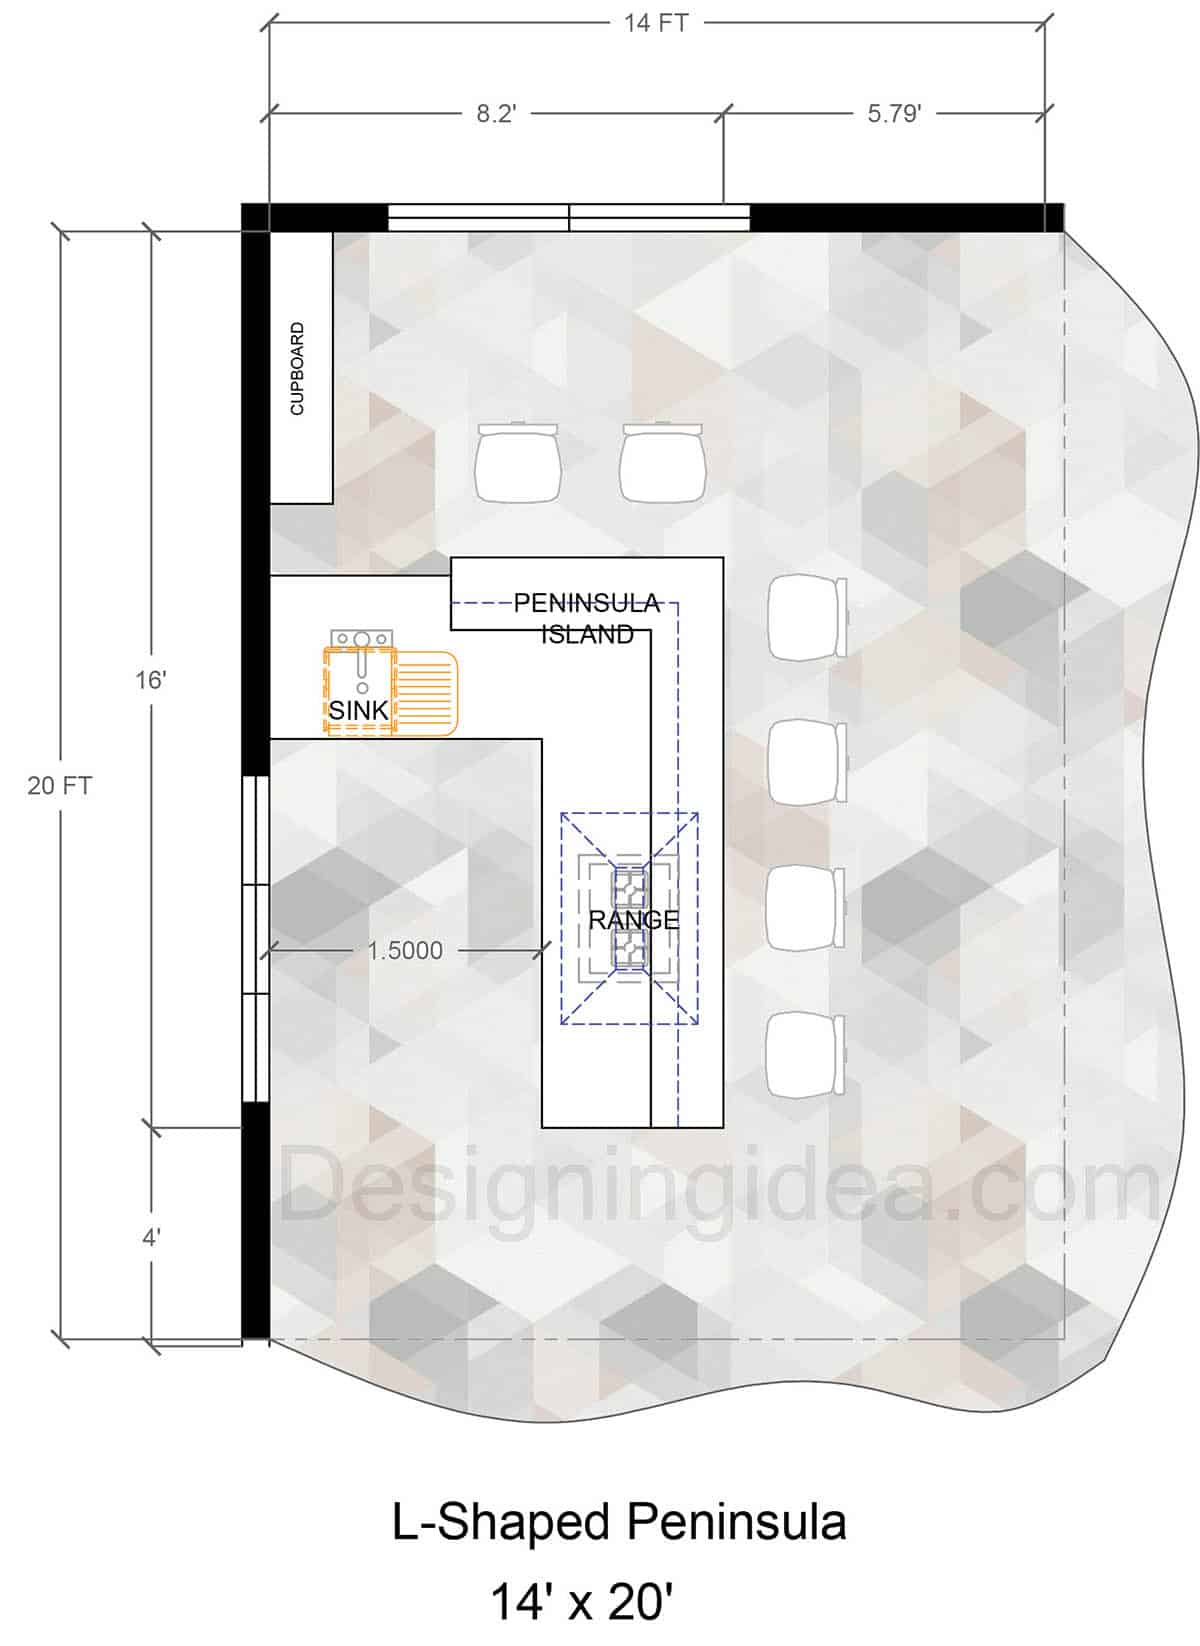
Floor Plan Details:
This spacious outdoor kitchen design featuring an L-shaped peninsula is effective for its seating arrangement, facilitating easy conversation and dining at its raised bar. The layout provides a clearly defined work triangle between the sink, range, and refrigerator (placement assumed nearby under the countertop.) This design efficiently separates cooking, prep, and seating areas and protects guests from touching the cooktop by using a raised bar counter (42″ high), to keep it out of reach.
Dimensions:
- Overall footprint size: 14′ (left-to-right) × 20′ (top-to-bottom)
- Main countertop run on the back wall: 8.2′ in length
- Counter depth: Standard 2′
- Peninsula island dimensions: Projects approximately 11′ along the right side, then turns about 8′ leftward to form the “L”
- Sink placement: Positioned on the left-side counter
- Range placement: Central installation within the peninsula to create a natural cooking hub
- Raised breakfast bar: This stadium level bar seating keeps hands away from the cooktop
Design Tips:
- Open Sightlines: Maintain the openness of the layout by limiting overhead cabinetry around the peninsula area, allowing the person grilling to more easily look out at the views and guests.
- Use Under-counter Fridge: An undercounter refrigerator and beverage cooler will allow for more countertop area.
- Consider Ventilation: If in an enclosed or covered area, consider adding a ventilation fan above the cooktop or grill to reduce cooking vapors.
- Choose Durable Countertop Surfaces: Ensure you use easy to maintain surfaces like concrete or granite that are preferred for an outdoor environment.
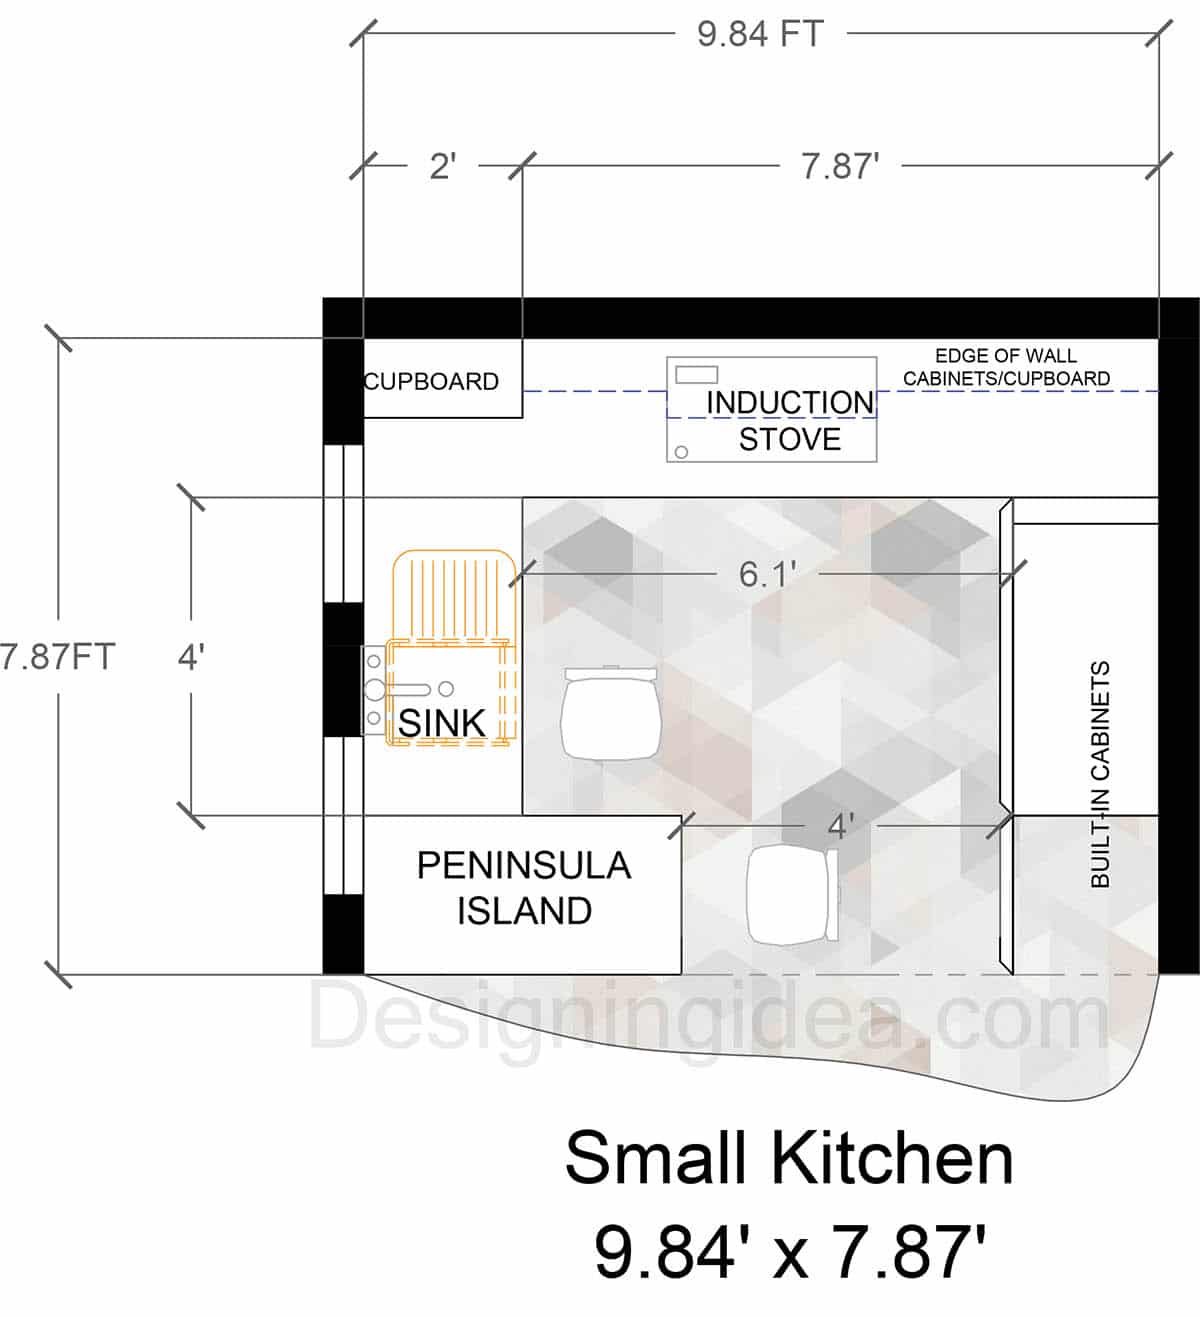
Small Kitchen With A Peninsula Countertop
With clever planning a peninsula can help a small kitchen design function like a much larger space to enhance functionality and enjoyment.
Floor Plan Details:
This compact kitchen uses a tiny peninsula add more work, cooking, and a casual seating area in to one streamlined footprint. The main countertop on the top wall houses the induction cooktop, while the sink sits on the left return and room for a refrigerator on the opposite side. A built-in cabinet bank on the right wall provides some storage, and the peninsula’s outer face accommodates one seat without blocking circulation.
Dimensions:
- Overall size: 9.84′ (left-to-right) × 7.87′ (top-to-bottom)
- Top run (cooking zone): Length: 7.87′ clear workspace between the cupboard and the right-wall cabinets
- Left return (cleanup zone): Length: 4′ from the top to the peninsula’s front
- Sink placement: A double-bowl sink centered, with a dishwasher or under-sink storage beside it
- Peninsula: Enough room for a small prep area on the inner side and seating on the outer side
- Right wall: Built-in cabinets: full 7.87′ run of tall storage and refrigeration
- Aisle clearances: 3′ between the peninsula’s seating and right-wall cabinets, which is tight but workable in a small footprint
- Inner Clearance: 3′ between the cooking run and the peninsula’s inner face for prep/range access
Design Tips:
- Maximize Vertical Storage: With a smaller footprint its essential to run cabinets higher to maximize all available space
- Slimline Appliances: Consider low-profile appliances to allow for more ease of movement
- Cooktop Selection: Choose a 18″–24″-wide induction cooktop and a compact sink base to free up counter space.
- Stool Comfort: In tight quarters like this use armless, backless stools that tuck under the overhang.
- Countertop Overhang: Provide at least 12″ of overhang so legs fit comfortably
- Lighting Solutions: Smaller designs tend to be darker due to the lack of windows, so utilize under-cabinet LEDs along the cooktop run to brighten surface areas.
- Pendant Lighting: Add a single pendant above the peninsula to define the seating without overwhelming the senses
- Durable, Light-Reflective Finishes: Choose lighter color surfaces for the counters with more reflective materials and high-gloss or glass front cabinets to bounce more light around
Countertop Height Guidelines
| Function | Height | Best For | Stool Seat Height |
|---|
| Cooking (Peninsula) | 36″ (91.5 cm) | Cooking, prep | (no stools needed) |
| Dining (Island) | 36″ (91.5 cm) | Casual meals, family seating | 24 to 26″ |
| Dining (Bar) | 42″ (106.7 cm) | Raised bar look, visual separation | 28 to 30″ |

