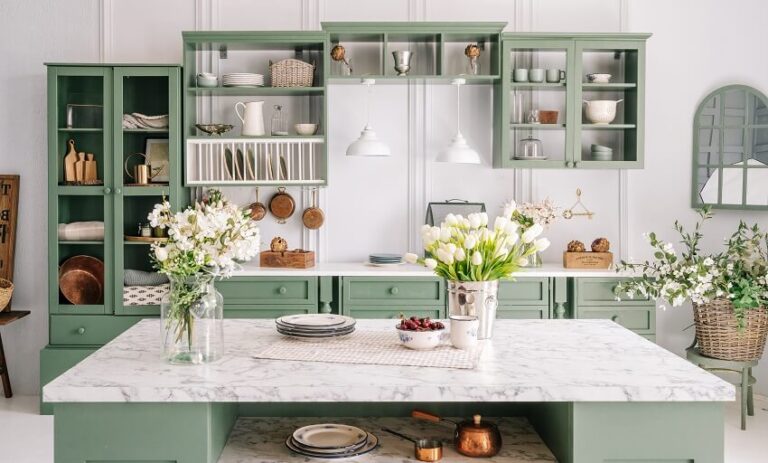
21 Ceiling Texture Types (Pattern Design Ideas)

When designing rooms in your home, ideas like the paint color for the walls and ceiling are among the basics. Yet, to create something truly interesting, it’s a good idea to think back further to the fundamentals. In other words, before deciding on the color of your room, try thinking about the ceiling texture patterns you want. There are many different textures that you can choose from, and they’re a great way to bring another dimension to your interior design.
Types of Ceiling Textures
Here are the different types of ceiling textures. Read below to get more details about each of the varieties and why you should consider them.
Knockdown Texture
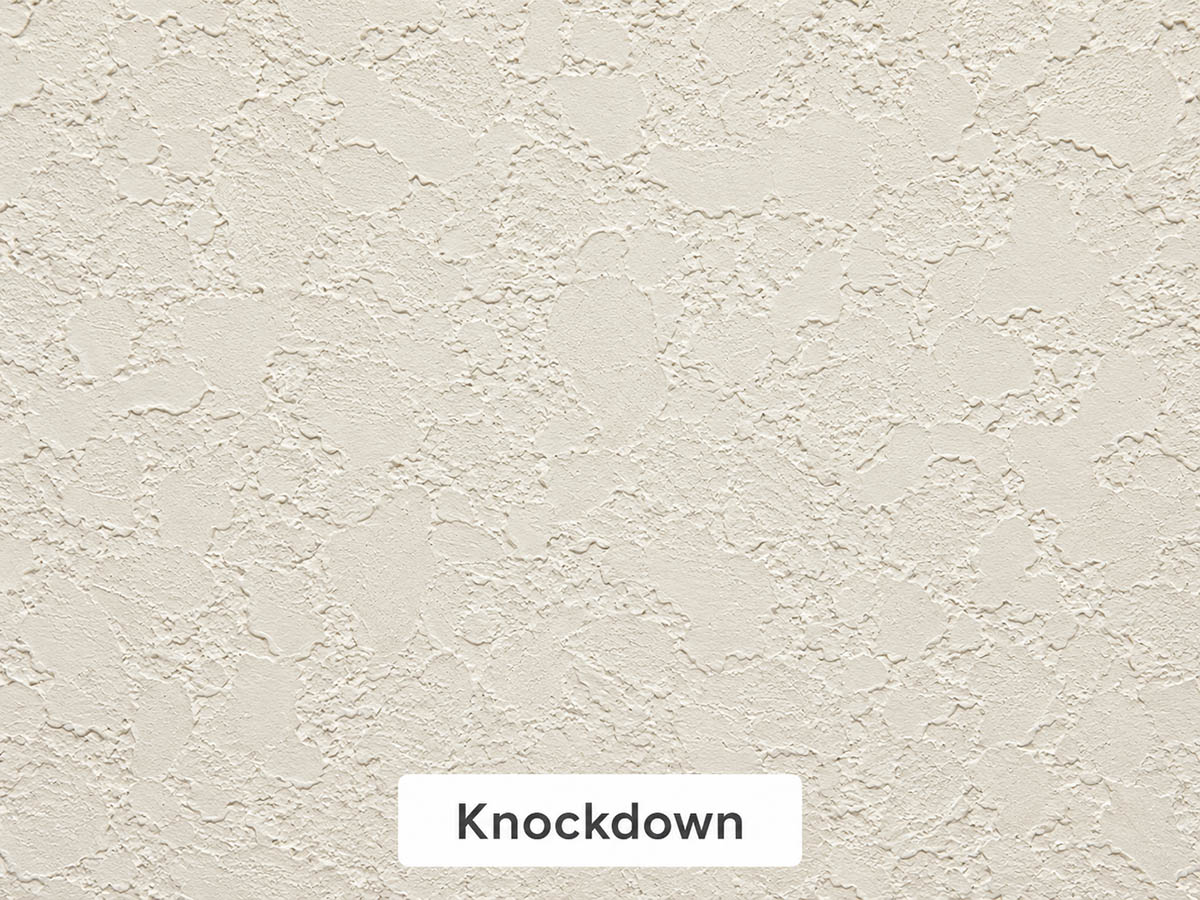
A knockdown ceiling texture takes a little work to install. You must wait for a ceiling compound to be skinned over and then flatten it with a specialty tool. This second step is known as “knocking down,” hence the application’s name. Once the material is set, the only thing left is to prime and paint the ceiling. While it’s difficult to install and repair, knockdown finishes have a popular appearance, and they cover imperfections well. Despite the number of steps it takes to set it up, it isn’t a particularly difficult installation.
Timing is important with this type; if you knock it down too soon, you’ll smear it, too late, and the peaks won’t flatten. Most pros wait about 10 to 15 minutes for the mud to firm up before running the knife across it.
Popcorn Texture
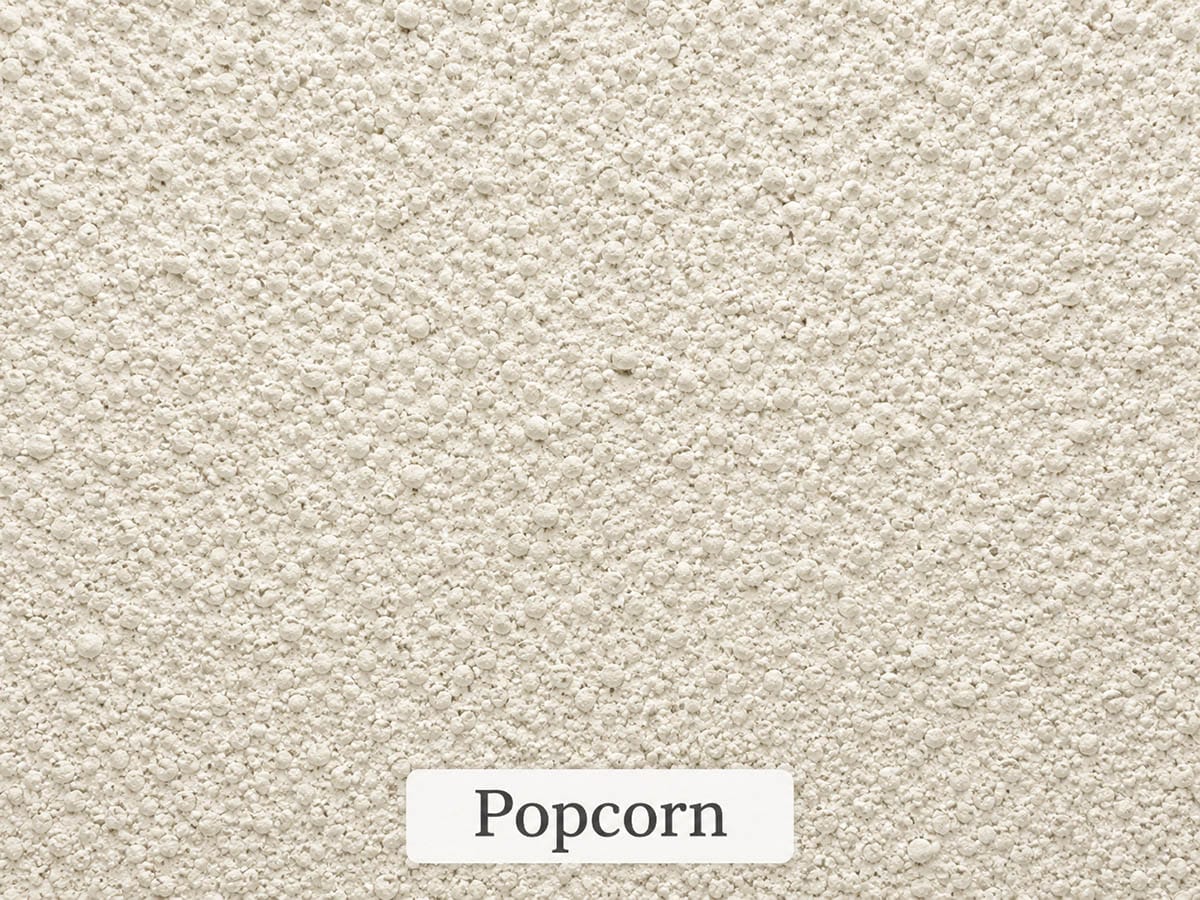
Popcorn ceiling texture peaked in the late 20th century, but it still holds sway in many homes. The application is achieved by using a mix of compound and styrofoam balls. Most are more interested in how to remove it rather than in its installation. To install it, a hopper and gun are used without complicated tooling. You also don’t need to worry about painting it, and it’s easy to handle during repairs and remodels. The downside is that the gun and hopper leave some mess, and you’ll need to hang plastic for the job.
There’s a reason builders loved this style so much. That bumpy surface muffles echoes and footsteps from above, which is why it’s sometimes called an acoustic ceiling. One real warning: if your home went up before the mid-1980s, get the popcorn tested for asbestos before you ever scrape or sand it.
Drywall Texture

Technically, a drywall ceiling texture is an open term. You can use any standard pattern to finish off a plain drywall or plaster area. In addition, it isn’t the plaster or drywall itself being manipulated when textures are added to a ceiling. Instead, a layer of drywall mud is added to the sheetrock, and tools such as trowels, rollers, and sprayers are used to create the textures. Even smooth finish applications tend to add a compound to the bare drywall rather than leaving it as is.
Think of this as the catch-all category. Almost every finish on this list starts as drywall mud over sheetrock, so the “type” really comes down to the tool and the hand using it to go from there. It can also be used to cover a ceiling with cracks as a general repair option.
Orange Peel Texture
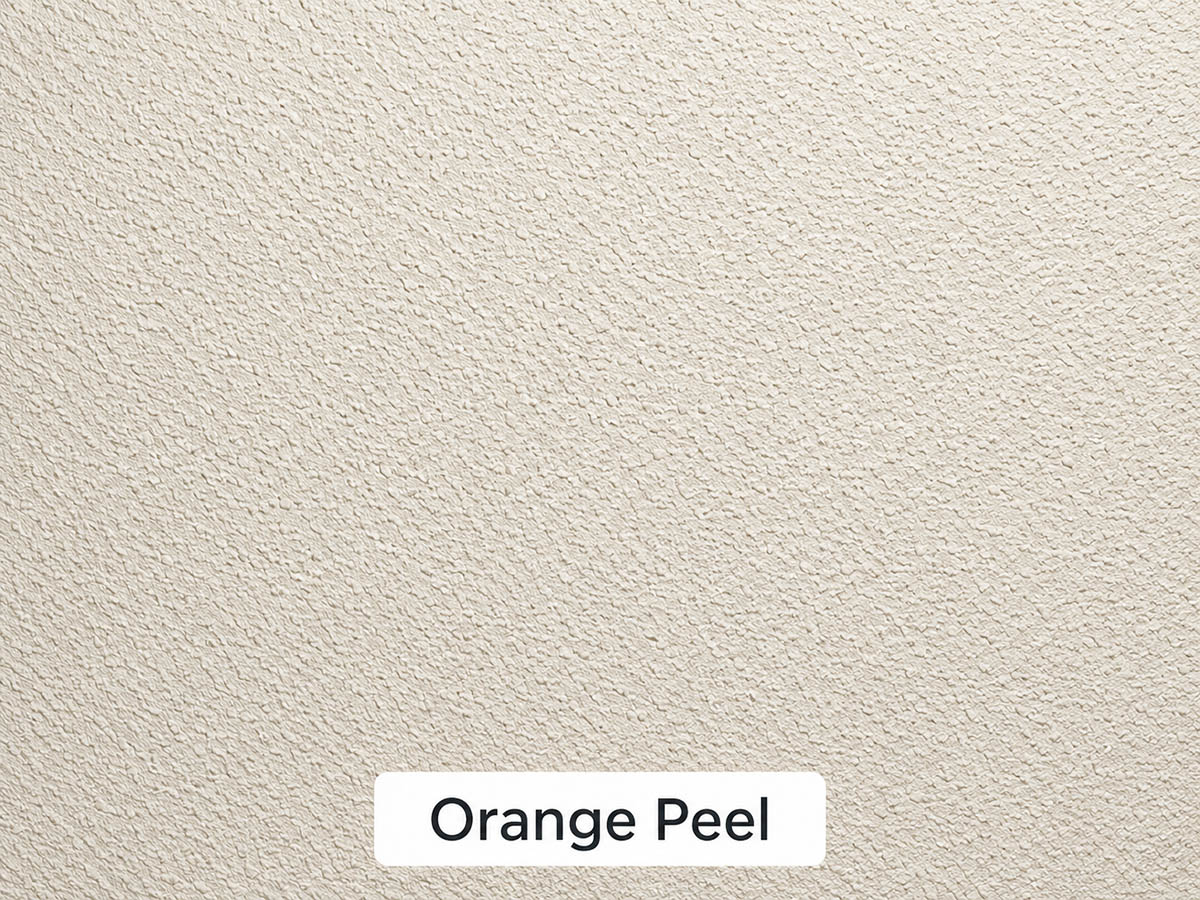
The orange peel ceiling texture gets its name from the look of the finish, which resembles the inside of the peel of an orange. To get this look, the ceiling is sprayed about 2 to 3 feet away with a mixture using a hopper and gun, much like how a knockdown finish is started. While applying, the hopper gun should continue moving at all times to avoid buildup.
Once the material is set, you can use a drywall knife to break off high spots if desired. The material will take about 24 hours to completely dry before being able to prime and paint. This is an easy choice to tackle during repairs and remodels, and it’ll hide imperfections during the process easily. It’s also a less expensive choice. However, since a spray is used, this can be a messy installation with a bit of cleanup.
It comes in a few weights, from a light dusting to a heavier splatter, so you can dial in how much texture you want. It’s also one of the easier finishes to keep clean and repaint, which is part of why it quietly replaced popcorn in so many homes.
Stomp Texture
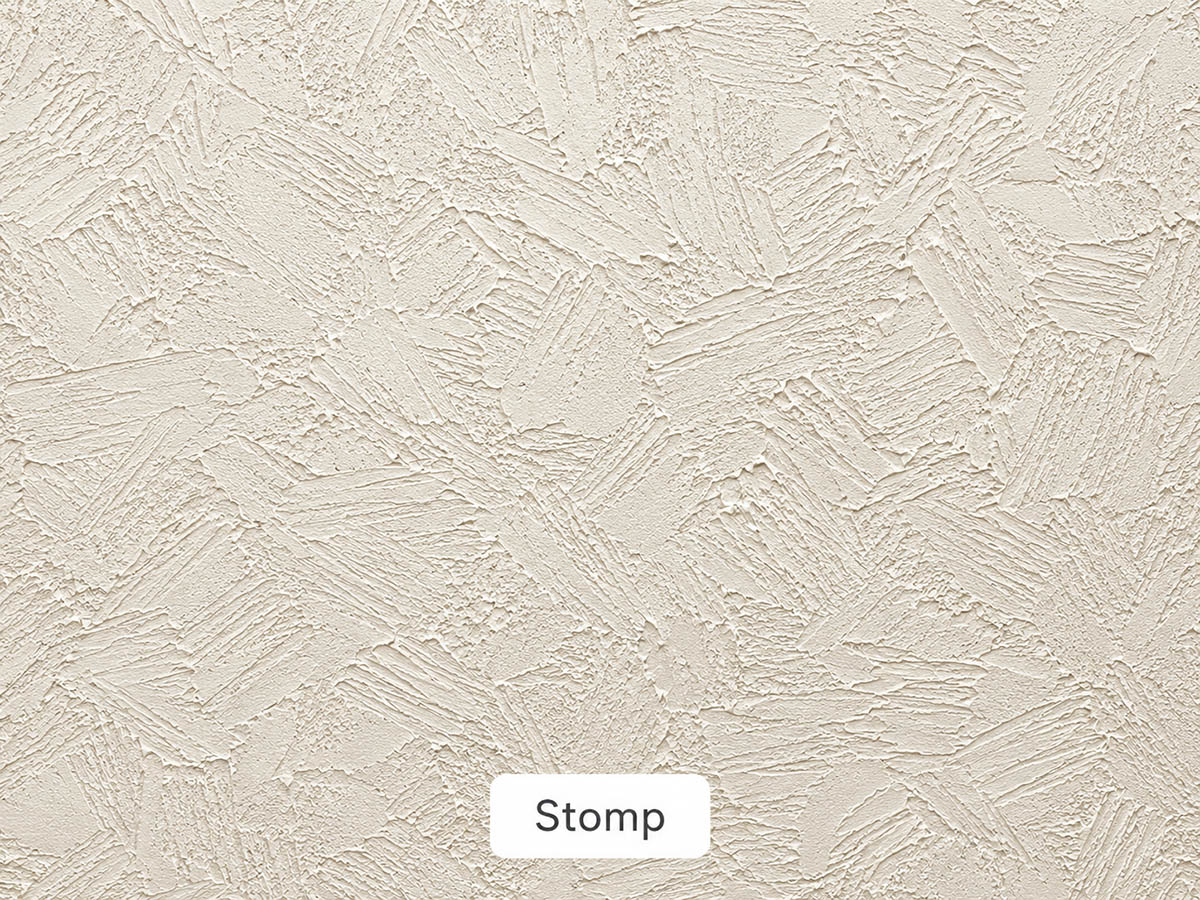
A stomp texture is a great choice if you want something unique that will easily cover any imperfections in the ceiling’s surface. The stomped look is achieved using a base material made out of drywall joint compound thinned with water to the point that it’s a paint-like consistency. From here, you can use a roller and stomp brush to set the pattern into the ceiling. This pattern isn’t necessarily difficult to pull off, but you’ll want to take measures such as putting down plastic to counteract the mess.
The brush you stomp with decides the whole look. A crow’s foot brush leaves little three-pronged marks, while a rounded brush gives softer fans, so it’s worth testing on a scrap board first.
Rosebud Texture
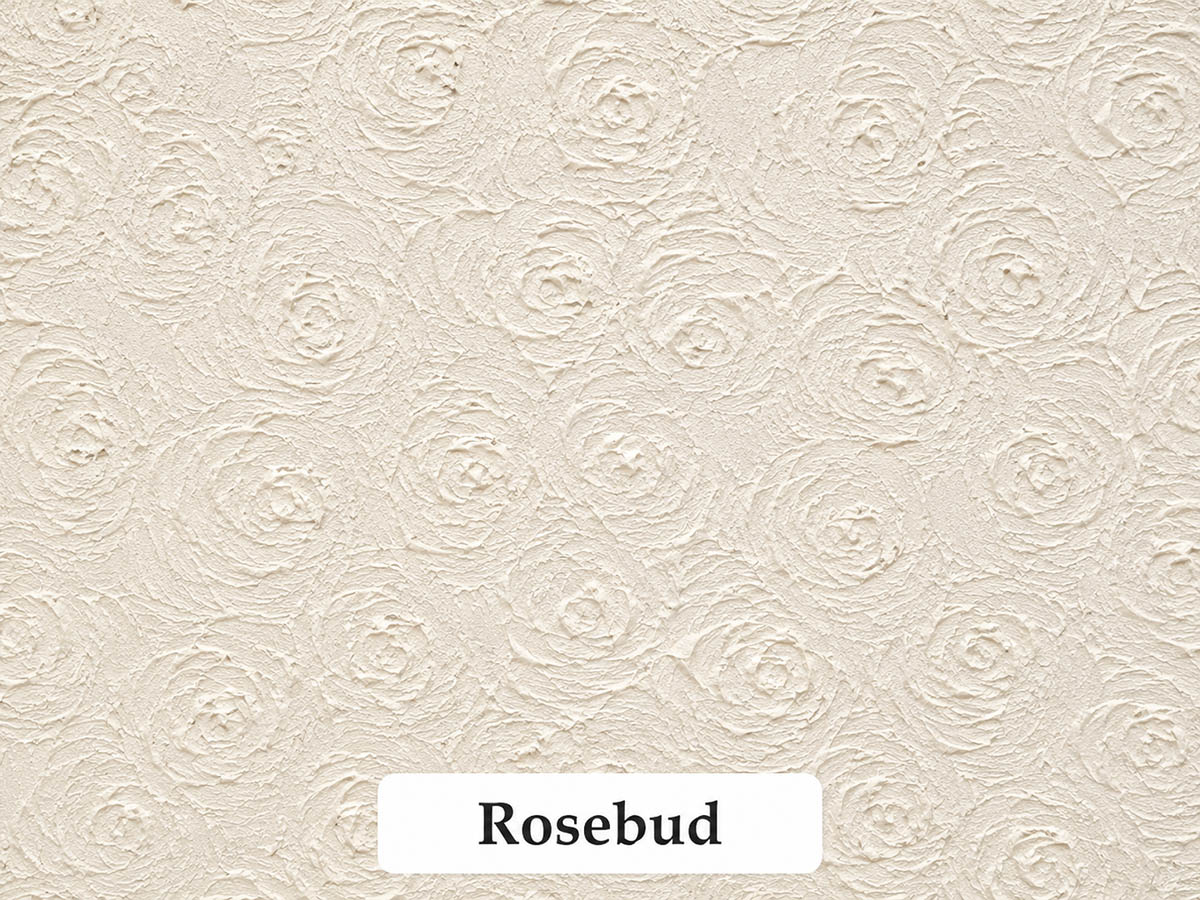
A rosebud texture is a very easy finish to apply to your ceiling if you know what to do. It only takes a thin layer of mud to pull off the look, and the finish can be created with either an airless paint sprayer, a stomp brush, or a paint roller. When using a paint roller, it’s advised to use a 3/4-inch nap roller cover. The application of drywall mud should be applied across all of the surfaces.
The result is a more subtle consistency, blending seamlessly with smooth walls. The only downside is that a thin layer of mud isn’t as effective as a thick one in accounting for imperfections. Rosebud is really a cousin of the stomp finish. The size of your brush sets the size of each “flower,” so a bigger brush reads bolder and a smaller one keeps things subtle.
Sand Texture
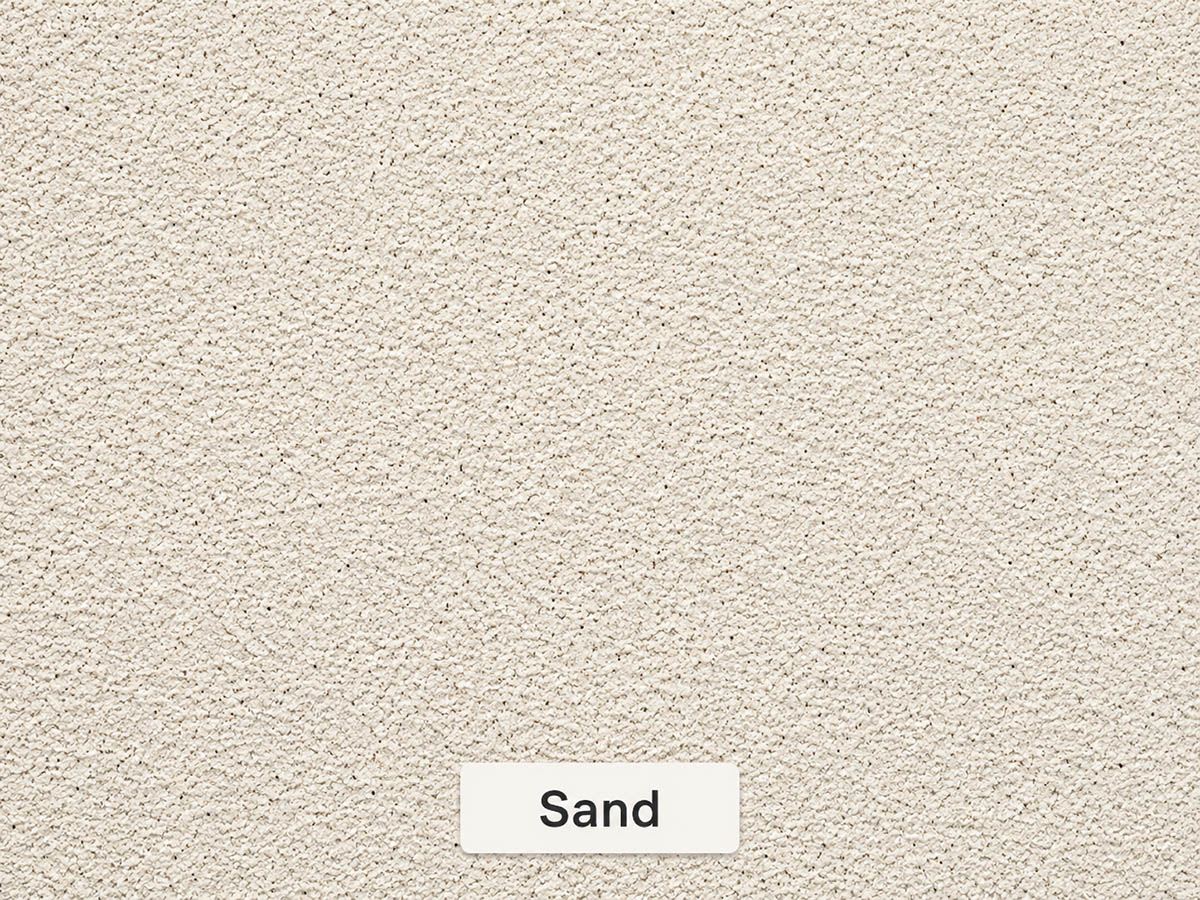
The sand, or sand spray texture, resembles the orange-peel finish. It gives your home an artistic touch, and it isn’t too difficult to install. The only challenge here is preparation, as you must mix a bag of sand additives with cold water the night before you complete the installation. As long as you remember to take this step, the actual installation is a breeze. Since this is a heavily textured pattern with no set composition, it hides any inconsistencies or blemishes in the process or ceiling well.
If mixing your own additive sounds fussy, you can buy sand texture as a pre-mixed paint and roll it straight on. Just know the trade-off: sand finishes are notoriously hard to patch invisibly down the road.
Swirl Texture
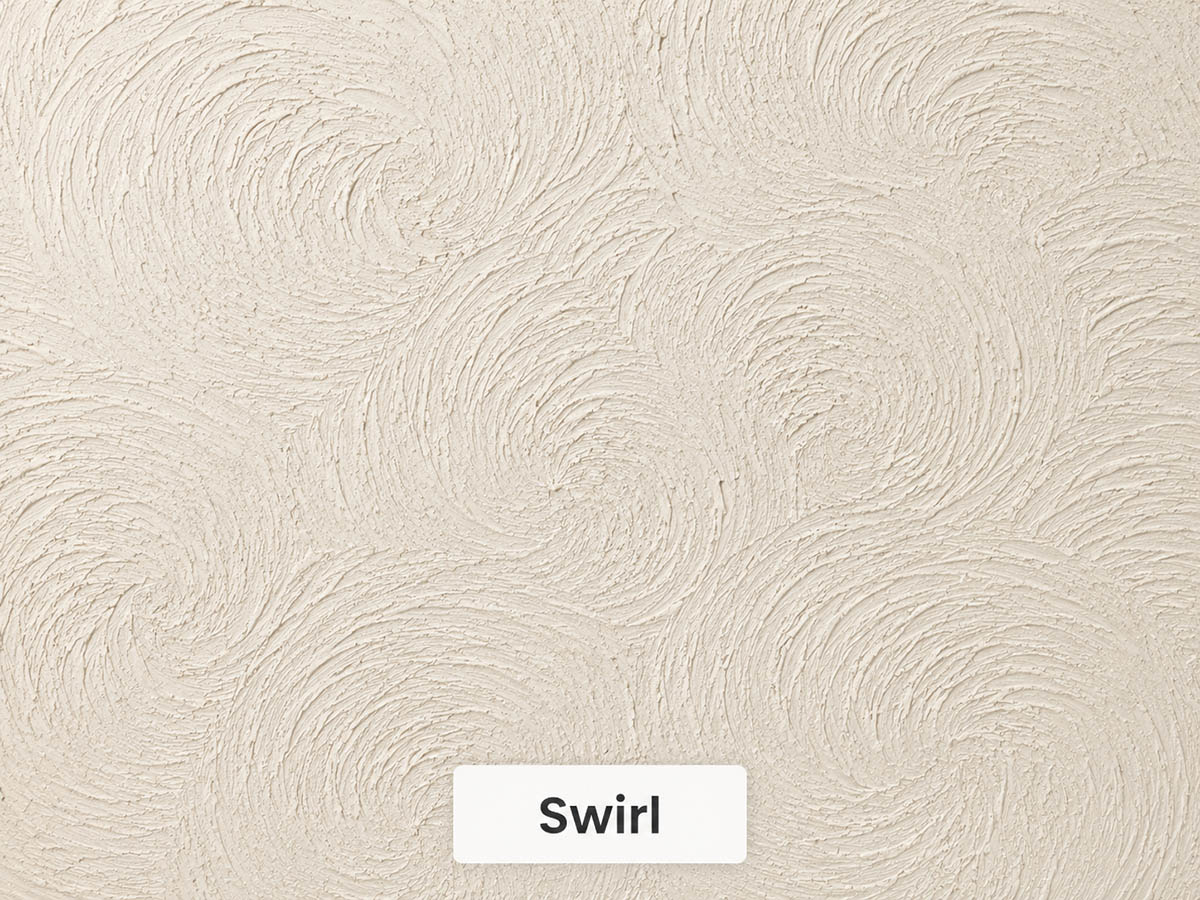
A swirl ceiling texture gets its name from the circular patterns on which the style depends. This is a pretty versatile choice that gives you a few application options. It is very similar to the fish scale design. The technique can be done with a trowel, roller, or sprayer. While it takes patience, the most difficult part of the installation is ensuring you complete the process before the mud dries. While the tedious aspect of the installation is a con to this style, you can make the process much easier by employing a second person to help you.
The trick when applying the swirl is consistency. Each half-circle needs to overlap the last by the same amount, or the pattern looks wobbly from across the room. A damp brush and a steady rhythm go a long way.
Fish Scale Texture
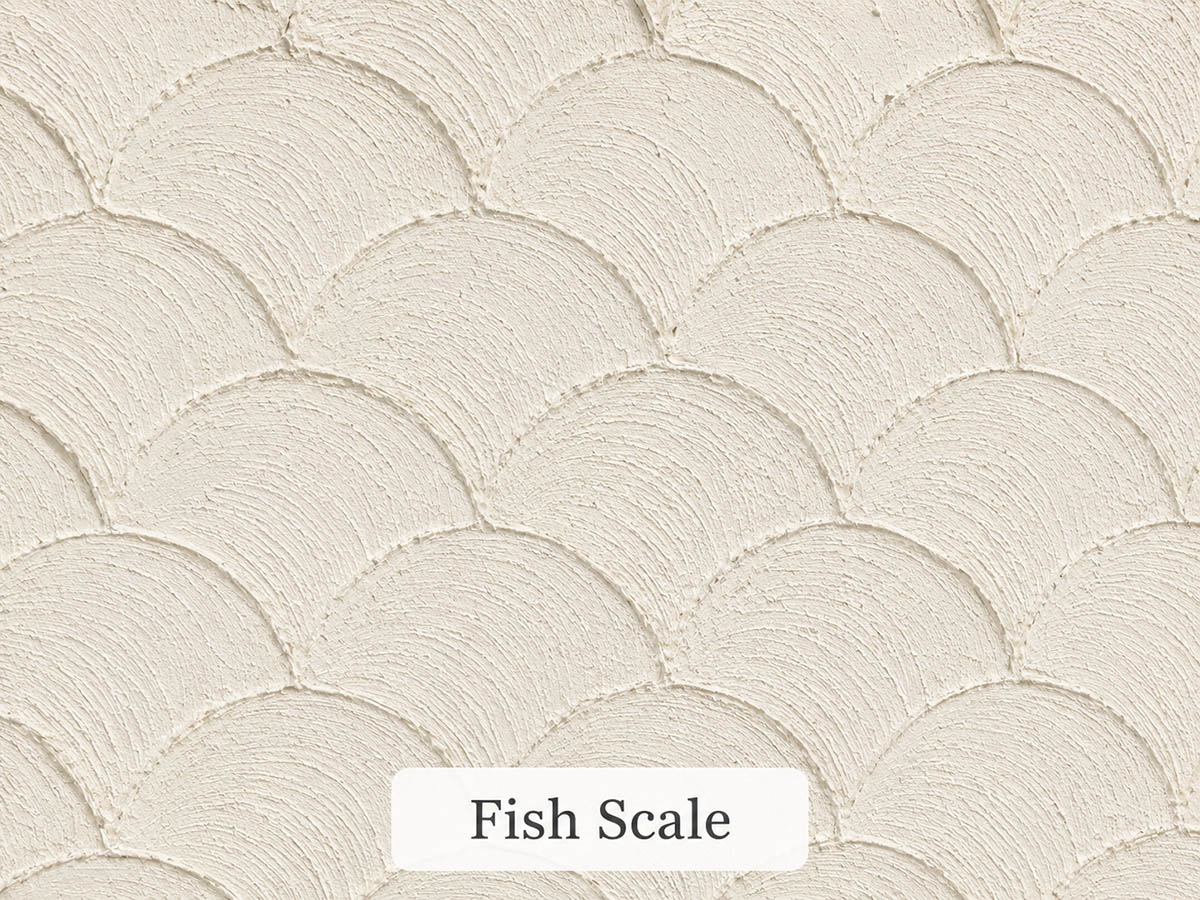
A fish scale texture is an eye-catching choice that will look amazing on any ceiling. It uses sweeping, circular arches to create the pattern, and it has the advantage of being attractive while not being one of the most common applications used. This means it’ll give your home a unique characteristic. The fish scale pattern is also called the fan or shell pattern.
The only downside is that fish scale finishes have a high difficulty level. It’s one of the options that is best left to a professional installation. Because the arches are so regular, fish scale really shines on a ceiling you actually look up at, like a dining room or entryway. On a cramped, low ceiling the busy pattern can feel like too much.
Crows Foot Texture

Crow’s foot ceiling textures resemble a bird walking around on the surface. To achieve this, a stipple brush is used in a process that usually takes two individuals. One installer applies mud to sections, while the other uses the stipple brush to make the pattern before the mud dries. While this can be a messy project, you don’t have to break your back doing it. It’s a fairly easy installation. Just remember to put plastic down to contain the mess.
How stiff your brush is, and how hard you press, changes everything. A firm slap leaves sharp, defined prints; a lighter touch softens them. Pick which you want before you start, since mixing the two rarely looks even.
Smooth Texture
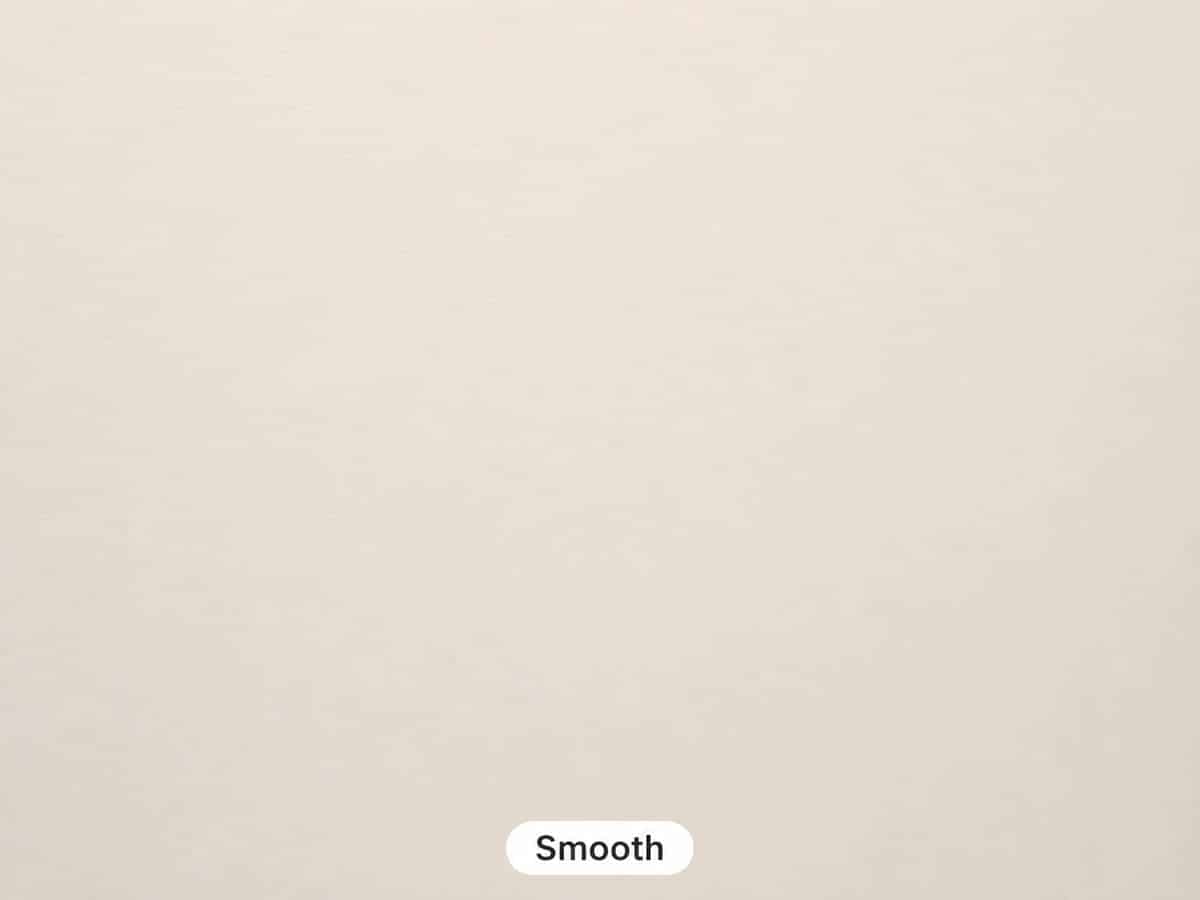
A smooth texture is likely the most popular finish in homes today. It’s exactly what it sounds like – with an even, uninterrupted consistency. While it’s the simplest option, it’s one of the more taxing installations. This is because it takes multiple coats of mud with time taken to sand it down between layers. This takes a lot of skill because any imperfections in the process will be noticeable. Once the application is installed, though, it’s easy to take care of. All you need to do is to prime and paint it to finish it off. Painting it with flat white gives a non-reflective quality that helps the room feel brighter.
In the trade, a truly flat ceiling like this is called a level 5 finish, and it’s the hardest one to fake. Ceilings are unforgiving because daylight rakes straight across them, so every dent and seam shows. Good lighting while you work is half the battle.
Stipple Texture
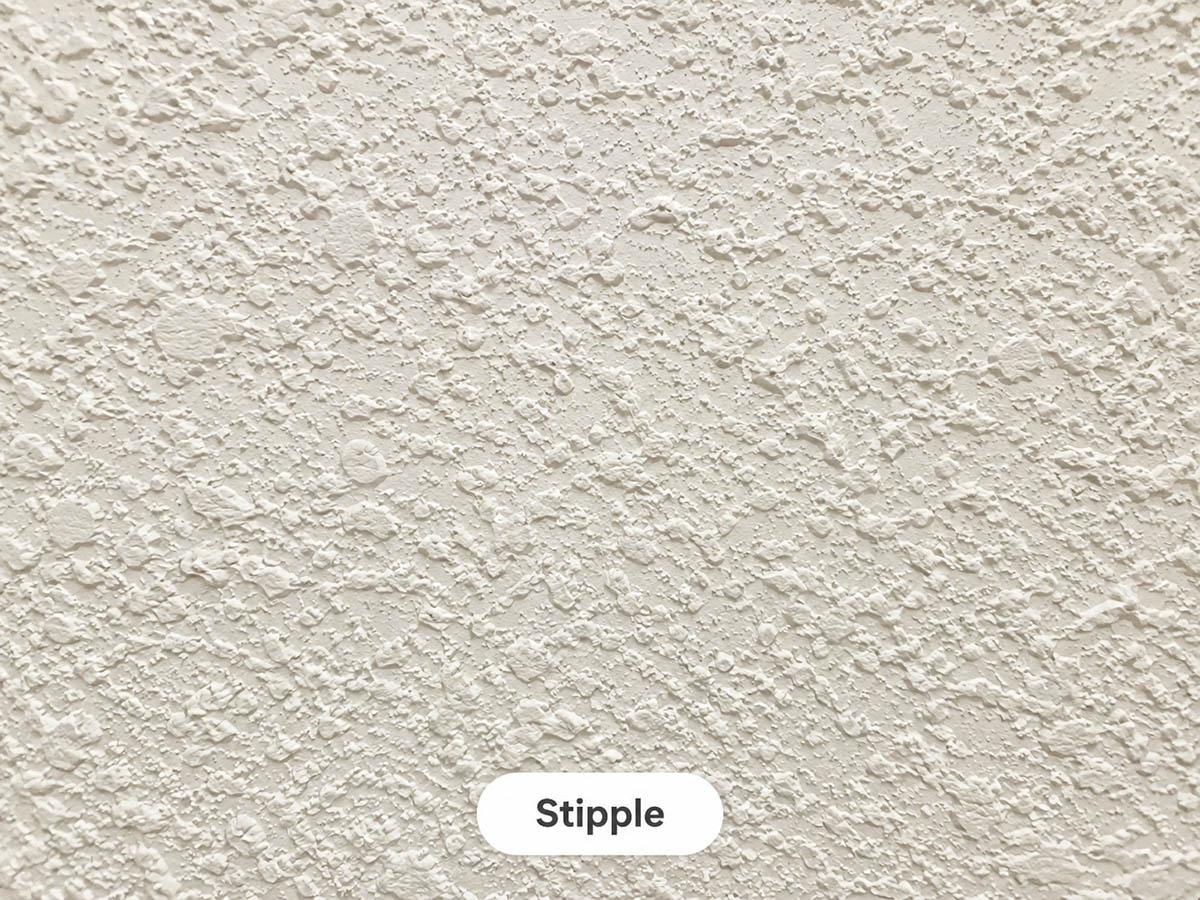
It takes a bit of technical skill to achieve stipple ceiling textures. It’s installed using a roller and slap brush, but the difficulty comes with the thickness of the material. This consistency can make the remodel a messy job if you aren’t sure exactly how to handle it. This style and material come with significant advantages as well, though. For one, you don’t have to worry about obvious imperfections.
Even larger imperfections like holes can be easily covered with this ceiling application. The result is an attractive and popular choice. Those little peaks look great fresh, but they do catch dust and the odd cobweb over time. If you want a gentler version, you can lightly knock the tips down once the mud sets.
Tree Bark Texture
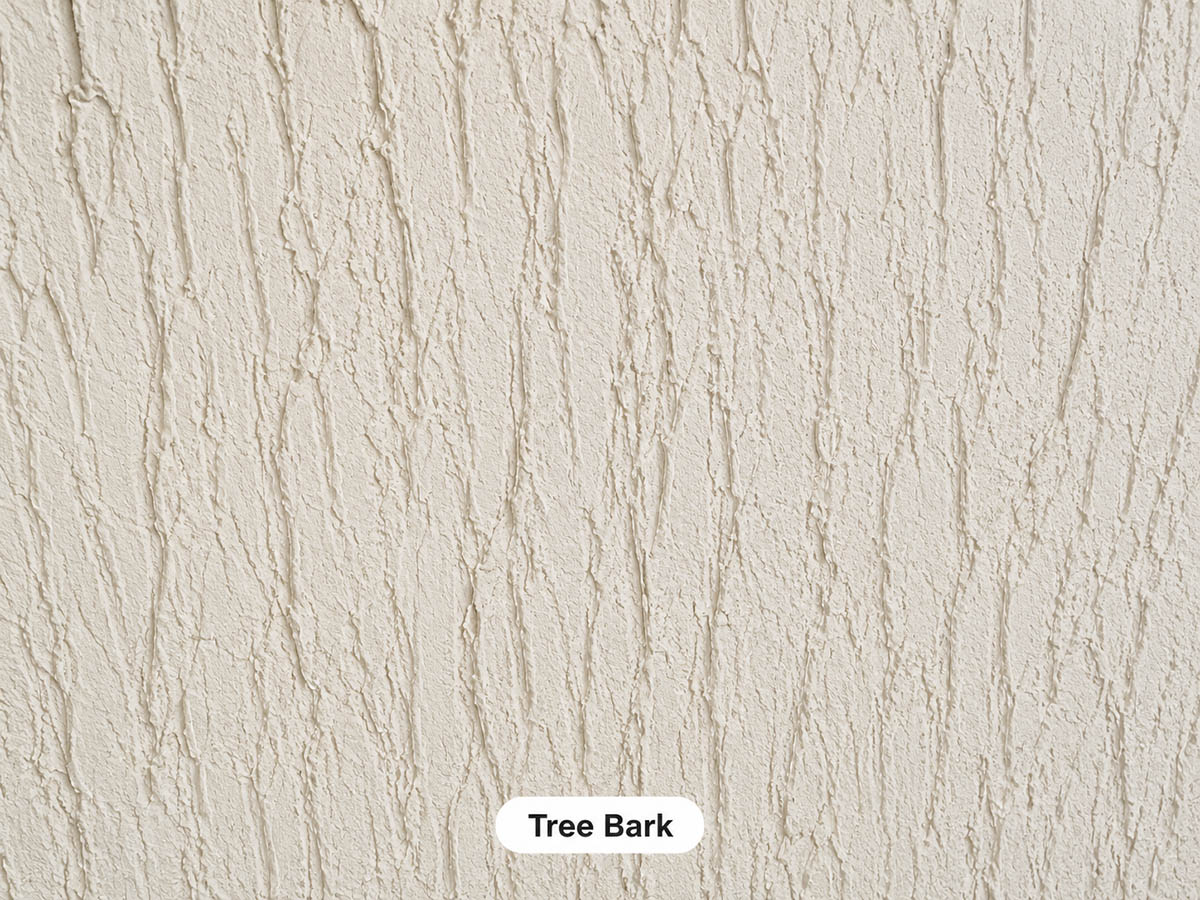
This ceiling texture, as the name suggests, is meant to resemble tree bark. This makes it a good choice for homes drawn from naturally-inspired interior design themes. This is considered a pretty artistic finish, so it’ll draw the eyes up with its distinct appearance. The finish is typically done using a heavy roller. The fact that the roller is heavy is important because this style depends on carefully implemented deeper grooves.
Direction matters with this application. Running the grooves the same way across the whole ceiling keeps it looking intentional instead of random. It pairs naturally with wood beams and earthy, rustic rooms.
Skip Trowel Texture
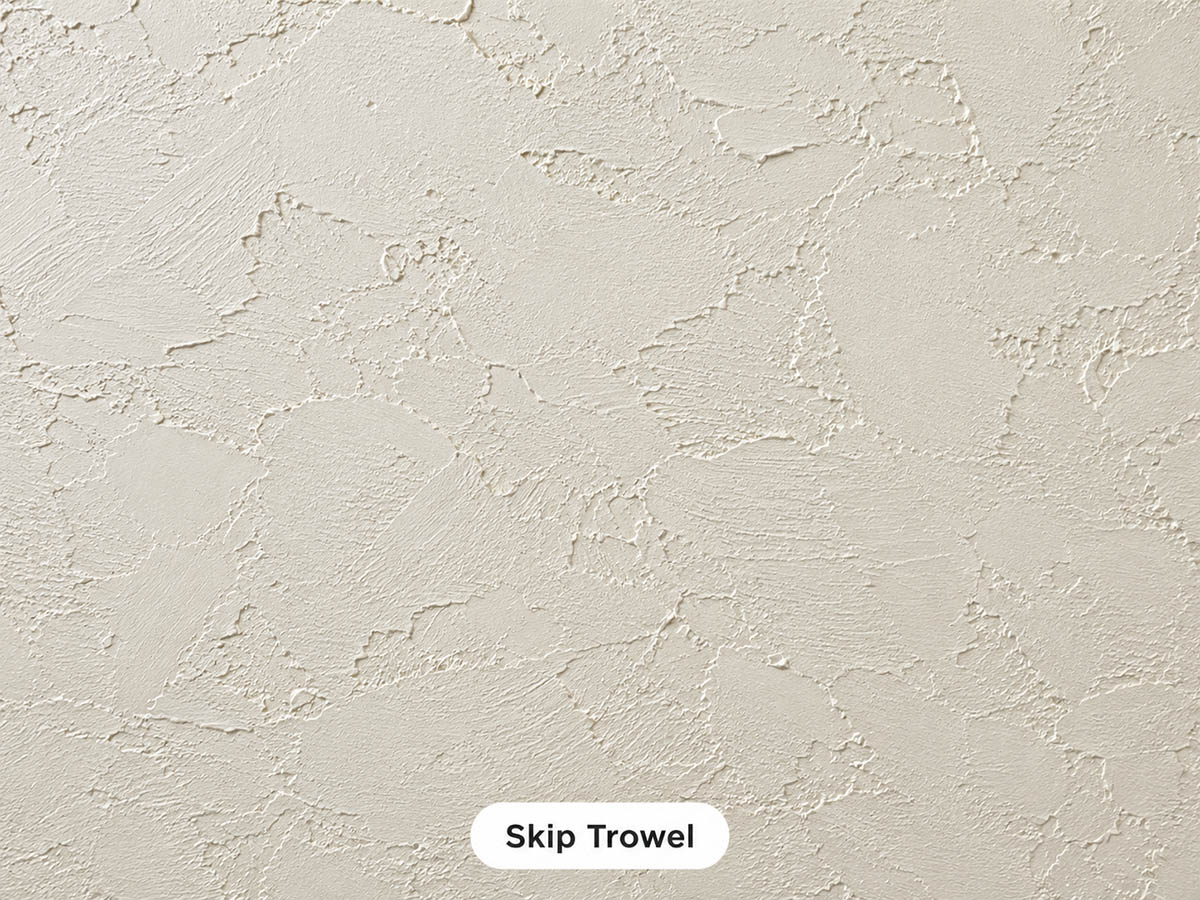
The uneven look of a skip trowel ceiling is created by dragging a trowel along the surface as an all-purpose joint compound is drying. This is generally done lightly with a more uneven pressure on the final pass to give an uneven look. This is an advantageous design because it works well at hiding any imperfections you might have in your room. Unfortunately, it’s also a difficult choice for any repairs you need later.
This one’s usually done by hand, not sprayed, which gives it that loose, Old World plaster look. It reads a touch more refined than knockdown, so it’s a favorite in Mediterranean and Spanish-style homes.
Skim Coat Texture
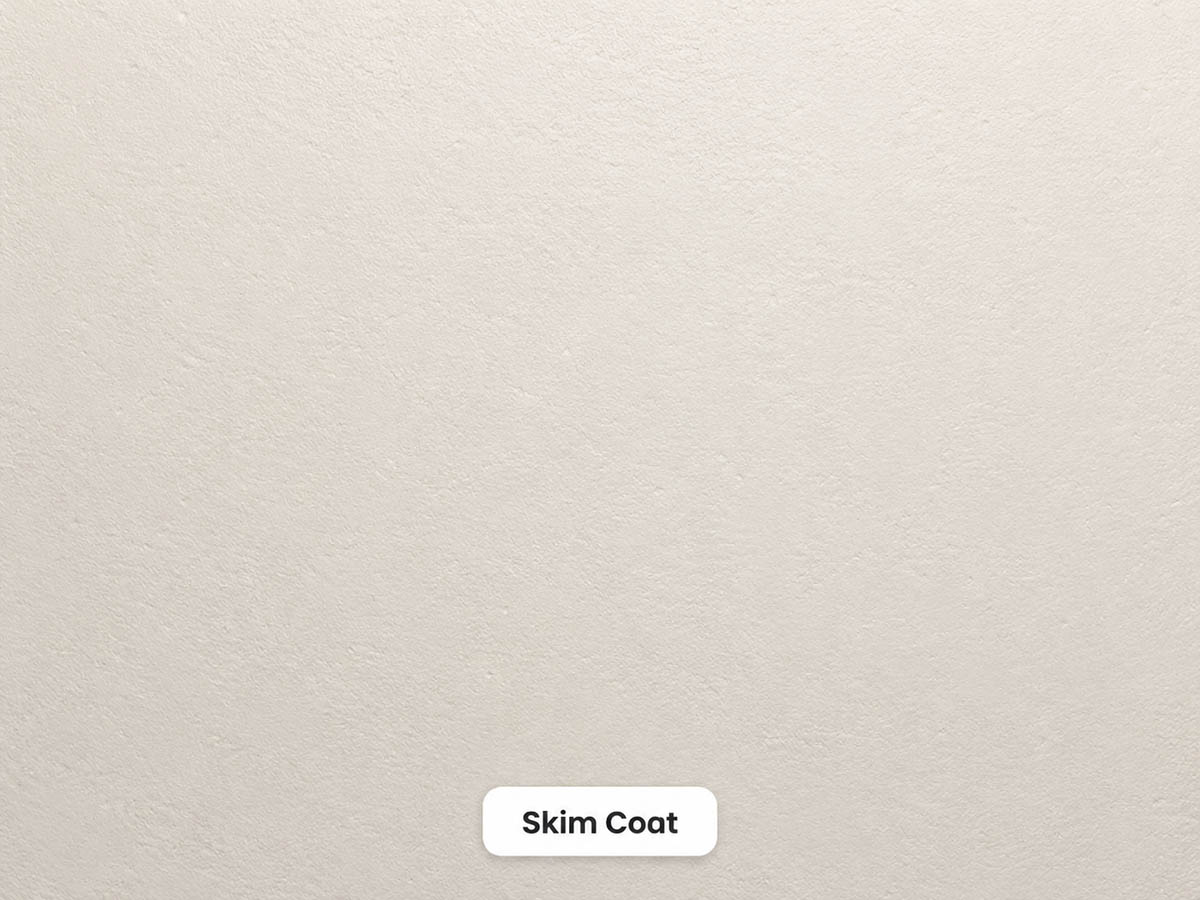
A skim coat ceiling texture is a type of smooth finish. It’s a nearly even surface with slightly raised areas. It doesn’t hold any specific pattern, but since it isn’t completely flat, it’s a little more forgiving when showing imperfections than a completely smooth composition. This makes it a good choice to cover previously heavily textured areas. This design does have some of the same installation challenges as a smooth finish, such as the use of multiple layers of mud.
This is the go-to move for modernizing an old popcorn ceiling without tearing it all down. A skim coat buries the texture under a fresh, near-smooth surface, though it takes patience and a few thin layers to get right.
Lace Texture
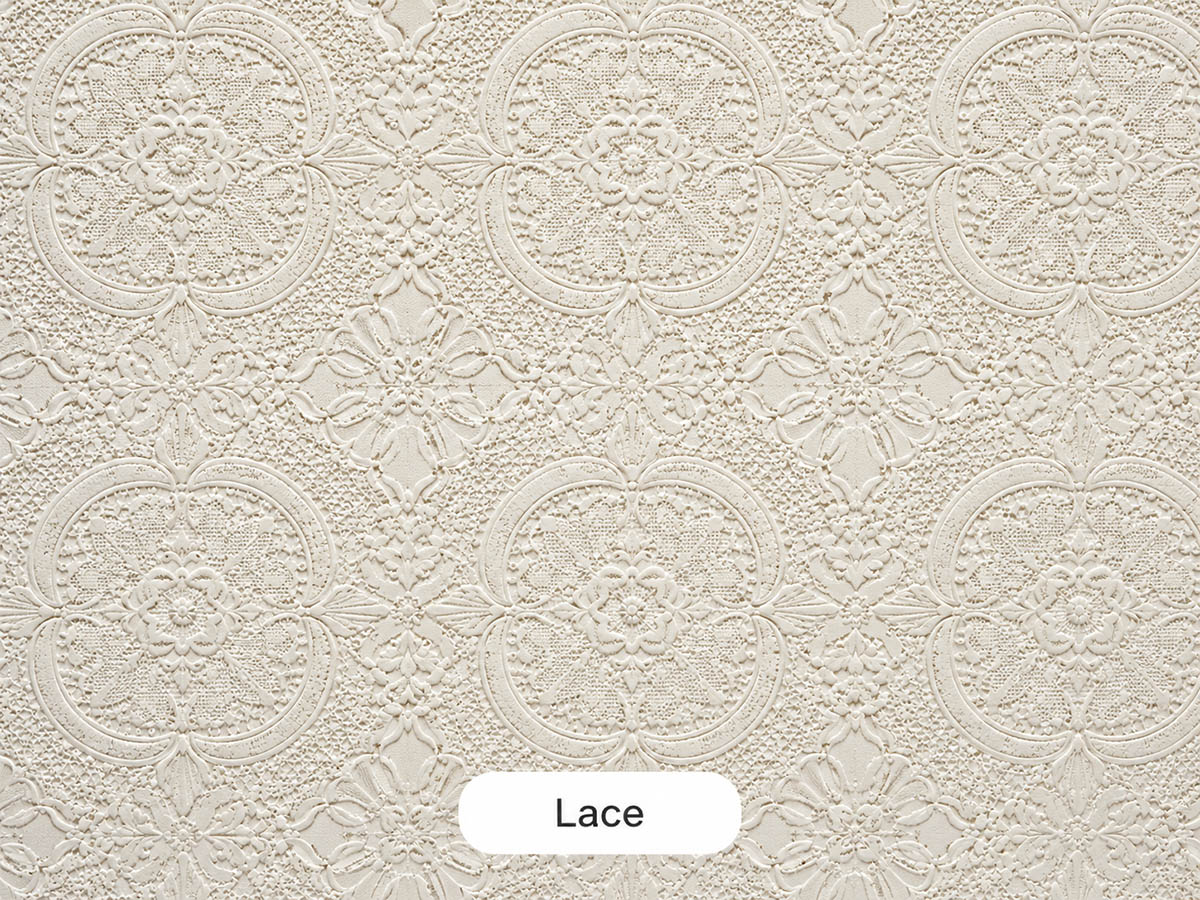
A lace ceiling texture is one of the most distinctive design choices. It copies the delicate designs of lace and lays them as a pattern. This makes it a great choice to complement older homes with traditional styles. This is also a good style for homes with a tray ceilings that will give your design a one-of-a-kind look. This is an intensive installation process that takes a lot of skill and tools. Because of this and the generally unforgiving nature of the design, it’s best to hire a professional to create this look.
Lace is often done in two tones. A darker base coat shows through the lighter knocked-down lace on top, which is what gives it that delicate, layered look. Every overlap has to line up, so this really is a hire-a-pro finish.
Slap Brush Texture

The largest drawback to the slap brush ceiling application is that it isn’t an easy installation. The good news is that once this challenging installation is finished, you’ll have a gorgeous and artistic touch to your home. To start, cover the area with the mud with a roller. Now, take a stiff bristle brush and use it to slap the surface to create the finish. This is the difficult part because any mistakes and imperfections in the process are going to be fairly visible and can give you a messy finish.
The goal is controlled randomness. You don’t want a repeating pattern, but you don’t want bare spots either, so work in small sections and keep your wrist loose. Overloading the brush is what leaves those gloppy marks.
Unaggregated Texture
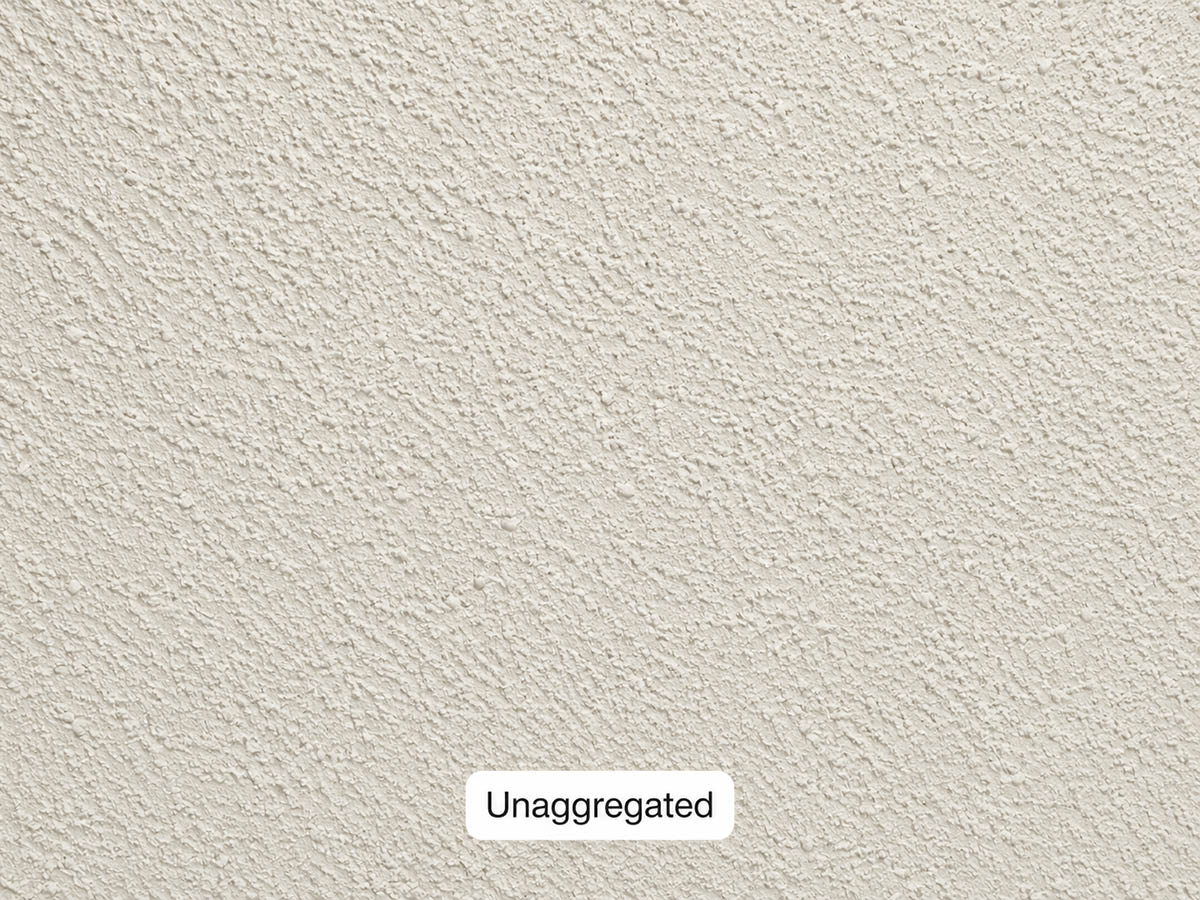
An unaggregated ceiling texture is another material rather than a specific application technique. It’s made to handle a wide variety of finish designs, whether mild or fairly bold. It is typically applied either by hand or as a spray-on application. It can create popular patterns such as knockdown, spatter, and orange peel. This makes unaggregated mixtures a rather versatile choice regarding the material for your new finish or repairs.
The word just means the mix has no added grit in it. That’s why it can fake so many looks, from knockdown to orange peel, since the pattern comes entirely from the tool rather than the material.
Artex Texture
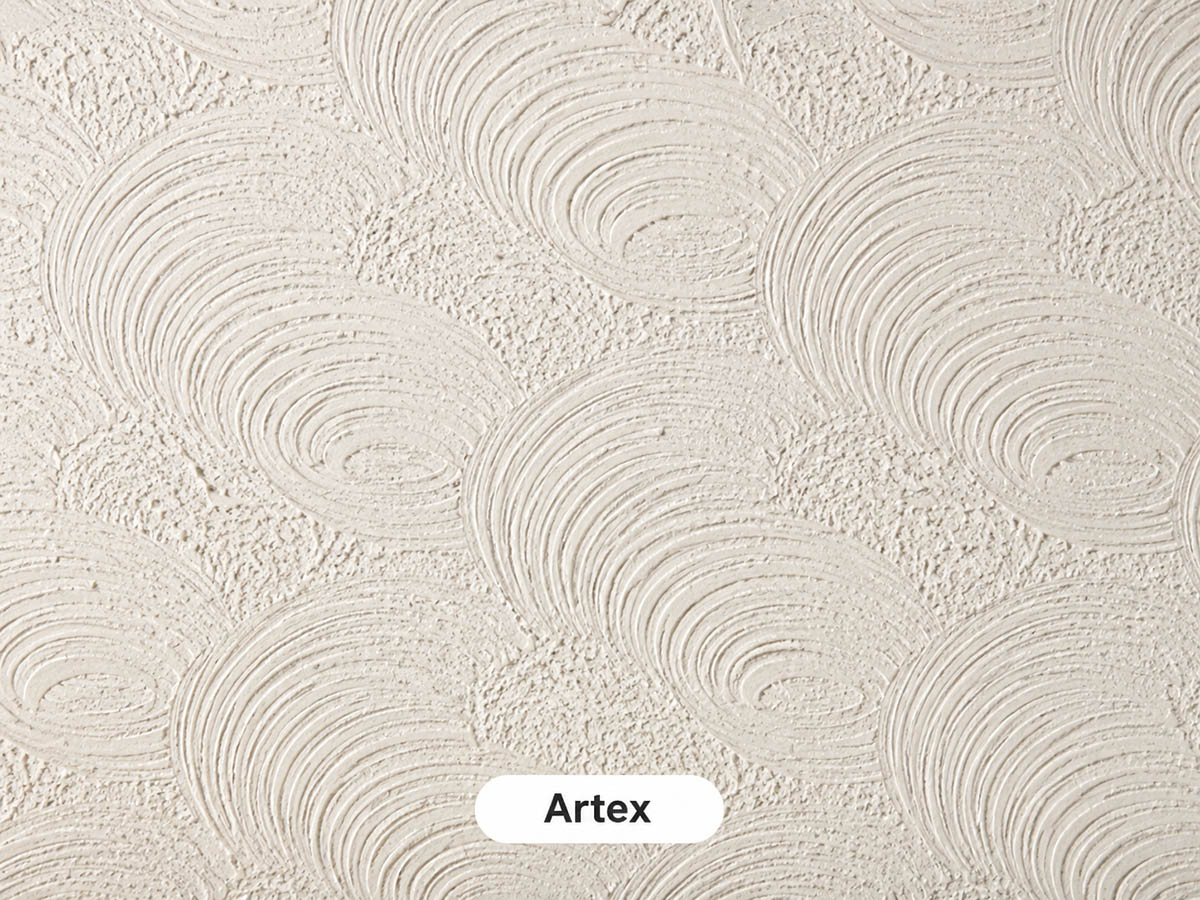
Artex refers to a branded material used in ceiling textures rather than just a special pattern. It’s meant to help homeowners obtain a patterned surface without having to call in plastering skills. It was initially high in popularity during the 1970s, especially in Britain. Today, though, the material has fallen out of mainstream use. The main reason the material isn’t as popular anymore is because it’s very difficult to repair and remove. It was the potentially marred appearance of earlier repairs that damaged its credibility.
If you’re in a UK home thinking about removing old Artex, pause first. Coatings made before the mid-1980s can contain white asbestos, and leftover stock went up in homes even later. Get it tested before you sand or scrape anything.
Homax Popcorn Texture
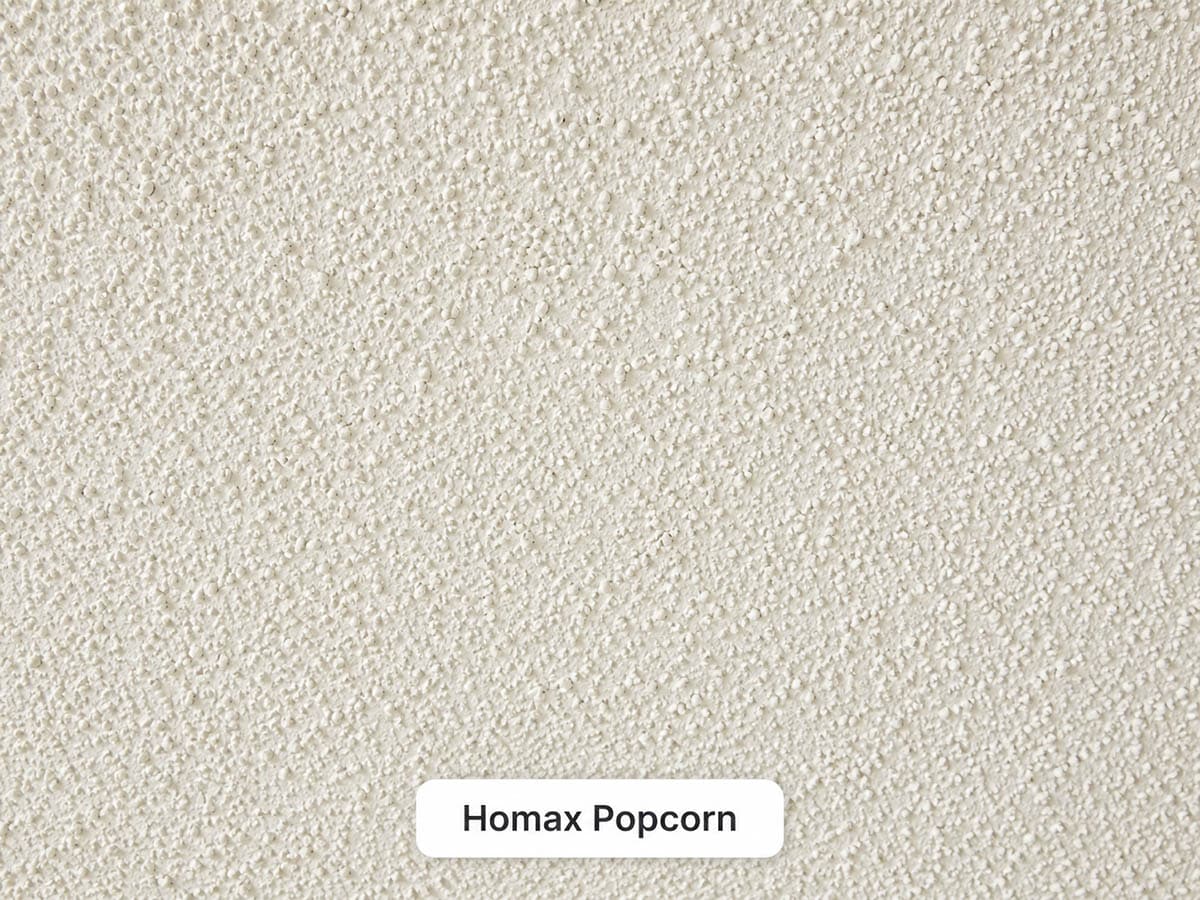
Homax Popcorn Textures is a non-asbestos-based spray that is made to help you get your ceiling ready to finish. This is a newer and more commonly used material than Artex. Artex does have an advantage when it comes to versatility. The Homax Popcorn Sprays are, as their name suggests, made with popcorn applications in mind. This material is also versatile because it comes in different colors. This helps consolidate installation and painting.
The handy part is the aerosol can version, made for spot-fixing small patches without renting a hopper and gun. Match the spray setting to your existing texture and test it on cardboard first.
Santa Fe Texture
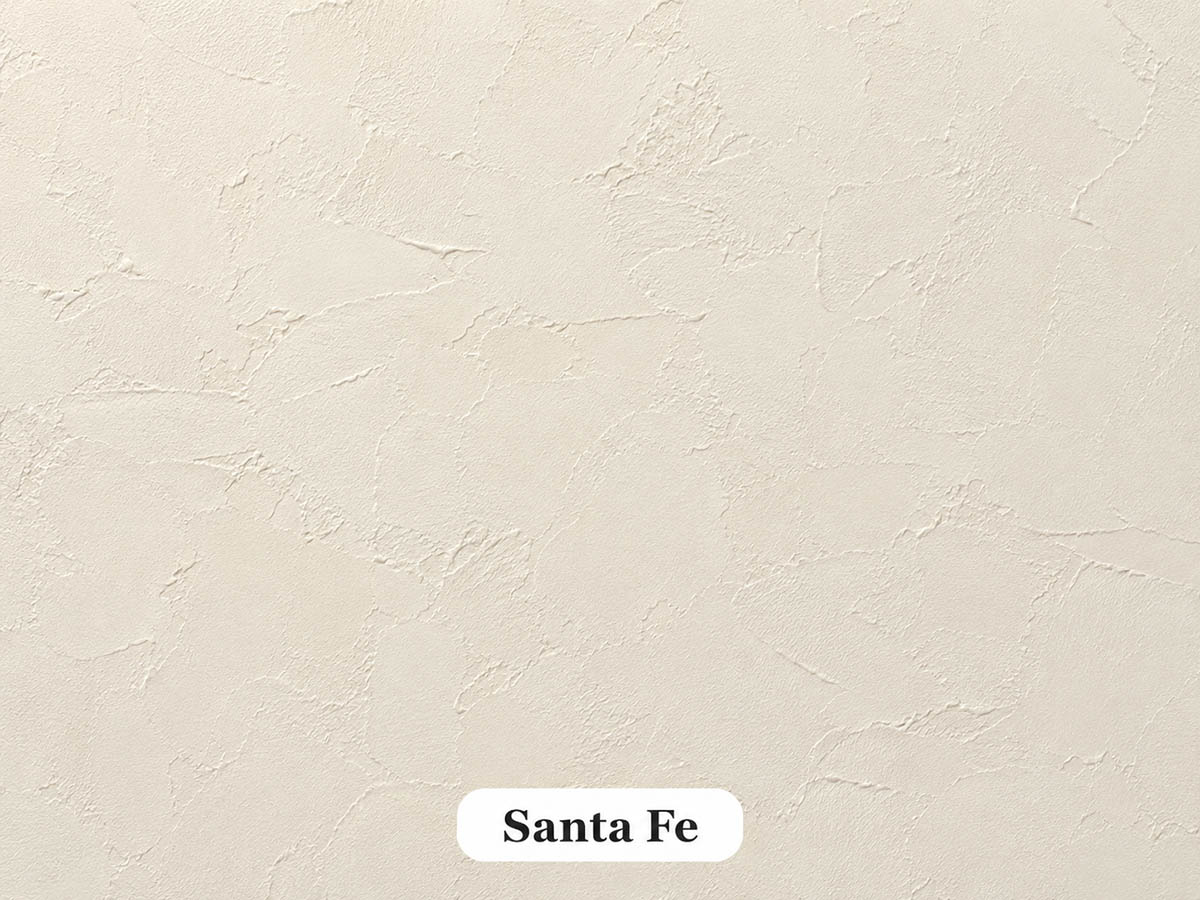
A Santa Fe ceiling texture is an offshoot of the drywall finish. It also holds similarities to the skip trowel design but differs in that it has smoother areas in its implementation. A good general rule of thumb is that if the application offers more than 60% coverage for your ceiling, it’s a Santa Fe finish. Less than 60% still fall in the skip trowel category. Since this is still an uneven application, it will help hide imperfections. However, it may not do so as well as a highly textured choice.
It usually goes on in two thin coats, with the second laid lightly over the first to build those smooth, raised islands. It suits Southwestern and adobe-style homes, which is where the name comes from.
Textures for the Ceiling FAQs
Below, we try to answer the most frequently asked questions regarding texturing your interior.
Most Popular Textures for the Ceiling
When it comes down to it, the most popular ceiling textures include skip troweling, knockdown, popcorn, orange peel, and smooth finish. These commonly used processes have advantages and disadvantages that we’ve already touched on.
Best Texture to Use
The best is a relative title. What works for one home might not fit another. However, lace patterns are often considered the most unique and beautiful options.
Cost to Texture the Ceiling
This number depends on a few factors. Mainly, the type you use will make a difference. Difficult choices such as lace applications will cost more than, for example, a stipple finish. The exact cost varies quite a bit. The average hovers around $.46 to $.62 per square foot, while more intensive choices like smooth applications can cost up to $2 or more per square foot.
How Do You Match an Existing Texture to the Ceiling?
To match an existing ceiling texture, you must first determine the current application and how it’s achieved. Then, it’s a good idea to test out a small surface area to ensure you know how to do it. For more complicated designs, it can be a good idea to contact professional help. The hardest part is matching colors. After all, you’re putting up fresh material next to material fading over the years.
For this step, paint will be your best friend. There is no secret regarding matching what you already have, and it will require you to experiment carefully. One thing to remember when applying is that if you don’t get the look right, you can gently wipe it off right away with a wet sponge to try again.
For a seamless look, you can match the wall texture with the ceiling. If you have low overhead space, a more subtle pattern is recommended. Also, remember that a deep grooved depth design can be harder to keep clean and collect dust and debris. This can add more maintenance in a space such as the kitchen, where cooking grease can accumulate.
Are Textures on the Ceilings Outdated?
Textures on ceilings aren’t a modern idea, but that doesn’t necessarily mean they’re outdated. Since there are so many different options you can use, it’s hard to say that all of them are outdated. That said, certain patterns aren’t as widely appreciated as they once were. For example, many homeowners prefer alternatives to popcorn because they were widely used between the 1950s and 1980s and is considered outdated.
Many of these finishes are still used in residential construction, while popcorn applications are out of style for most people. For rooms with higher overheads, a design can offer visual interest and the experience of being in a luxurious setting. Smaller spaces may benefit from a toned-down appearance not to be overwhelming.
Popcorn Vs. Textured Ceiling
Technically, there is a difference between popcorn and an (acoustic) textured ceiling. The main difference is that the popcorn surfaces are not achieved by stamping or shaping mud but by introducing a foreign ingredient, such as styrofoam balls, to create the pattern. Popcorn surfaces can be textured over, but the job isn’t always easy. Your most affordable choice is to seal the material with a heavier application in another style, or you can trowel it.
The best way to remove the popcorn for retexturing is to mist the area with a garden pump sprayer, letting it soak for approximately 15 minutes before scraping the material away. Be careful not to over-spray the roof interior, as doing so may damage the drywall underneath. One thing to check before you scrape: if your home was built before the late 1980s, have the material tested for asbestos first. Older popcorn mixes sometimes contain it, and sanding or scraping it loose without knowing isn’t a risk worth taking.
Ceiling Texture Infographic
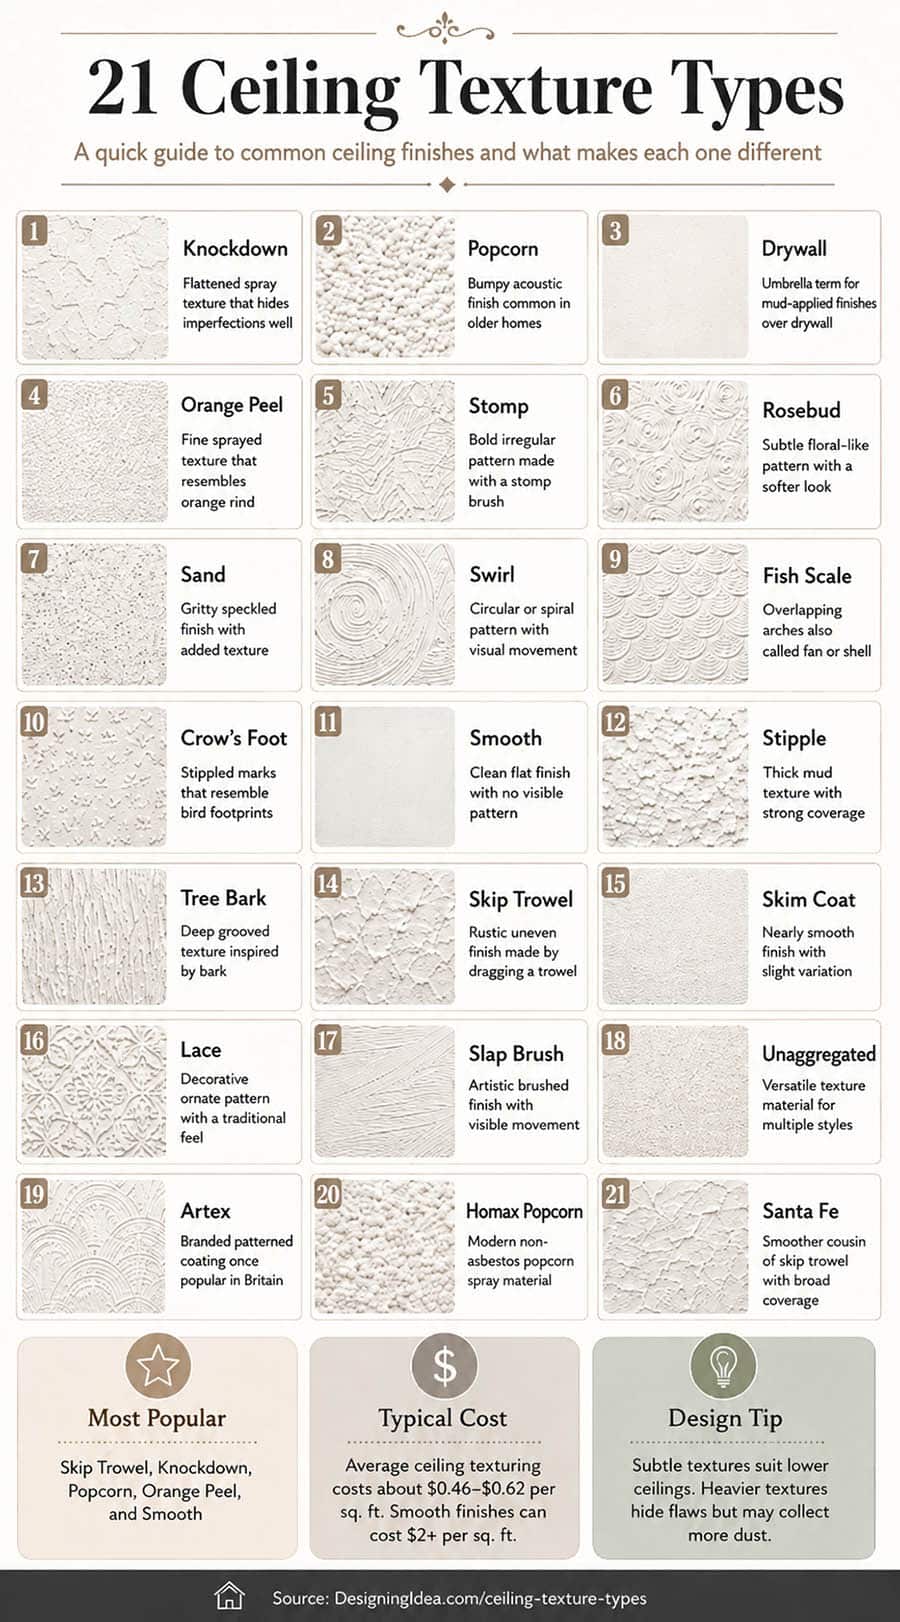
For more ceiling treatments check out this guide showcasing the different options.
To showcase highly specific designs, some images on this website use advanced AI-generation software to illustrate ideas and room inspiration. See our editorial policy to learn more.

Upload a photo and get instant before-and-after room designs.
No design experience needed — join 2.39 million+ happy users.
👉 Try the AI design tool now