Backyard Greenhouse Ideas (DIY, Kits & Designs)
Welcome to our gallery of beautiful backyard greenhouse ideas including DIY kits, designs and information on how to build your own.
However, existing environmental conditions may sometimes prevent you from doing so. But don’t worry, because the perfect gardening companion is here for you – the greenhouse. Read on as we share with you our ultimate guide on backyard greenhouse ideas and designs.
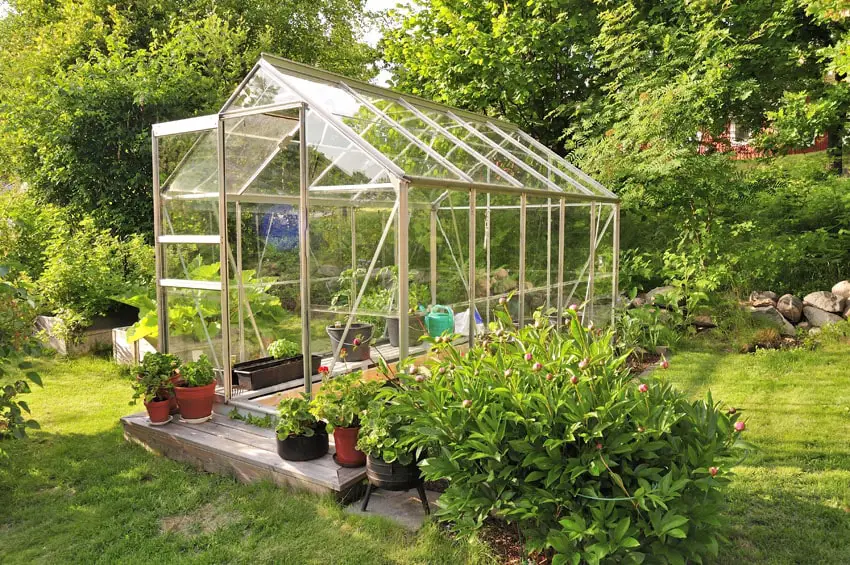
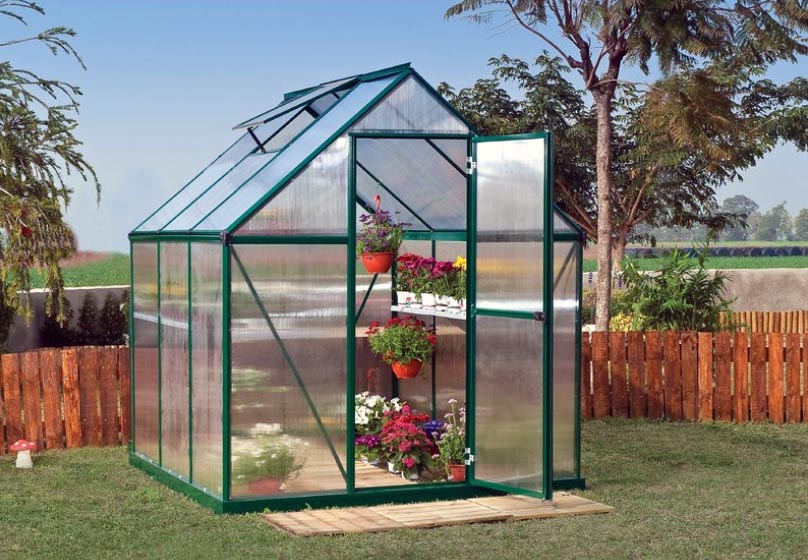
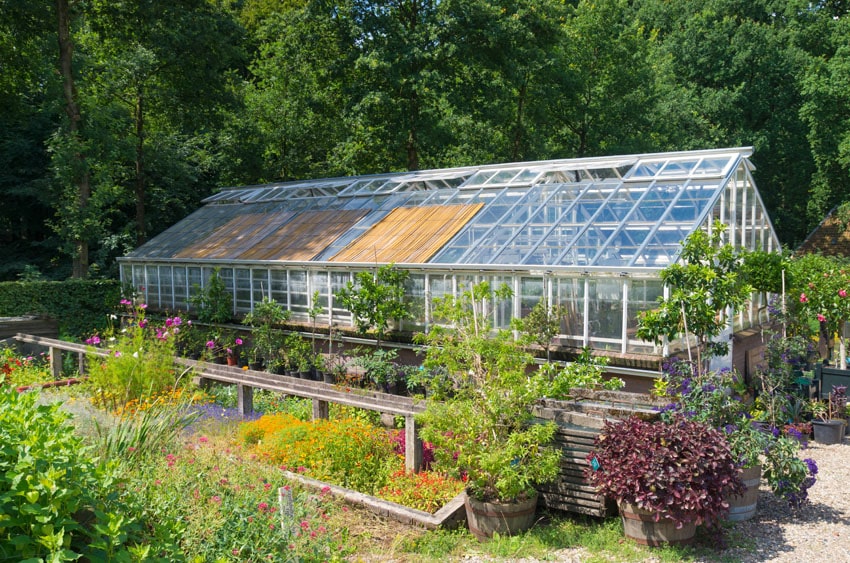
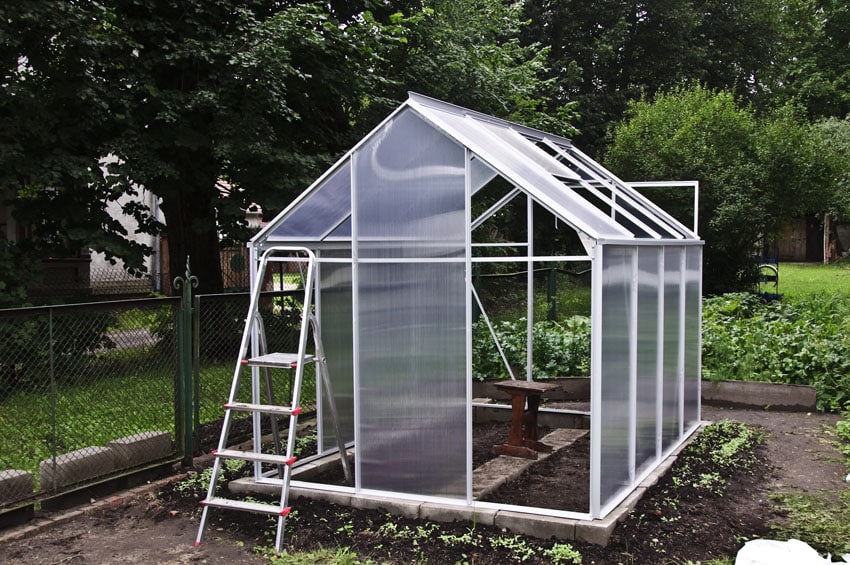
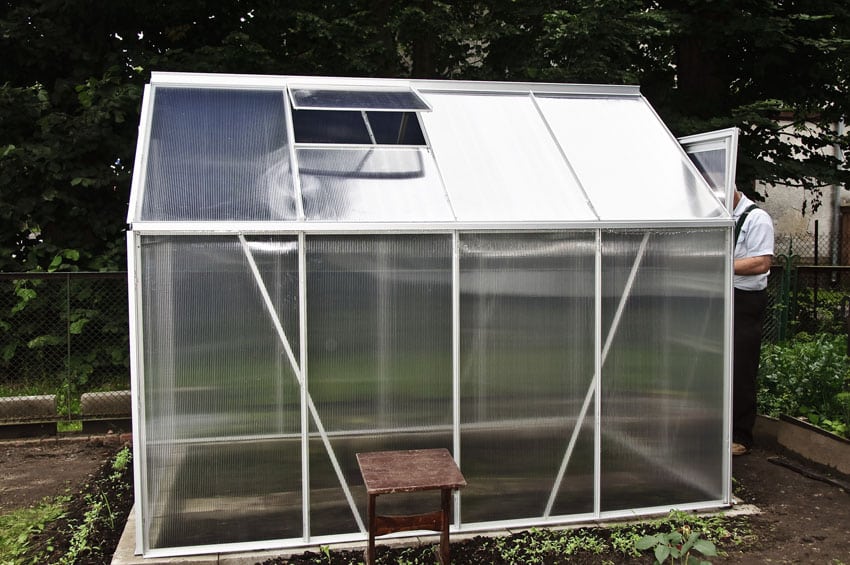
The simple post and rafter greenhouse in the picture above is perfect for holding a small variety of potted plants and crops. It is made up of an aluminum framing system, gable roofing and an acrylic covering. The clear acrylic panels allows a view of the plants grown in the greenhouse, while also allowing sufficient sunlight to pass through. [toc]
What is a Greenhouse
The primary purpose of a greenhouse is to act as a shield between your plants and the nature. Generally, it protects plants from harsh outdoor elements, insect infestation and diseases, allowing for an extension of the growing season by providing improved growing conditions for your plants.
There are a number of advantages to using greenhouses for growing your plants. In this article, we help you break down each of the positive reason as to why you should get a greenhouse.
Makes your garden extra interesting – A greenhouse with a wide varieties of plants offer an exhibition of different shapes and sizes offering an interesting focal point for your garden design.
Extends the growing season for plants – A greenhouse offers a longer season, allowing you to grow plants even during the colder climates. Consequently, an extended growing season will enable you to maximize the produce that you harvest from your plants.
Also, with a greenhouse you do not have to wait off a season to cultivate something which you like. It can be quite frustrating if you are excited to plant a crop, only to find out that the current season cannot sustain it due to the existing temperature conditions. With that you are left with no choice but to wait for the right time, until your excitement just wears off.
However, with a greenhouse you do not have to wait off a season to cultivate something which you like. Seasonal plants can be grown anytime as you get to control the garden’s existing conditions.
Allows you to grow plants in any weather – One of the potential threats that one has to regularly deal with in gardening is the constant change in weather.
In times of bad weather, it is harder to keep up with maintaining your plants, however when gardening inside a greenhouse, your plants are protected from harsh outdoor elements. Everything is covered, so in the event of a heavy rain, plants are kept dry.
During the snow, plants will not succumb to frost, while during hot summers, they do not get exposed to excessive heat and sunlight.
Protects crops from pests and small animals – Moles,squirrels, rabbits and rodents all pose a potential harm to growing plants as they usually damage the produce. Since the greenhouse keeps everything contained within an enclosed area, even larger animals like deer can be easily kept out.
Keeps the beneficial insects inside – Not all insects are harmful to plants. Ladybugs, for example, are a beneficial group of insects which are capable of consuming aphids, mealybugs, scale, leaf hoppers and mites that destroy plants.
Unlike in an open area where beneficial insects may leave, a greenhouse keeps them enclosed. Therefore, the population of pesky insects are also controlled and prevented from spreading. 
Perfect for growing a wide variety of plants – A greenhouse can hold a wide variety of plants and you can arrange it in such a way that you can take advantage of every inch of space available for gardening.
You can incorporate vertical wall gardens inside or multi level or tiered planting systems. A greenhouse also allows you to experiment on growing plants which are not local to an area as the environment’s conditions can be modified according to the plant’s needs.
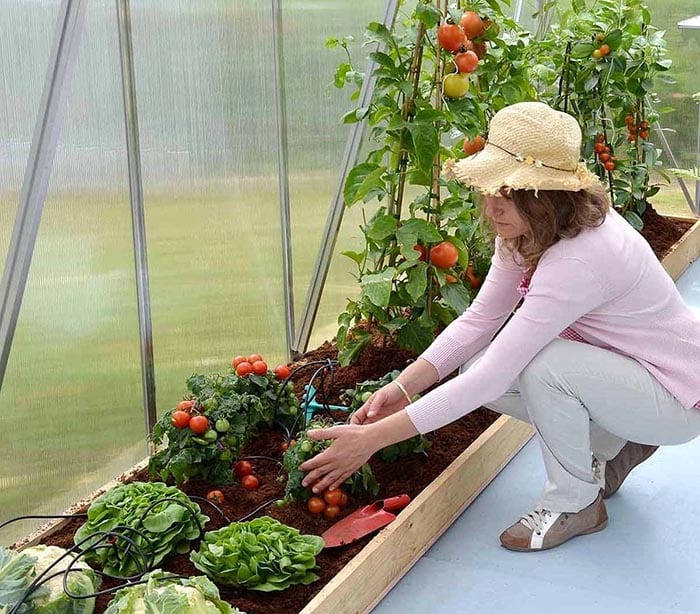
Creates an environment which optimizes the growth potential of plants – With a greenhouse, you can easily customize the growing environment of your plants to enhance their health and promote their growth.
It allows you to incorporate irrigation and drainage systems which keep the plants adequately watered. Self watering features, on the other hand, lessens the effort in maintenance and upkeep.
As plants love humid and warm environments, a greenhouse also offers effective temperature control by trapping the sun’s radiation within the enclosure, thus retaining the heat within the structure. Also, with a greenhouse, there is no need for dangerous and harmful pesticide.
Provides relaxation – Gardening, in general, is considered to be therapeutic and stress relieving. Some people find comfort in this activity as it is a great way to deviate from the everyday stresses of life. A greenhouse provides a place where you can unwind after a long tiring day from work, allowing you to enjoy the benefits of gardening all year long.
Versatility and easy customization – A greenhouse can be modified in many ways according to your taste and preference and your plant’s needs. Depending on their requirements, you can decide on what type of greenhouse will work well with the type of plants you grow, whether they may be vegetables, herbs, flowering plants or ornamental foliage.
Indoor and outdoor plants can be mixed. Also, you can freely choose the design elements such as the size, shape, number of doors, placement and arrangement of plants. A greenhouse can also serve as a multipurpose area for storage and for relaxation.
Keeps your garden contained in one place – Keeping all the plants in one place lessens the effort required to maintain, water and feed them. An effective work flow is also ensured if the plants and gardening tools can be found in one location as you can easily access them while going through your gardening activities.
Saves energy – Compared to a traditional gardening environment, a greenhouse allows you to conserve energy sources. Water can be easily controlled and made sure that nothing goes to waste.
Saves money and cuts grocery expenses– A greenhouse provides an effective way to grow your own food all year round. Providing a consistent supply of fruits, vegetables and herbs, it lessens the effort required to go to the supermarket. Aside from the assurance that you get only the best quality of crops that are organic and safe, you also get to enjoy the advantage of saving money on food bills.
Helps the environment – A greenhouse is an environment-friendly solution that benefits both the gardeners, the plants and the earth. If you want to go green and help fight global warming, adding a greenhouse can provide a cleaner atmosphere by acting as a natural air purifier.
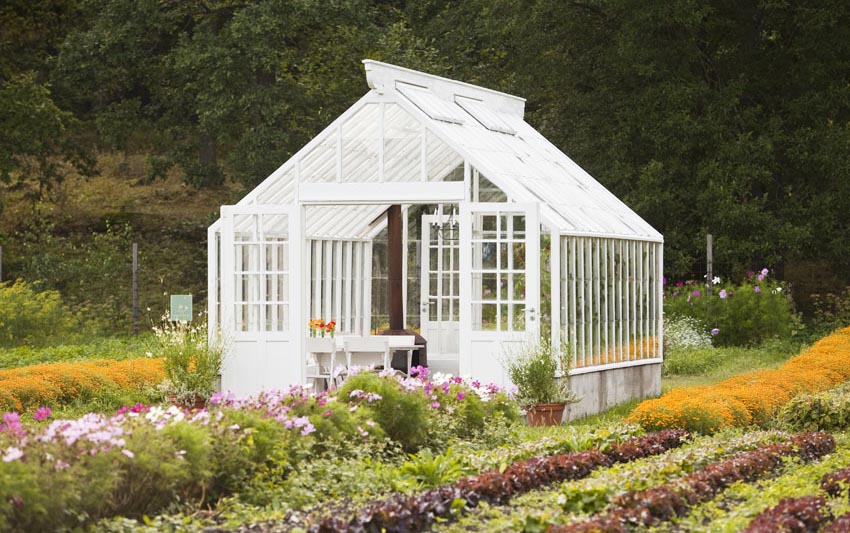
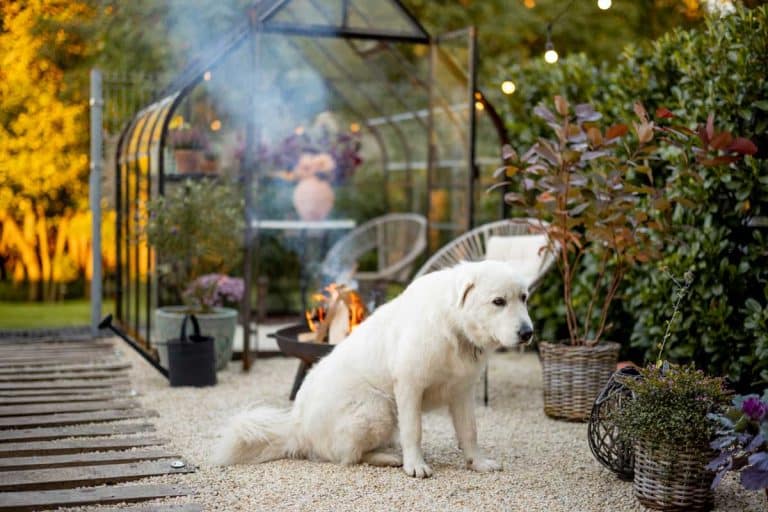
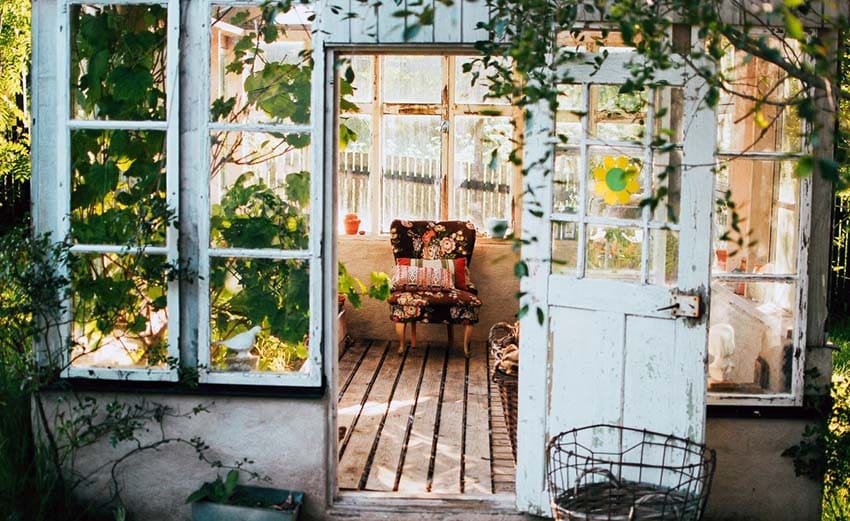
Its classic white color stands out against the surrounding myriad of colorful plants and blooming flowers. This greenhouse also acts as a charming decorative feature for the garden.
How Much Does a Greenhouse Cost
The average cost of greenhouses is $25 per square foot. While the total cost for greenhouses run $13,000 with professional installation and including all the factors. Self installed or DIY greenhouses are cheaper and can drop the costs to $3500.
However, these prices can still vary depending on the design of your greenhouse. Here are some factors which affect the total cost of greenhouses:
• Size – The size of your greenhouse affects the total cost of construction because, obviously, a larger greenhouse would require more materials. Large greenhouses would also entail more time and effort to build, thus resulting to increased labor costs. There are three types of greenhouses according to size.
Basic Greenhouse – A basic greenhouse is typically 6 feet x 8 feet and is usually hoop-shaped or an arched shape. Commonly sold in packages, a basic greenhouse kit includes all the parts and materials needed for installation. On average, basic or beginner greenhouses cost $240 per package.
Medium-sized Greenhouses– Medium-sized greenhouses are ideal for experienced growers. With a typical size of 12 feet x 12 feet, medium-sized greenhouses usually include added features such as drainage and irrigation systems.
This type of greenhouse also costs more in terms of grading the foundation, laying down the floor, and installing the plumbing and electrical systems. It is also usually made up of polycarbonate roofing with a vented roofing design.
Unlike basic greenhouses, a medium-sized greenhouse for experienced growers are not suitable to be undertaken as a “do it yourself” project but rather requires the expertise and services of a skilled professional. This type of greenhouse usually cost $3500 to $7000.
Large Greenhouses – Large greenhouses are highly suitable for gardening experts or for “serious growers”. With a typical area of 500 to 1000 square feet, large greenhouse features advanced amenities such as temperature-controlled environments, HVAC systems, computer and sensor-operated vents and windows, automatic feeders, self-watering systems, and lights
• Materials – The type of materials also has a significant impact on the cost of greenhouses. If you want to build a basic freestanding greenhouse, the most cost-effective material you can use are polycarbonate panels with an aluminum frame.
Alternatively, you can also build your own greenhouse using readily available materials from local home improvement stores. The cheapest greenhouse can be built using PVC pipes and sheet plastic. Although relatively cheap and costing only as much as $40, these types of greenhouses are temporary and are not meant to be used year-round.
Here are some of the average costs of greenhouses depending on the covering materials:
Glass (double strength glass with minimum thickness) – $2.50 per square foot
Polyethylene – $0.12 per square foot
Fiberglass – $72 per 6’x8’ panel
Polycarbonate – $55 per 4’x8’ sheet
Here are some of the average cost of greenhouses depending on the framing materials:
Wood (Cedar) – $1 per linear foot
Steel – $2.50 per linear foot
Here are some of the average cost of greenhouse flooring materials:
Gravel – $0.75 to $3 per square foot
Concrete – $10 per square foot
Pavers – $8 to $11 per square foot
Price of Hobby Greenhouse
For greenhouse kits with a basic steel tubing frame, the average price is $200 per set, while high-end kits with galvanized steel framing can cost as much as $10,000. Wooden greenhouse kits can range from $120 to $5,000, depending on the complexity of the design.
Backyard Greenhouse Shed Kits
Greenhouses can be bought in unassembled kits containing all the materials needed to complete the project. Unlike building from scratch, greenhouse kits include ready-made parts. They usually consist of a frame, covering and flooring material. The main advantage of a greenhouse kit is that it saves you time, money and effort.
Backyard greenhouse kits have several material options for the frame and the covering. The least expensive greenhouse kit comprises PVC pipes assembled as a hoop house, while the most expensive is the composite greenhouse kit. Some other backyard greenhouse kits come in aluminum, wood, resin, PVC, glazing and polycarbonate.
Greenhouse starter kits can be bought for as low as $10 per set. While the larger backyard greenhouse kits usually cost $200 to $5000, depending on the size and material.

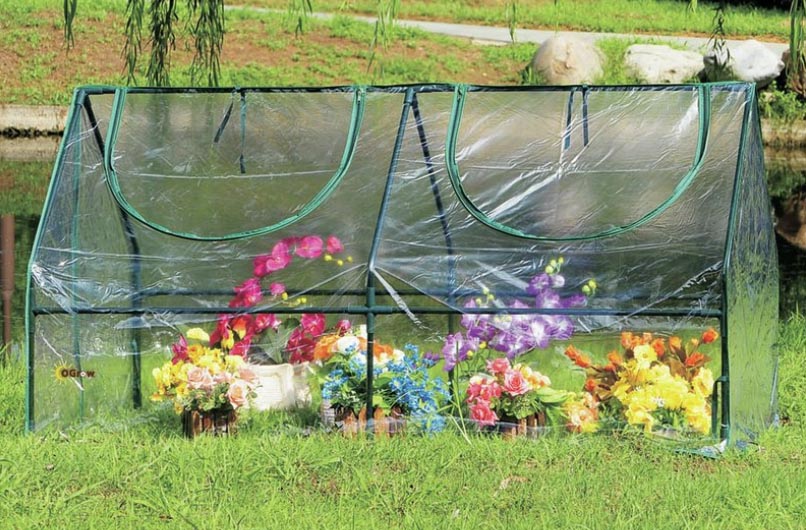
The main advantage of this type of greenhouse is that it can be assembled and disassembled easily and can be relocated quickly depending on one’s preference.
Made from twin wall polycarbonate panels and a painted aluminum frame, this small greenhouse can be easily set up in any backyard within our to five hours. This greenhouse kit contains all the needed parts such as a roof vent, a steel base, rain gutter, a frame, and a covering. It allows for an effective heat retention, diffusion and ventilation. In addition to that it is also weather resistant and its aluminum frame is corrosion-resistant.

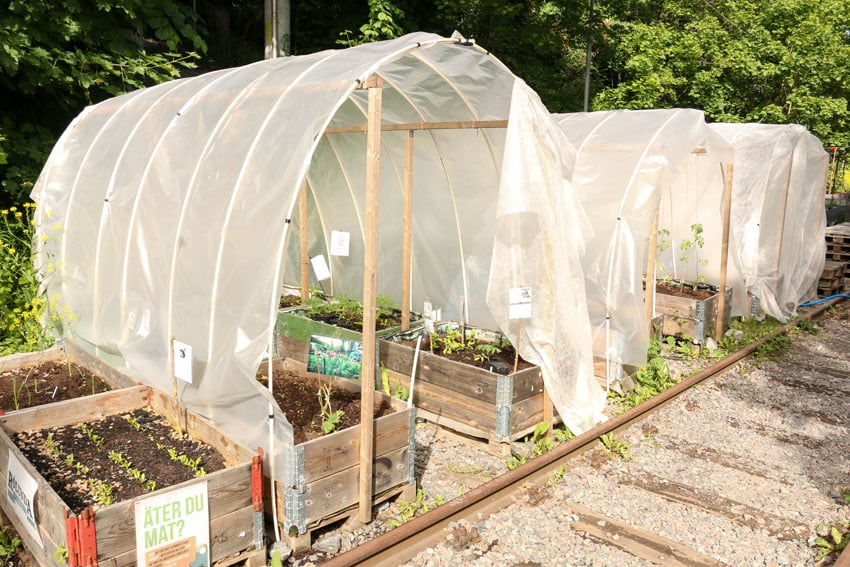
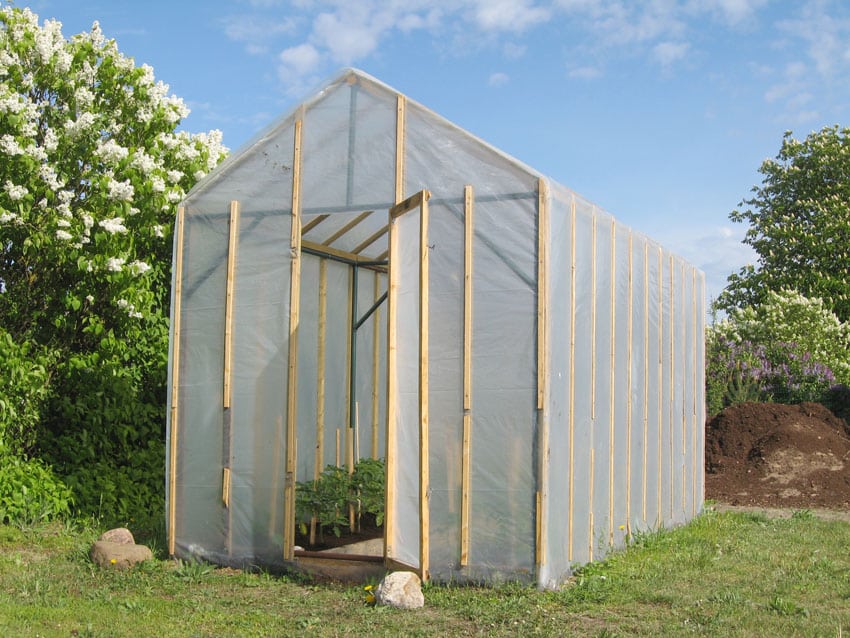
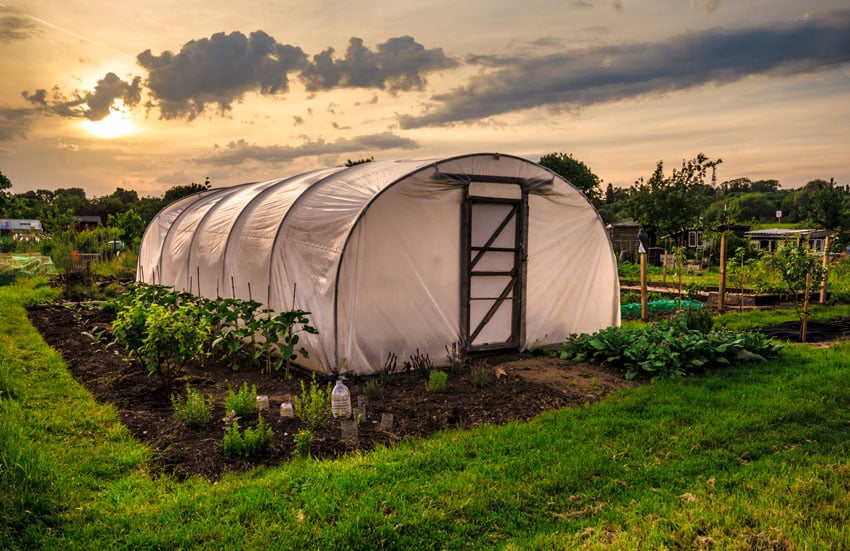
This walk in tunnel backyard greenhouse is another form of easy to assemble kit. Its structure resembles that of a tent, which starts with a simple frame and a ready made cover. made up with heavy duty polyethylene fabric and a high grade powder coated steel tube frame, this portable greenhouse also comes with a zippered door which allows for easy access.
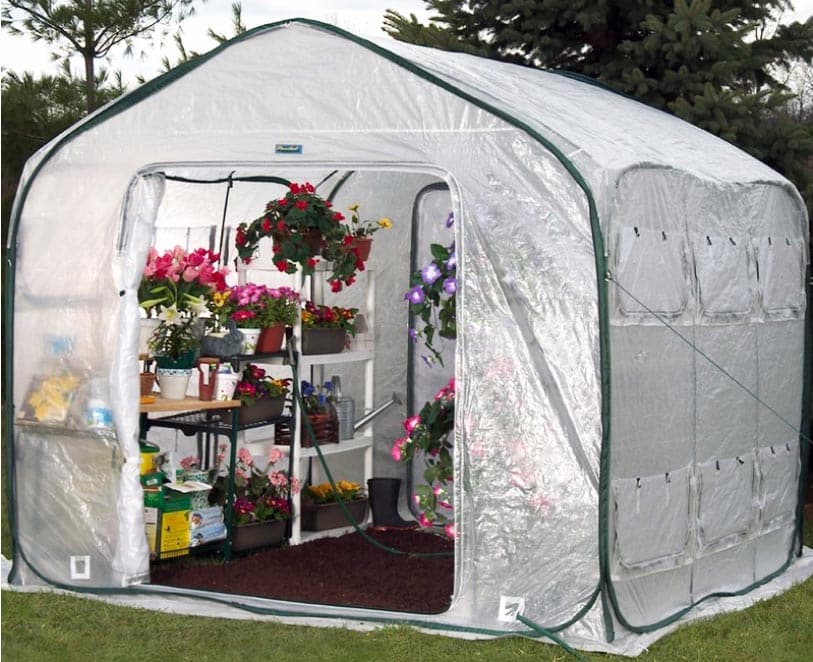
The unique thing about this backyard greenhouse kit is that it can be attached to another piece by zipping the greenhouses together. with that, you get a more expansive protected area for growing your plants.
Aside from that, it can also function as a storage shed for garden tools and other equipment you have in your backyard. Made with “Gro-Tec ” material, this backyard greenhouse kit is weather resistant, durable, UV resistant and works well in improving the climate within different regions. It is ideal for growing vegetables, flowers and ornamental plants.
Greenhouse Kits for Small Spaces
Small greenhouse kits are the perfect head start for those who want to try greenhouse gardening. Small greenhouse kits usually come in simple designs and plans which can be built easily as a DIY project, without having taking much time and effort to install.
This type of greenhouse is easy to assemble and disassemble for storage and can be moved to another area if needed.
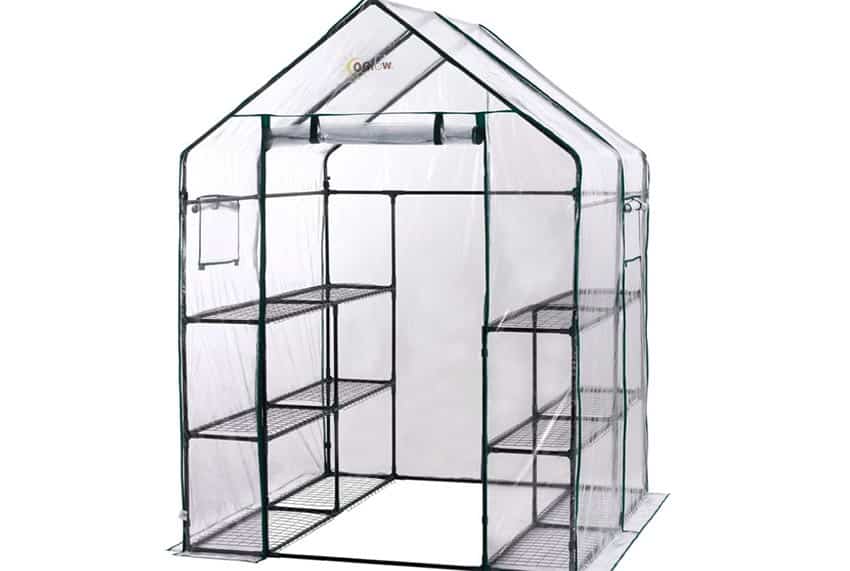
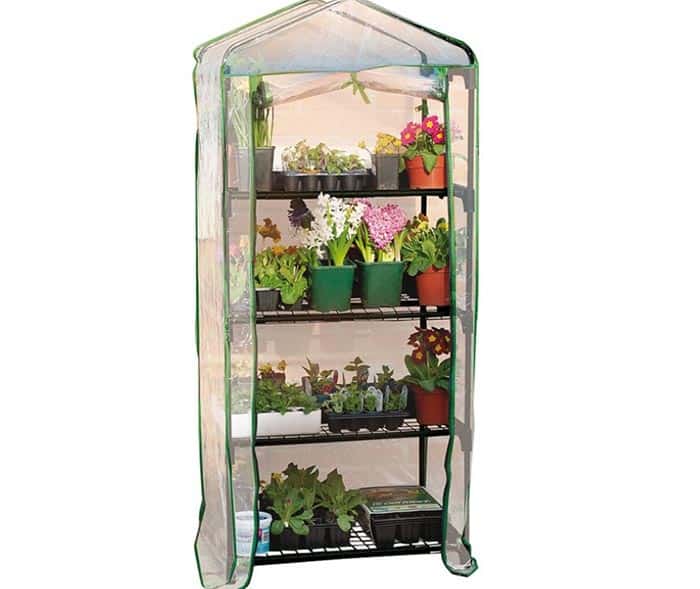
This ready made walk in greenhouse effectively makes use of small and limited spaces by providing builtin metal racks and shelves for holding potted plants.
It is made up of sturdy powder coated metal frame which doe not easily rust and corrode, while the covering is made with a durable clear plastic sheet. Aside from that, it is easy to assemble and can be placed not only in backyards or gardens, but also in patios, decks and balconies.
A greenhouse does not always need to be a big structure which can accommodate persons in it. It can be a simple freestanding shelving unit with an effective covering material. As long as it protects your plants from the weather, it can be classified as a greenhouse.
This 4 tier mini greenhouse is made up of a tubular steel frame and a durable clear polyethylene cover. Ths type of greenhouse is perfect for houses where space is at a premium, like condominium units, apartments and studios.
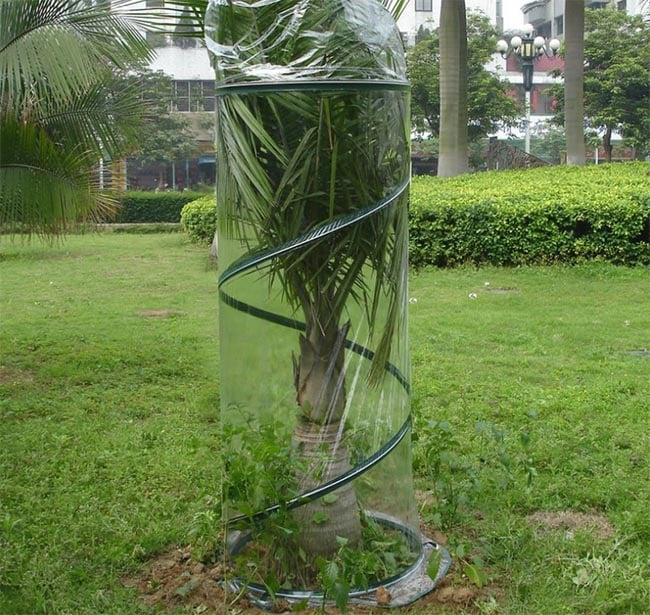
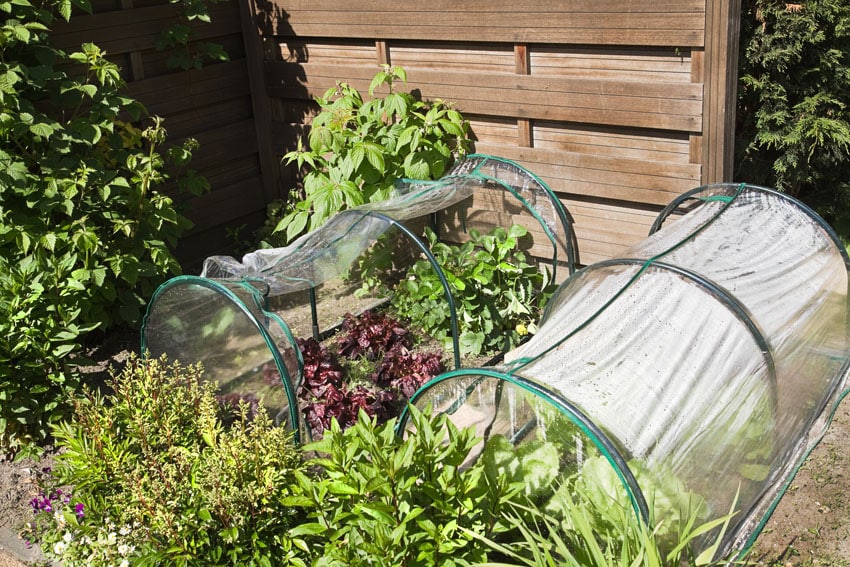
Protect growing trees from the harsh weather using single plant cold frames. Unlike regular greenhouses which can commonly accommodate a large variety of plants, this ready made greenhouse is specifically designed for protecting small trees, shrubs and bushes from harsh outdoor elements.
This portable greenhouse is made up of a polyethylene film cover over a steel frame and can be easily assembled through “pop up”. It is perfect for caging small fruit bearing plants and trees.
Greenhouse Designs
There are several options for greenhouse designs, each using different materials and possessing specific positive and negative features. Greenhouses can be bought in kits which are ready for assemble or prefabricated pieces which are ready to set on a foundation. It can be customized, built from scratch, “do it yourself” or installed by a professional.
Before building your very own greenhouse, it is important to know some basics regarding their design, materials and construction. Read on as we explore some backyard greenhouse ideas to help you decide which is best for your home.
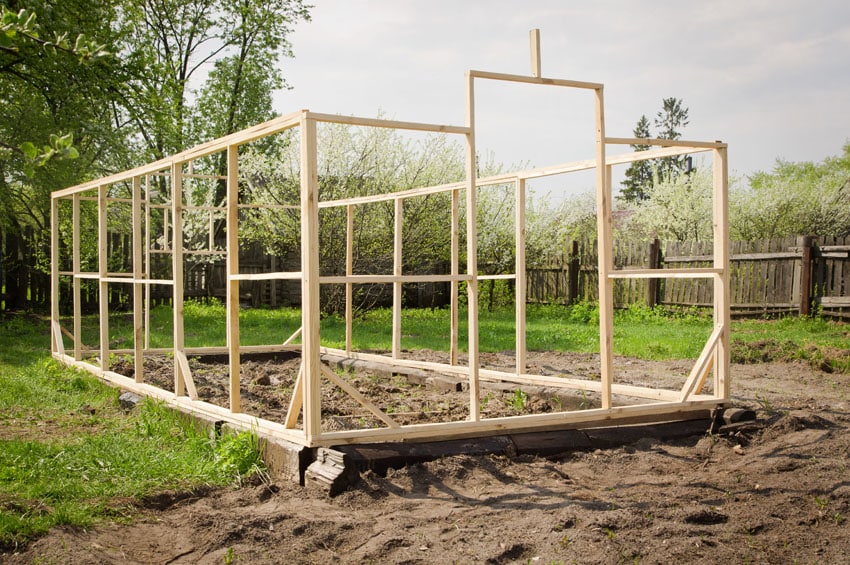
Post and Rafter Greenhouse
The simplest and most common greenhouse structure type this is composed of embedded post and rafters. This design is also considered to be the strongest, as the rafter lends support and reinforces the strength of the roof.
This type of greenhouse gives an optimum and maximum use of space. It also provides adequate air circulation for the plants. Compared to other greenhouse structure designs, a post and rafter greenhouse needs more materials.
Post and rafter greenhouses are considered heavy at the top, thus requiring footed posts and frames. It can be covered with glass and polycarbonate rigid panels.

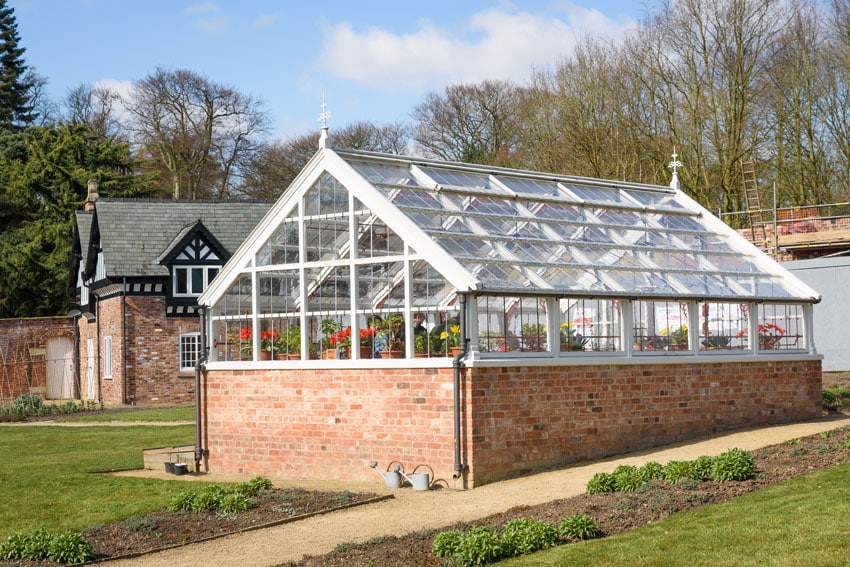
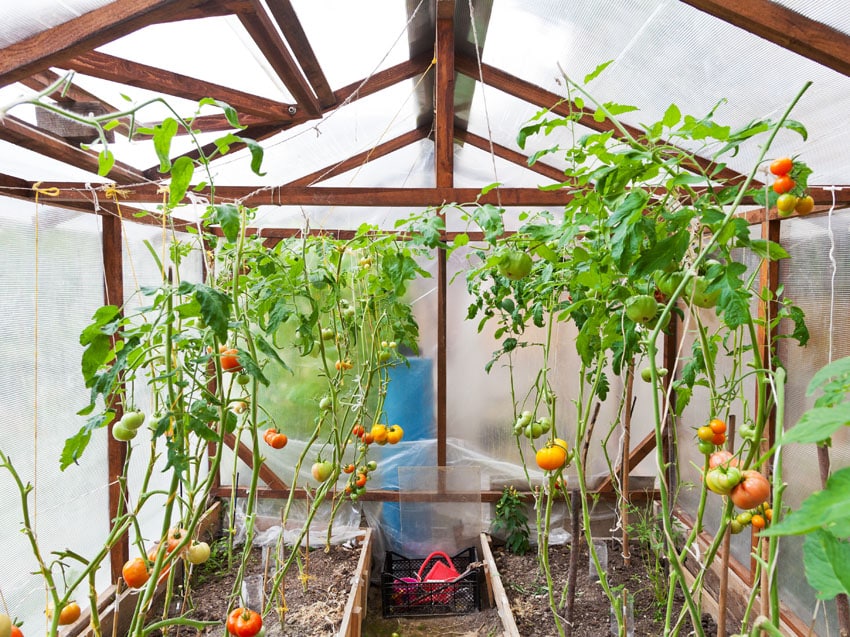
A Frame Greenhouse
A-frame greenhouses are characterized by side walls and a roof that form a simple triangular structure. This greenhouse design is popular because of its simple design.
Compared to a post and rafter greenhouse, A-frame greenhouses are easier to construct and require fewer building materials. Typical coverings for A-frame greenhouses are polycarbonate panels and glass.
The only drawback of using an A frame greenhouse design is that the leaning side walls narrow the spaces, thus giving a limited amount of space for usage. The corners can also pose a problem regarding adequate air circulation.
Window Greenhouse
Window greenhouses, otherwise known as greenhouse windows, bay windows or window-mounted greenhouses, are a type of greenhouse that is usually used indoors.
Compared to a regular window with a single glass pane, a window greenhouse projects to the house’s exterior wall. This allows for light to enter while an open design on both sides permits maximum ventilation. This type of greenhouse design is commonly used for growing herbs and other small plants because of its limited size.
PVC Greenhouse
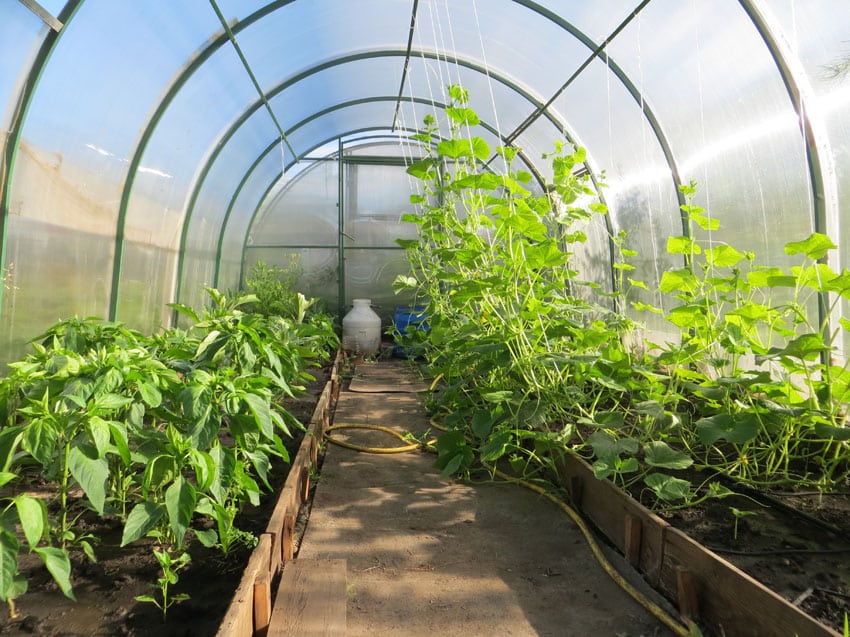
PVC greenhouses are commonly made into a hoop house form. This type of greenhouse is the cheapest material option that one can explore. PVC greenhouses are simple and can be built into any size depending on the existing need. This type of greenhouse design can be completed in several hours and do not require a professional’s services.
PVC greenhouses may have a straightforward design, but when it comes to efficiency in growing plants, they can surely help in extending your growing season all year round. This type of greenhouse is also more sturdy and can stand up to the rain and heat.
This compact greenhouse is the perfect solution for small gardens that cannot accommodate a standard greenhouse. Like most ready-made greenhouses, this comes as a kit with a powder-coated steel frame and PVC vinyl covering. The openings can be easily accessed using zippers, providing adequate ventilation and air circulation for small potted plants.
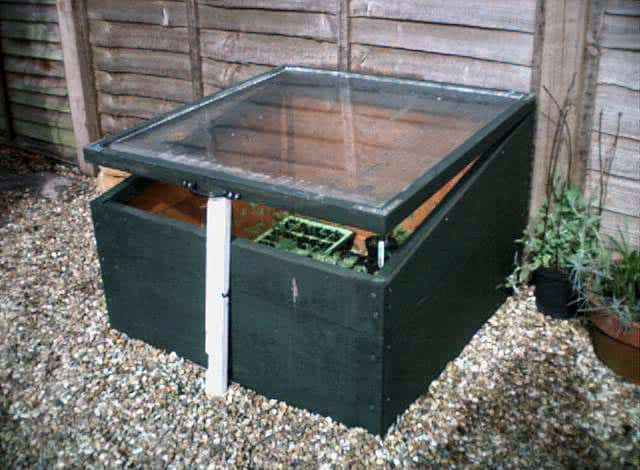
Cold Frame
Cold frames are a transparent roofed enclosure or a structural cover for a garden that protects plants from rain, snow, wind, or excessively low temperatures.
It functions like a miniature greenhouse that is built close to the ground. Its appearance resembles a bottomless box with a skylight that can be opened. Cold frames are also considered to be the simplest and cheapest form of greenhouses.
It can be undertaken as a weekend “do it yourself” project using old and new materials such as scrap wood, pallets and wold window. And since, it can be made with any material, its cost is manageable as it can either be cheap or practically free.
One major disadvantage of using cold frames is that it can sometimes cause overheating once exposed to the sun with closed windows. Overheating can result to damaged plants. Also, depending on the type of material employed, DIY cold frames can sometimes be less durable and prone to damage.
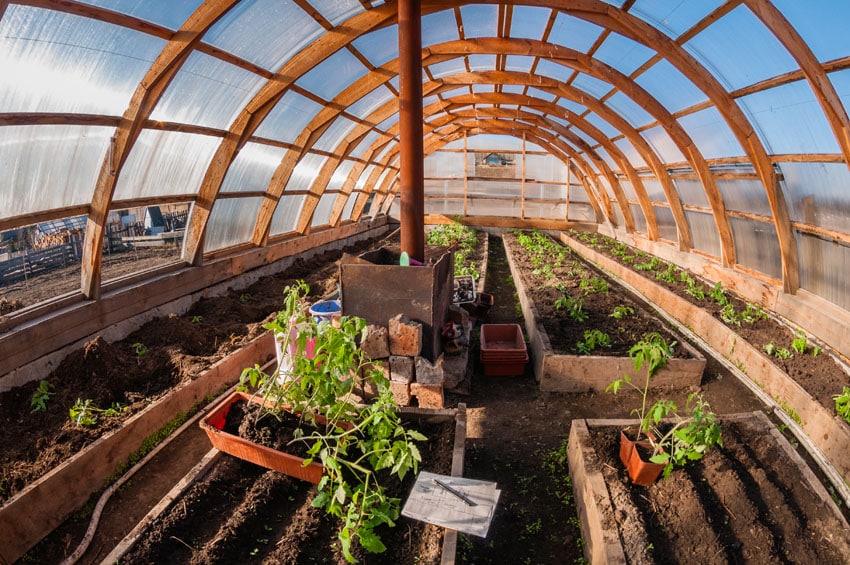
Hoop House
A hoop house got its name from its shape which is like a semicircular structure. Hoop houses are typically made up of aluminum pipes or PVC plastic pipes which are bent and covered with a single layer of greenhouse fabric or polymer plastic covering.
A second layer of fabric or plastic covering is added for better insulation. The hoop or dome-shaped roof allows rainwater to flow downwards and snow to shed from the exterior.
One of the primary advantages of a hoop house is that it is easy to build and can be used even in limited spaces.
Hoop houses are also considered one of the most inexpensive options for greenhouses with their average price amounting to as low as $1 per square foot. However, compared to an A-frame or post and rafter greenhouse, the hoop house is less sturdy.
Lean to Greenhouse
Lean to greenhouses, also known as attached greenhouses, is a type of nursery that is attached to an existing exterior wall of a house.
This is traditionally built at the back of the home, however it can also be placed on the sides, depending on the existing site conditions and the orientation of the house.

One drawback of lean-to greenhouses is that since it is attached to an exterior wall of the house, temperature control can be quite challenging. Exterior walls are built to collect the sun’s heat, while the nursery wall windows may not be able to contain the heat.
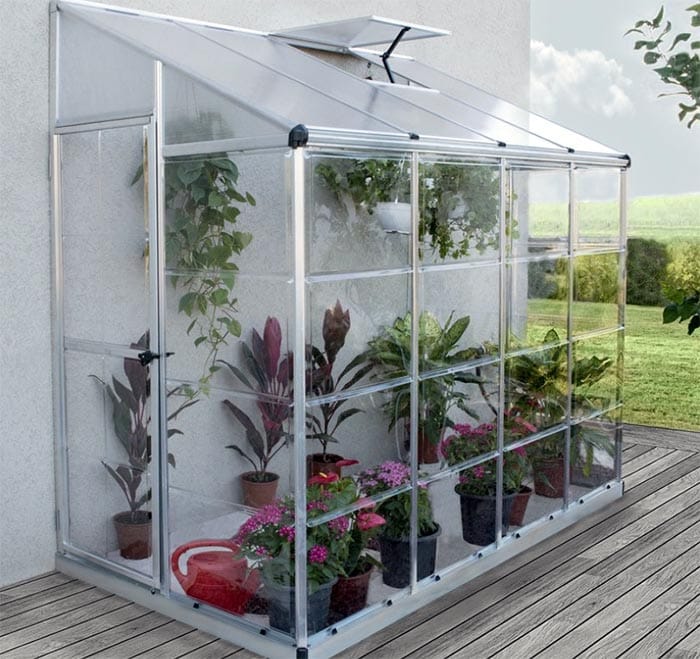
This small lean to nursery can be easily attached to any existing exterior wall in your house. The compact size of this ready-made nursery allows for growing a wide variety of vegetables without taking too much space.
It has a rust-resistant aluminum frame and sturdy polycarbonate panels that can withstand harsh weather. Its modern design also allows it to harmoniously blend with the aesthetics of contemporary themed houses.
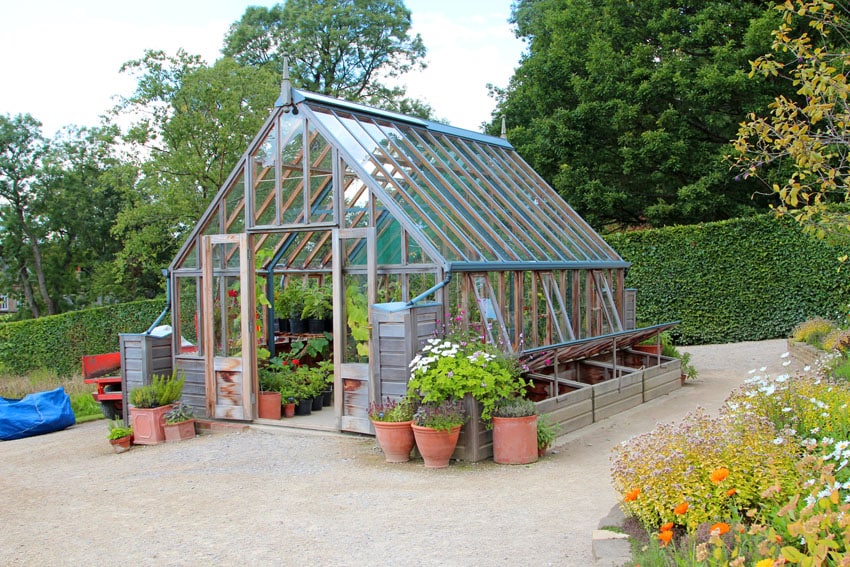
Greenhouse Shed
A nursery shed, also known as a potting shed or a solar shed is a multipurpose structure that serves as storage for garden tools and supplies, while at the same time providing a place for potting plants.
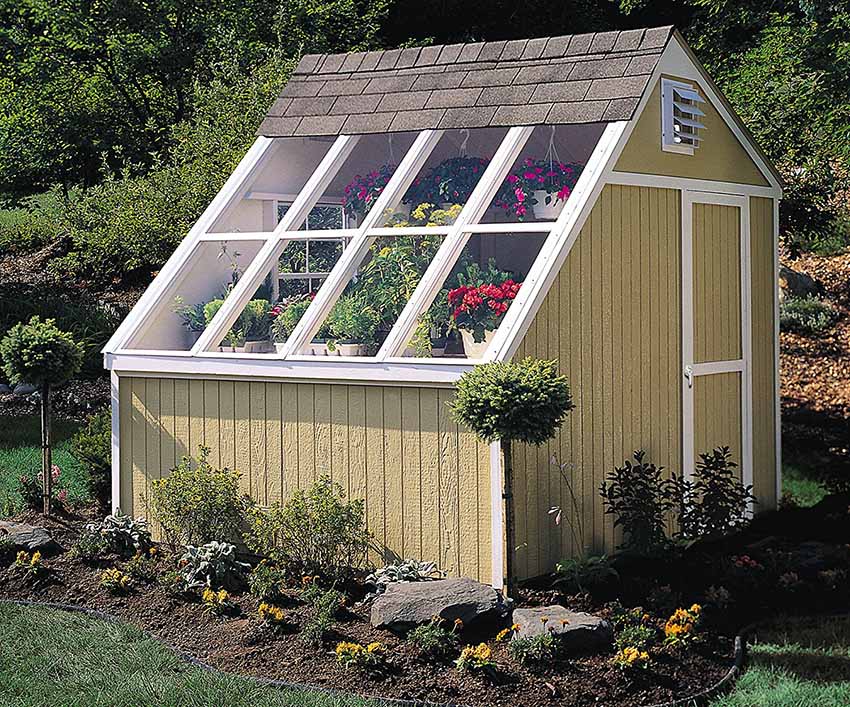
Greenhouse sheds are designed in as such a way that one side of the structure allows an adequate amount of sunlight in. Typically, it looks like any small, pitched roofed building but with one side filled with windows. Other nursery shed designs employ two different materials for each side – with one side covered in glazing while the other half covered with solid siding panels.
One major advantage of nursery sheds is that it allows you to maximize any limited space by serving dual functions. However, this can also pose as a problem for some homeowners as the area can get cluttered if not maintained well.
Compared to a regular nurserywhich is mainly used for growing plants, a nursery shed shares the space with other tools. So if you want to grow a large variety of plants, this might not be the right option. But if you have a limited space within your yard and do not have the luxury to build two separate structures for your nursery and shed, then this might be the best design you can explore.
This type of nursery design also present some disadvantages. The lack of light, proper ventilation and effective temperature control are some of the issues that one may encounter with nursery sheds.
Since only a part is covered in glazing or windows, there is a low amount of light which enters the structure, compared to a regular nursery design. This can be quite problematic especially during the cold days of winter.
Build Your Own Greenhouse
Although greenhouses may look complicated and hard to build, they can be easily made at home using simple materials. Along with careful planning and proper installation, a simple basic nursery can be accomplished in two o three days, provided you are favored with good weather.
For this specific “how to” , we will be helping you to build your very own hoop house. A hoop house is one of the simplest nursery designs that can be built without the help of a professional installer.
The materials are cheap and can be bought in local home improvement stores. This specific PVC hoop house is 12 feet by 24 feet, giving you a large space to hold plenty of plants within your garden.
If you have limited space in your home, you can adjust the size of the hoops and frames based on the available area in your backyard.
Materials you’ll need
- For the base frame:
6 pieces of 2” x 6” x 12” lumber
2 pieces of 2”x 4” lumber
- For the reinforcing bar hoop anchors:
26 pieces of 10mm or ½” thick x 2 feet long reinforcing steel or rebars (cut from 10 foot pieces to save on costs, precut steel are more expensive)
Galvanized screws (3 inches)
- For the door frames:
5 pieces of 2”x 4”x 8’ lumbers
2 pieces of 50 lbs bags of concrete
- For the doors:
Hinges
Makeshift door (using four corner braces)
- For the ridges:
2 pieces of 4”x 4”x 8’ lumber
3 pieces of 2”x 6”x 8’ lumber
2 x 6 framing brackets
3 pieces of 50 lbs bags of concrete
- For the end walls:
10 pieces 2”x4”x6’ lumber
Galvanized screws
Galvanized nails
- For the hoops:
13 pieces 20 ft ¾” PVC pipes
Metal straps
- For the covering:
Galvanized roofing nails
Plastic sheet/roll
Lathe strips
Shade cloth
- For the soil or flooring:
Top soil
Peat moss
Compost
Potting soil
Tools to use
Measuring tape
Pencil
Level
Hammer
Screwdriver or electric drill
Circular saw
Shovel
Wheelbarrow
Trowel
Rake
Other gardening tools
Video on How to Build a Small Nursery
Prior to Building Your Nursery
- Choose a location. The ideal location for greenhouses is one that receives direct sunlight for at least 6 hours per day. Typically, greenhouses are built with a southern orientation and exposure. Also, the location must be leveled or at least, can be leveled.
2. Learn about the existing climate in your region. Climate is a significant factor when it comes to growing plants. Since you are creating an artificial environment for your plants to ron in all year round, it is important to know the existing environmental conditions in your area.
In cold regions, you will be needing insulating materials and a heating system, while in hot regions, you will be needing shade. But generally, temperature control is needed to ensure the healthy growth of your plants.
3. Take note of ventilation, air circulation, temperature control, pest control, water supply and heating systems.
4. Make sure that there is an existing supply of electricity and water. Electricity and water are essential to make your nursery work. They are used for heating systems, lighting and other design features. Proximity to water and electricity supply will ensure the effectivity of your nursery.
5. Check if the area is well drained. Drainage is important because it prevents the soil from being too saturated and prevents diseases from spreading to your plants. If the soil is too moist, it becomes a breeding ground for algae and other pests and insects.
6. Choose the type of structure you want to build. Decide on whether you want to use a ready-made nursery kit or if you prefer to build from scratch. This will also help you determine the budget you need to prepare for your project, the type of labor your will be requiring and the materials you will be using.
7. If using wood for your nursery frames, make sure to choose the right type of species. Use pressure-treated wood or a type of wood species that is naturally resilient when wet.
Cedar is an example of a water resistant and insect resistant wood as it contains natural oils that allow it to withstand rot, decay, molds and termites. If using pressure treated pine, leave it outside in the rain for a few weeks before building your nursery.
8. Determine the size of your nursery. Measure the area where you will be putting your nursery. Use wooden stakes to mark the ground with the length and the width of the nursery.
9. Prep the ground. If using the natural soil as the base layer, till the ground and remove any unwanted plants that are growing. A landscaping fabric may be used to create a barrier for weeds. If using one, layer the top of the fabric with soil.
Steps in Building Your Own Greenhouse
1.Building the base
-Connect two pieces of of 2x6x12 wood using a 2×4 wood, to create a single length of 24 feet. Make two of these, one for both sides.
-Using the boards, form a rectangle in your preferred nursery site. The sizes of the sides must be 24 feet long while the top and bottom members are 12 inches wide (using the 2x6x12 lumbers).
-Check if the boards are perfectly aligned with each other. Start by putting the right side to the top frame, then put the left side and finish off with the bottom board. The top and bottom boards must be inside the long sides (left and right boards) .
You may use temporary wood stakes on the outside of the frame to make sure that the base is perfectly squared.
-Join each board using 3 inch screws.
-Double check the alignment and adjust if needed.
2.Building the rebar hoop anchors
-Clamp the bars together and cut them into 24 inches or 2 feet long pieces using a reciprocating saw with a metal cutting blade.
– Using a hammer, pound the rebars at least ⅛” away from the side of the bottom boards. Make sure that they are placed at 2 feet intervals. The gap is needed so that there is room for the hoop to slide on.
3.Building the door frames
-Build a door that is 3 feet wide by 8 feet tall using the 2x4x8 lumber pieces. Use one as the header, two for the sides and leave the bottom open.
-Find the location of your door in the bottom boards of your rectangular frame. Mark using a pencil. This will also be the location of the ties for the door frame studs.
-Plant the door firmly into the post holes.
-Attach the studs to the bottom boards of your rectangular frame using an electric drill and galvanized screws.
-Mix concrete according to instructions.
-Pour concrete into the post holes and let it cure for 24 to 48 hours.
4.Building the ridge
The ridge or the center posts are recommended to reinforce the strength and durability of your nursery against strong winds. This will also make the plastic covering last longer.
-Dig post holes 8 feet deep. measure from where the edges of the door are.
-Locate the position of the center ridges. It has to be 8 foot away from the door and 6 feet away from the sides. Attach framing brackets for the center ridges, one on each door frame, two on each post.
-Place the 4x4x8 lumbers into the post holes.
-Prepare the concrete according to the instructions. Pour over the post holes and allow to cure for 24 to 48 hours.
5.Adding the soil
-Add the topsoil (ask your supplier to estimate the amount needed), then on top of it, add some peat moss, compost and potting soil. Combine this mixture evenly.
6.Building the hoops
-Place a piece of PVC pipe over a rebar and plant it at least an inch deep into the soil. Pull the other end over the ridges and plant it over the rebar located at the other side. Make sure that the hoops are firmly planted onto the ground.
-Repeat the same process for all 13 pieces of hoops.
-Secure the hoops to the center ridges using metal straps.
-Check the alignment of the hoops, adjust if needed.
-Tighten the screws of the straps to make sure that the hoops do not move.
-Fasten the top of the hoop and the metal straps together with duct tape to reinforce strength.
7.Building the end walls (or the walls beside the door frames)
-Cut four small wood blocks and attach them to the bottom border of the frame (near the door). Fasten it near the corner, just beside the first rebar hoop and make sure that they are tightly fit together.
-Do the same step for the other end of the bottom border.
-Fasten the hoop going over the end wall and the top of the door frame using straps and screws.
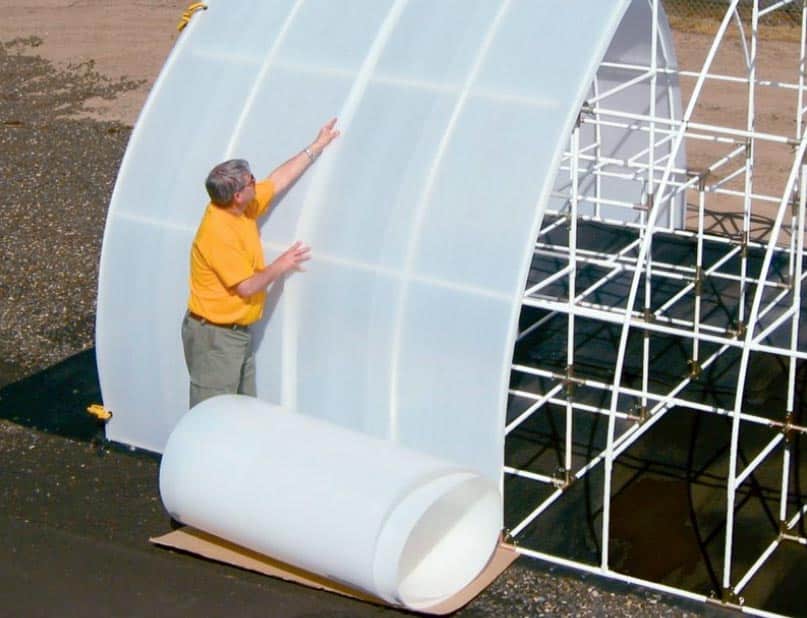
8.Attaching the covering
Laying the nursery covering requires an additional help and do it on a warm day to allow the plastic to stretch.Prior to installation, roll it over a flat surface and allow it to stretch under the sun.
-Lay the plastic sheet or film over the nursery and secure one side to the bottom frame using lathe strips.
-Stretch the plastic film and secure the other side tightly to the bottom frame using lathe strips.
-Do the same thing for the door header and the wall sidings beside the door, just make sure to exclude the door opening. Secure with lathe strips.
-Make sure that the plastic sheet is tightly placed to avoid sagging in the future.
-Once tightly in place, you can now permanently fasten the plastic sheet to the studs and the bottom frame using galvanized nails.
-Attach the shade cloth or landscaping felt inside the structure. Fasten them to the hoops using zip ties. The shade cloth will help control the heat and temperature inside the hoop house.
9.Add the door
-Assemble a simple yet sturdy four braces door using lumber.
-Attach the hinged to the door and mark your door studs for the location of the hinges accordingly
-Attach the door and check if it swings properly. Check for alignment.
-Cover the door frame with the same plastic sheet used as the nursery cover. Attach with lathe strips and secure tightly with nails.
-Add a simple lock, latch or handle, depending on your preference.
10.Start planting.
-Start planting your crops according to their specific requirement.

Greenhouse Materials
There are a wide variety of materials which once can use to build a nursery. Generally, a nursery has two main parts : the frame and the covering. The covering consists of the roofing and siding of the greenhouse.
Common Materials for Nursery Frames:
Wood Greenhouse Frames – Wood is a popular material for nursery framing because it is widely available. Its abundant supply, easy assembly and highly customizable feature make it the ideal material for DIY nursery projects.
It is also well-loved because of the distinct natural beauty it possesses. This material also works well with insulation. However, some homeowners find this impractical because wood is naturally prone to warping and rotting.
Greenhouses, constantly exposed to moisture and dampness, require a resilient material even when wet. Unless you are using a pressure-treated wood or a species that is inherently water resistant, then your nursery frame can easily get damaged.
If using wood for greenhouses, make sure to go with cedar or redwood as these are the proven species that can withstand outdoor use. Although they cost more, these types of wood contain natural oils, which make them inherently resistant to insects, rot, molds and mildew.
Alternatively, pressure-treated pine can also be used, ensuring they are properly sealed.
Galvanized Steel Greenhouse Frames – galvanized steel is a type of metal that is made up of steel or iron, covered with a zinc coating to prevent rusting. It is one of the most affordable and practical materials for a nursery roofing.
Because of its high durability, a galvanized steel nursery needs less framing members. Lesser framing means lesser shadows projected into the nursery, thus ensuring a more well lighted space. Consequently, this also results to fewer materials needed to build and lesser costs.
Typically, galvanized steel nursery framing are used with polyethylene film. However, one of its major drawbacks is that the zinc eventually wears off and will also rust after some time.
Aluminum Greenhouse Frames – Aluminum is a type of metal that is known for its durability. Aluminum is low maintenance and unlike other metals, it does not rust or get easily damaged when exposed to harsh elements.
It can hold up to harsh outdoor elements like rain and sun exposure but can break down in the event of extreme weather conditions such as high winds and heavy snowfall. However, when it comes to strength, it needs to be reinforced, doubled or increased in size as it cannot hold too much weight.
Aluminum works best with glass or polycarbonate siding, giving it a rigid form. It can either be painted, anodized or powder coated to achieve the particular look you desire for your nursery.
Alternatively, more heavy duty type of metal like steel can also work as a nursery frame material, but this is more expensive and the weight can be an issue because it is heavy to lift and harder to handle than aluminum.
The downside of using aluminum for your nursery frame is that it has poor insulation properties. Unlike PVC, aluminum cannot maintain heat well, thus allowing it to escape from your greenhouse.
PVC or Polyvinyl chloride Greenhouse Frames – PVC is a type of lightweight material that is affordable and easy to assemble. Although not as resilient as metal and mood, PVC can withstand exposure to elements like insects, molds, mildews and they do not rot, decay or warp.
The advantage of using PVC for nursery framing is that it limits heat loss thus keeping the temperature controlled and your nursery well insulated. In addition to that, they usually have a lifespan of 20 years.
PVC greenhouse frames are also suitable for large greenhouses. It is also commonly used for hoop houses as it is flexible and easy to work with. One of its forms, the PVC pipe is usually used for DIY greenhouses as this materials does not require the skills of a professional when it comes to installation.
Compared to wood and metal, PVC nursery frames are also cheaper. However, one of the biggest drawbacks of using PVC plastic nursery frames is that they deteriorate under the sunlight. This problem can be addressed by using UV protection to ensure that your greenhouse lasts long. It can also lack in strength and will not be able to stand up to heavy rains and strong winds.
Plastic Greenhouse Frames – An alternative to traditional materials like wood and metal, plastic is another popular choice for nursery frames. Just like PVC, plastic is durable, but when it comes to continuous exposure to the sun, it has the tendency to warp, expand and contract.
Although this will take several years to create an impact on your nursery, address the issue beforehand by applying a light colored resin base to prevent warping and extend the lifespan of your greenhouse.
Common Materials for Nursery Covering :
Glass Greenhouse Covering – Glass is the most traditional covering material used for greenhouses. Old greenhouses were commonly made up of hundreds of glass panels with metal or wooden frames. This material allows for good transmission of sunlight, keeping your plants adequately lighted.
However, one of the advantages of using glass for nursery coverings is that they are not good insulators. Aside from that, upkeep is also a potential issue as glass is difficult to replace once broken.
Its cost is also one potential drawback as it is more expensive compared to other covering materials. The price of annealed and tempered glass for greenhouses usually range $6 to $8,50 per square foot with a thickness of 3/16 inch to ¼ inch.
When using glass as a nursery covering, a sturdy structural system is needed to support the weight of the roof and the sidings. With proper construction and maintenance, a glass greenhouse can last for a minimum of 30 years.
Fiberglass Greenhouse Covering – Fiberglass is almost similar to glass when it comes to letting the sunlight into your nursery, but it terms of durability, it does not break easily. A nursery covering made up of fiberglass allows more light when the sun is located at lower angles because less light is reflected.
Fiberglass usually comes in transparent or clear and translucent forms. Typically, it comes with a 10 years warranty from suppliers. Over time, fiberglass panels discolor into a yellowish form and sometimes structurally fail by deteriorating on the top and exposing the fibers to the surface. The exposed fibers usually cause dirt to get trapped and require to be rewashed and resealed to prevent them from blocking the sunlight from entering the nursery.
On average, fiberglass nursery covers cost $72 per 4×8 foot rigid corrugated panel, while flexible fiberglass rolls usually cost $335 per 4×50 foot roll.
Vinyl Greenhouse Covering – Vinyl is usually used as coverings for greenhouses with a clear and exposed look. They work perfectly well if you want to give your guests a glimpse of what’s inside the nursery without entering the structure. Unlike other materials, vinyl should only be used on the ends of the nursery and not for the roof.
Clear vinyl nursery sidings typically have a 4-year lifespan and usually cost $130 for a 16-millimeter thick 54-inch by 50 feet roll.
Acrylic Greenhouse Covering – Acrylic or “plexi glass” is made up of polymers of acrylic. It is commonly found in skylights and is used in other architectural and building applications. Acrylic also works as a material for nursery covering since they are strong and can withstand exposure to snow, and can stand up to the impact of strong winds and hail storms.
Typically, acrylic greenhouses can last for 20 years and are effective materials for greenhouses since they can reduce heating costs for up to 30%. Installation-wise, they require a specific type of attachment so that they do not expand and contract once exposed to outdoor elements.
Compared to other materials, acrylic is expensive but is a wise investment in the long run. Single-layer acrylic panels typically cost $90 per panel, while double acrylic panels cost more at $108 per sheet for a size of 8 millimeters thick, 41 inches x 8-foot sheet. The difference is that, twin acrylic panels have an airspace in between, which allows for insulation.
Other types of acrylic panels used as nursery coverings are triple acrylic panels, quad acrylic panels, nondrip acrylic panels, and UV-blocking acrylic panels.
Polycarbonate Greenhouse Covering – Polycarbonate is a type of synthetic material that is made up of thermoplastic polymers. Just like plastic, this material is lightweight yet considered to be strong and durable.
Polycarbonate sheets usually undergo a UV treatment to make them more resilient for outdoor use.This ensures that the material does not discolor into a yellowish hue and will not deteriorate even when exposed to excessive sun. UV-treated polycarbonate coverings are guaranteed to last for 10 years.
Polycarbonate usually comes in two forms, namely sheets and rolls, with thicknesses that vary from 0.03 inch to ½ inch. The average polycarbonate rigid panels cost $51 for a 6-millimeter thick 4 feet by 8 feet panel. A corrugated polycarbonate panel is $4.70 per linear foot for a single wall construction. Polycarbonate rolls or flexible sheeting usually cost $6 per linear foot.
Polyethylene Plastic Greenhouse Covering – Polyethylene is the least expensive nursery cover. It comes in two forms: polyethylene plastic films and polyethylene plastic panels. This type of material is guaranteed to last for 10 years.
Polyethylene nursery panels usually have a twin-wall construction. The air space in between allows for improved insulation. The average price of polyethylene panels are $6 per foot for 3 millimeter thick flexible rolls.
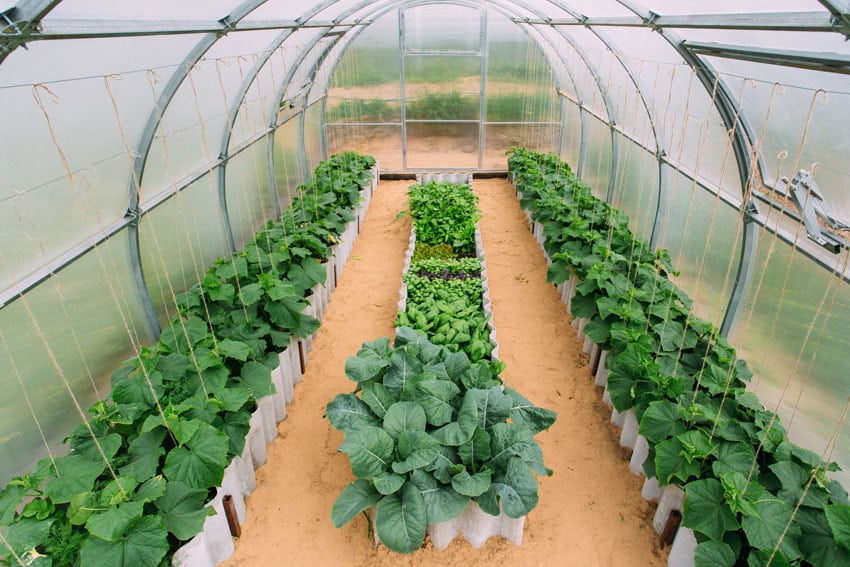
Keeping an opening on the roof will allow adequate air and natural light to pass through, without the need for artificial sources.
Greenhouse Panels
Nursery panels are used to cover the perimeter and the proofing of greenhouses. This is commonly used for permanent structures. The most common type of nursery panel is the polycarbonate panel.
Polycarbonate is a type of rigid panel that is made up of plastic that is almost as transparent as glass. Polycarbonate nursery panels are available in single-layer or double-wall thicknesses. It is easy to install and can be cut into different sizes.
Nursery panels usually have air pockets between the walls, acting as an insulation system. And since this material is transparent, light transmission is also efficient.
Nursery panels usually come in thicknesses that range from 4 millimeters, 6 millimeters and 8 millimeters. The standard sheet size for greenhouse panels are 4 feet by 8 feet.
Greenhouse Fabrics
Nursery fabrics are used to cover the roof, sidings and frames of a nursery. Unlike greenhouse panels, nursery fabrics do not last as long and are ideal for temporary or semi permanent structures.
A specialized type of fabric, known as the nursery shade cloth, comprises knitted polyethylene fabric. This type of fabric is not susceptible to mold, mildews and rotting and will not become brittle over time. This shade fabric helps protect plants from direct sunlight while offering maximum ventilation and effective insulation.
Another advantage of nursery shade cloths is that they diffuse the sunlight better and reflect heat well, keeping the greenhouse temperature cooler. This type of fabric is also easy to install and usually comes in a prefabricated form to lessen the amount of time and effort for installation.
Nursery Lighting
One of the significant components of a nursery is the lighting. Lights are essential for the food-making process, otherwise known as photosynthesis. When plants re exposed to adequate light, they grow more healthily and produce food sufficiently.
One way to introduce lights into a nursery environment is through “grow lights”. Grow lights are primarily used for cultivating plants without adequate sunlight.
There are different types of grow lights and each one varies depending on the need of your plant. By nature, plants respond differently to each light color. Blue and red lights give out the most impact for photosynthesis.
Blue light or cool light, is ideal if you want to promote a compact and bushy growth.
Red lights or warm lights encourage the formation of blooms by triggering plant hormones.
Orange or reddish grow lights also give off warmth and produce heat that the plants need to grow.
Cost-wise, the most inexpensive grow lights amount to $30 per piece.
There are different types of grow lights in the market, namely incandescent lights, fluorescent lights, T5 fluorescent lights, HID or high-intensity discharge lights, and LED lights. Incandescent lights are characterized by the heat and high temperature that they give off.
Since they can get quite hot, it is advisable that incandescent grow lights as placed at least 2 feet away from the plants. This grow light also comes in a color-corrected form which are ideal for a small group of plants.
Fluorescent lights are the most common choice of grow lights for homeowners. This is energy efficient and emits a blue light that encourages bushy growth. Fluorescent grow lights are safe to be placed near seedlings as they give off a cool temperature.
Another fluorescent grow light is T5 light, a thin tubular piece of lighting fixture. They have an increased light output compared to regular fluorescent lights but are more energy efficient. This type of grow light can be placed near the plants as the leaves absorbs them well.
HID or high-intensity discharge lights are commonly used for commercial applications and large greenhouses. This type of grow lights can cover a wide area because of their high output. Because of the high heat that they emit, they are not recommended to be placed near plants as they have the tendency to burn the leaves. It comes in two types, metal halide and high-pressure sodium lights.
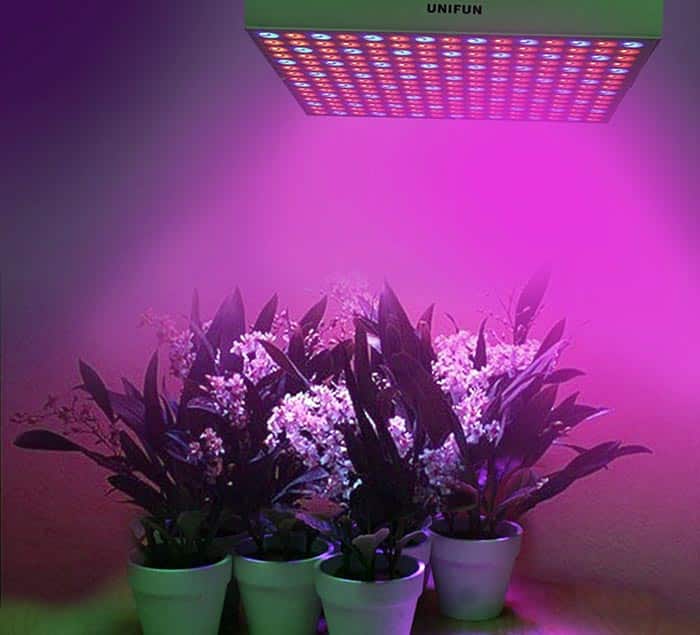
LED lights, are the newest form of grow lights used for greenhouses. Although small and compact, LED grow lights emit an adequate amount of light that has the perfect balance of red and blue lights. It produces just the right temperature that plants need to grow well. LED grow lights are practical, easy to mount, and lightweight.
When choosing the right type of artificial lighting for your nursery, consider the amount of natural sunlight the location receives. Some regions have longer days, while others have shorter ones.
Supplemental lighting is needed for those with less daylight to ensure that your plants receive ample lighting despite the existing environmental conditions. Grow lights are also necessary to continue cultivating your plants all year round, even during the winter.
Greenhouse Sprayer
Nursery sprayers distribute water, chemicals, and pesticides to plants. Three basic types of sprayers are used for chemical application in greenhouses: high-volume hydraulic sprayers, targeted low-volume sprayers, and ultra-low-volume sprayers.
High-volume hydraulic sprayers is the standard type of nursery sprayer that has been used for years. This is considered the most effective way to treat a huge problem with pests as it works well with general applications.
The advantage of hydraulic nursery sprayers is that they do not overwet the plants, as the application is controlled and is distributed well in fine droplets. Hydraulic nursery sprayers are available in different gun and nozzle types which render different flow rates, patterns and amounts of pressure.
Targeted low-volume sprayers are known for their flexibility and better coverage. This type of nursery sprayer is between a hydraulic sprayer and an aerosol fogger. Targeted low-volume sprayers disperse chemicals at a liter-per-minute flow rate.
Unlike hydraulic sprayers used for general application, targeted low-volume sprayers are usually directed to their specific target. Its primary purpose is spot treatments as it directly focuses on a problem area.
This nursery sprayer also disperses chemicals more quickly than a standard hydraulic sprayer. Targeted low-volume equipment includes electrostatic sprayers, mist blowers, rotary disc atomizers and high-pressure cold foggers. Each type is designed for a specific crop as it propels the right particle size needed by each plant.
Ultra-low-volume chemical applications are commonly known as “foggers”. This type of nursery sprayer distributes a small amount of water, about 2 liters for every 10,000 square feet. The droplets it releases are also smaller, thus, it is ideal to be used in enclosed spaces to contain the solution within the structure. Foggers use jet propulsions as the source of their air.
Several factors must be considered to determine which type of sprayer is the most suitable for your nursery. First is the type of crop, the structure, and the environment. Vegetables and other edible crops are more suitable for a ULV approach because of their flexibility and the shorter time required to apply the pesticides.
Greenhouse Heating System
A heating system is required in greenhouses because they control the temperature that the plants require to grow well. Nursery heating systems typically use fuel oil, wood chips, logs, coal, kerosene, and natural gas.
Nursery heating systems can be divided into central and localized heating systems. Central heating systems usually comprise a hot water or steam boiler with a pipe system in a central location.
This heating system is typically used for commercial and large greenhouses because they are more expensive. They are considered to be a large investment and have large capacities. Localized or forced air heaters are gas-fired heating systems or furnaces. This type of nursery heating system is versatile and can be used as a starting investment for your nursery.
Central heating systems such as central boiler use a large volume of water heated to 120 degrees Fahrenheit to 180 degrees Fahrenheit. The water is then distributed through the use of pipes.
On the other hand, steam systems use a small broiler. There is also less plumbing and no circulating pumps in the system. Unlike With the central boiler, using a steam system makes it more difficult to control the steam flow into the nursery.
Several ways may be used to distribute the steam or hot water to the nursery. These methods are pipe or rail heating distribution, under-bench heating distribution, in-floor heating distribution, overhead heating distribution, and perimeter heating distribution.
When choosing the right heating system for your nursery, consider the following factors: the type of crops you are growing and the size of your nursery. Firstly, the type of crop along with the outdoor temperature of your greenhouse’s location, will help you determine the amount of heating you need.
Lettuce, for example, needs a cool environment, while basil, on the other hand, needs a warmer environment. The size of your nursery also plays an important role. You will need a heating system that is proportional to the size of your nursery, whether it may be small or big.
Fuel efficiency is another consideration that must be considered since heating systems usually use fuel, and fuel can be quite expensive. Make sure to get one that will burn the fuel efficiently and cleanly.
Greenhouse Cover
As discussed earlier, several materials can be used as a covering for greenhouses. These materials range from glass, fiberglass, acrylic, vinyl and polyethylene. Alternatively, you can also use a plastic sheet as a covering material.
The ” greenhouse plastic ” is the most cost-efficient and affordable nursery cover available in the market is the “greenhouse plastic”. Nursery plastic is a durable type of plastic that is used as an alternative to large glass frames.
Unlike regular plastic, nursery plastic resists tearing and can withstand constant weather changes. This type of plastic is knitted rather than being just formed into sheets. The application of nursery plastic is that it is usually wrapped around the frame. It is flexible and works well with various nursery designs, sizes and shapes.
Nursery plastic is commonly made up of four different types of plastics. Unlike other materials, they can also last for two to three years. These four types of plastic are; polyethylene plastic, co-polymer plastic, polyvinyl plastic and polycarbonate plastic.
Polyethylene nursery plastic is the lowest grade of nursery cover with one to two years of lifespan. It comes in two grades, the commercial grade which is used for industrial applications and the utility grade, which is utilized for personal and home use. This type of nursery cover is repairable.
Copolymer plastic, is a type of nursery cover that is a grade above polyethylene. Compared to the former, copolymer plastic is more durable and has an extended lifespan of up to three years. But they share the same drawbacks as both become too brittle and weak when exposed to freezing and then subjected to thawing. Some copolymer plastics also have an appearance that resembles glass.
The polyvinyl plastic cover is a grade higher than polyethylene and copolymer plastic. Relatively more expensive but is also more durable and has a lifespan of five years, provided that it is regularly maintained and properly cleaned.
On the other hand, polycarbonate plastic is the most durable of the four types of nursery covers. It has the longest lifespan, which lasts for up to ten years. This type of nursery cover, comes with good insulation properties as it can maintain heat and humidity well.
Indoor Greenhouse
Indoor greenhouses are temporary structures which allow for growing plants within the confines of the home. An indoor plant house is designed in such a way that it can be easily be set up or taken down,as needed. This type of plant house is perfect for beginners and for those who want to start with a small nursery and eventually expand into a bigger one.
Indoor greenhouses are usually sold in kits. It can either be a shelving kit, a tabletop unit or a small freestanding unit. Old furniture like benches and tables can also be used for this purpose, as it can also save you some money.
When looking for indoor greenhouses, choose something which is lightweight, quick to install and easy to disassemble. Plastic plant house kits can also be considered as these are easy to clean and maintain compared to other materials. Most indoor greenhouses feature a vinyl covering to help keep the humidity, heat and moisture within the structure.
The ideal location for indoor greenhouses is near a sunny window or an area that receives at least 6 hours of direct sunlight. The ideal orientation for the indoor plant house is to face the west or the south.
However, if you desire to place your indoor plant houseon another area, you can always use grow lights to aid you with the light supply. Grow lights may be purchased at a low affordable price in local home improvement stores and gardening supply centers.
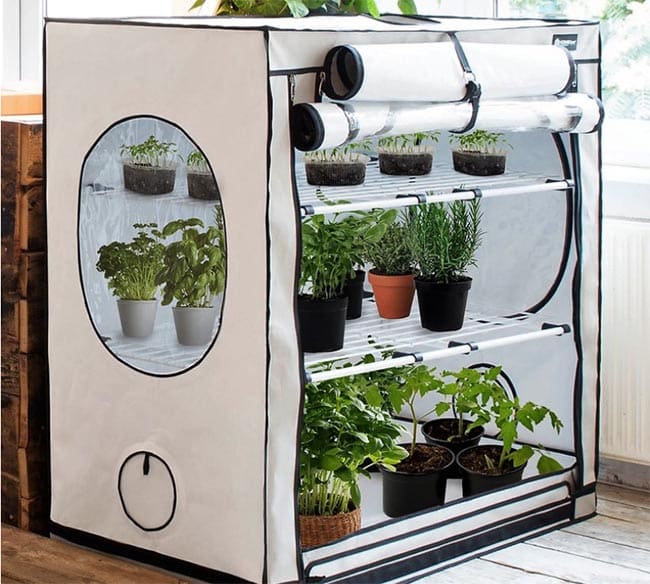
This ready-made plant house is perfect for indoor use and can be placed in any area as its size is just like any standard furniture piece. It is made up of a steel frame and a white reflective lining that distributes heat evenly to plants.
It also comes with adjustable shelves which provide flexibility in terms of growing different plants variants. This type of indoor plant house is perfect for growing herbs and vegetables near the kitchen, as it gives you an easy and quick access to the crops you need.
Related Garden & Landscaping Galleries You May Like:
Window Flower Boxes – Flower Box Ideas – Fence Planter Designs – Vertical Garden Ideas
To showcase highly specific designs, some images on this website use advanced AI-generation software to illustrate ideas and room inspiration. See our editorial policy to learn more.

Upload a photo and get instant before-and-after room designs.
No design experience needed — join 2.39 million+ happy users.
👉 Try the AI design tool now