Designing a walk-in closet in an 8×10 ft space is all about proper planning to ensure you have a proper balance between a stylish and functional floor plan. In this guide we share seven 8×10 walk-in closet layouts that offer a variety of different setups you can use. Whatever is most important to you, from maximizing clothing storage, to a built-in vanity, his-and-hers organization, or having a central island, we’ll share below. Each design is tailored to optimize the space to give you a closet you’ll enjoy using every day.
This U-shaped walk-in with dual hanging rods on all sides offers three rows of 14 to 18-inch-deep storage that works as a high-capacity closet for easy clothing accessibility.
Easily Create Your Own Room Makeover
Upload a photo and get instant before-and-after room designs. No design experience needed — join 2.39 million+ happy users. 👉 Try the AI design tool now
Floor Plan Details: The u-shape is an effective design with hanging sections wrapping the left, back, and right walls. The uninterrupted U shape lets you stand in the center and scan every item without moving a step. Each run is framed with a 14 in-deep upper rod and an 18 in-deep lower rod, and are staggered so garments nest neatly. An overhead shelf, the blue line, sits directly above the top rod on all three walls. The blue square inside shows a clear aisle clearance measuring 4 ft-wide x 5 ft-deep (1.2 m × 1.5 m) standing zone. That exceeds the 36 in minimum recommended for walk-in closets, so clothing won’t brush your shoulders as you turn around or try things on. The entry is centered on the bottom wall, giving a straight sight-line to the back wall and letting natural light (or a fixture) bounce into the corners.
Why It Works:
It maximizes clothing hanging space on three walls.
Clothes can easily be sorted by type.
You still get a comfortable aisle in the center for movement, with room for a pull-out bench or ottoman.
Design Tips:
Use matching slim-profile velvet hangers. This can shave an extra inch off garment depth, keeping the 4′ aisle comfortable even when the closet is full.
Label each wall by clothing type. For example, left = weekday outfits, back = formal wear, right = casual, so the U naturally guides your morning routine.
Install low-glare LED strip lighting. This should be placed under the overhead shelf on all three sides to eliminate dark corners and make colors read true.
Turn the blind corners into valet hooks. Use short rods that are set perpendicular to the main runs, so you can stage tomorrow’s outfit without stealing rod space.
Pick a light, reflective floor finish. The plan shows something akin to pale oak to bounce light upward and make the enclosure feel larger.
Use the top shelf for off-season storage. The top shelf, measuring 12–14 in deep, caps each wall, and is perfect for off-season bins and hat boxes while hiding the rod hardware for a tidier look.
L-Shaped Closet Floor Plan with Shoe Tower
This L-shaped closet floor plan concentrates storage using double-rod hanging along one wall and an 18-inch shoe tower near the door for high-capacity organization while offering a five-foot central aisle for stress-free dressing.
Floor Plan Details: The L-shape design starts with a 2 ft-wide section on the left fitted with open shelving for shoes or folded sweaters, bags, or boxes. This 18 in-deep shoe tower offers five to six adjustable shelves, enough for 20-25 pairs without intruding into the aisle. On the upper side, two consecutive 4 ft-wide segments of double-hanging rods (upper rod mounted at 66 in, lower rod at 40 in) gives 8 linear ft of high-capacity garment space. A clear rectangle aisle in the center measures 5 ft front-to-back × the full 6 ft door-to-tower width, exceeding the 36 in minimum clearance so you can pivot, or dress comfortably. For the entry, a standard 30–32 in swing (or pocket door) preserves the continuous L layout without blocking movement.
Why It Works:
You cluster storage on two walls, giving plenty of floor space to move around.
A dedicated shoe tower contains footwear in one organized space.
Easy “grab-and-go” flow. Enter, pick your shoes on the left, slide to the right for clothes, step back to the mirror, with no back-tracking required.
No visual clutter on multiple sides.
Design Tips:
Face the shoe tower with draw-in lighting: a low-profile LED strip under each shelf shows heel labels and coordinates your different pairs.
Use a mirror door. Reflections double the perceived depth of the 5 ft aisle.
Install a motion-sensor kick light under the bottom shelf of the tower. It acts as a night-light and prevents toe stubs during early-morning wardrobe raids.
Use pull-out acrylic bins. Place these on the 2 ft shelving section for hats or scarves; that shallow width prevents forgotten “dead corners.”
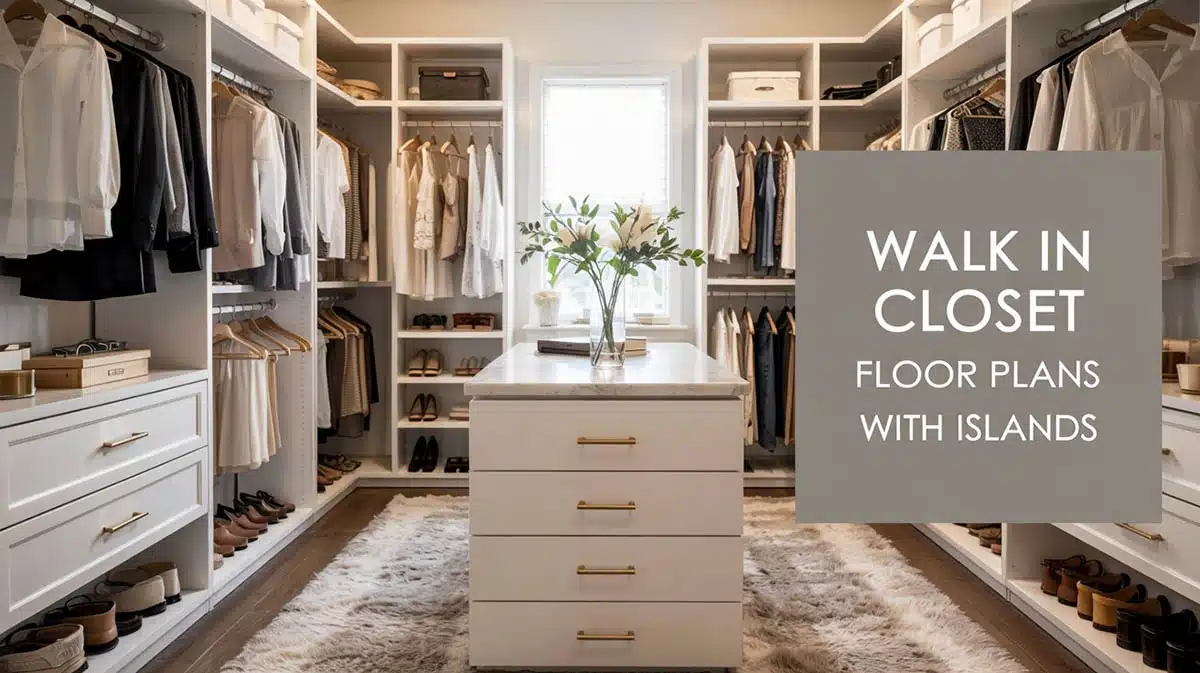
Closet With Center Island Layout And Hanging Rods
By using a skinny 12×47-inch island, one can turn a 8 × 10 walk-in closet into a boutique-style dressing room, all while preserving the 24- to 37-inch clearances you need for circulation and access to clothing.
Floor Plan Details: Since an 8×10 closet is too tight for full-depth hanging rods on both sides plus an island, this plan optimizes space by placing all hanging rods on one side and using the other side for shallow shelving or drawers. For storage zones there are 10 ft of double hanging on the right wall. Clothes project 22 in into the room, leaving a 24 in clear aisle between garments and the island. On the left side is a built-in base cabinet + continuous 12 in-deep overhead shelf. There are no rods here, so bulkier folded items, handbags, or hat boxes stay can be dust-free.
The island measures 12 in W × 47 in L, and has three shallow drawers or pull-out trays with a 1 in overhang all round. Overall, the closet’s aisle circulation provides 37 in aisle on the left (island ➜ shelf), giving comfortable shoulder-room for dressing. There is 24 in aisle on the right (island ➜ hanging) that meet the minimum “reach-in, step-back” clearance when clothes are on hangers. The front & rear clearance is 37 in at both ends of the island so you can pivot or open drawers without blocking the doorway. The door is centered on the short wall; a 30 in swing or pocket door keeps the island unobstructed.
Why It Works:
Keeps the walkway spacious with at least 24 inches per side.
Uses one side for deep hanging storage and the other for shallower shelves.
Has an open feel that is inviting.
Design Tips:
Go slim on the island. A 12 in-wide island feels more like a boutique display table than heavy casework, while the long 47 in top is perfect for folding shirts or setting a travel bag.
Balance the asymmetry. Because the right side is visually “busier,” finish the left shelf wall in a contrasting light colorto even out the look.
Add a flip-up valet rod. Install it on the left wall near the door so tomorrow’s outfit can be staged without stealing island space.
His and Hers Closet Division Design
This symmetrical walk-in closet design offers twin 4′ 9″ hanging bays, and a shallow dresser turns a single galley into a harmonious his-and-hers dressing suite that feels generous and stays organized for each’s needs.
Floor Plan Details: This shared closet’s upper zone is split into two equal 4′ 9″ bays. Each bay is 24 in deep with its own double-hanging rod and a continuous overhead shelf 2 ft above the rods. This arrangement gives each partner equal linear footage for short garments while keeping long pieces possible by removing the lower rod on one side if desired. Sliding mirrored doors run the entire width and a center stile marks the “his”/“hers” divide. These mirrors help reflect light, visually double the room, and let partners dress without moving to get in front of the same mirror. For the dresser/storage console on the lower zone, a built-in 10 in-deep bank runs along the entry wall. This allows drawer faces to sit flush with wall framing to avoid door swing clashes. It can be used to hold folded knits, under-garments, and accessories, and its shallow depth keeps the aisle roomy. In the center sits the dressing aisle with 39 in of clear space between the dresser front and the mirrored doors, ample room for two people to move.
Why It Works:
It simplifies dividing storage between couples so each person has their own racks, shelves, and possibly drawers.
The symmetrical layout is easy to keep organized and find items.
Design Tips:
Color-code interiors. For example use a charcoal back panel for “his,” blush linen for “hers”, so the mirrored doors reveal a subtle identity when slid open.
Add soft-close full-extension drawers. Install these in the dresser so they pull completely clear of the 39 in aisle without feeling cramped.
Use motion-activated LED tape. Place the strips atop the shelf washes light down the clothes and acts as night-lighting when one partner rises early.
Use adjustable rods. If seasonal wardrobes differ, install adjustable rod brackets so either side can convert to single-high hanging for coats or dresses.
Use tall mirrors. Tall mirrored door panels (floor to ceiling) eliminate a visual break and allow each partner to check full outfits simultaneously.
Closet With Back Wall Focal Point Design
A centered dresser-bench flanked by twin double-hang rods turns an 8 × 10 closet into a mini dressing gallery with a back accent wall that steals the show.
Floor Plan Details: As you enter this closet you’ll see that the side walls are each fitted with full-length double-hanging rods, plus a continuous overhead shelf, leaving a generous center aisle. As you head deeper into the space you’ll notice the back wall composition is made with a 4 ft dresser/bench. The dresser/bench is roughly 18 to 20 in deep × 48 in wide, and is ample for six drawers or a cushioned seat with pull-out storage below. The open aisle is a full 4 ft wide all the way to the back wall, widening visually at the bench to create a gallery-like “runway” that two people can share.
Why It Works:
Instant focal point. Your eyes are drawn to the back wall, where you can highlight different wall colors, paneling, or a mirror.
The “corridor” setup ensures you have storage along the sides but keeps the center clear.
The centered dresser/bench gives purpose to the back wall.
Makes a great closet for a master bedroom due to its visual symmetry, double hanging space, and functionality.
Design Tips:
Turn the bench into a statement piece. Think fluted oak drawer fronts with a plush upholstered top in a favorite accent color.
Hang a mirror, paint or use artwork above the bench. The 4-ft width frames it perfectly and bounces light back down the aisle.
Install linear LED strips. Put them beneath the overhead shelves on both sides so they glow evenly.
Hide the hamper. Sneak in hidden laundry pull-outs behind the bench drawer fronts to keep hampers off the floor and out of sight.
Closet with Floor-to-Ceiling Shelving and Central Hanging Section
With a pair of 16-inch-deep floor-to-ceiling shelving on both sides and a hanging section in back, this closet turns into a bright, boutique-style dressing room that stores everything without sacrificing a roomy center aisle.
Floor Plan Details: As you enter this closet layout, you’ll see that both the left and right runs are 16 inches deep, with floor-to-ceiling shelves. These are ideal for folded clothes, handbags, hat boxes, or labelled bins, and since they’re shallower than hanging depth, they don’t crowd the aisle. Along the back wall the entire 8-ft span is fitted with double hanging rods and a continuous overhead shelf, giving a clear “gallery” of garments in one sweep. The dressing room style aisle of the central corridor remains a full 4 ft wide front-to-back, easily accommodating two people or a rolling hamper.
Why It Works:
Perfect if you have lots of folded items or prefer bins or cubbies.
You still retain a decent amount of hanging space without sacrificing the aisle.
Zoned storage. Long items in the back, folded items, and accessories on the flanks keep categories visually separated and easy to grab.
Maximum vertical yield. Full-height shelving squeezes every inch out of an 8-ft ceiling.
Easy upgrades. If your wardrobe grows, the side shelves accept pull-out baskets, drawers, or even a shoe cubby without costly changes.
Design Tips:
Use adjustable shelves. Adjustable shelf pins every 2 in so you can fine-tune heights for boots, bags, or sweaters.
Matching fabric bins. Place them on the topmost shelves to hide visual clutter and draw the eye upward, making the closet feel taller.
Mirror the inside face of the door. This can reflect the hanging display and bounce light throughout the space.
Closet with Built-In Vanity Nook Layout
A 5-foot built-in vanity in the the back wall turns this walk-in closet into a personal dressing lounge with double-hanging capacity and a large center aisle that makes day-to-day use effortless.
Floor Plan Details: This design features a built-in vanity nook in the back for applying makeup or grooming. The right 5 ft of the back is fitted with a built-in vanity counter with 17 in deep knee-space underneath. The entire left wall stretching all the way, is devoted to the 10 ft run of double-hanging rods, plus a continuous overhead shelf. The right side has a 14 in-deep floor-to-ceiling shelf tower along the full length. The middle circulation zone is an aisle between the rod fronts (22 in projection) and shelf face (14 in) for a 60 in (5 ft) wide corridor.
Why It Works:
You combine a dressing/makeup zone in the back with wardrobe storage.
This design feels extra luxurious and makes getting ready in the morning more convenient.
Design Tips:
Studio-quality lighting. Mount vertical LEDs on both sides of the vanity mirror and add a dimmable can-light overhead to help prevent harsh cross-shadows.
Low-profile stool on casters. These tuck completely under the counter so the full 5-ft aisle stays clear when not in use.
Mirror inside the entry door. to bounce light and give a full-length view.
Color contrast. Paint or lacquer the vanity and shelf tower in a light tone to reflect light, while using a warm neutral to showcase garments.
General Closet Space-Saving & Organization Tips
Walkway Clearance: Aim for 24 to 30 inches of free space for aisle clearances.
Depth of Rods/Shelves: The typical rod depth is 24 inches and shelves range from 12 to 16 inches.
Vertical Storage: Use overhead shelves and place bins or baskets on them for off-season clothes or lesser-used accessories.
Lighting: ensure there is adequate lighting (LED strips, recessed lights, or a center fixture), which makes a big difference for usability.
Mirrors: If you can’t fit a freestanding mirror, a mirrored door or mirrored panel on a cabinet face or door is a space-efficient alternative.
For more illustrations like this, check out our 7ft x 10ft closets here.
To showcase highly specific designs, some images on this website use advanced AI-generation software to illustrate ideas and room inspiration. See our editorial policy to learn more.
You may think a 25-square-foot closet can’t feel luxurious, well think again. One can design a well-planned 5×5 walk-in that uses double-hanging rods, shoe towers,…
A well-planned closet space can alleviate a lot of the frustration while searching for clothing in the early morning hours. This is especially true when…
Creating an efficient yet stylish walk-in closet is all about using intelligent storage solutions. Whether you have a compact space or more generous dimensions, design…