7×7 Bathroom Layouts With a Shower That Feel Spacious & Inviting

A 7×7 bathroom provides 49 square feet, which exceeds most people’s initial expectations but falls short of what most people anticipate. Since the room is a perfect square with 84 inches along each wall, its shape will not work against you. The main factor in determining the overall arrangement is the position of the shower and the wall the door is built into. The five plans mentioned below all use the same square dimensions and include the same three features: a shower, a toilet with a zone measuring 30 by 48 inches, and a vanity, the only difference being the geometry used. If you move the shower from the back corner to the side wall, the walking path changes, and the way the room seems sized when you first open the door also changes. All the measurements given on the plans are real and not merely decorative. The shower sizes range from 30 inches by 48 inches to 36 inches by 42 inches, and the door is 30 inches in each case. Use these measurements to check your space before you decide to have anything installed.
48-Inch Shower Across the Back Right Side Layout
Placing the shower in the back right corner leaves the central area of the room open, which gives the room a larger and more open feel.
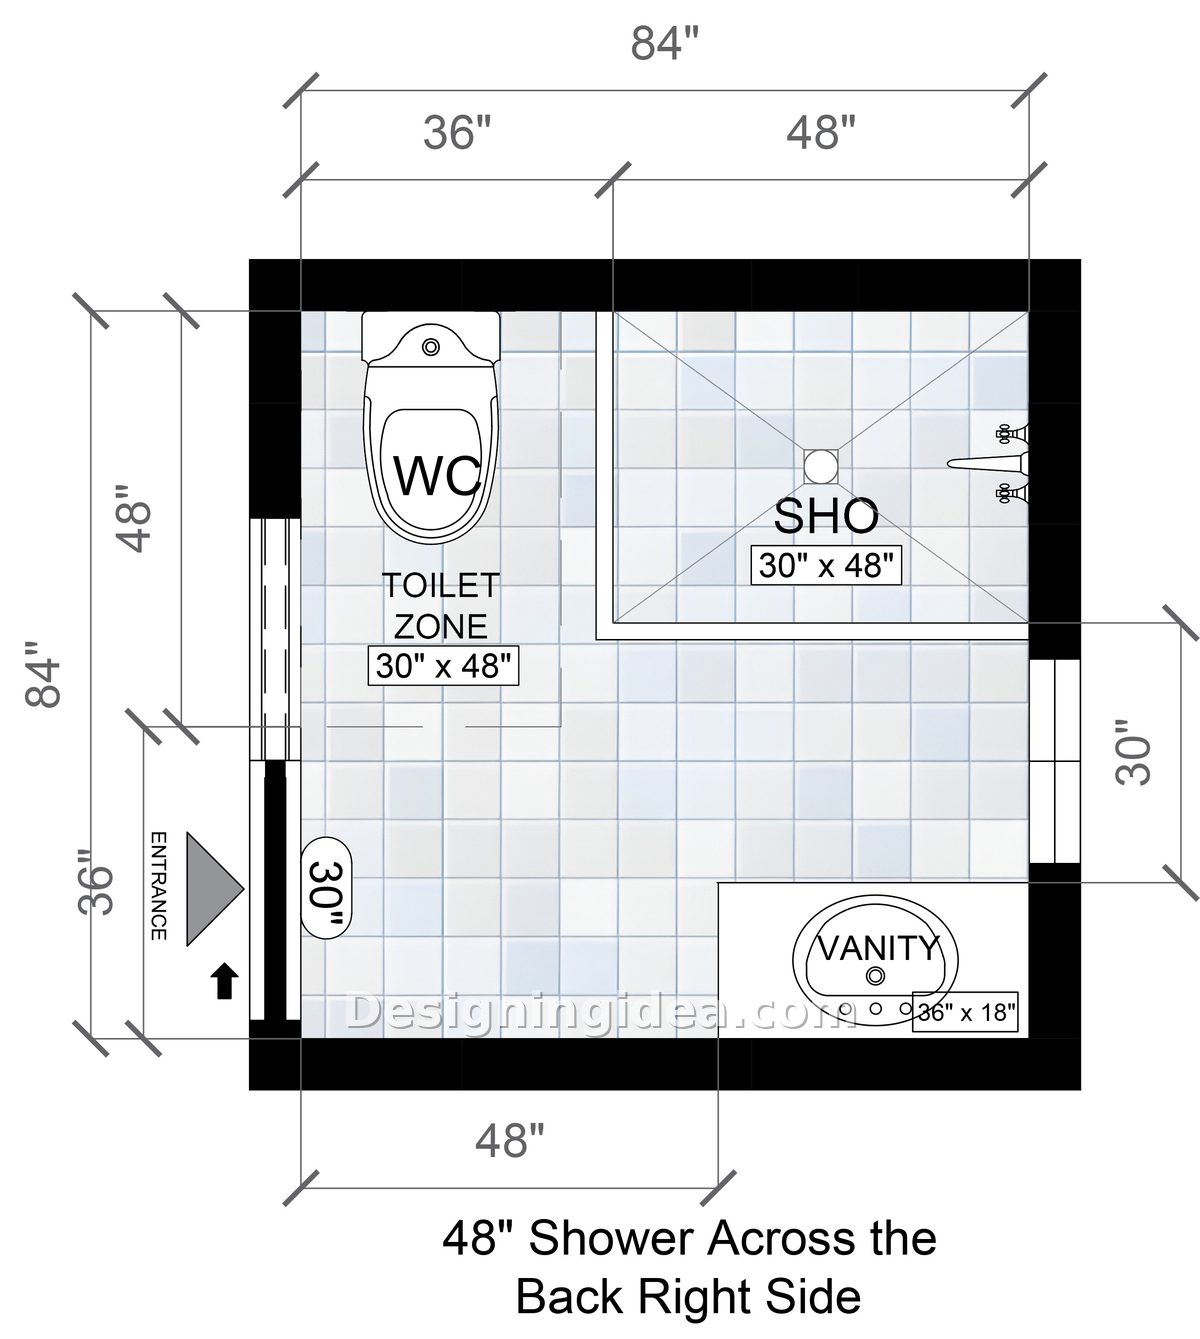
For this plan, the shower and toilet have the back wall divided, with 36 inches allocated for the toilet and 48 inches for the shower. That is a neat arrangement. Both numbers sit inside the usual range, and it helps to know how shower sizes actually measure up before you lock in the stall. Since both of the wet areas are situated against the same plumbing wall, it usually results in a lower rough-in cost and requires less demolition when carrying out a renovation rather than a new build.
The vanity is situated in the bottom right corner near the window, and it’s that feature which causes this arrangement to be effective. When you enter from the left, the first thing you see is the open floor rather than a sink. The 30 inch entry section swings into the clear central area without colliding with anything.
The result is that the bath is quite shallow, measuring 36 by 18, so it isn’t suitable for deep drawers. Instead, you end up with counter space rather than storage space. This is generally the appropriate compromise for a guest bathroom or a bathroom for a child.
Dimensions:
- Room: 84″ x 84″
- Shower: 30″ x 48″
- Toilet zone: 30″ x 48″
- Vanity: 36″ x 18″
- Door: 30″
Design Tips:
- Install a clear glass panel in the shower rather than a framed door so that you can see the entire 84-inch section of the back wall.
- Include a recessed niche in the common wall which is between the shower and the toilet since you are already providing space for the plumbing.
- Suspend a mirror that is wide enough to cover the window trim that is above the vanity so that the two features appear as a single unit.
Back Corner Shower With Toilet Beside It Floor Plan
This design features the smallest shower most people will put up with daily: a 36 by 36 square foot stall, but you get a more usable vanity and open space.
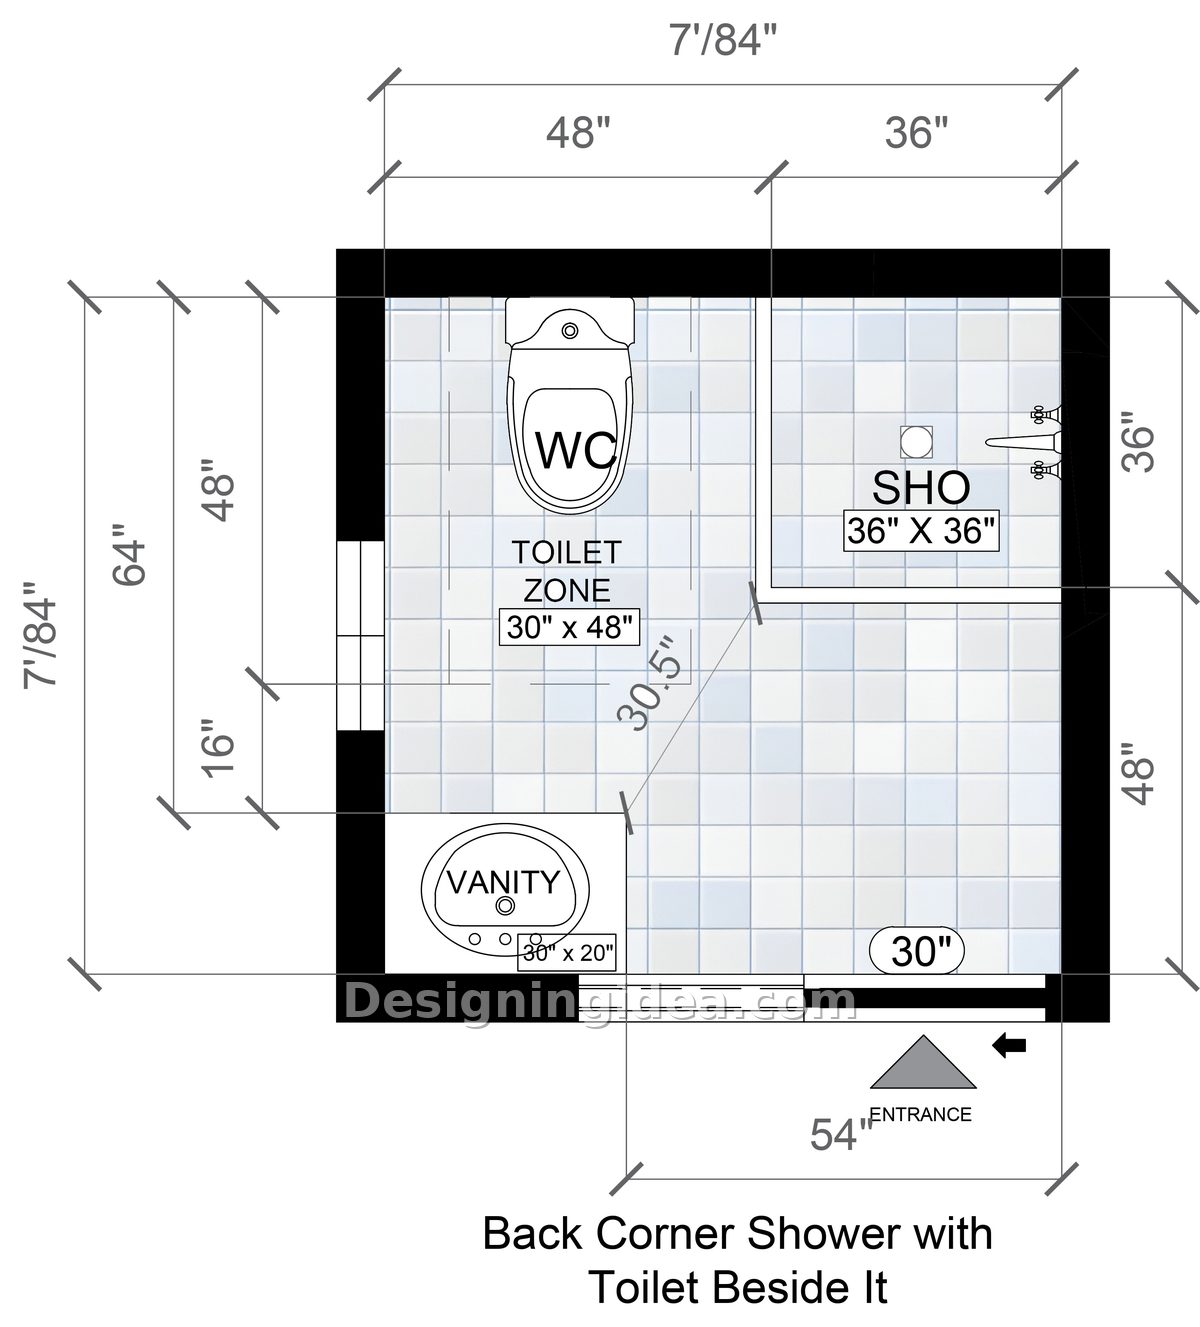
The plan reduces the shower to a square size of 36 inches and uses the money saved to enlarge the vanity, which then measures 30 inches by 20 inches in depth. Twenty inches is the depth at which a vanity ceases to be merely a shelf and begins to hold items. So if your issue is storage, then this is the plan for you. Corner stalls turn up in a lot of small baths, so it’s worth comparing more corner shower arrangements before you commit to one.
The diagonal clearance line in the drawing is worth examining again; it is 30.5 inches long when measured from the vanity corner to the shower corner, which is the narrowest part of the room. While this space is still sufficient for comfortable passage, it will seem tight if you install a bulky vanity with a projecting countertop. If that pinch point worries you, it’s worth seeing what a 6×6 square gives up before you decide 7 feet is too tight.
Entry is situated on the right-hand side of the lower wall, which means that when you go in, you face the open central area with the shower in front of you and on your right. The toilet is positioned at the top left corner and is out of sight from the door. It’s a small point, but one that becomes important when the door is open and someone is walking by.
Dimensions:
- Room: 84″ x 84″ (7 feet square)
- Shower: 36″ x 36″
- Toilet zone: 30″ x 48″
- Vanity: 30″ x 20″
- Diagonal clearance at pinch point: 30.5″
- Door: 30″
Design Tips:
- Choose a vanity that has a flat front and lacks a projecting edge, since the diagonal pinch point offers no extra room.
- A shower bench in the corner takes up space within a 36 inch square; if you’d like a place to sit, use a fold-down teak seat instead.
- Paint only the part of the walls within the shower area with tiles and paint the remainder. This prevents the small stall from looking as though it were a tiled box.
Larger 42-Inch Shower With Vanity Near Entry Design
Replacing a few inches of floor space with a 36 by 42 shower has a greater effect on the daily experience than any of the other changes you can make in this room.
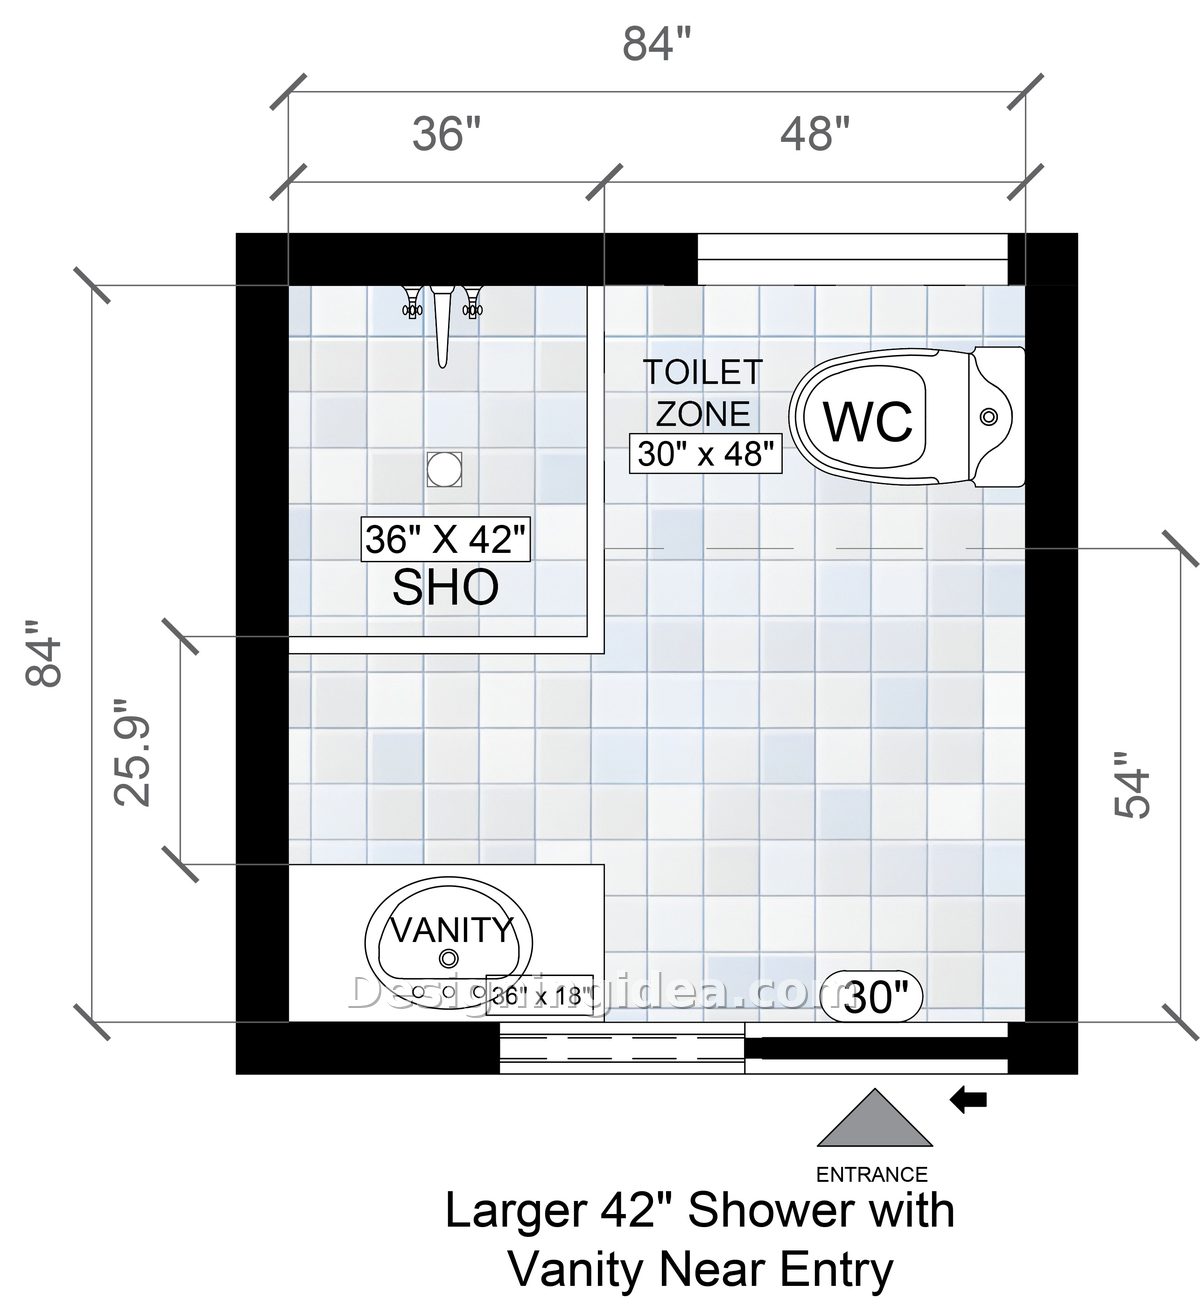
This shower measures 36 by 42, which seems to be a small improvement on one that is 36 inches by 36 inches. In reality, it makes no difference whether you have to turn around carefully or simply turn around; six extra inches in a shower is a great deal.
The shower and toilet take up the upper wall, divided between 36 and 48. The vanity is situated at the bottom left and is separated from the shower by a clear wall space of 25.9 inches; this is the smallest gap in the plan and although it is possible to walk through it, it is too narrow to allow for a linen tower or a hamper. Narrow gaps like this are the whole story in a smaller room, which is what makes fitting a walk-in into 5 by 7 such a different problem.
You enter at the bottom right and the vanity is immediately to your left. Some people like that, since you can wash your hands and leave without crossing the room. Others find it crowded at the door. Worth picturing yourself doing it before you build it.
Dimensions:
- Room: 84″ x 84″
- Shower: 36″ x 42″
- Toilet zone: 30″ x 48″
- Vanity: 36″ x 18″
- Clearance between vanity and shower: 25.9″
- Door: 30″
Design Tips:
- Fix the vanity by mounting it on the wall with the floor lying underneath. In a room of this size, it is the fact of seeing the floor extend that prevents the entrance from seeming crowded.
- On the 42 inch side, skip the hinged shower door and opt for a fixed panel with a walk-in entrance.
- Place the light switch on the wall that is opposite the vanity so that when it’s dark you don’t have to reach over the sink.
Neo-Angle Shower Layout Ideas
The front face of a neo-angle stall cuts off the corner of the shower and reclaims more of the floor space in the room.
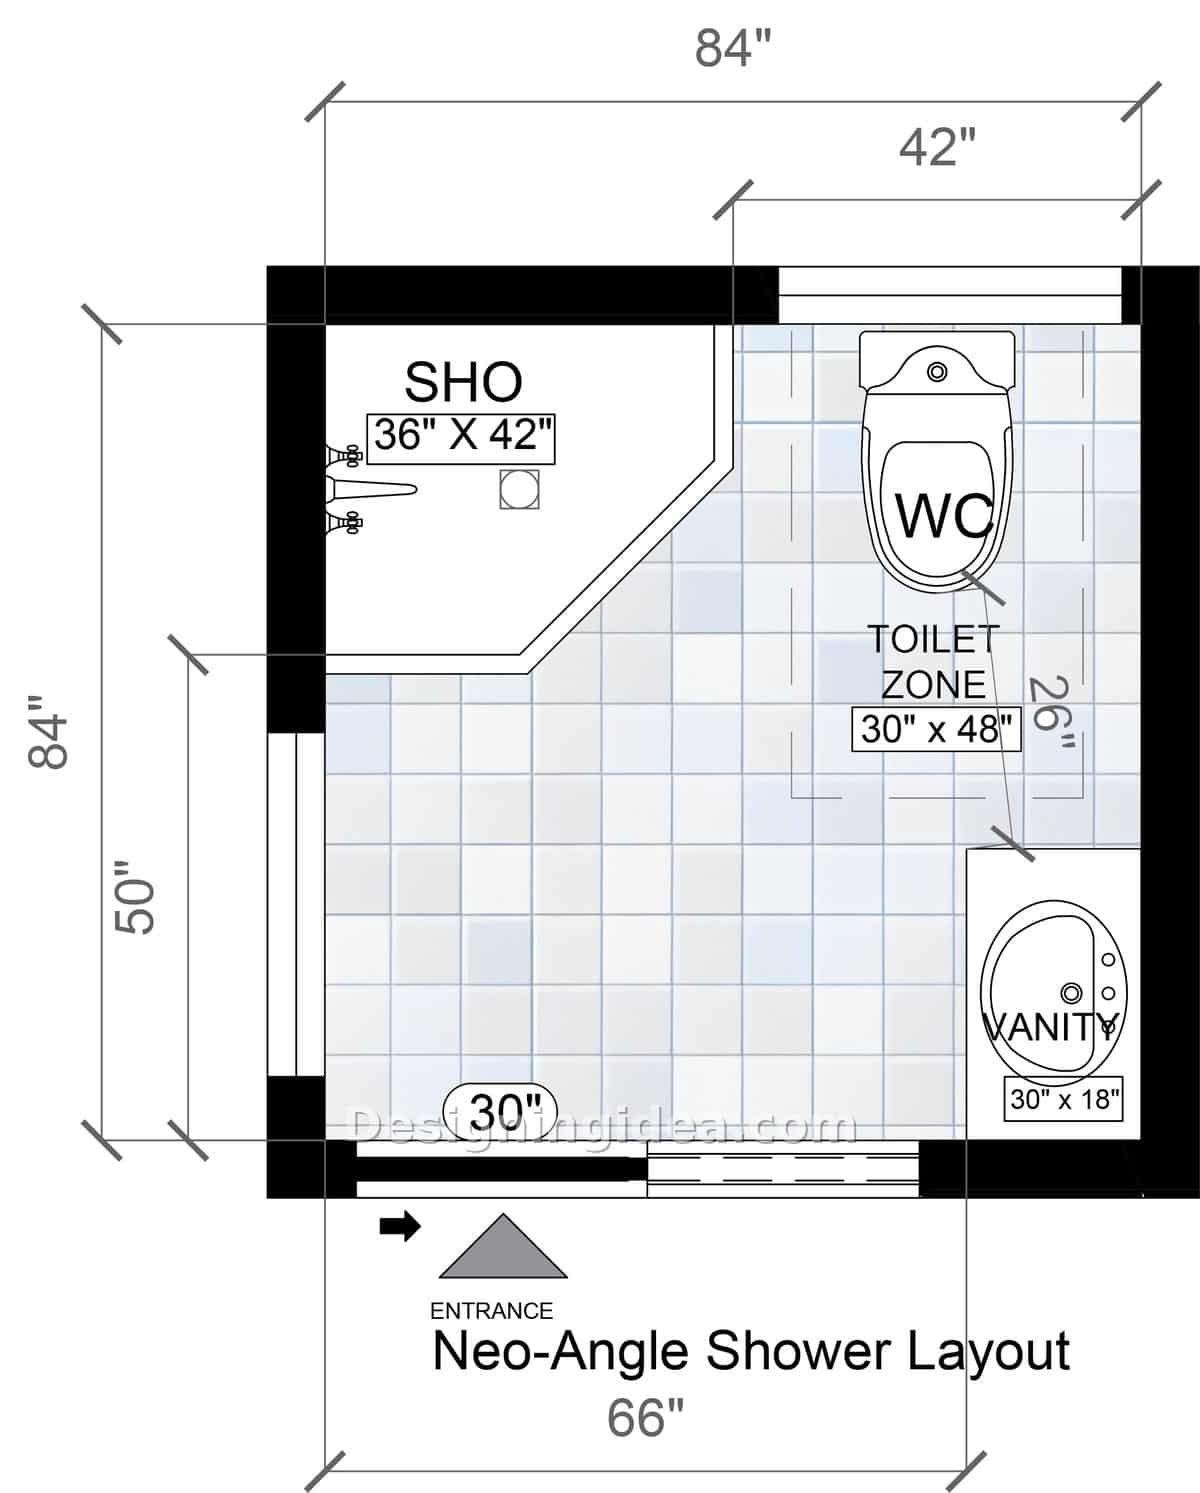
Neo-angle showers are often ignored since they appear rather complicated when looked at on paper; in a square room they do look smart. The area measuring 36 by 42 is placed in the top left corner, but because of the truncated diagonal front you never have to walk around a hard 90 degree corner each time you go across the room.
The toilet is in the top right corner with a standard dimension of 30 by 48, and the vanity extends along the right wall measuring 30 by 18. This arrangement places the two most frequently used items on the same side, thus reducing the distance you have to travel from the door to the sink. Since you enter from the bottom left, the diagonal shower wall is right in front of you and leads you into the room rather than blocking your way.
A fair warning is that neo-angle enclosures are more expensive than standard rectangular ones and the glass is generally made to measure. In the case of a tight budget, this is the first thing to give up.
Dimensions:
- Room: 84″ x 84″
- Shower: 36″ x 42″ with angled front
- Toilet zone: 30″ x 48″
- Vanity: 30″ x 18″
- Door: 30″
Design Tips:
- Leave the shower glass without a frame and without tint to enlarge the space visually. If it has a neo-angle design with heavy framing, it will look like three separate walls rather than one continuous wall.
- Put the shower head in the middle of the back corner, not in the angled panel, or the water jet will hit the glass door each time.
- Use the wall next to the vanity for a narrow cabinet that extends from floor to ceiling, since the angled shower leaves that section of the wall unusually unobstructed.
Side-Wall Shower With Toilet Opposite Floor Plan
Giving the top wall a split at 42 inches for each side ensures that the shower and the toilet each have the same amount of space, and this symmetry has a visually appealing result.
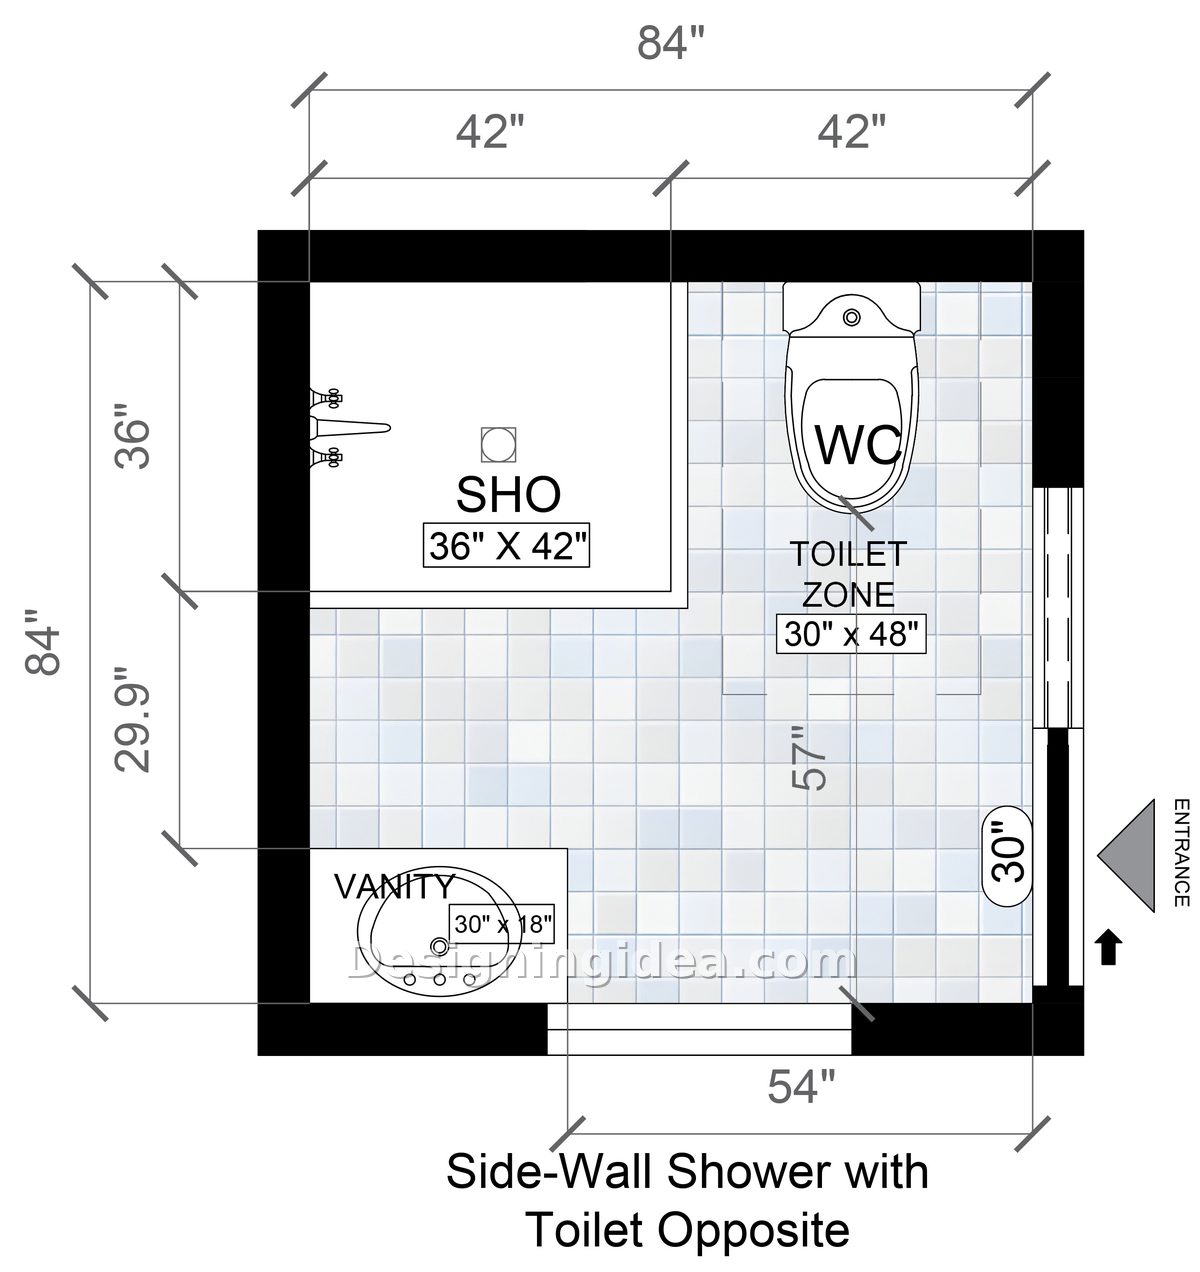
Of the five plans I offer, this is the most balanced one; the upper wall is divided equally between 42 and 42, there being a 36 by 42 shower on the left and the toilet area on the right, and nothing is packed in too tightly nor is there any space that is left over which is not required.
In this case, the door is positioned against the right wall, and that is the actual difference; when you enter from the side, you end up facing the vanity and the open floor rather than a piece of furniture. There is 57 inches of clear space between the toilet area and the vanity, making it the widest walking space in the entire setup. It’s also the closest any of these plans gets to the turning space in a square bathroom that mobility planning asks for.
The vanity is reduced to 30 by 18 in order for the arrangement to work, which means you end up with a compact sink. This arrangement gives up some storage space in order to improve the flow of the room. When a bathroom is used by more than one person in the morning, this approach is usually the better one.
Dimensions:
-
-
- Room: 84″ x 84″
- Shower: 36″ x 42″
- Toilet zone: 30″ x 48″
- Vanity: 30″ x 18″
- Clear walking path: 57″
- Door: 30″
-
Design Tips:
- Use an outswing door or a pocket door on the right wall so that the 30 inch swing won’t interfere with that 57 inch path.
- Put a tall mirror on the wall opposite the door. This will reflect the open floor and make the room appear deeper than 84 inches. If you’re not sure how wide to go, start by sizing the mirror to the vanity.
- Make a single continuous tile stretch from the floor of the shower across the room in order to make the room appear larger rather than dividing it up into separate areas.
Choosing Between These 7×7 Plans
Choose the plan based on what you do first thing in the morning when you wake up, not on the one which seems the most feature-impressive. When two people are using the room at the same time, the side-wall arrangement with its 57-inch path is the better choice. And if every plan here feels tight, stepping up to an 8×8 square buys the room back. If you require more storage than space for your arms, then the plan in the back corner with the 20 inch deep vanity should be selected. And if the shower is where you spend the most time, the 36 by 42 stall in either of the larger shower plans or the neo-angle is worth the amount of floor space it takes up.
This footprint can serve a main bedroom too, which is what these small primary bathroom layouts work through. Before choosing, measure your existing door wall to ensure the sizing. The 30 inch door placement is what makes each plan work, and moving it is usually an expensive change. If the square shape suits you but the size doesn’t, these square bathroom plans in other sizes run from 6×6 up to 12×12. And every clearance quoted here traces back to the standard clearances room by room that these plans are built on.
To showcase highly specific designs, some images on this website use advanced AI-generation software to illustrate ideas and room inspiration. See our editorial policy to learn more.