6×10 Bathroom Layouts With a Tub, Walk-In Shower, or Extra Storage

A 6×10 bathroom measures 72 by 120 inches and is 60 square feet, which is a proper full-bathroom size. With this much space, you can fit a tub or shower big enough to turn around in, a toilet with extra elbow room, and possibly a linen cabinet. I drew all five floor plans to scale, with fixture sizes and clearances labeled with the same basic logic: wet fixtures flow across the back wall, toilet on a side wall, and a 30-inch door at the front. Beyond that, each uses the remaining space differently, such as having a wider vanity or more open floor, a tub or shower, or storage. One number that stays constant is a 30-by-48-inch zone for the toilet. Code only requires 15 inches from the centerline to the nearest wall and 21 inches of floor in front, and you could place the toilet tighter than these plans and still pass inspection, but it would feel cramped. These designs provide a functional space and lean toward those wanting comfortable daily use.
Full Bath Layout With Tub & Shower Combination at the Back
When a shower/tub combination is placed against the back wall, you gain 88 inches of open floor space between it and the door for the toilet and vanity.
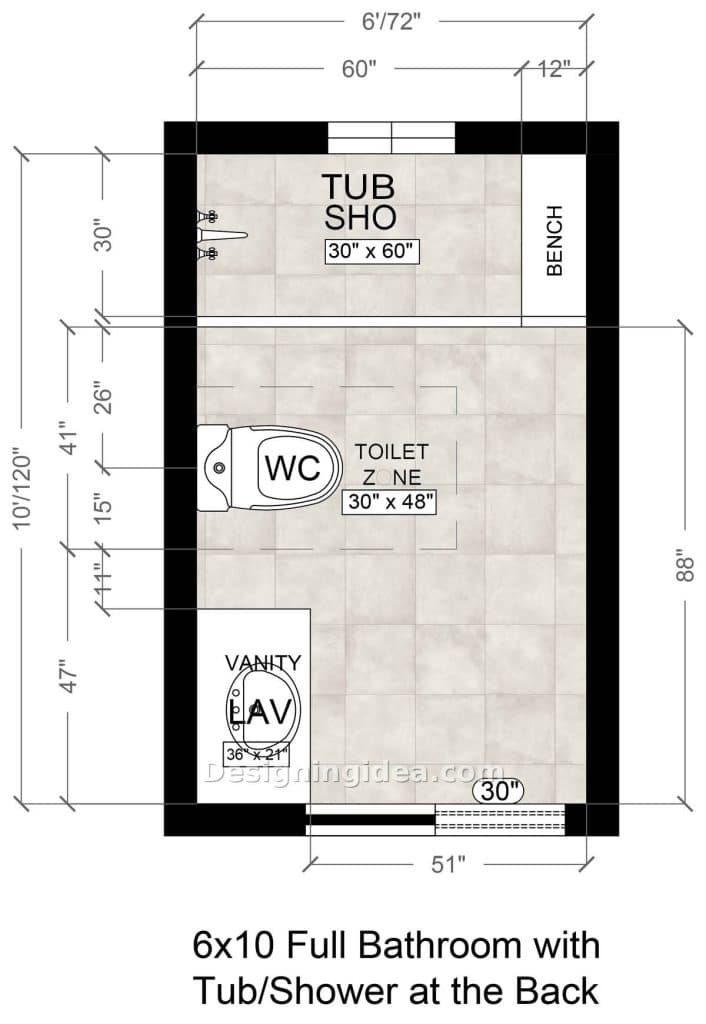
This is the standard layout for a reason, as it is perfectly functional, with a 60-by-30-inch tub/shower fitting across the back wall with 12 inches to spare to the side as a bench or platform for accessories. The toilet and a 36-inch vanity line up along the left wall, putting all the plumbing on one side, making it cheaper to rough in and easier to work on later. It also leaves the entire right side of the room empty with 51 inches of walkway width beside the vanity and an 88-inch run of floor from the door to the tub. The vanity is the compromise, since with only 36 by 21 inches and one sink, you have limited counter space. It’s fine for one person, but in a shared bathroom situation, it can be tough to wait your turn while getting ready.
Dimensions:
- Room size: 72″ x 120″ (6′ x 10′)
- Tub/shower: 60″ x 30″, plus a 12″ bench at the end
- Toilet zone: 30″ x 48″
- Vanity: 36″ x 21″
- Open floor from tub to front wall: 88″
- Clear width beside the vanity: 51″
- Door: 30″
Design Tips:
- Lay the bench top with a gentle slope towards the tub so that the water runs off instead of collecting on it.
- Hang a single long towel bar on the right wall rather than an assortment of hooks nailed around the vanity.
- The only window is located at the end by the tub, meaning you should position your most powerful light over the vanity close to the door. If you don’t do this, you’ll be getting ready in the darkest section of the room.
Larger Vanity Bathroom With Tub & Shower Combo Floor Plan
In a 6×10 situation, twelve extra inches of vanity represent the most economical real improvement that this plan achieves without altering the tub.
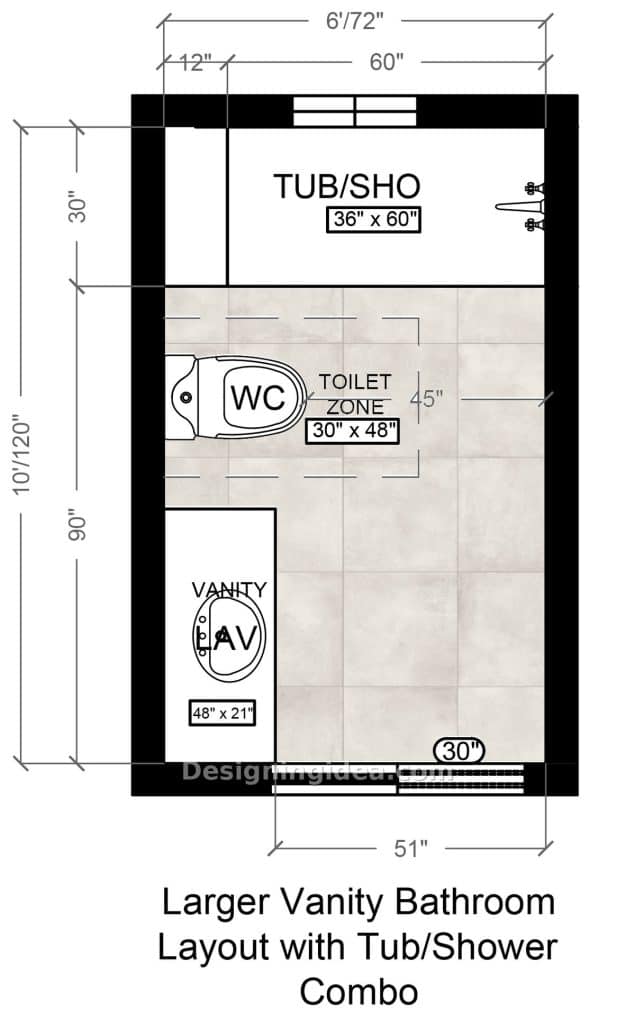
This plan has the same skeleton as the first, with the tub under the window, the toilet and vanity on the left, and the door at the front. The vanity grows in size from 36 to 48 inches, and the toilet shifts toward the tub to make room. On paper, these changes sound minor, but at the counter, it isn’t. Forty-eight inches gives you a sink plus set-down space on both sides, and possibly a bank of drawers underneath that swallows the daily-use items like your hair dryer and everything else that was on the counter in plan one. The toilet still has 45 inches of open floor in front, which is more than double the minimum, and adequate room to the sides to be code compliant. What you actually give up is a stretch of empty floor near the tub/shower that makes entering and exiting a little easier and provides a more roomier feel.
Dimensions:
- Room size: 72″ x 120″ (6′ x 10′)
- Tub/shower: 36″ x 60″, with a 12″ ledge at the end
- Vanity: 48″ x 21″
- Toilet zone: 30″ x 48″
- Clear floor in front of the toilet: 45″
- Clear width beside the vanity: 51″
- Door: 30″
Design Tips:
- Resist the double-sink pitch, as two sinks on a 48-inch vanity get you two faucets and no counter space.
- Match the width of the vanity completely, using a 48-inch mirror, as this will brighten the space with its reflective surface and make it seem larger inside.
- The ledge is at the far end from the faucet, so if you ever want to rinse that part of the tub, you should fit a handheld shower on a slide bar to reach it.
Shower-Only Bathroom With a 60 x 36 Walk-In Shower Design
Drop the tub, and you gain a large walk-in shower that measures 60 by 36 with a bench, with the rest of the room remaining unchanged.
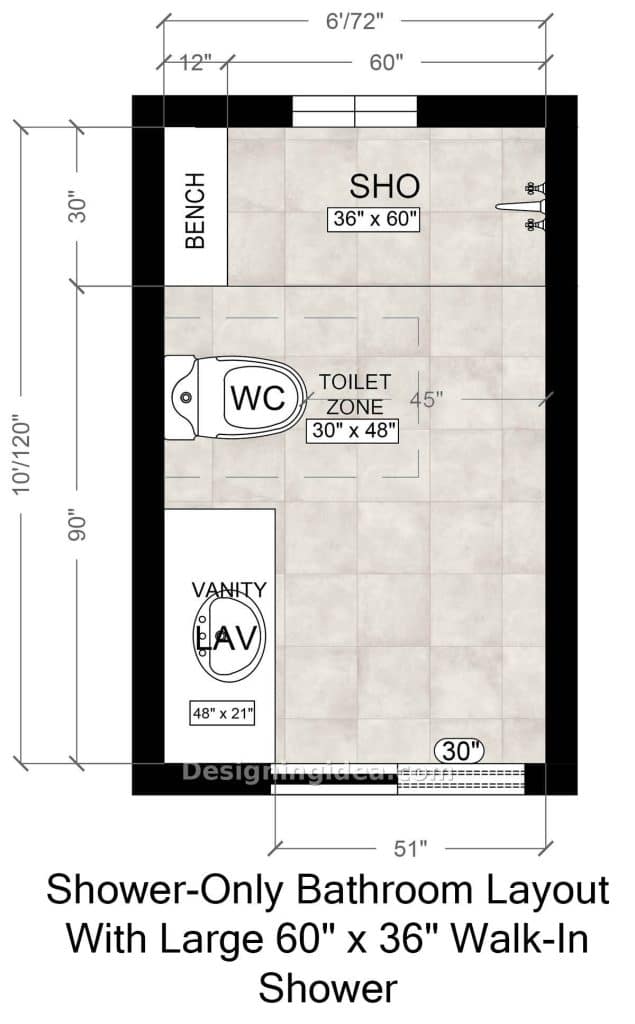
The plan shown here removes the tub, so the 60-inch alcove becomes a tiled walk-in shower, with a 12-inch bench at the end rather than a ledge. This shows what most tub-to-shower conversions end up looking like, since a 60-by-36 shower base is a standard size that fits into a tub alcove. One thing to keep in mind before ordering is that tub drains are at the end and run under the faucet, while shower bases generally have drains in the center or along one edge. You should allow time to move the drain line and check where the drain on your base is before you receive it, not after it arrives. Enclosures like this typically have a fixed panel, which covers half of the opening, prevents the water from spraying, and never extends into the area of the toilet. This drawing shows the shower opening without a cover, so it could be a curbless wet room design, or you can decide where to position the glass (generally, the fixed glass is next to the spray to prevent water from exiting). Below the enclosure sits the standard 30″ x 48″ toilet zone followed by a 48-inch vanity.
Dimensions:
- Room size: 72″ x 120″ (6′ x 10′)
- Walk-in shower: 60″ x 36″, plus a 12″ bench at the end
- Vanity: 48″ x 21″
- Toilet zone: 30″ x 48″
- Clear floor in front of the toilet: 45″
- Clear width beside the vanity: 51″
- Door: 30″
Design Tips:
- Place the glass with the fixed side on the faucet end and keep the bench end open so that you can sit down without having to go around the panel.
- Take the bench tile up the wall and form a recessed niche right above it since that is the height at which razors and shampoo are used.
- Take the tile up to the ceiling on the shower wall; when the window is positioned in the center, using full-height tile makes the room appear taller.
Staggered Split-Side Bathroom With Full-Width Shower Floor Plan
This bathroom uses a staggered design by placing the toilet and the vanity on opposite sides so the room doesn’t become cramped with a full-width shower along the back wall.
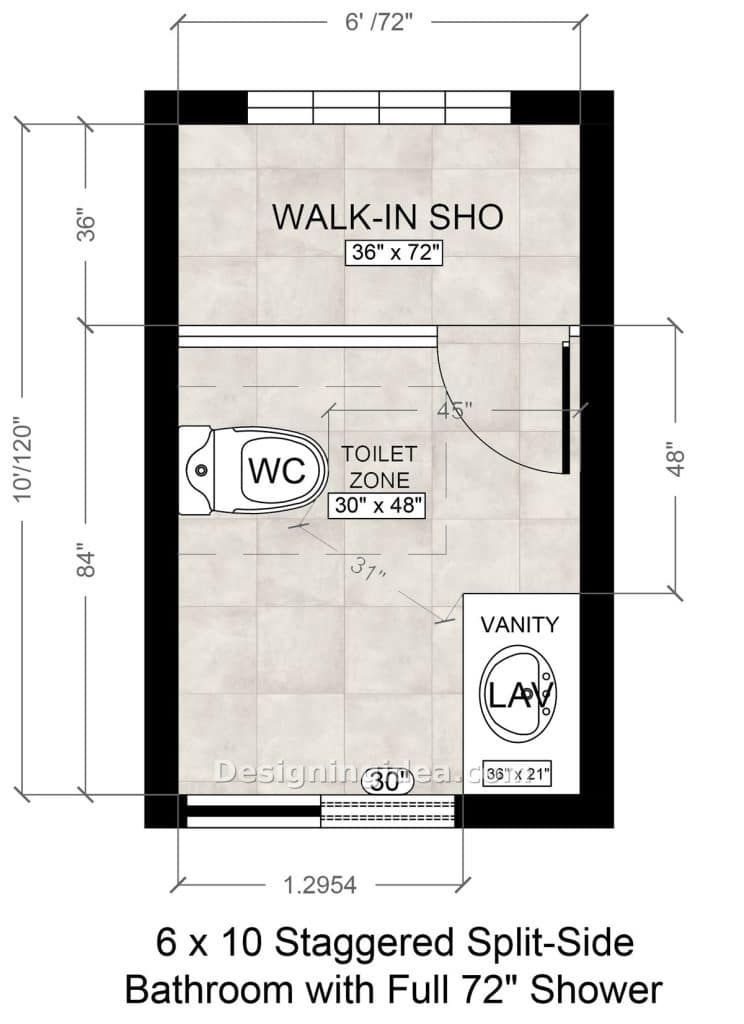
The main benefit of this plan is that there’s no bathtub, allowing the shower to extend continuously from wall to wall along the back. The enclosure is 36 inches deep and spans the full 72 inches in width, with the window above it to let in natural light. The cleverer arrangement is beneath the shower, with the toilet on the left wall and the vanity in the front-right corner. This arrangement means you take a diagonal route from the door to the glass, with 31 inches between the toilet area and the vanity corner where the two sides meet. The vulnerable point is the hinged shower door at the right end; it opens into the same 48-inch strip where the vanity is located, so one person leaving the shower and another at the sink will have to meet. A slider or a fixed panel with a walk-in gap would deal with this problem from the outset.
Dimensions:
- Room size: 72″ x 120″ (6′ x 10′)
- Walk-in shower: 36″ x 72″
- Toilet zone: 30″ x 48″
- Vanity: 36″ x 21″
- Shower to vanity: 48″
- Toilet zone to vanity corner: 31″
- Clear floor in front of the toilet: 45″
- Door: 30″
Design Tips:
- To enlarge the space, make the bathroom floor extend directly into the shower and provide a linear drain in the back wall. Keep the design curbless with a single surface so the room feels like one continuous space.
- Position the valve at the entrance end so that you can turn the water on and allow it to warm up without having to step into the spray.
- Use a wall-hung vanity so the entrance corner doesn’t feel like something you have to go around each time you enter.
Storage-Friendly Linen Cabinet Bathroom Layout
Reducing the shower width to 48 inches would let me install a built-in linen cabinet, which is very useful for those needing the space to keep towels and other accessories nearby.
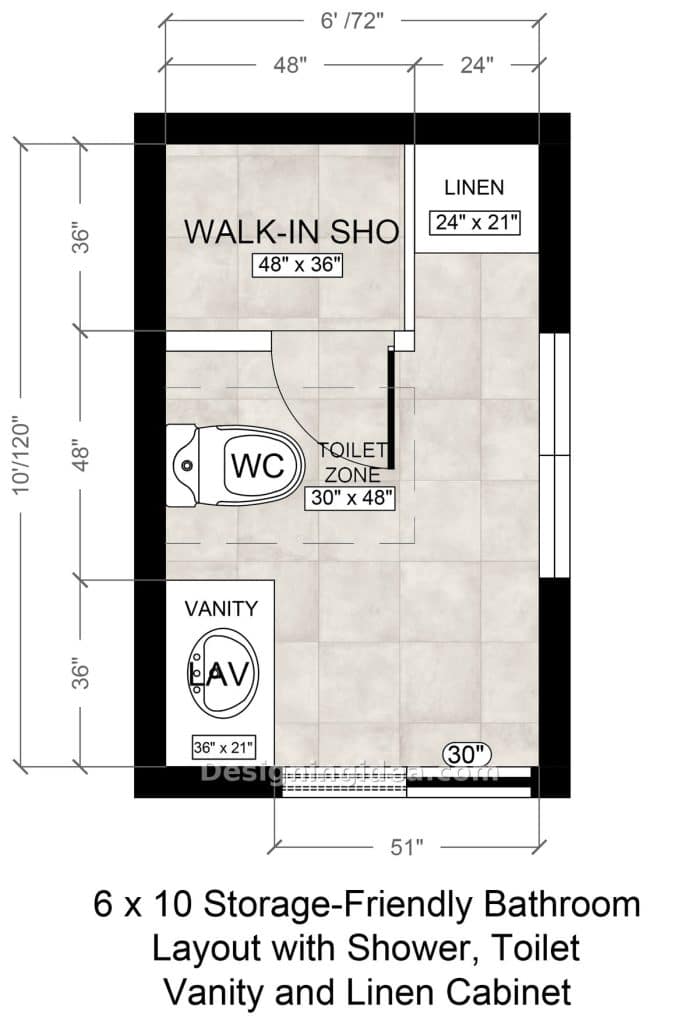
The fair question is whether you would rather have an extra foot of shower space or somewhere to store towels and accessories. This plan prioritizes the towels, with a shower measuring 48 by 36, still a typical size for a prefabricated unit and well above the minimum requirement of 30 by 30. The 24 inches it sacrifices become a 24 by 21-inch linen cabinet in the back corner. The window is moved to the right-hand wall so as to clear up space on the back wall for the shower and the cabinet, and the toilet and the 36-inch vanity are stacked on the left as they are in plan one. The shower door opens toward the toilet area, although this sounds more unpleasant than it is. One person uses both of them. Just don’t place a hamper in the arc. You already know why this plan made the list if you’ve ever kept the bath towels in a hallway closet outside the bathroom.
Dimensions:
- Room size: 72″ x 120″ (6′ x 10′)
- Walk-in shower: 48″ x 36″
- Linen cabinet: 24″ x 21″
- Toilet zone: 30″ x 48″
- Vanity: 36″ x 21″
- Clear width beside the vanity: 51″
- Door: 30″
Design Tips:
- Get a linen cabinet that has a door rather than open shelves, since shelving three feet from a shower picks up dampness and dust within about a month.
- The side window is situated directly beside the toilet and the vanity, so you should frost the glass or use a shade that comes from the top.
- Recess a niche in the shower’s back wall. In a 36-inch deep shower, a hanging caddy is one more thing to catch with an elbow.
For more options, if your room is a foot narrower, compare these 5×10 bathroom layout ideas, or if it’s a foot shorter, see these 6×9 bathroom layouts.
To showcase highly specific designs, some images on this website use advanced AI-generation software to illustrate ideas and room inspiration. See our editorial policy to learn more.