If you want to get the most out of your 5×10 closet space, you may want to consider dual clothing racks, a built-in vanity, or squeezing in a peninsula for a luxury feel. The right floor plan design can make a big difference in your daily life and your home’s resale value. Below, we explore five of the best 5×10 walk-in closet layouts, with everything from u-shaped organization to galley designs, each offering practical storage solutions and dressing zones to help you dress in style.
Upload a photo and get instant before-and-after room designs. No design experience needed — join 2.39 million+ happy users. 👉 Try the AI design tool now
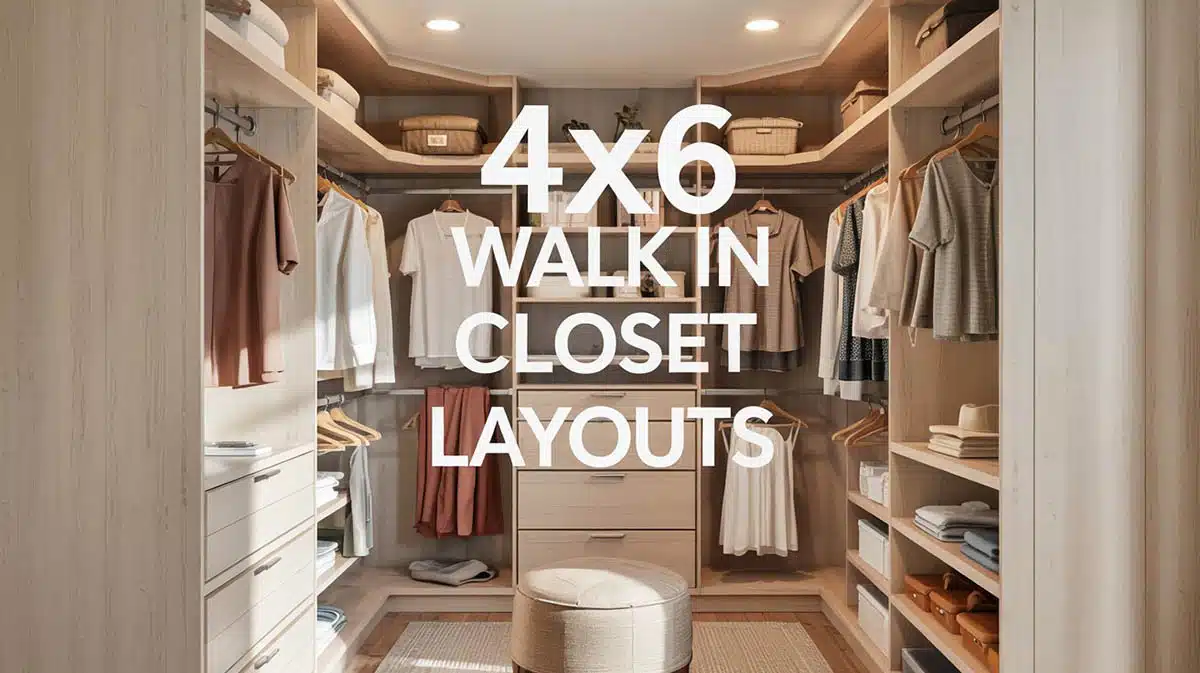
Floor Plan Details: This 5′ × 10′ walk-in closet uses its u-shape to wrap storage options around three sides, while offering a 2 ½-foot-wide aisle from the doorway to the back wall. The left side is equipped with double-hanging sections that include two parallel rods spaced 42 inches apart vertically, so shirts and folded pants can sit above one another. On the back wall, the hanging depth increases to a full 24 inches and drops to a single rod, giving longer garments like gowns, coats, and other long clothing their own spot underneath a shelf that runs the closet’s width. The right side converts to open shelving that is perfect for shoes, handbags, and folded sweaters; this way, nothing sticks out into the aisle. A small storage cubby at the bottom left is reserved for a pull-out hamper or a place to stow items. Even with storage on three sides, the 30-inch walkway clears modern building-code minimums and keeps every item within an easy reach.
Dimensions:
Size: 5′ W × 10′ L (60″ × 120″)
Central walkway clearance: 2 ½’ (30″)
Back-wall hanging depth: 24″
Side-wall hanging depth: 18″
Right-wall shelf depth: 12″ (open shelving)
Double-hang spacing (left wall): 42″ between upper and lower rods and 84″ total hanging height
Door opening: aligns with 30″ aisle for unobstructed entry
Design Tips:
Double-hang efficiency. Install two rods on one side to double the available linear feet for hanging shirts, blouses, and folded pants.
Dedicated long-hang zone. Place a single rod on the back wall (with a 24″ depth) to protect dresses and coats from crowding.
Versatile shoe wall. Use adjustable shelves to alternate between flat 8″ spacing for sandals or 12″ spacing for boots.
Pull-out hamper or luggage nook. Use the small recess marked ‘STO’ near the door to keep items off the floor yet out of the main traffic lane.
Promote a bright & airy feel. Use light wood or finishes and a flush-mounted ceiling fixture, combined with a mirrored pocket or barn door to help reflect light, and give the appearance of a bigger space.
Best for: Those who want to maximize storage capacity and have a clear walkway for easy accessibility.
Galley-Style Closet With Dressing Area Floor Plan
This design transforms a simple hallway-sized space into a streamlined dressing room with efficient wall-to-wall storage and a built-in full-length mirror so you can easily find what you want, try it on, and go.
Floor Plan Details: This 5′ × 10′ galley-style walk-in closet divides the narrow room into two zones, which are a storage and dressing area. As you enter and walk down the 2 ½-foot (30″) center aisle, the right side is fitted with an 18″-deep hanging section that combines a full-height single rod for dresses and coats with a stacked double-rod segment for shirts and pants. Opposite, on the left wall there are 12″-deep adjustable shelves that transition from shoe cubbies near the floor to handbag or sweater slots at eye level. All the way back, a full-length mirror spans the width between the walls for checking out your attire. There’s room to slide in an optional 12″-deep console or stool, as a dressing perch or valet area. The uncluttered floor facilitates the ability to pick an outfit, check the mirror, and exit.
Dimensions:
Size: 5′ W × 10′ L (60″ × 120″)
Central aisle/dressing lane: 2 ½’ (30″) width
Right-wall hanging depth: 18″
Left-wall shelf depth: 12″ (adjustable)
Mirror width: spans 30″ between walls, with a full length recommended
Optional console depth: 12″ (fits below mirror without entering the aisle)
Double-rod spacing (right wall): 42″ between upper & lower rods for two-tier hanging
Design Tips:
Mirror + console combo. Mount the mirror 6 to 8″ above the floor to slip a narrow bench or console below for shoes, jewelry trays, or next-day outfits.
Balanced load. Place the heaviest items, like coats or boots, closer to the door end to avoid lugging them through the aisle, reserving the far mirror zone for daily wear.
Adjustable shelves for seasonal changes. 32 mm shelf pin holes let you swap shelf heights as seasons, styles (or shoe heels) change. Keep the top two tiers taller for bags and hat boxes that are infrequently used.
Bright & vertical lighting. Install vertical LED strips along each wall edge to help eliminate shadows when you’re checking outfits in the mirror.
Pocket or barn door upgrade. Replace a swing door with a pocket/barn door to keep the 30″ aisle fully usable.
Best for: This layout is ideal for those wanting a spacious central dressing area, with a mirror that enhances functionality and offers a sense of space.
L-Shaped Storage Closet With Vanity Area Layout
This L-shaped plan features double-tier clothing rods on one side and a dedicated grooming vanity on the other, with shoe storage along the back for a fully-equipped storage closet.
Floor Plan Details: Inside this 5′ × 10′ footprint, the design trades the classic “storage-on-both-sides” approach for an L-shaped arrangement that frees up one long wall for a built-in vanity and dressing zone. The left side features a full-height double-rod/two-tier hanging section for all of your large garments. Across the top, a shallow 15-inch-deep shelf makes the perfect spot for seasonal shoe bins or handbags. As you turn the corner toward the the right rear you’ll see that 5 ft (60″) of wall is devoted to a slim vanity cabinet with an 18-inch-deep counter with drawers underneath, and a vertical lighted mirror above. As you enter the closet, you’ll notice the first 45″ of the right wall remains clear, giving breathing room for changing clothing or placing a small bench or chair. By wrapping storage only on two sides, the plan carves space for a grooming station while supplying double-hung wardrobe capacity for your storage needs.
Double-rod spacing: 42″ between upper & lower rods with 84″ total usable hanging height
Top cross-shelf depth: 15″ (runs full 5′ width)
Built-in vanity: 60″ long × 18″ deep
Open vanity standing zone: 45″ of space before the doorway
Design Tips:
Glow-up corner. Add LED strips on each side of the mirror, as side lighting helps to remove face shadows when applying makeup or styling hair.
Keep the aisle clutter-free. Use pull-out racks for belts, ties, or scarves and mount them inside the hanging section so nothing impedes into the 24″ walkway.
Contrast for added depth: Finish the vanity in a lighter tone than the hanging cabinet, for a look that makes the narrow closet feel wider.
Ventilation tip: Install a low-profile exhaust fan above the vanity light fixture, especially if you use a lot of cosmetics or hair products, which add humidity.
Best for: Those wanting a functional dressing and vanity area with a blend of hanging and drawer storage.
Compact L-Shaped Closet with Peninsula Floor Plan
By dedicating a 2′ × 4′ corner of the closet to a peninsula, you gain a dedicated folding and staging surface for ” island”-like functionality.
Floor Plan Details: This compact walk-in has two storage rods that fit the back corner in an L-shape with a small 2′ × 4′ peninsula table in front that divides the room into a working “island” zone with a narrow walkway. The left wall starts with a peninsula, which serves as a folding, packing, or jewelry layout surface, then transitions into a stacked double-rod section for shirts and pants. Turning the corner, the 24-inch-deep back wall hosts a single rod for dresses and coats, with a full-width shelf above. Opposite the peninsula, on the right wall there is slim 12-inch open shelving dedicated to shoes and accessories, with a 24-inch center aisle. Despite its smaller sized footprint, the peninsula adds countertop functionality that’s usually reserved for larger walk-ins, creating a mini “island closet” feel without sacrificing any hanging capacity.
Dimensions:
Size: 5′ W × 10′ L (60″ × 120″)
Center aisle width: 2′ (24″) between peninsula edge and shoe shelves
Peninsula table: 2′ W × 4′ L, 34″ to 36″ typical counter height
Back-wall hang depth: 24″ (single rod + shelf)
Left-wall hang depth: 18″ (double-rod, two-tier)
Right-wall shelf depth: 12″ (open, adjustable)
Double-rod spacing: 42″ between upper & lower rods; 84″ total usable hanging height
Design Tips:
Rounded peninsula corners. Soften the outer edges to prevent bumps with rounded edges in the tight 24″ aisle.
Multi-task surface. Add shallow drawers under the peninsula for jewelry trays, lint rollers, or other clothing accessories.
Mirror trick. Mount a mirror behind the peninsula that doubles as a final outfit check without eating into floor space.
Task lighting. Install a mini-flush light directly above the peninsula for focused illumination.
Color zoning. Finish the peninsula in a contrasting material (for example, white oak against walnut shelves) so it reads as intentional furniture.
Best for: Those who want the feel of a central island (Peninsula) to add luxury and usability that is ideal for accessories and folded clothing.
Single Wall Closet With Maximized Storage Design
By keeping every shelf, rod, and drawer on one 24-inch-deep wall, this 5′ × 10′ walk-in closet floor layout leaves a generous 32-inch aisle and a full-width bench to avoid feeling cramped.
Floor Plan Details: This walk-in uses a single-wall run of clothing rods and adjustable shelving to keep every inch of storage on the left side. This frees up the remainder of the room for easy movement and a built-in seating nook at the end. The 24-inch-deep storage unit combines full-height hanging (centered along a steel rod), 12-inch-deep adjustable shelves for shoes or bags, and a bank of base drawers for folded items. Opposite the cabinetry, the right wall is purposely left shallow, with just a slim, floor-to-ceiling slat panel (ideal for belts, scarves, or a mirror strip) so the passage stays clear. At the back of the closet, a 36-inch-wide bench spans the wall and can act as a perch for putting on shoes or changing clothes. The end result is a roomy 32 to 33 inch center aisle that offers room for hanging, shelving, and drawer space that’s equal to many U-shaped designs.
Dimensions
Size: 5′ W × 10′ L (60″ × 120″)
Storage wall depth: 24″ (hanging & drawers)
Walkway width: 2.7′ (32″ to 33″) floor space between storage face and the opposite wall
Adjustable shelf depth: 12″ within the main unit
Bench length: 36″ (full width of closet back)
Slim accessory panel: 18″ deep (on the right wall), ideal for hooks or mirror insert
Design Tips:
Zoned vertical storage. Place drawers at knee level (24″–36″ AFF) so hanging above and shelves below create a seamless “grab-and-go” column.
Light up the bench. Install an LED strip under the bench seat that becomes soft task lighting for tying shoes without any overhead glare.
Mirror-panel hack. Fit a 12″ × 60″ mirror into the slat panel on the right wall so there’s no need to reduce the aisle width for a swinging mirror door.
Add a pull-out valet bar. Install a retractable rod just inside the cabinet face for displaying the next days outfit without obstructing the walkway.
Unified finishes. Use the same wood or paint tones for bench and drawer fronts so the single wall feels like custom furniture, not a bulky closet system.
Best for: Those wanting to maximize one wall for storage and provide open space, giving room for dressing.
To showcase highly specific designs, some images on this website use advanced AI-generation software to illustrate ideas and room inspiration. See our editorial policy to learn more.
A well-planned closet space can alleviate a lot of the frustration while searching for clothing in the early morning hours. This is especially true when…
Creating an efficient yet stylish walk-in closet is all about using intelligent storage solutions. Whether you have a compact space or more generous dimensions, design…