5 Luxury Double Island Kitchen Layouts: For Families & Entertaining

Imagine a kitchen where function meets luxury, where entertaining feels completely effortless, and you fall in love each time you enter the room. With a floor plan that optimizes every inch for beauty and efficiency, a double island kitchen layout can provide the luxury feel you crave. Whether you’re a chef, culinary enthusiast, busy parent, or host who wants more space for guests, a double island setup could be your ultimate kitchen upgrade. Let’s dive into double island kitchen layout ideas you can incorporate in medium or large kitchens. [toc]
Symmetrical Double Island Layout
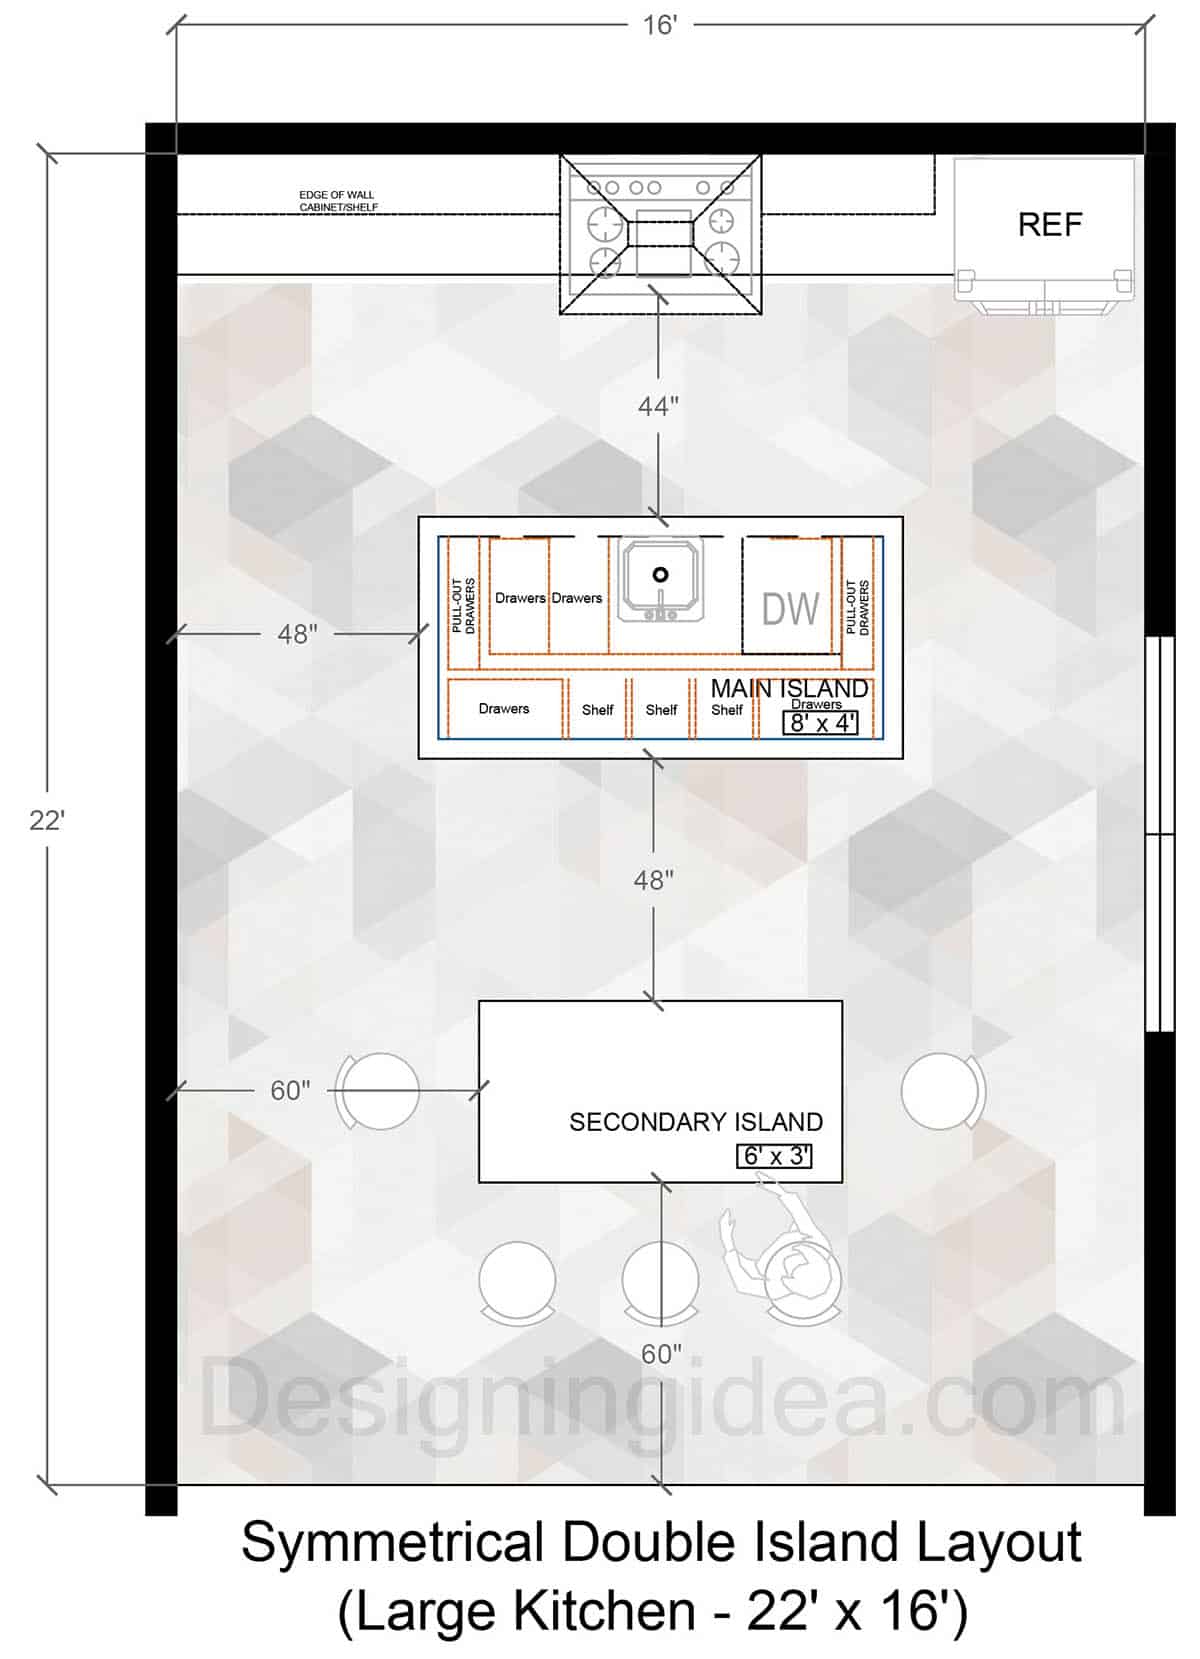
Ideal for: Entertaining, large families, multiple cooks, and open-concept homes.
Key Features:
- Two identical islands (one for prep, one for seating)
- Ample workspace and storage
- For entertaining, guests can gather around one island while the other stays dedicated to food prep.
Floor Plan Details:
- Overall Kitchen Dimensions: 22’ (L) x 16’ (W)
- Main Island (Prep): 8’ x 4’ (with sink, dishwasher, and storage)
- Secondary Island (Seating): 6’ x 3’ (with 4 bar stools)
- Walkway Between Islands: 4’ (comfortable circulation)
- Perimeter Cabinets:
- Cooking wall: 10’ (range + hood + storage)
- Refrigerator/freezer wall: 8’
- Cleanup zone: 6’ (sink + dishwasher in main island)
Traffic Flow:
- The work triangle between the fridge, sink, and range remains efficient.
- The seating island doubles as a buffet for gatherings.
The symmetrical double island layout works well with the hallway-like perimeter as it gives design solutions to two main challenges in this kitchen floor plan.
The rectangular space is accessed from one of its shorter sides (16 feet), which pivots the functional zones into a hallway or portrait orientation. Without careful planning, this can result in an inefficient kitchen. It also presents a challenge to users as the work zones—preparation, cooking, and cleaning—may be too far away from each other area.
The layout utilizes the space by keeping clearances within the minimum 42” to 48”. The countertop, for instance, has 44 inches of clearance from the main island, giving ample space for two users while providing the minimal distance for efficiency.
The space’s symmetrical layout allows for a clean and simple placement of zones, creating two main areas: the workspace and serving or social space. The inner zone houses your food cleaning, preparation, and cooking, which is uninterrupted in the event that guests are visiting but still accessible and transparent.
Also, an option to choose a lightweight or mobile secondary island so it can be easily moved away or combined with the main island if an open space is needed.
L-Shaped Kitchen Floor Plan with Double Islands
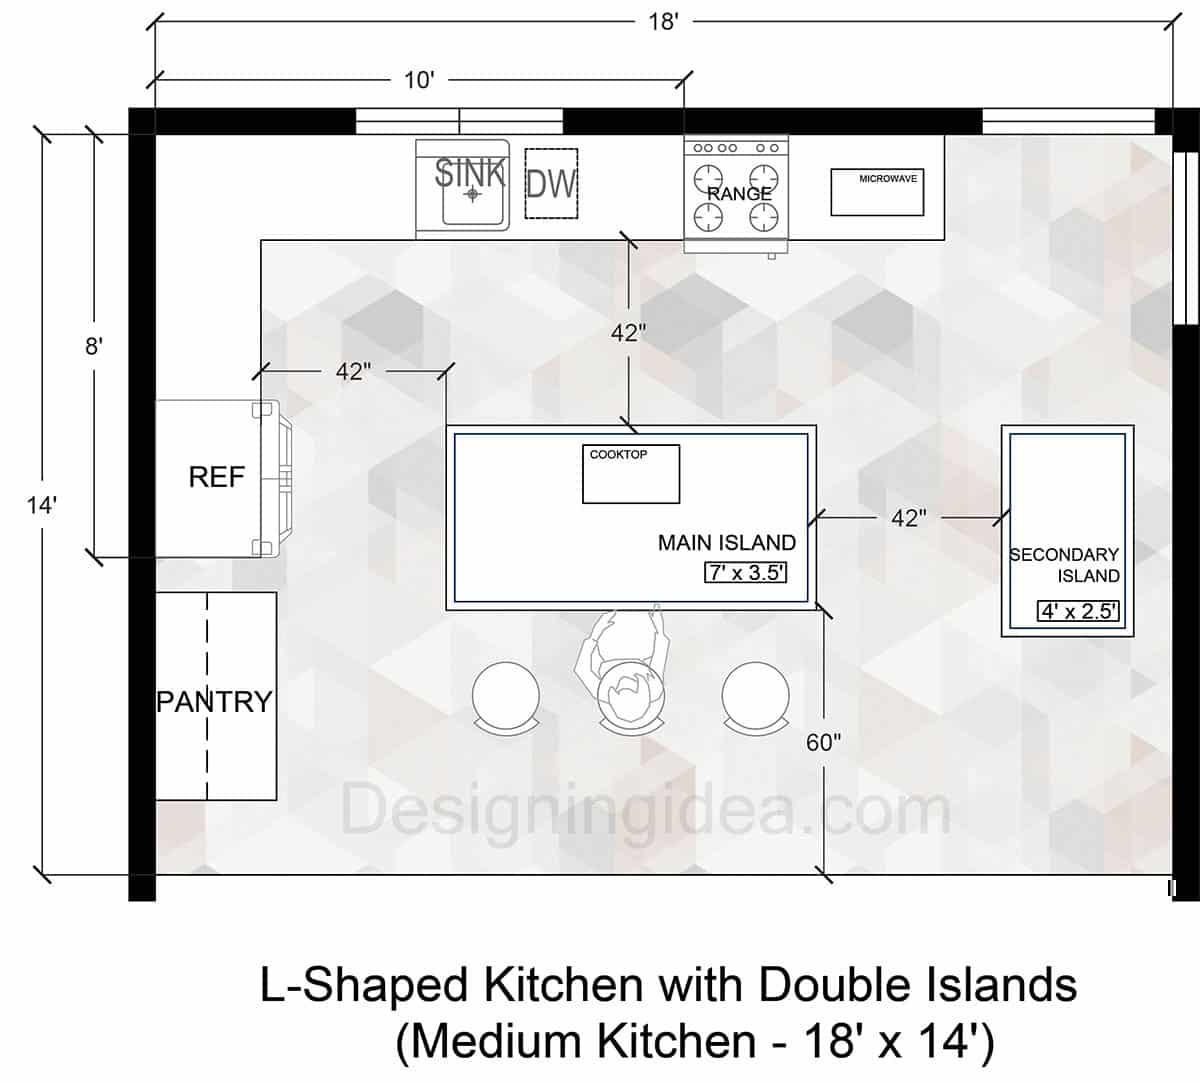
Ideal for: Homes needing extra prep space without a full second island.
Key Features:
- One large main island + a smaller prep island
- Efficient workflow for multiple cooks
Floor Plan Details:
- Overall Kitchen Dimensions: 18’ (L) x 14’ (W)
- Main Island (Cooking & Seating): 7’ x 3.5’ (with cooktop & 3 stools)
- Secondary Island (Prep & Storage): 4’ x 2.5’ (additional counter space)
- Walkway Between Islands: 5’
- Perimeter Cabinets:
- L-shaped counter: 10’ (sink) + 8’ (fridge & pantry)
- Range wall: 6’ (oven + microwave)
Traffic Flow:
- The secondary island can be moved if needed (on wheels).
- Great for baking stations or beverage centers.
With a medium-sized kitchen of 18’ x 14’ or 252 square feet, it can be a challenge to zone in areas such as an added social or serving space. To accommodate this, an L-shaped countertop frees up the right side of the kitchen, allowing a social hub to be adjacent without disrupting the work area.
A 42-inch clearance is placed between the main and secondary islands to provide a passageway for two persons. Also, the islands can easily turn into an extension of your working space when needed. A wider clearance of 60” is provided at the lower end of your kitchen, which usually transitions to a living space; this effectively becomes the main traffic lane of the room.
The sink and stove are located on the same wall, which makes for an effective cooking work triangle with the placement of the island’s surface close by. With an extra cooktop aside from your full range, you can have multiple cooks or have a single cook to manage multiple dishes. The secondary island is easily serviceable because of its adjacency to your full-range cook area and main island with cooktop. While the freezer and pantry area is particularly farther than your other workstations, you can place items from these store areas on your main island easily.
Other features of the plan include a spacious pantry that can be expanded in the future. A built-in kitchen tower can be installed between the pantry and freezer.
U-Shaped Kitchen Design with Two Islands
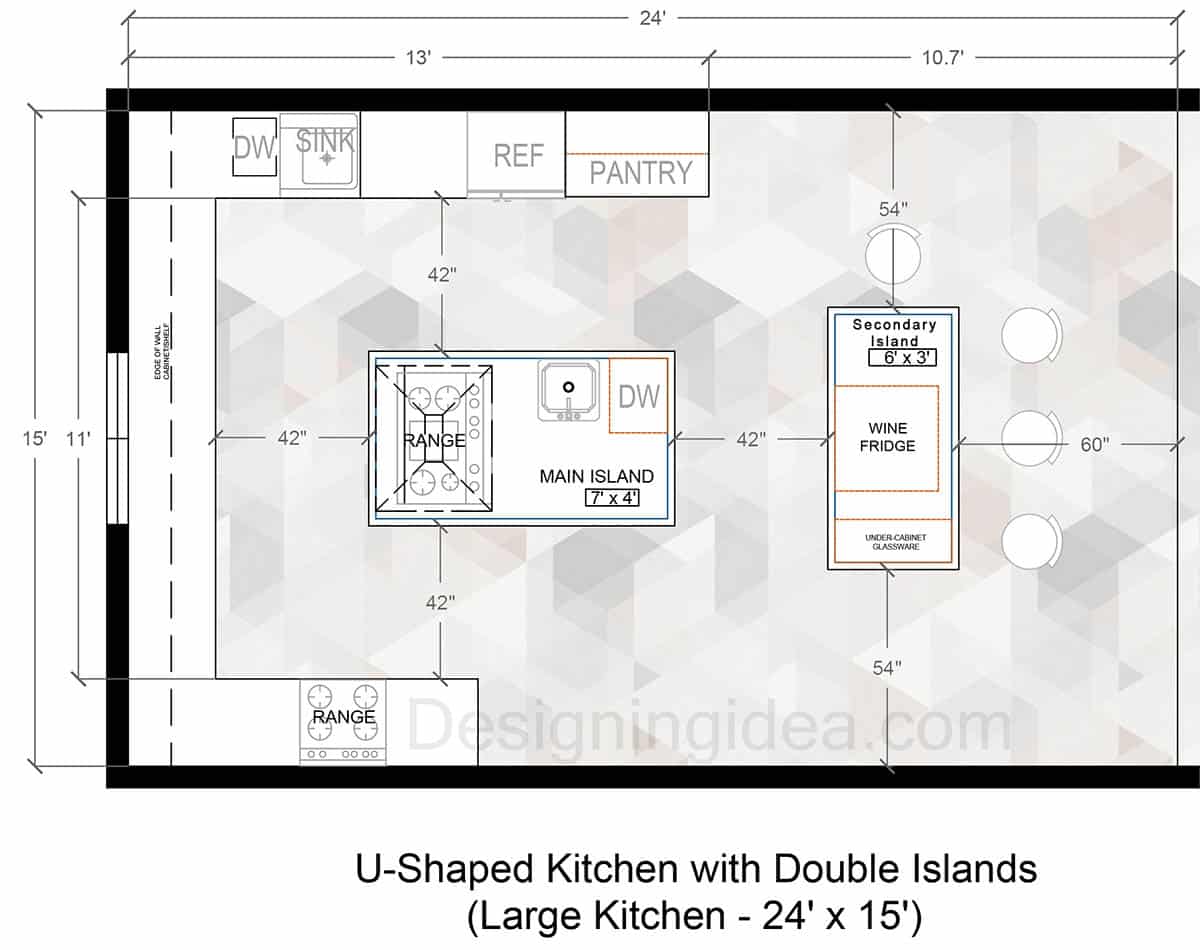
Ideal for: High-end kitchens with multiple work zones.
Key Features:
- One large island for cooking, one for seating
- Dedicated baking/drinks station
Floor Plan Details:
- Overall Kitchen Dimensions: 24’ (L) x 15’ (W)
- Primary Island (Cooking): 9’ 7’ x 4’ (range, prep sink, storage)
- Secondary Island (Breakfast Bar): 6’ x 3’ (4 stools + wine fridge)
- Walkway Between Islands:5’(3.5’)
- Perimeter Cabinets:
- U-shaped counters: 12’ 15’ (cleanup), 10’ (fridge/pantry), 8’ (baking station)
Traffic Flow:
- Perfect for chefs who need multiple workstations.
- A secondary island can serve as a buffet for parties.
With a spacious 360 square feet of food prep, cooking, and cleaning, you’ll want to utilize the long perimeter for storage. A U-shaped kitchen with double islands presents an abundance of storage. However, efficiency can be a challenge if there is a lack of careful planning ahead when laying out your storage area. A good rule of thumb for U-shape designs is to go along with your basic work triangle, and use a bubble diagram to assign the layers of items categorized according to the frequency they are used. For instance, assign a bubble (layer 1) (See bubble layer definition below) to place daily and weekly items that are categorized as essentials. Layer two can be kitchen or food items that are used often but are not essential. Lastly, a bubble or area that has seldom-used items or is used according to season as layer 3.
Applying this concept to your plan, you can place layer 1 around your pantry and ref area. Layer 2 items can be placed at the main island storage and cupboard above your sink countertop. Seldom-used items can be further away from your workspace along your 11-foot-long countertop on the left side of your main island. A secondary range or baking equipment can be installed across the full range to utilize the long countertop space. If you want a sink in the corner, you can swap the dishwasher with the basin for easier access or to fit a window or position for outside views.
Open-Concept Kitchen With Two Islands And Peninsula
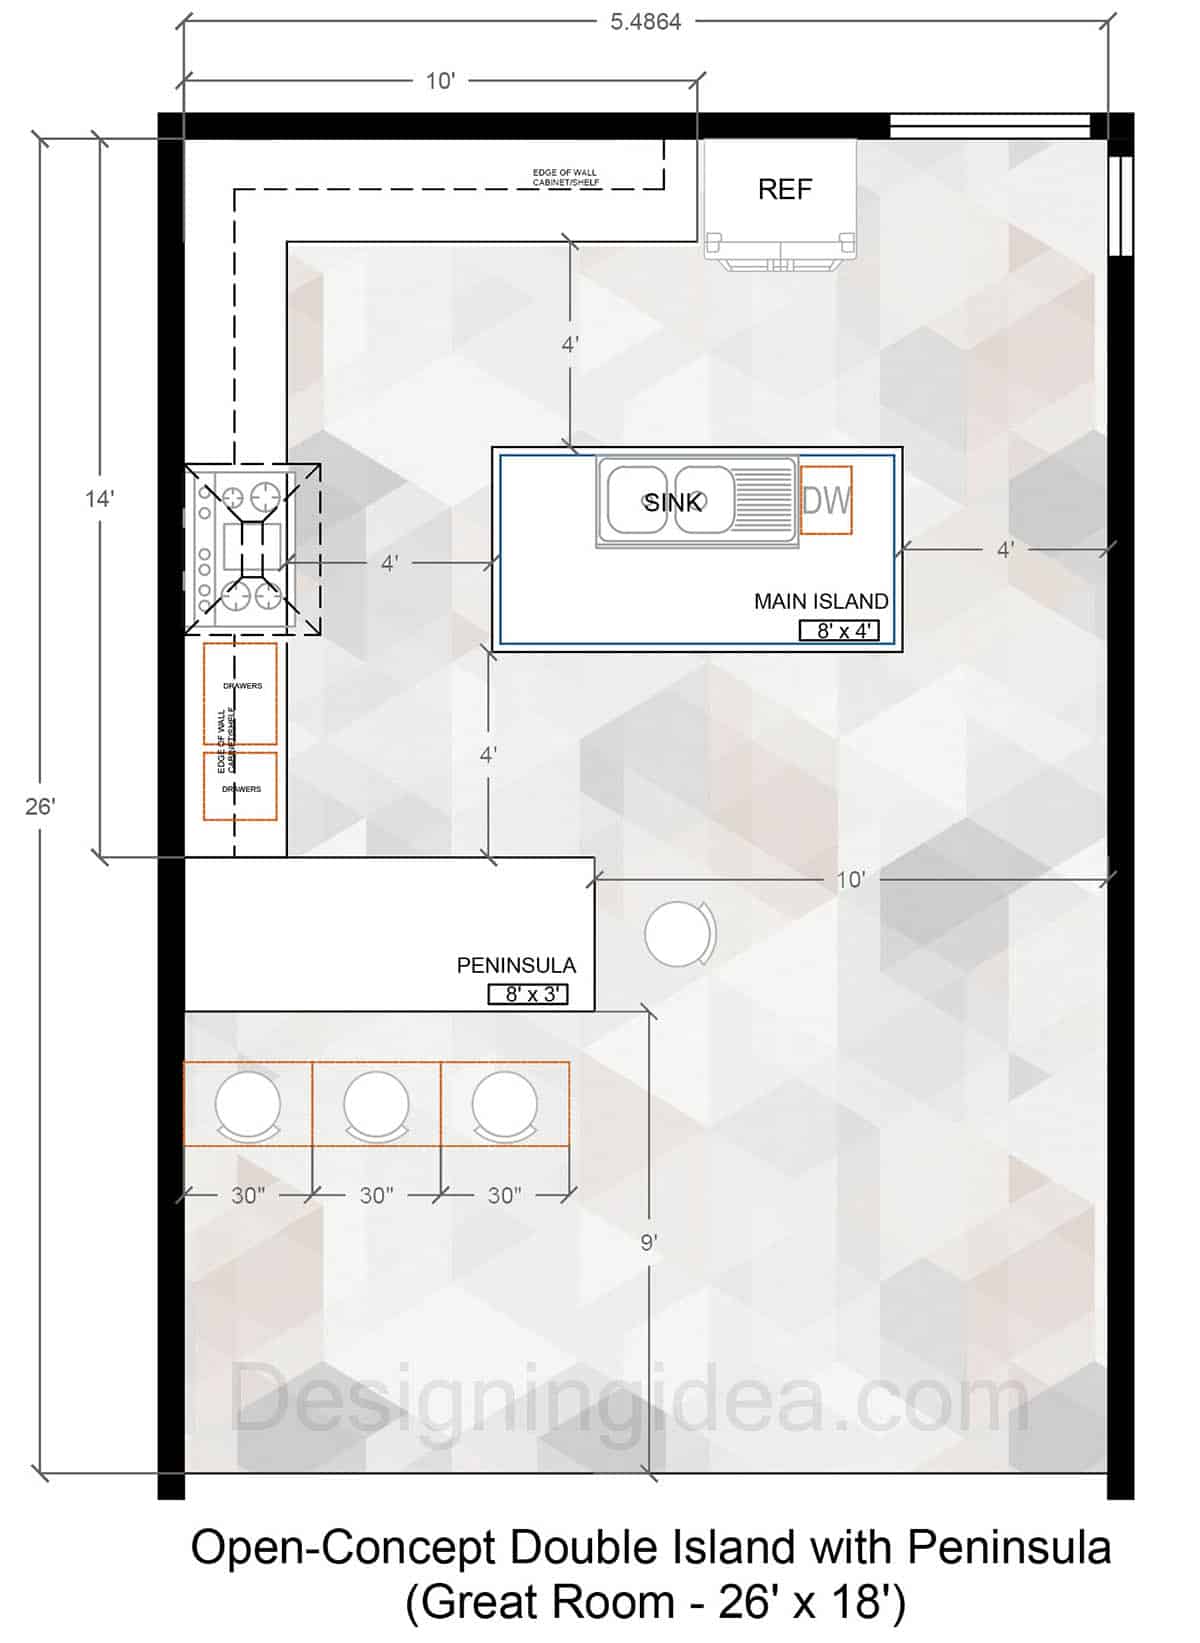
Ideal for: Homes with combined kitchen, dining, and living areas.
Key Features:
- One large island + a connected peninsula for seating
- Seamless flow between cooking and entertaining
Floor Plan Details:
- Overall Kitchen Dimensions: 26’ (L) x 18’ (W)
- Main Island (Multipurpose): 10’8’ x 4’ (sink, dishwasher, prep space)
- Peninsula or Portable Island (Seating & Storage): 8’ x 3’ (4 stools + beverage cooler)
- Walkway Between Islands: 4’
- Perimeter Cabinets:
- Cooking wall: 12’ (double oven + range)
- Fridge/pantry wall: 10’
Traffic Flow:
- The Peninsula acts as a second island but connects to a wall. It can also be a portable cart or movable piece that functions as an island’s surface.
- Great for open floor plans with high traffic.
Mark your workstations with appliances or equipment. This is an important starting point when planning or laying out a large space such as this 936 square feet (26’ x 18’) kitchen in a great room.
Each area commands the zone while having an overview of visual control of the whole space. This means you can have a conversation across people seated at the peninsula while you are washing dishes or chopping vegetables at your main island. Serving quick meals is also easy since you have a full range adjacent to your peninsula island. The sink can be used without interrupting the cooking area or the dining area. The ref is near the sink for easy direct access to the sink for washing meat or vegetables.
Like your symmetrical plan, this open-concept kitchen has two main zones, namely the working and social zones. There is still room for seats and a 3rd island or table, which can be portable or foldable if you want to maintain flexibility at the end of your kitchen space. All four sides of your main kitchen island can have additional storage spaces.
Expanded Double Island Kitchen Layout
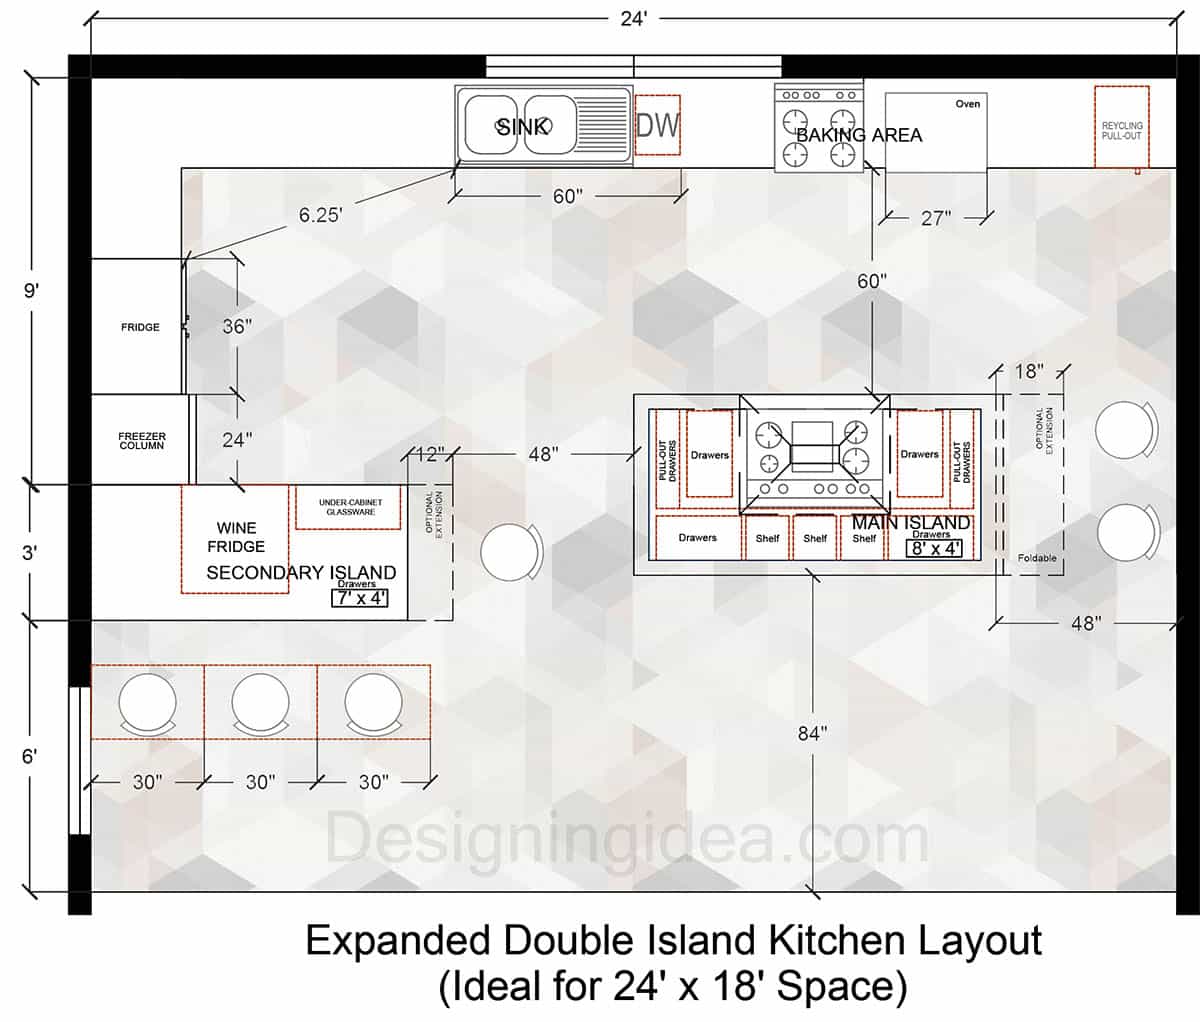
Best for: Large open-concept kitchens, multi-cook households, and frequent entertaining.
Key Features:
Two full-sized islands (one for cooking, one for seating + storage)
48″ walkways (comfortable for multiple cooks + guests)
Dedicated zones (prep, cooking, baking, bar, cleanup)
Seating for 4+ (great for gatherings)
Floor Plan Details:
Overall Kitchen Size
- 24’ (L) x 18’ (W) (Minimum recommended for this layout)
Primary Island (Cooking + Prep)
- Size: 10’ (L) x 4’ (W)
- 36″ gas range + downdraft vent
- 24″ prep sink + disposal
- Deep drawers (pots, pans, utensils)
- 18″ overhang for 2 counter stools (optional)
Secondary Peninsula/ Portable Island (Seating + Storage)
- Size: 8’ 7’ (L) x 3.5’ (W)
- 12″ overhang for 4 bar stools (30″ per seat)
- Wine fridge + under-counter beverage cooler
- Extra storage (glassware, serving dishes)
Perimeter Layout
- Refrigerator Wall: 36″ French-door fridge + 24″ freezer column, 48″ pantry cabinet (floor-to-ceiling)
- Cleanup Zone: 60″ workstation sink + 24″ dishwasher (x2), Trash/recycling pull-outs
- Baking Station: 36″ double wall oven + microwave, 18″ marble slab (pastry prep)
Walkways & Traffic Flow
- Between islands: 5’ (allows easy movement even with multiple cooks)
- Around perimeter: 4’ (meets NKBA standards for luxury kitchens)
- Appliance spacing: Fridge to sink: 6’, Sink to range: 7’ (efficient work triangle)
This spacious kitchen of 24’ x 18’ or 432 square feet offers conversational hotspots and extensive workspace that is perfect for frequent entertaining. It utilizes a peninsula island as its secondary island that functions as a bar area equipped with a wine fridge and under-cabinet glassware. The main island, on the other hand, provides another grouping of seats that can serve as a breakfast nook. An option to have a bar or slab 18” overhang in addition to or as an alternative to your wrap-around storage shelving and cabinetry around your island.
There’s still lots of space at the front of your main island. The 84 inches or 7 feet stretch is an opportunity to place an extra table or seating. The secondary island or peninsula can also have a 12” or 1-foot extension for additional seating or extra prep space.
Since the two islands are mainly used for socialization, the sink area, which is frequently used though placed farther away, is placed at the center. The sink can be accessed without disturbing other work zones. Another feature of the plan is that it has an ample traffic lane of 48 inches minimum. This means the plan can accommodate two people working at the same time as 48 inches or 1.2 meters wide is enough to let two persons pass through conveniently.
Two Island Design Tips
- Minimum Walkway: Keep at least 5’ between islands for comfortable movement.
- Island Sizing:
- Prep islands: At least 4’ x 2’
- Seating islands: Allow 24” per stool
- Appliance Placement: Avoid placing any cooktops near seating islands to prevent hands from touching hot surfaces.
Bubble Layers:
The bubble layer method is used to better organize kitchen items depending on how often they are used. This helps to provide better day-to-day workflow, efficiency, and accessibility. The concept is especially useful for U-shaped kitchens (or any layout) where space zoning is important.
Here’s how it works: (The 3 Bubble Layers)
Layer 1: Essentials and daily and weekly use items.
Bubble Placement: Closest to the core work triangle (sink, stove, fridge).
- Items Included: Add everyday use items like utensils (spatulas, knives, cutting boards here).
- Frequently used appliances (coffee maker, and toaster).
- Pantry staples (oils, spices, and often-used cookware).
Design Tip: Store these in easy-to-reach drawers, countertop zones, or upper cabinets near prep areas for ease of access.
Layer 2: (Often-Used but Non-Essentials)
Bubble Placement: A little more distant from the primary work triangle but still easily accessible.
Items Included: Baking sheets, mixing bowls, blender, specialty cookware (rice cooker, air fryer), and less frequently used pantry items (canned goods, bulk staples).
Design Tip: Use lower cabinets or pull-out shelves for these items.
Layer 3: (Seldom-Used/Seasonal Items)
Bubble Placement: Farthest from the work triangle (e.g., high shelves, corner cabinets).
Items Included: Holiday dishes, serving platters, specialty appliances (fondue set, ice cream maker), and bulk storage or backup supplies.
Design Tip: Labeled bins or deep storage solutions work well for this layer.
Why This Matters for Your Double Island Layout
Efficiency: Helps to keep daily clutter off the counters while ensuring essentials are within close reach.
Zoning: Assign islands to specific layers (e.g., primary island for Layer 1 prep, secondary island for Layer 2 serving/dining).
Adaptability: Seasonal items won’t disrupt daily workflow or get in the way when looking for items and ingredients.
Pro Tip: Sketch your bubbles directly onto the floor plan (like the diagram you shared) to visualize zones. For example:
Layer 1 – Primary island drawers.
Layer 2 – Secondary island cabinets.
Layer 3 – Wall cabinets or pantry.
For more kitchen plans with islands, take a look at this page. If you have comments or are planning a remodel, we’d love to hear your thoughts below.
To showcase highly specific designs, some images on this website use advanced AI-generation software to illustrate ideas and room inspiration. See our editorial policy to learn more.

Upload a photo and get instant before-and-after room designs.
No design experience needed — join 2.39 million+ happy users.
👉 Try the AI design tool now