A 6×10 walk-in closet gives you enough room to feel like a real dressing space, but is small enough that you need to plan the layout so everything fits. The difference between whether the closet feels cramped or functional generally depends on the aisle width and how you place your storage. In this guide, I provide 6×10 walk-in closet layouts designed to maximize your clothing hanging capacity while maintaining a large walkway so your space is functional for your needs. Each plan includes all of the floor plan details, dimensions, and tips so you can choose the layout that works best for you.
6×10 U-Shaped Closet Layout With Max Capacity Clothing And Shoe Storage
This U-shaped closet layout allows for plenty of hanging storage by lining up rods on both sides with a shoe section in the back, so everything is reachable without any wasted space.
Easily Create Your Own Room Makeover
Upload a photo and get instant before-and-after room designs. No design experience needed — join 2.39 million+ happy users. 👉 Try the AI design tool now
Floor Plan Details: This 6′ x 10′ closet uses a U-shaped storage arrangement that wraps storage on the left, back, and right walls so you have an abundance of different options for hanging clothes and storing shoes. The entry door at the bottom is a 24″ outswing door that leads into a 24″ aisle. The built-ins on each side are designed to be full-depth at 24″ deep on both sides to maximize your hanging and shelf capacity. The straight center aisle runs directly to the back wall organization area that’s laid out in three 24″ zones to keep the corners productive for storing items. The left side of the room is primarily used for double-hang rods with a dedicated shoe zone near its back corner. The right side features hanging rods and shelves, plus a small accessory/drawer zone at the front.
Dimensions:
Closet size: 72″ (6′) wide x 120″ (10′) long
Aisle width: 24″ aisle (this plan is explicitly “maximum capacity” with a tighter walkway)
Module sizing across the back: 24″ + 24″ + 24″ = 72″
Built-in depth: 24″
Double-hang section: Upper rod 84″, lower rod 42″
Single/alternate hanging section: Rod 66″ (with lower storage zone beneath)
Shelf spacing note: 7 to 8″ spacing called out for stacked/folded shelving
Keep the 24″ aisle visually open by keeping the floor free from any obstructions that may stick out into the walkway.
Install pull-out trays or flush drawers for small items and accessories.
Make your corners work for you by running shoe shelving or adjustable shelves all the way across the back wall.
Add lighting overhead down the middle with LED strips under the shelves to help make the space feel bigger and illuminate your garments.
Adding a pocket door instead of the out-swing helps if you don’t have the space in the adjacent room.
6×10 Asymmetrical Easy Walk-in Closet Floor Plan
This plan substitutes some storage space on one side for a larger 36″ aisle, making the closet easier to walk through, get dressed in, and keep organized.
Floor Plan Details: This 6′ x 10′ walk-in closet offers an asymmetrical storage plan that uses full-depth hanging on the left, and a shallow bench and shelving storage run along the right. The door at the bottom opens into a straight 36 aisle. A 24″ deep hanging run on the left uses multiple zones so you can have double or long hang sections depending on your needs. The right side has shallow built-in strip shelving with a built-in bench mid-run, plus space for small-item storage above. Shoes are shown near the bench zone, so it’s easy to grab and try them on.
Aisle width: 36″ aisle, so it’s easy to move and change clothes
Left wall zone lengths (top to bottom): 36″ + 24″ + 36″ + 24″ = 120″
Right wall zone lengths (top to bottom): 48″ + 30″ bench zone + 42″ = 120″
Typical depths shown: 24″ hanging depth on the left; 12″ shallow depth shelving and bench on the right
Design Tips:
Treat the left side as your wardrobe wall for bulk hanging, and split the zones by category.
Make the right wall shelves a holding place for shoes, folded shorts and pants, bags, hats, and tomorrow’s outfit on hooks.
Install a mirror at the end of the wall to brighten the space and try on your outfits.
Add closed storage under the bench.
Add a dresser on the left mid-run with pull-out drawers for accessories.
Light it like a dressing room with a bright overhead light/s and under-shelf LED strips to reduce shadows.
6×10 Boutique Closet Floor Plan With Mirror Wall
This closet setup crafts a good balance with its comfortable 30″ walkway with high-visibility display shelving and a full mirror wall so the closet feels like a luxe dressing room.
Floor Plan Details: This 6′ x 10′ walk-in closet is designed like a boutique with display shelving, hanging racks, drawer storage and a statement mirror wall with a wide middle aisle so everything is easier to find. The door at the bottom opens into a straight aisle that leads all the way to back-wall showcase. On the left, there’s a drawer tower followed by a 36″ section for hanging clothes and then an open shelving zone for your handbags, folded shirts, and pants. The drawer tower at the front is useful for stowing socks, tees, jewelry trays, and any other smaller accessories. On the right side, there’s a long mirror wall, shown as a continuous panel above, so the closet acts as a mini dressing area. There’s a small spot for shoes near the bottom and a shelf above the mirror for more seasonal or seldom used items. The full mirror gives you plenty of space to try on outfits before you leave. The back wall is centered with a 30″ hanging rack framed by two 21″ display zones on either side for shoes and accessories.
Dimensions:
Closet size: 72″ (6′) wide x 120″ (10′) long
Aisle width: 30″ (more comfortable than 24″, and still space-efficient)
Left wall zone lengths (top to bottom): 24″ + 30″ + 36″ + 30″ = 120″
Mirror height shown: 96″ tall (for a full-length dressing mirror)
Design Tips:
Light the showcase shelves in back with LED strip lighting under each shelf so the corners don’t feel dark.
This layout looks best when you treat shelving like a display, so use bins and matching boxes so it all looks curated.
Use the drawer tower for all of your messiest categories, like gym gear, pajamas, and accessories, so the other areas stay clean.
Enhance the mirror wall with a lower shelf unit for shoes to one side and a full-length overhead shelf above for infrequently used items.
Choose a consistent hanger and rod height with uniform hangers so the design looks boutique and high-end.
6×10 His & Hers Closet With Zoned L-Split Design
This plan was designed as a his-and-hers split closet with one side dedicated to maximum hanging and shoe storage, with the other offering mixed use to satisfy two people’s needs.
Floor Plan Details: This 6′ x 10′ his and hers walk-in closet is wider near the door, and tighter at the back to accommodate more storage while helping to keep the area from feeling too cramped overall. The door at the bottom opens into a wide standing/dressing zone, and you can easily turn to the “his” or “hers” sections immediately. The left wall is the primary wardrobe zone with a longer run of hanging clothing racks that are broken into multiple sections for easy categorizing of tops, pants, seasonal, etc. There’s also a shoe landing/shelf zone in the middle for displaying your heel collection. The right side has open shelving to fit all of your folded storage and a dedicated VALET section that’s ideal for a mirror with hooks to hang out tomorrow’s outfit, with a small accessory storage area on one of the shelves. The back wall features two 24″ deep hanging racks on the left and right with a center shoe shelf along the back for a classic “U” feel design that is cozy but functional.
Dimensions:
Closet size: 72″ (6′) wide x 120″ (10′) long
Back wall width split: 24″ + 24″ + 24″ = 72″ (left hanging + center passage + right hanging)
36″ aisle near the door for a more comfortable dressing & turning space
24″ aisle at the back that maximizes hanging capacity on both sides
Left wall zone lengths (top to bottom): 48″ + 30″ + 42″ = 120″
Interior clearance callout shown: 42″ across the mid-closet open zone
Make the valet zone work for your morning routine by adding a full-length mirror, a small shelf for cologne/perfume, and 2 to 3 hooks for planning your outfit.
Keep the back wall for shared categories such as jackets, seasonal wear, or less-used items.
Add higher shelving across the top of the racks for additional storage potential and to keep things off the floor.
Use the wide front zone as your dressing spot and add a small rug or runner to designate the “get ready” area.
Stick to slim hangers, and avoid bulky bins in the back area so the space doesn’t feel cramped.
6×10 Closet With Drawer-Forward Dresser Layout
This closet design combines a full-length hanging wall for all of your long clothing on one side with a built-in dresser and hamper, with a comfortable 30″ walkway so everything is well organized and effective on the go.
Floor Plan Details: This 6′ x 10′ walk-in closet is billed as drawer-forward due to its dresser section near the entrance, with a full hanging wall on the left that’s meant to offer a variety of storage options. The swing door at the bottom opens into a straight aisle with a half rack and shoe shelving immediately to your left. The left side is the main wardrobe run featuring a long, continuous hanging section for the bulk of your clothing. The right side starts with an 18″ deep dresser zone for all of your folded clothing. Midway down there’s a tilt-out hamper built into the cabinetry that keeps laundry off the floor. The back right provides dedicated shoe shelving so all of your pairs are easy to see when you need them. If you have the remodeling room, we have slightly larger 7′ x 10′ closet designs here.
Left wall vertical run (top to bottom): 18″ + 36″ + 36″ + 30″ = 120″ with multiple hanging zones with a shorter section near the door
Right wall run (top to bottom): 36″ + 24″ + 60″ = 120″
36″ top zone (shoes/shelves)
24″ hamper zone
60″ dresser/drawer-forward zone
Design Tips:
Add a drawer on the right near the entry to free up your bedroom and store everyday categories like tees, gym clothes, underwear, pajamas, and accessories.
Use the top of the dresser for laying out your next day’s clothing and keeping an accessory tray for your smaller items like watches/keys, cologne/perfume, lint roller, etc.
For a more luxurious feel, choose soft-close, full-extension drawers so you can see what’s inside without pulling any items out.
Install a tilt-out hamper so nothing obstructs the aisle like a big pull-out bin can.
Balance hanging heights on the left with the highest-use section for daily tops & pants as the most reachable.
Universal Specs & Clearances (for all layouts)
Rod heights: double-hang rods at 42″ and 84″ AFF; long-hang at 66 to 68.”
Depths: hanging 24″ D (don’t go any smaller), shelves 12 to 18″ D (12″ for tees/denim, 14 to 16″ for sweaters).
Aisle targets:36″ is ideal, 30″ is good, 24″ is the minimum (only if both sides are 24″ deep).
Shoe shelves:12 to 14″ D, spacing 7 to 8″ (heels/sneakers), 10 to 12″ for boots (or stage them along the floor).
Fillers: leave 1 to 2″ at walls/corners per run for scribe and door/drawer clearance.
Heights: standard system height 90 to 96″; cap shelf at top rod where possible.
Lighting: aim for 30 to 50 fc across the aisle; LED strips under shelves improve visibility.
Breakdown of Plans
Max Storage:Layout 1 (U-Shaped). Choose this if every inch of your available storage counts, and you can tolerate a tight aisle.
Best All-Around:Layout 2 (Asymmetrical). Offers the best balance of comfortable space and well-organized storage.
Best for Couples/Zoning:Layout 4 (L-Split). The most clever use of space provides distinct areas and a comfortable entry.
Best for Aesthetics/Folded Items:Layout 3 (Boutique) or Layout 5 (Drawer-Forward). Choose Layout 3 if you want to display items and a high-end feel, and Layout 5 if you specifically want dresser-like drawer space inside your closet.
To see more designs like this take a look at our gallery of closets that are 6×8 here.
To showcase highly specific designs, some images on this website use advanced AI-generation software to illustrate ideas and room inspiration. See our editorial policy to learn more.
Architect-Designed Room Layouts - Delivered in 7 Days
Stop guessing your layout. Receive two custom, to-scale floor plans designed by a professional architect, complete with furniture placement, traffic flow, and accurate dimensions.
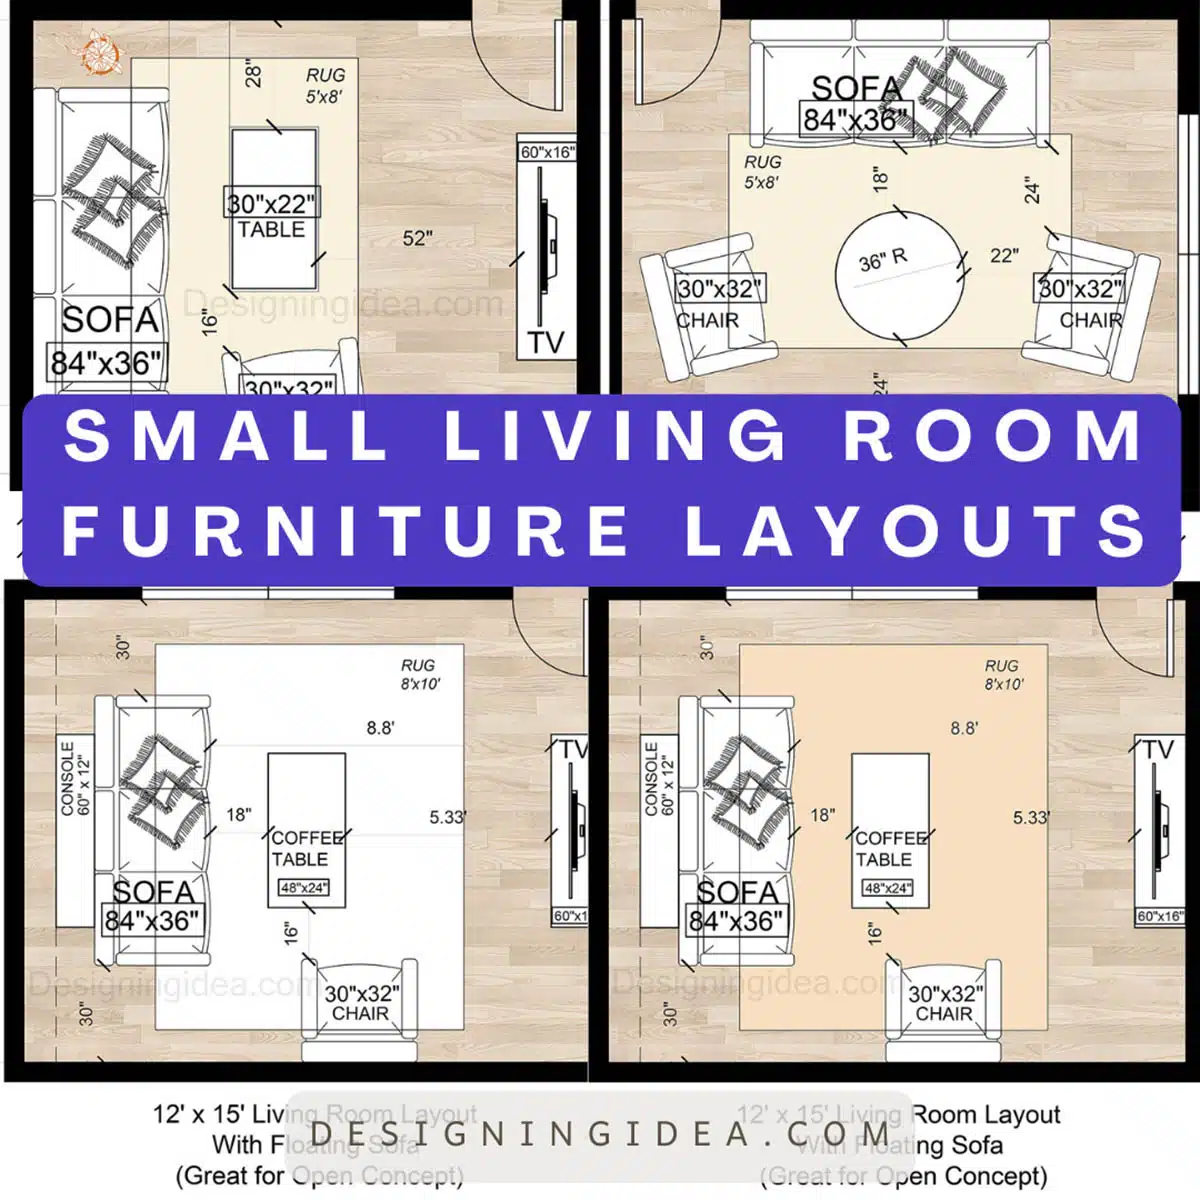
If you’ve got a small living room, you’ve probably realized that the right furniture sizing and placement make all the difference in creating a functional…
You may think a 25-square-foot closet can’t feel luxurious, well think again. One can design a well-planned 5×5 walk-in that uses double-hanging rods, shoe towers,…
Creating an efficient yet stylish walk-in closet is all about using intelligent storage solutions. Whether you have a compact space or more generous dimensions, design…
The front room, when designed well, sets the desired ambiance and impression of your built environment. Moreover, the transitional space also functions as a gathering…
Creating a stylish and functional space within a 10×12 bathroom floor plan can be a challenge. Especially, when you want to include elements like walk-in…