A 12×12 kitchen is just large enough that you have room to do all of your cooking, yet still small enough to keep the design functional and efficient. The right floor plan can include all of the features you want with plenty of cabinet storage, an island for eat-in dining, and a comfortable traffic flow. In this guide, I’ll share some of my favorite 12×12 kitchen layouts, including L-shapes, U-shapes, galleys, single-wall plans with islands, and peninsulas. Each of these designs provides tips on where to position your appliances, the proper clearances needed, and everyday features to add for convenience and style.
L-Shaped Kitchen with Island and Corner Pantry Layout
I love this L-shaped kitchen layout because it works perfectly with an island and a pull-out corner pantry to deliver efficient workflow, storage, and eat-in dining potential.
Easily Create Your Own Room Makeover
Upload a photo and get instant before-and-after room designs. No design experience needed — join 2.39 million+ happy users. 👉 Try the AI design tool now
Floor Plan Details: This L-shaped kitchen offers an effective work triangle that flows from the refrigerator to the sink to the stove top with an abundance of counter space on all sides. From the top right, you start with a refrigerator placed near the entry for easier access, leading to the sink, and a corner pantry with pull-out shelves in the corner. As you go down the left leg, you’ll find the 30″ range with upper cabinets on either side. A 48″ x 36″ island sits in the middle and can also be used as an additional prep surface (no cooktop), and space to accommodate two diners. Around the island there’s comfortable 42″ aisles allowing two cooks to pass each other if needed. With the addition of the corner pantry cabinet at the top-left with pull out drawers, dry goods and bulky items can be found easily in the otherwise dead corner instead of eating up regular cabinet space.
Dimensions:
Room size: 12′ x 12′
Island: 48″ x 36″ (worktable island, or seating for two)
Aisles around island: 42″ on all sides
Base cabinet depth: 24″
Range width: 30″
Sink base: 30″
Corner pantry cabinet footprint: typical 36″ x 36″ with pull-out shelves (kidney or LeMans style)
Design Tips:
Keep the island clear of a sink or cooktop. This will save space to use it as your primary prep or small dining area.
Add a trash/recycle pull-out inside the island and install it directly across from the sink.
Upgrade the corner pantry cabinet with full-extension swing-outs (LeMans or Magic Corner) so the entire deep recess is reachable.
Use the deep pantry to store small appliances or larger bulk items.
Give yourself landing space: target 15″ or more, next to the fridge and 24″+ on one or more sides of the sink.
Place everyday dishes/glasses in the upper cabinets between the range and the pantry.
Add under-cabinet lighting and two pendants centered over the island for balanced illumination.
Include GFCI outlets near the sink and code-compliant island receptacles for operating small appliances.
Add a shallow tray drawer in the island to keep knives and essential cooking tools handy.
Make sure there’s a 10 to 12″ overhang on one island for stools on the right and lower sides.
Select stools that can be tucked under the overhang to preserve walking space.
U-Shaped Kitchen With Narrow Island Layout
For a highly efficient kitchen, this U-shaped design with a 48″ × 24″ island delivers a fast and ergonomic workflow that wraps counter and cabinet space along three sides.
Floor Plan Details: For those looking for the maximum amount of counter space in a 12ft by 12ft kitchen, this U-shaped design should be considered. It wraps cabinetry on three sides with a narrow island in the center to form a compact U. The 30″ sink is centered at the top, and the 30″ range is on the left, with both located a short 36″ to the 48″ x 24″ island in the middle. There’s corner storage at the upper left that comes with pull-out or kidney shelves, so the dead space can be more effectively used to store bulk items and small appliances. The refrigerator is conveniently located on the lower right near the entrance, allowing traffic to access it on the right without crossing next to the hot zone at the range. This makes it easy to grab a quick drink.
Dimensions:
Room size: 12′ × 12′
Island: 48″ × 24″ (slim, and seatless prep island or table)
Clearances around island: 36″ on all sides (best for one-cook)
Base cabinet depth: 24″
Sink base: 30″
Range: 30″
Refrigerator: plan for 36″ width (counter-depth preferred)
Corner unit: typical 36″ × 36″ footprint with pull-out shelves
Design Tips:
Keep the island free of fixtures so its surface is dedicated to prep space.
Because aisles are 36″, avoid adding bar seating and overhangs, which would tighten the aisle passage.
Choose a counter-depth fridge to preserve the right-side aisle and ensure that the door swing doesn’t interfere with cabinets.
Upgrade the corner pull-outs by using LeMans or a Magic Corner so everything in the U is reachable.
Store your heavy items low in the pantry and your frequently used items where they’re easy to grab.
Aim for 15″+ of landing space near the fridge and 24″+ around the range and sink for prep.
Plan to add under-cabinet lighting on all three runs to help remove shadows from the work surface.
Hang one or two pendant lights over the island for more balanced task lighting.
Place the dishwasher to the immediate right or left of the sink to enhance your cleanup ease.
Include code-compliant GFCI protection near the sink and island for use with small appliances.
If two cooks regularly share the space you may want to limit the island to 42″ × 24″.
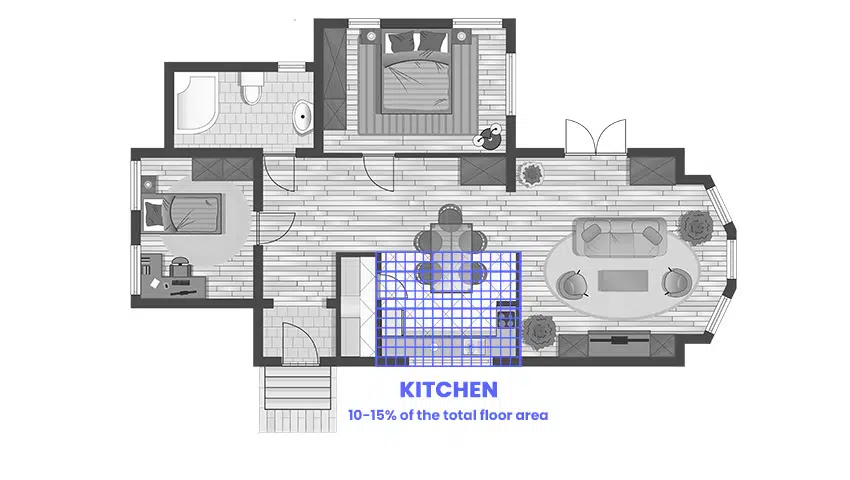
Single Wall Kitchen with Large Dining Island Floor Plan
By pairing a single line of cabinets with all the essential appliances with a large 72″ x 42″ island, this kitchen offers an effective cooking zone with room for eat-in dining and a stylish design that works well for open-concept living.
Floor Plan Details: A single-line kitchen with an island gives an efficient linear workflow that minimizes the number of steps required to reach everything you need while cooking. To make the kitchen triangle effective, the range and refrigerator are located at the top with the 24″ sink and dishwasher contained within the 72″ x 42″ island. The main work aisle between the top cabinet run and the island is 42″, which is comfortable enough that one or two cooks can prep at the island or cooktop. Since the island is long, it can accommodate up to four people seated for eat-in dining. And since the sink and dishwasher reside inside the island, it keeps cleanup and prep in the middle of the room, where it is central to the other appliances. This style of kitchen is excellent for entertaining and families, as it provides room for sitting with the host while they cook and allows for open conversation through the remainder of the space.
Dimensions:
Room size: 12′ x 12′
Island: 72″ x 42″ with 24″ sink and a dishwasher to the sink’s right
Primary work aisle (wall ⇄ island): 42″
Perimeter aisles: 36″
Typical base depth: 24″
Range width (approx): 30″; fridge: 36″ (counter-depth preferred)
Seating capacity: long side seats 3 comfortably and allow 24″ per stool for comfort
Recommended dining overhang: 12–15″ with 12″ knee clearance at 36″ high counters
Design Tips:
Ensure the island works for easy prep and cleanup by placing the sink and dishwasher inside.
Add drawers inside the island to keep knives, cutting boards, and mixing bowls where they are needed.
Install a trash and recycle pull-out opposite the sink on the main cabinet base for easier cleanup.
Use a counter-depth refrigerator to aisle spacing.
Add under-cabinet lighting along the cabinet run and install two or three pendant fixtures over the island and centered.
Plan landing space: Go for at least 15″+ beside the fridge for grocery drop-off and loading, and 12 to 18″ on either side of the range.
For dining comfort, leave ≥36″ of walkway behind stools; if space gets tight, keep seating on only one long side.
If you want a sleeker look or want softer edges to protect kids in the house, specify soft-radius corners on the island.
Provide island power receptacles (code-compliant placement) for small appliances and charging your devices.
Galley Kitchen with Open Dining Peninsula Floor Plan
A galley plan with an open peninsula creates a social dining spot where people can sit and eat, and naturally forms a straight, efficient work path for cooking and cleaning.
Floor Plan Details: This open galley style kitchen uses two parallel cabinet runs with a top cooking wall and a lower cleanup side with a seating area. The range/cooktop is positioned on the top wall with the refrigerator at the right end, so it doesn’t come into contact with the hot zone. On the opposite side, there’s a cleanup and prep run with a dishwasher, sink, and countertop that extends into an open dining peninsula with seating for two. Since there are no upper cabinets on the lower side, guests can eat and talk while the cook works on the inner cooking lane. The central aisle is large enough at 48″, so two people can pass by each other. A small table has been added at the far, bottom left corner that can work as extra seating or a staging area if needed.
Dimensions:
Room size: 12′ × 12′
Central work aisle (between cabinetry runs): 53″ (with a 48″ pinch point near the upper right opening)
Path at right opening to adjacent space: 4′
Continuous countertop on the cooking wall: 8′
Range: 30″; Refrigerator: 36″ (a counter-depth is recommended)
Sink base: 30″ with DW on the right
Peninsula seating: plan 24″ per bar stool and a 12 to 15″ overhang and try to keep a 36″ walkway behind the stools
Standard base cabinet depth: 24″
Design Tips:
Make the peninsula your prep, serving and dining hub.
Use full height cabinets along the upper wall with a pantry at the end near the fridge for bulkier items.
Choose a counter-depth refrigerator so the right-side passage stays comfortable and door swings don’t crowd the aisle.
Provide landing space of 15″ beside the fridge, and 12 to 18″ on each side of the range, and 24″+ at the sink.
Use two small pendants over the peninsula plus under-cabinet lighting on the other side to help eliminate shadows.
Keep the microwave off the main counter, and instead use it in a wall cabinet with a trim kit or add a base microwave drawer at the end of the peninsula.
Add GFCI protection along the wet wall (lower side)and code-compliant receptacles along the peninsula.
Install a quiet dishwasher (≤44 dBA) in the peninsula since it’s near seating and other areas of the home.
Peninsula Kitchen Layout
By adding a peninsula through the center of this room, making an F-shape, this kitchen plan delivers an efficient cook line that includes seating so friends and family are close to the cook, but not in the way.
Floor Plan Details: This kitchen with a peninsula running through the center allows for eat-in dining and conversations to happen effortlessly, and allowing the cook to be within close proximity of guests. The peninsula features two seats on the lower side and a 24″ sink and under counter dishwasher on the top. The cabinetry runs along the left and upper sides, with the range centered on the upper run, not far from the corner fridge. This peninsula measures 72″ × 36″ and projects into the room from the left to become the primary prep and cleanup area. The main cook aisle between the range wall and the peninsula is kept at 48″, so there’s plenty of room to maneuver or accommodate two inside the space. Family and guest traffic is kept outside the main work zone, so guests can sit, snack, or do homework without getting in the way.
Dimensions:
Room size: 12′ × 12′
Peninsula size: 72″ × 36″ with 24″ sink and a dishwasher to the right
Main work aisle (range wall ⇄ peninsula): 48″
Right-side passage: 48″
Walkway behind stools: 42″
Base cabinet depth: 24″
Range width: 30″
Refrigerator: plan 36″ (counter-depth recommended)
Seating: allow 24″ per stool and 12 to 15″ counter overhang and knee space at a 36″ counter height
Design Tips:
Make the peninsula central for seating, prep, and cleanup.
Add a pull-out cutting board and trash receptacle near the sink for quick chopping tasks.
Keep seating on the dining side so the 48″lane is clear for the chef to use.
Ensure there’s 42″ behind the stools so there’s room to pass through.
Choose a counter-depth fridge and verify its doors won’t crowd the passage.
Provide landing space of 15″ near the fridge and leave 12 to 18″ on each side of the range.
Light it well with under-cabinet lighting along the range wall and two pendants hung above the peninsula.
Add code-compliant receptacles on the peninsula and GFCI protection at the sink.
For some slightly smaller 10 by 10 kitchens take a look at this gallery.
To showcase highly specific designs, some images on this website use advanced AI-generation software to illustrate ideas and room inspiration. See our editorial policy to learn more.
Are you searching for a kitchen that works hard, hugging two walls, without crowding the center of the room? With an L-shaped, island-free layout, you…
A well-planned kitchen island can add extra prep space, storage, and seating, all while making the design look more appealing and increasing the home’s resale…
A corner sink kitchen layout offers many benefits, from freeing up the counter space, to creating a more usable workspace for prepping food, and helping…