The good news is that a 10′ × 10′ dining room can seat from four to six guests comfortably, as long as the table is placed with intention. In a compact square like this, every inch matters and elements like chair pull-back, walk paths, and where the lighting lands all impact how the room feels and functions. This guide shows you proven 10×10 dining room layouts that show exactly where to put the table so you get the most out of your space. These designs include a variety of rooms such as one that centers a 48″ round table for a symmetrical feel, has a pass-through area with a dedicated walkway, and utilizes a corner L-banquette to squeeze in more guests. Use the shared room tips and diagrams to get the perfect table placement for how you actually live.
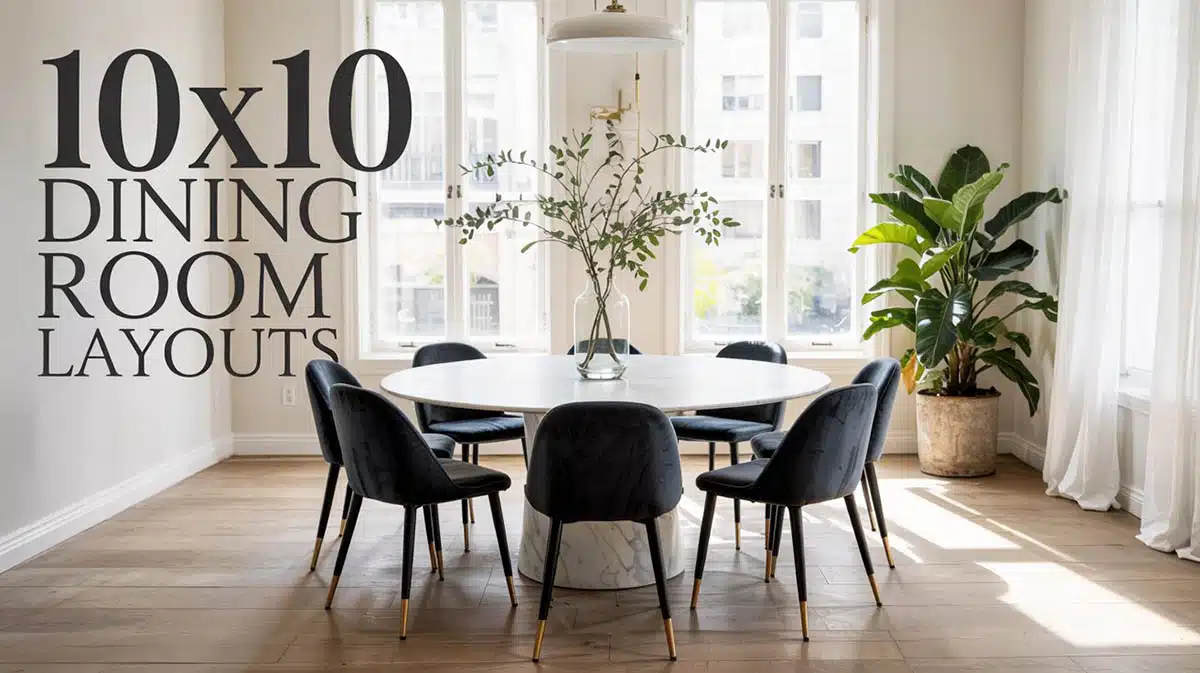
Dining Room Layout With Centered Round Table for 4
This plan centers a 48″ round table in the middle of the room that allows 36″ walking paths on all sides making four-person dining comfortable and leaving space for a shelf or sideboard along one wall for storage.
Easily Create Your Own Room Makeover
Upload a photo and get instant before-and-after room designs. No design experience needed — join 2.39 million+ happy users. 👉 Try the AI design tool now
Floor Plan Details: This simple 10′ × 10′ dining room places a 48″ round table in the middle of the space, surrounded by four armless 18″ × 18″ chairs. This positioning allows for open sight lines and 36″ clearances from the table edge to the walls. This provides enough space to comfortably pull out chairs and move about when needed. The top wall is dedicated to storage or display and has room to accommodate a centered 60″ sideboard or console with floating shelves above.
Dimensions:
Room size: 10′ × 10′ (120″ per side)
Table: 48″ round diameter, centered in the middle
Clearance: 36″ from the table edge to the walls (120″ – 48″ = 72″; ÷2 = 36″)
Chairs: 18″ W × 18″ Deep that allow for 18 to 20″ pull-back space when seated
Sideboard (top wall): 60″ W × 18–20″ D
Floating shelves (top wall): 84″ total span with 18″ margins at either end
Lighting (guideline): pendant 20 to 24″ and hung 30 to 34″ above the tabletop in the center
Optional rug: place an up to 8′ round rug if you want all four chair legs on top (leaves 12″ to the walls)
Design Tips:
Choose a pedestal-base round table to get the most knee and leg room and make it easier to slide chairs in.
Select armless chairs with a low-profile and curved backs that match the table’s shape.
If adding a rug, pick a flatweave or low-pile product so chairs can glide easily. (Avoid the rug if you want the room to feel larger.)
Use a shallow sideboard that’s 18 to 20″ deep to maintain the larger walkways.
Style the floating shelves with balanced groupings that keep the heavier items toward the center.
Hang a dimmable pendant over the middle of the table and add wall sconces above the sideboard for layered and mood lighting.
For extra seating, use stacking stools that tuck under the sideboard.
Who’s It for? Those wanting a combination of a simple dining and social design for a small group.
Dining Area Floor Plan With Wall Banquette for 5 to 6
By pairing a rectangular table with a wall banquette, you trade one tight side for a roomy aisle, allowing you to comfortably seat five to six people without feeling cramped.
Floor Plan Details: This 10′ × 10′ dining room uses a built-in wall banquette on the right side wall that can act as extra seating, a surface for staging food or additional storage space. A 60″ × 36″ rectangular table sits in the center to the side of the banquette. The typical setup sits up to six people at the table with a short 18″ span to the banquette for those on the left while seated. The overall clearances are modest but workable, with the left side more open for serving and traffic.
Dimensions:
Room size: 10′ × 10′ (120″ per side)
Table: 60″ L × 36″ wide, and centered to favor the left aisle
Left aisle (wall to table edge): 30″ clear
End clearance (wall to table ends): 24″ on each end
Banquette: 18″ deep × 72″ long (fits 3 average adults and plan 22 to 24″ per person)
Chairs: 18″ × 18″ (armless) on the aisle side and at both ends
Seat heights: bench/chairs 18″ H and the table is 30″ H
Bench front to table’s edge: target 10 to 12″ for comfortable slide-in (general guideline)
Design Tips:
Use a pedestal or trestle table base so guests can slide in without hitting the legs.
Give the bench a slight back rake and 2 to 3″ of lumbar cushion for more comfort.
Add drawer or lift-up storage beneath the banquette for keeping linens and decor out of sight.
Keep the left aisle uncluttered with no deep consoles to preserve the 30″ walkway.
Center a pendant over the tabletop and add a 72″ cushion or tufted back to the seating bench to visually widen the nook.
When hosting six, use two end chairs and remove them for everyday use to improve flow.
Who’s It for? For those wanting a comfortable aisle on one side with a versatile banquette for extra seating, storage or surface area.
Compact Rectangle Table Placement for 4 Diners
By using a slim 48″ × 30″ rectangular table with chairs on the long sides, there’s room for comfortable pull-back aisles with 12″deep shelves on one side and a console on the other.
Floor Plan Details: This balanced 10′ × 10′ dining room features a 48″ × 30″ rectangular table that’s centered in the middle with floating shelves on one side and a storage console on the other. Two 18″ × 18″ armless chairs sit on each of the long sides with nothing on the end to help the room feel more open. The available storage is split between 12″deep floating shelves that run the full length on the left wall and a slender 12″deep console sitting against the right. This arrangement leaves a 96″ span between the two for the table zone. This setup creates a clean symmetrical look with 27″ pull-back aisles above and below, and compact but workable 24″ clearances to the shelves and console.
Dimensions:
Room size: 10′ × 10′ (120″ per side)
Table: 48″ L × 30″ W with a height of 30″
Chairs: 18″ W × 18″ D (armless), two per long side
Front–back pull-back aisles: 27″ to each wall
Clearance at table ends to shelves and console: 24″ on each side
Storage: left wall floating shelves 12″ deep and right wall console 12″ deep
Lighting (guideline): pendant 20 to 24″ that is hung 30 to 34″ above the tabletop
Optional rug: 6′ × 9′ with a low-pile
Design Tips:
Keep the tabletop to 30″ wide to preserve a full 27″ for pull-back aisles.
Choose a table with rounded corners to soften the edges.
Use armless, low-back chairs that can tuck in to save walking space.
Select a narrow console that’s 12 to 14″ deep for serving space and style the shelves with balanced decor groupings.
Hang a pendant over the table and add a lamp on top of the console for a layered lighting effect.
If you occasionally need a fifth seat, use a backless bench or stackable stool under the shelving.
Who’s It For? Those looking for a balanced, storage-friendly space that comfortably accommodates up to four people.
Dining Area Layout With Corner L-Banquette + Round Table for 6
By combining a 48″ round table with a corner L-shaped banquette, you can unlock the maximum amount of seating in a 10′ × 10′ room while preserving space for an easy, social flow.
Floor Plan Details: This 10′ × 10′ dining room layout uses an L-shaped built-in banquette bench that wraps around a round table so it can better use the corner space and free up floor area around the perimeter. To set it up, the design uses a 48″ round table that sits 10 to 12″ off the built-in banquette with two loose 18″ × 18″ armless chairs placed on the left and bottom sides. With this arrangement, the chairs and nook seat up to six comfortably, with two on each bench side and one on each chair.
Dimensions:
Room size: 10′ × 10′ (120″ each way)
Table: 48″ round and centered toward the upper right corner
Banquette: two runs at 66″ L each, with 18″ D seats, and a 18″ seat height
Table edge to banquette front: 12″ and target 10 to 12″ for knee and slide-in space
Loose chairs: 18″ W × 18″ D on the left and bottom sides
Tucked-chair back to wall (on the left & bottom): 12″ (snug and fine for compact rooms)
Lighting: pendant 20 to 24″ that is hung 30 to 34″ above the tabletop
Optional rug: 8′ round keeps all chair legs on the rug
Design Tips:
Choose a pedestal-base round table to remove legs that will get in the way of the chairs.
Build the banquette with lift-up seats or drawers for hidden storage underneath for linens or cushions.
Upholster the bench with a performance fabric or vinyl for easier cleanup, and add a supportive angled back for comfort.
Keep the two loose chairs that are armless and have a low-back that can fit snug with the tabletop.
Consider a wall sconce or art above the longer bench to style the space.
Add a dim-to-warm pendant for cozier dinners.
If everyday access feels tight, remove one of the loose chairs or size the table to 42 to 45″ for more breathing room.
Who’s It For? Great for busy families who want the maximum number of seats and a good flow around the room.
Dining Table Placement For 4 to 6 With Off-Center Racetrack
Placing the table off-center creates a compact 54″ × 32″ always-open traffic lane on one side, that lets the small 10′ × 10′ room flex from four to six seats.
Floor Plan Details: This 10′ × 10′ dining room design uses an off-center “racetrack” table with a rounded rectangular shape to allow a dedicated walkway on one side. The 54″ × 32″ table is shifted toward the right to allow a larger aisle. For everyday seating, there’s room for four, or two chairs on the long left side and one at each end. For seating 6, add two more chairs to the long open sides. (Pulling the table may be necessary to accommodate the extra seats.)
Dimensions:
Room size: 10′ × 10′
Table: 54″ L × 32″ W with rounded corners to help reduce bumping
Chairs: armless, ~18″ × 18″
Open walkway (left wall to table edge): 56″ to create an easy pass-through even when the chairs are occupied
Tight side (right wall to table edge): 18″ and treat this space as a service gap, not a walkway
End clearances: 32″ from the table ends to the walls (comfortable pull-back for end chairs)
Lighting: center a pendant or chandelier over the table, not the middle of the room, and hang it 30 to 34″ above the tabletop with an 18 to 22″ diameter
Design Tips:
Choose a pedestal or trestle base table that can better accommodate legs.
Keep the tight wall free of any deep furniture.
Seat backs should be low or open so the room still feels airy.
Consider stackable or folding chairs for the occasional 6 seat requirement.
If using a rug, select a 6′ × 9′ low-pile that’s centered under the table.
10 to 12″ table-to-bench with tight wall clearances elsewhere
Off-Center Racetrack (4–6)
54″ × 32″ (rounded corners)
4 daily and add two side chairs for 6
Keep extra chairs stackable
Optional 10 to 12″ shallow ledge on tight wall
56″ open walkway on one side; 18″ service gap on tight side & 32″ at ends
Lighting
Layout
Pendant Diameter
Hang Height
Placement
Secondary Lighting
Centered Round
20 to 24″ round
30 to 34″ above tabletop
Center over the table (and room)
Buffet lamp(s) on sideboard; dimmer recommended
Wall Banquette
18 to 22″ round (oval works too)
30 to 34″ above
Center over tabletop (not the room)
Sconce(s) or picture light above the bench back
Compact Rectangle
20 to 24″ round or linear 30 to 36″
30 to 34″ above
Center over the tabletop
Table lamp on console for warm fill
Corner L-Banquette + Round
18 to 22″ round
30 to 34″ above
Center over round; consider an off-ceiling canopy with swag if box isn’t centered
Corner sconce or LED under-shelf glow
Off-Center Racetrack
18 to 22″ round or slim linear 28 to 34″
30 to 34″ above
Center over tabletop (not room); this keeps the walkway clear
Low-profile wall washer on tight wall
Rugs
Layout
Recommended Size
Shape
Placement Notes
Centered Round
8′
Round
Leaves 12″ to the walls and all chair legs remain on the rug
Wall Banquette
6′ × 9′
Rectangle
Run rug to within 2 to 4″ of the bench so chairs glide. The bench can sit off rug
Compact Rectangle
6′ × 9′
Rectangle
Center under table and maintain 12″ border to the walls
Corner L-Banquette + Round
8′
Round
Edge 2 to 4″ from the bench fronts to keep loose chairs fully on the rug
Off-Center Racetrack
6′ × 9′
Rectangle
Center under the table (not room) so the open walkway stays clear of the rug edge
Décor & Styling
Layout
Wall Treatment
Best Chair Style
Table Base Tip
Extra Styling Notes
Centered Round
Gallery or mirror over the sideboard and long shelves for display
Armless, curved backs
Pedestal for legroom
Symmetry + dimmable pendant for a classic, airy feel
Wall Banquette
Upholstered back or ledge; art/sconce above bench
Compact armless at the aisle
Trestle/pedestal to ease slide-in
Performance fabric/vinyl; add storage under seats
Compact Rectangle
Open shelves opposite a slim console
Low-back, slim profile
Four-leg or narrow trestle; rounded corners
Keep console shallow (12 to 14″) to protect walkways
Corner L-Banquette + Round
Framed art in the corner; cozy wall sconce
Two armless loose chairs
Pedestal for knee clearance at banquette
Use storage drawers; choose warm, wipeable textiles
Off-Center Racetrack
Keep tight wall mostly bare; slim ledge only
Armless; keep two extras stackable
Trestle/pedestal to maximize side access
Center light over the table and leave the 56″ side as the main walkway
Quick Specs Summary
Room: 120″ × 120″ (10′ × 10′)
Pendant size: ½ to ⅔ of the table’s width/diameter and hang 30 to 34″ above the tabletop.
Chair space: plan for 22 to 24″ per person on benches and 18 to 20″ chair width.
Rug overhang: Go for 24″ past the table’s edge so back legs stay on top of the rug. For a 10×10 room you’ll likely choose an 8′ round for round tables or the largest rectangle that the clearances allow (expect some compromise).
Clearances: ideal seat pull-back is 36″, with 30″ being workable and 24″ at the ends is “compact but okay.”
Chair depth assumption: 18″ (armless). “Aisle behind chairs” numbers above are with the chairs pushed in.
Bench/banquette depth: 18″ with an eating gap (bench front to table edge) of 10 to 12″ for comfort.